background image

YCO-1127-12-08

PPC-300WP 

Operation Manual

Grading Function

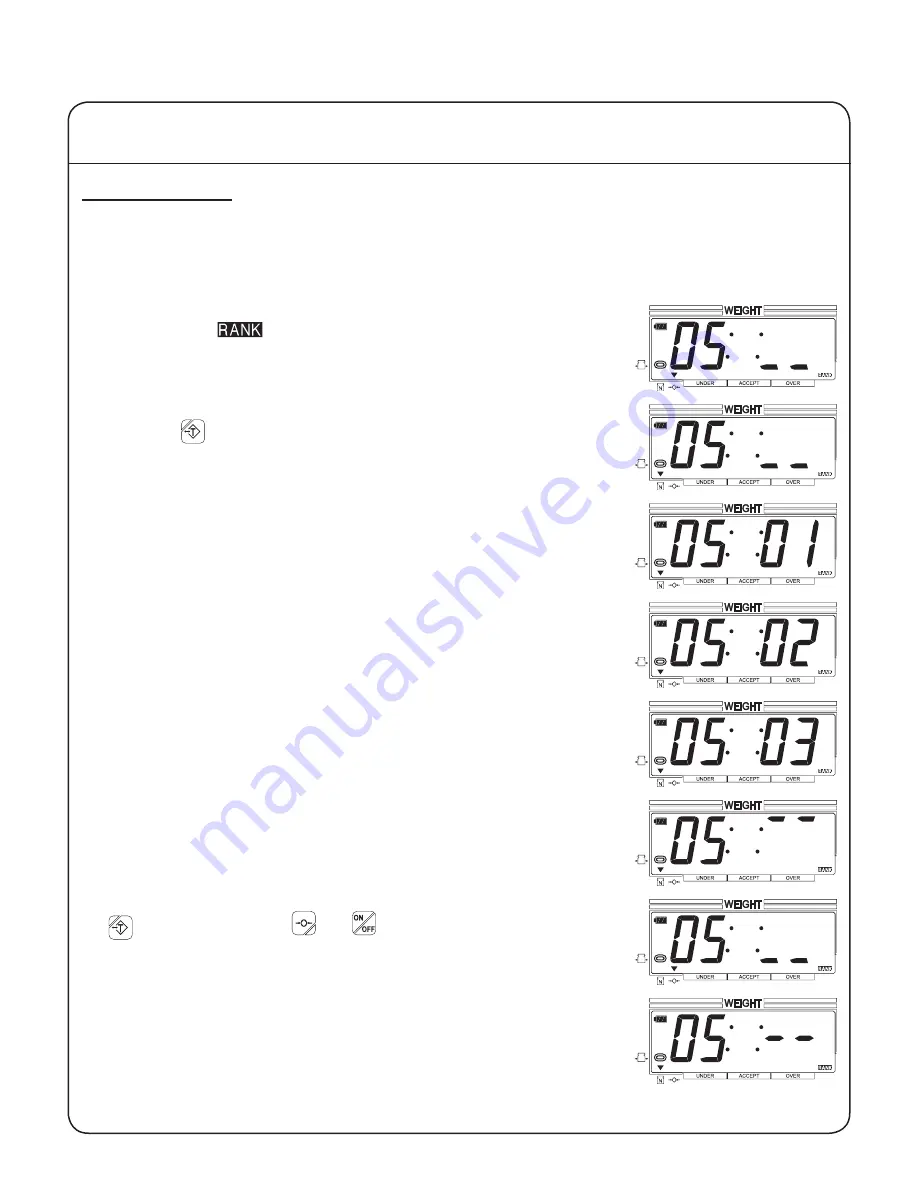
This is an example of how the grading function operates once it has been enabled and setup.  The 

setup for this example has grades of 8.00 to 9.99 lb, 10.00 to 11.99 lb, and 12.00 to 18.00 lb.  The 

scale is set to display real time grade values.  The flashing display is not enabled.

Operation

1.  The scale should display the grading setup that is active, 05 in this 

example.  The 

, stable and center-of-zero indicators should be 

displayed.  The rightmost two digits should display underscores.  This 

indicates that the current load is below the lowest grade.

2.  If you wish to enter a tare, place the item on the scale platform and 

press the 

 key.  The net weight indicator should be displayed, and 

the center-of-zero indicator should not.

3.  Load the scale with the product to be graded.  If the product falls at or 

above the first grade setpoint, and below the second grade setpoint, 

then grade 01 will be displayed.

4.  If the product falls at or above the second grade setpoint, and below 

the third grade setpoint, then grade 02 will be displayed.

5.  If the product falls at or above the third grade setpoint, and below the 

final grade setpoint, then grade 03 will be displayed.

6.  If the product falls at or above the final grade setpoint, then two over

-

scores will be displayed.

7.  Remove the product and any tared item.  If a tare was entered, press 

 to clear it.  Press the 

 and 

 keys to toggle between the 

checkweighing function and the normal weighing mode.

If parameter 04 is set to 001 (stable weight reading required), then the 

scale will display two dashes on the right until the weight reading is 

stable.

IV Using the Scale

21

Summary of Contents for PPC-300WP

Page 1: ...AMATO CORPORATION 1775 S Murray Blvd Colorado Springs CO 80916 USA Tel 719 591 1500 Fax 719 591 1045 YAMATO TECH CORPORATION 112 19425 Langley By Pass Surrey B C V3S 6K1 Canada Tel 604 533 2338 Fax 604 533 0827 www YamatoCorp com NTEP CC 08 041 ...

Page 2: ......

Page 3: ...atteries 7 Installing the AC Adaptor 7 Leveling the Scale 7 Cleaning the Lower Diaphragm 8 IV Using the Scale 9 Turning the Scale On and Off 9 Zero the Scale 9 Selecting Units 9 Checking the Battery Level 9 Basic Weighing 9 Net Weighing Tare Operation 10 Batch Weighing 11 Selectable Functions 12 Packing Function 13 Checkweighing Function 16 Grading Function 19 V User Parameters 22 VI Troubleshooti...

Page 4: ...uld result in injury or property damage if not performed properly or if ignored Caution Warns users about a procedure that could result in minor injury or damage to the scale if not performed properly or if ignored Indicates an action that must never be performed Indicates an action that must always be performed Note Statements that provide additional information Safety Precautions Danger To Avoid...

Page 5: ...icator or keys with sharp objects They can puncture or break the switch membrane panel voiding the watertight seal This scale is a sensitive weighing instrument avoid physical shocks If you drop something on the scale overload the scale step on the platform or drop the scale the scale may be dam aged and lose accuracy Never open the housing The electronics may be damaged and you may be injured by ...

Page 6: ...n a flat stable surface that will support the scale and the load Use only parts and modifications specified by Yamato Yamato cannot be held responsible for problems caused by modifications or parts not specified by Yamato If dust or foreign matter becomes lodged in the lower diaphragm chamber remove it following the instructions in Cleaning the Lower Diaphragm End of life disposal Dispose of all e...

Page 7: ...ed or to decrement a digit 6 Unit Toggle Press the Net Gross and Tare keys simultaneously to toggle through the available weight units 7 User Parameter Mode Indicates that the scale is in user parameter mode 8 Test Mode Indicates that the scale is in test mode 9 Battery Status Indicates approximate remaining battery capacity in thirds 10 Bubble Level Use to level the scale 11 Stable Indicator Indi...

Page 8: ... as pound ounce are not legal for trade Weight display PPC 300WP single display Type 7 segment LCD Character size etc 0 5 13 5 mm W x 1 2 30 mm H 5 digits Functions One touch tare battery charge indicator auto off timer and check weighing packing and grading functions Housing Upper 304 Stainless Steel Lower ABS resin Enclosure Rating IP68 when sealed by Yamato authorized technicians IP65 otherwise...

Page 9: ...YCO 1127 12 08 PPC 300WP Operation Manual 6 II Description Specifications Dimensions ...

Page 10: ...ommended if the scale is to be exposed to water or to high levels of dust Use only the AC adaptor specified for use with this scale Using the wrong adaptor can damage the scale or cause inaccurate readings Gently and carefully turn the scale on its side Open the battery cover and remove any batterres that are installed The scale will continue to draw power from the bat teries if they are installed...

Page 11: ...r an environment with foreign matter that may become lodged in the chamber Objects in the lower diaphragm chamber can interfere with the load cell and cause inaccurate readings Remove the stainless steel platform cover Gently and carefully turn the scale on its side Wipe away any foreign matter or liquid in the vicinity of the diaphragm cover Press the tab on the diaphragm cover and remove the cov...

Page 12: ...idicate If this happens then turn the scale off and back on while the platform is empty to return to a zero indication Changing Units To switch between kilogram pound ounce and pound ounce units press the and keys at the same time Checking the Battery Level The battery status indicator shows the approximate life remaining in the batteries as follows 2 3 to full charge remaining 1 3 to 2 3 charge r...

Page 13: ...e weighing platform and wait for the stable indication 3 Press the key The weight of the container will be subtracted au tomatically and the net weight indicator will display 4 Place the items to be weighed in the container The weight displayed will be the net weight of the items 5 To display the gross weight press the key The net weight indica tor will no longer display and the displayed weight w...

Page 14: ...he weight of the container will be subtracted au tomatically the net weight indicator will display and the scale will read zero 4 Add the first item to be weighed in the container until the desired weight is reached 5 Press the key to return to net zero Add the second item to be weighed in the container until the desired weight is reached 6 Press the key to return to net zero Continue adding items...

Page 15: ... legal for trade Parameter 01 002 The checkweighing function uses a lower limit and upper limit to establish an acceptable weight range for portioning quality control and filling while displaying the weight loaded on the platform The bar chart gives a graphical representation of the status of the loaded weight in relationship to the upper and lower limits for quick reference Up to 99 different set...

Page 16: ...he displayed value 3 To store any changes made to this parameter and to advance to the next parameter press the key The right arrow next to this key indicates that it advances the display to the next parameter 4 If you wish to set the automatic tare advance to parameter 06 000 disables the automatic tare 001 enables the automatic tare Press the key to save any changes and advance to the next pa ra...

Page 17: ...select a digit to change and the and keys to decrease or increase the digit s value Example Press the key three times to select the fourth digit Press the key once to change the digit to 1 5 Press the key to enter the target weight and progress to the ac ceptable weight range The acceptable weight range is the value above the target weight that is acceptable Example For an accept able range of 10 ...

Page 18: ...h the product to be weighed As the amount of product increases the negative weight reading will ap proach zero and the length of the bar chart will increase 4 The weight reading will begin to flash and the bar chart will enter the ACCEPT range when the target weight is reached 5 The weight reading will continue to flash and the bar chart will remain in the ACCEPT range through the acceptable weigh...

Page 19: ...e parameter value to 002 The down and up arrows next to these keys indicate that they decrease and increase respectively the displayed value 3 To store any changes made to this parameter and to advance to the next parameter press the key The right arrow next to this key indicates that it advances the display to the next parameter 4 If you wish to set a flashing weight reading advance to parameter ...

Page 20: ...e the key to select a digit to change and the and keys to decrease or increase the digit s value Example Press the key three times to select the fourth digit Press the key once to change the digit to 1 5 Press the key to enter the lower limit weight and progress to the upper limit weight The acceptable weight range is any weight be tween the upper and lower limits inclusive 6 Use the key to select...

Page 21: ...he scale with the product to be weighed As the amount of product increases so will the weight display and the length of the bar chart 4 The weight reading will begin to flash and the bar chart will enter the ACCEPT range when the lower limit weight is reached 5 The weight reading will continue to flash and the bar chart will remain in the ACCEPT range up to and including the upper limit weight 6 I...

Page 22: ...ease respectively the displayed value 3 To store any changes made to this parameter and to advance to the next parameter press the key The right arrow next to this key indicates that it advances the display to the next parameter 4 The second parameter determines the number of grades for all setups The greater the number of grades the fewer setups that can be stored in the scale s memory Setting 00...

Page 23: ...ng If the configura tion is already setup then press the key to exit setup and begin weighing The single bar on the bar chart indicates that this is the first grade weight 4 Use the key to select a digit to change and the and keys to decrease or increase the digit s value Example Press the key eight times to change the digit to 8 Press the key to save this weight and advance to the next grade 5 En...

Page 24: ...isplayed and the center of zero indicator should not 3 Load the scale with the product to be graded If the product falls at or above the first grade setpoint and below the second grade setpoint then grade 01 will be displayed 4 If the product falls at or above the second grade setpoint and below the third grade setpoint then grade 02 will be displayed 5 If the product falls at or above the third g...

Page 25: ...ing display 000 Disabled 001 Flash when under weight 002 Flash for acceptable weight 003 Flash when over weight 004 Flash when under or over weight 005 Flash when buzzer sounds 08 19 000 Inactive 000 Do not adjust these settings 22 000 Vibration compensation 000 Standard highest response speed 001 Increased slower response speed 002 Maximum slowest response speed 23 001 Units at power on 000 kg 00...

Page 26: ...ill display two dashes in place of the grade value until the weight reading is stable Then it will display the appropriate grade 05 Auto off Timer The PPC 300 series of scales can be set to automatically turn off after a specified time with no activity This feature only operates when the scale is using batteries for power 06 Automatic Tare The packing function can be set to automatically tare an i...

Page 27: ...ies Scale will not turn on Dead batteries or AC DC adapter not connected Replace all four batter ies with fresh batteries or verify proper adapter is connected to the scale and plugged into a pow ered outlet Load over allowable limit at start up Remove all items from the scale platform and press the key Load under allowable limit at start up Remove items wedged under the scale platform and press t...

Page 28: ... on the scale platform if removed Remove all items from the scale platform and press the key Sensor error Turn the scale off wait one minute and then turn the scale back on Circuit error Turn the scale off wait one minute and then turn the scale back on Controller error Turn the scale off wait one minute and then turn the scale back on Additional troubleshooting steps require the services of a qua...

Page 29: ...YCO 1127 12 08 PPC 300WP Operation Manual ...

Page 30: ...CORPORATION 1775 S Murray Blvd Colorado Springs CO 80916 USA Tel 719 591 1500 Fax 719 591 1045 YAMATO TECH CORPORATION 112 19425 Langley By Pass Surrey B C V3S 6K1 Canada Tel 604 533 2338 Fax 604 533 0827 www YamatoCorp com ...

Reviews: