background image

FRONT PANEL

5

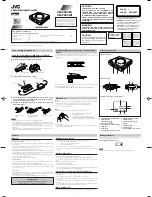
IDENTIFICATION OF COMPONENTS

REMOTE CONTROL TRANSMITTER

* The control functions on the main unit and on the remote

control transmitter are virtually identical, with the exceptions
below.

NATURAL SOUND COMPACT DISC PLAYER

POWER

OPEN/CLOSE

+

10

1

2

3

4

5

6

7

8

9

0

TIME

PEAK

TAPE

PROG

OUTPUT LEVEL

DOWN

UP

PLAY

PAUSE

STOP

RANDOM

SKIP

REPEAT

SEARCH

PHONES

POWER switch

TAPE button

OPEN/CLOSE button

MODE button

INDEX button

OUTPUT LEVEL buttons

PROG button

REPEAT button

RANDOM button

PHONES jak

SEARCH button

SKIP button

STOP button

PAUSE button

PLAY button

PEAK button

Disc tray

Remote control sensor

Numeric buttons

Display panel

TIME display

modeselect button

DOWN

OUTPUT LEVEL

UP

STOP

PLAY

MODE

1

2

3

4

5

6

7

8

9

0

INDEX

SKIP

10

OPEN/
CLOSE

Summary of Contents for YHT-470

Page 1: ...ic shock to persons The exclamation point within an equilateral triangle is intended to alert you to the presence of important operating and maintenance servicing instructions in the literature accomp...

Page 2: ...unit should be cleaned only as recommended by the manufacturer 13 Nonuse Periods The power cord of the unit should be unplugged from the outlet when left unused for a long period of time 14 Object an...

Page 3: ...ed and used according to the instructions found in the users manual may cause interference harmful to the operation of other electronic devices Compliance with FCC regulations does not guarantee that...

Page 4: ...ditional details concerning these connections refer to the operation instructions for the amplifier being used Be sure that the left L and right R LINE OUT terminals are connected to the corresponding...

Page 5: ...PEAK TAPE PROG OUTPUT LEVEL DOWN UP PLAY PAUSE STOP RANDOM SKIP REPEAT SEARCH PHONES POWER switch TAPE button OPEN CLOSE button MODE button INDEX button OUTPUT LEVEL buttons PROG button REPEAT button...

Page 6: ...ng the disc tray by pressing the OPEN CLOSE button the display shows the total number of tracks and the total recorded time of the disc for a few seconds Additionally you can close the disc tray by pr...

Page 7: ...of the track now playing To play from the beginning of the track before the one now playing twice These operations can also be performed when the unit is in the pause or stop mode To advance or rever...

Page 8: ...ees by pressing the MODE button Normal illumination Slightly dim Dim When you listen with headphones Connect the headphones to the PHONES jack and adjust the volume by using the OUTPUT LEVEL buttons A...

Page 9: ...the track now being played This indication appears while the unit is mixing up tracks Total remaining time on the disc will not be displayed during random sequence play REPEAT PLAY You can play any de...

Page 10: ...step 2 if P 01 does not appear in the display press the TIME display mode select button If during programming the TIME display mode select button is pressed the program number display can be changed...

Page 11: ...he beginning of the program To cancel a programmed setting There are several methods as described below Press the STOP button while the unit is stopped Open the disc tray Switch off the power To check...

Page 12: ...ot be programmed if the tape s length is not enough To program all tracks use a longer tape In step 4 you can check the program data for side A and sideB Shows the number of programmed tracks Shows th...

Page 13: ...because there is not enough time remaining on the tape However at this time if any other track number is flashing continuously in the display you can program it instead of the unprogrammable one In st...

Page 14: ...e programmed data changes every time the RANDOM button is pressed the amount of time remaining at the end of the tape also changes accordingly If the tape s length is not enough all tracks cannot be p...

Page 15: ...searching function Press the STOP button However some other buttons can also be used to cancel this function Notes Even if the peak level searching is performed twice or more on the same disc the same...

Page 16: ...iscs bearing the mark Never attempt to load any other type of disc into the unit The unit will also play 3 inch 8 cm compact discs To remove a disc from its storage case open the case and then press d...

Page 17: ...ith the label side up Clean the disc Check the disc carefully replace it if necessary Connect the cables properly If the problem persists the cables may be defective Set the amplifier controls to the...

Page 18: ...EMENSSTR 22 34 25462 RELLINGEN BEI HAMBURG F R OF GERMANY YAMAHA ELECTRONIQUE FRANCE S A RUE AMBROISE CROIZAT BP70 CROISSY BEAUBOURG 77312 MARNE LA VALLEE CEDEX02 FRANCE YAMAHA ELECTRONICS UK LTD YAMA...

Reviews: