background image

11

○ ○ ○ ○ ○ ○ ○ ○ ○ ○ ○ ○ ○ ○ ○ ○ ○ ○ ○ ○ ○ ○ ○ ○ ○ ○ ○ ○ ○ ○ ○ ○ ○ ○ ○ ○ ○ ○ ○ ○ ○ ○ ○ ○ ○ ○ ○ ○ ○ ○ ○ ○ ○ ○ ○ ○

YDP-101

Demonstration tunes are provided that effectively demonstrate each of the

YDP-101’s voices. There are also 50 piano songs that you can play individually,
all in sequence, or in random order. Here’s how you can select and play the
demo tunes.

NOTE

• The demo or piano song mode cannot be engaged while the recorder (page 21) is in use.

• No MIDI reception occurs in the demo/piano song mode.

• The demo/piano song data is not transmitted via the MIDI connectors.

* See page 33 for a complete listing of the demo tunes and piano songs.

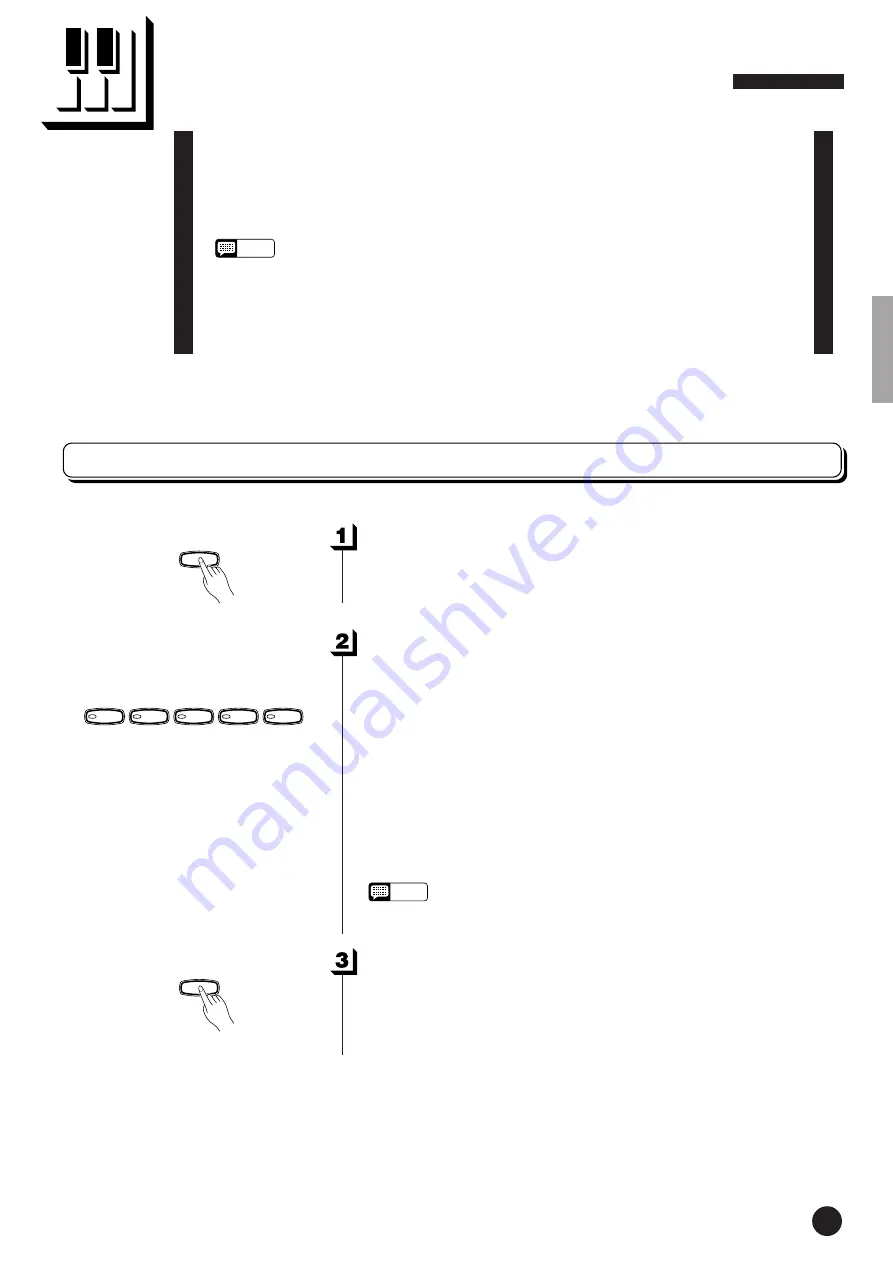
Playing the Demonstration Tunes

Engage the Demo Mode

.........................................................................

Play a Voice Demo

.........................................................................................

Press one of the voice selectors to start playback of all songs starting

from the corresponding voice demo tune — featuring the voice nor-
mally selected by that voice selector button. (If you press the 

[START/

STOP]

 button instead of a voice selector button, the GRAND PIANO

demo tune will begin playback.) The indicator of the selected voice
selector button will flash during playback, and “- - -” will appear on the
LED display. You can start playback of any other voice demo tune
during playback by simply pressing the corresponding voice selector.
You can stop playback at any time by pressing the 

[START/STOP]

button or the voice selector of the currently playing demo.

NOTE

• Use the [MASTER VOLUME] control to adjust the volume.

Press the 

[DEMO]

 button to engage the demo mode — the voice

selector indicators will flash in sequence.

Voice Demo

Exit From the Demo Mode

....................................................................

Press the 

[DEMO]

 button to exit from the demo mode and return to

the normal play mode.

DEMO

DEMO

GRAND

PIANO

E.PIANO

 HARPSI-

CHORD

STRINGS

PIPE

ORGAN

9

Summary of Contents for YDP-101

Page 1: ...annungswert weist IMPORTANT Contrôler la source d alimentation Vérifiez que la tension spécifiée sur le panneau inférieur correspond à la tension du secteur Dans certai nes régions l instrument peut être équipé d un sélecteur de tension si tué sur le panneau inférieur du cla vier à proximité du cordon d alimen tation Vérifiez que ce sélecteur est bien réglé en fonction de la tension secteur de vot...

Page 2: ...ed as follows The wire which is coloured BLUE must be connected to the termi nal which is marked with the letter N or coloured BLACK The wire which is coloured BROWN must be connected to the terminal which is marked with the letter L or coloured RED Making sure that neither core is connected to the earth terminal of the three pin plug 2 wires The serial number of this product may be found on the b...

Page 3: ...he power switch disconnect the electric plug from the outlet and have the instrument inspected by qualified Yamaha service personnel Only use the voltage specified as correct for the instrument The required voltage is printed on the name plate of the instrument Before cleaning the instrument always remove the electric plug from the outlet Never insert or remove an electric plug with wet hands Chec...

Page 4: ...touch response adjustable in 4 stages provides extensive expressive control and outstanding playability Dual mode allows 2 voices to be played simultaneously Metronome feature with variable tempo facilitates practice 2 track digital recorder lets you record and play back anything you play on the key board MIDI compatibility and a range of MIDI functions make the YDP 101 useful in a range of advanc...

Page 5: ...o Start 23 Left Pedal Start Stop 23 The Function Mode 24 To Select a Function 24 F1 Tuning 25 F2 Scale 25 F2 1 Scale 25 F2 2 Base Note 25 F3 Dual Mode Functions 26 F3 1 Dual Balance 26 F3 2 Dual Detune 26 F3 3 1st Voice Octave Shift 26 F3 4 2nd Voice Octave Shift 26 F3 5 Reset 26 F4 Left Pedal Mode 27 F5 Metronome Volume 27 F6 Piano Song Part Cancel Volume 27 F7 MIDI Functions 28 A Brief Introduct...

Page 6: ...und system The MASTER VOLUME control also adjusts headphone volume when a pair of headphones is plugged into the PHONES jack page 9 3 DEMO Button Activates the demo playback mode in which you can select playback of different demonstration sequences for each of the YDP 101 s voices See page 11 for details 4 TRANSPOSE Button The TRANSPOSE button allows access to the YDP 101 s TRANSPOSE function to s...

Page 7: ...SONG Button This button enters the Piano Song Mode While in this mode you can use the SONG SELECT buttons to select from 50 songs SONG SELECT NO YES Buttons These buttons select a piano song number for playback and are also used to adjust a range of other parameters i e their NO and YES func tions START STOP and REC Buttons These buttons control the YDP 101 s recorder letting you record and play b...

Page 8: ...cover toward you XGently lower the cover over the keys Be careful to avoid catching your fingers when opening or closing the cover Key Cover Music Stand To raise the music stand ZPull the stand up and toward yourself as far as it will go XFlip down the two metal supports at the left and the right on the rear of the music stand CLower the music stand so that it rests on the metal supports To lower ...

Page 9: ... terminal is for connecting the pedal cord from the pedal box refer to the Keyboard Stand Assembly on pages 40 45 3 MIDI IN and OUT Connectors The MIDI IN connector receives MIDI data from an external MIDI device such as a sequencer or MIDI instrument which can be used to control the YDP 101 The MIDI OUT connector transmits MIDI data generated by the YDP 101 e g note and velocity data produced by ...

Page 10: ...n the MIN and MAX settings Then when you start playing re adjust the MASTER VOLUME control for the most comfortable listening level Select a Voice Select the desired voice by pressing one of the voice selectors Use the VARIATION button to select a variation of the current voice as required Play The YDP 101 also offers keyboard touch response so the volume and timbre of notes played can be controll...

Page 11: ... voice demo tune featuring the voice nor mally selected by that voice selector button If you press the START STOP button instead of a voice selector button the GRAND PIANO demo tune will begin playback The indicator of the selected voice selector button will flash during playback and will appear on the LED display You can start playback of any other voice demo tune during playback by simply pressi...

Page 12: ...m the range will differ depending on the selected song The default tempo is automatically selected whenever a new piano song is selected or playback of a new piano song begins during ALL or rnd playback You can play the keyboard along with the piano song playback The voice playing on the keyboard can be changed You can change the Reverb type that is applied to the voice you play on the keyboard an...

Page 13: ...ton before starting playback Specify the End B of the Phrase Press the FUNCTION button a second time at the end of the phrase This sets the B point A b will appear on the display At this point repeat playback will begin between the specified A and B points Stop Playback Press the START STOP button to stop playback while retaining the specified A and B points A B repeat playback will resume if the ...

Page 14: ... no sound to 20 The default setting is 5 Both parts are automatically turned ON whenever a new song is selected Start Stop Playback Press the START STOP button to start and stop playback as required Synchro Start When the Synchro Start function is engaged playback of the se lected piano song will begin automatically as soon as you start playing on the keyboard To engage the Synchro Start function ...

Page 15: ...if the variation is engaged for either or both of the dual mode voices While the dual mode is engaged the VARIATION button can be used to turn the variation for both voices on or off To use the variation for only one of the voices the setting must be made prior to engaging the dual mode REVERB in the Dual Mode The reverb type assigned to the 1st Voice will take priority over the other If the rever...

Page 16: ...t hall HALL 2 For a really spacious reverb sound use the HALL 2 setting This effect simulates the natural reverberation of a large concert hall STAGE A simulation of the type of reverb produced in a stage environment NOTE The default reverb type including OFF and depth settings are different for each voice Adjusting Reverb Depth Adjust the reverb depth for the selected voice by using the NO and YE...

Page 17: ...to pedal Sostenuto Center Pedal If you play a note or chord on the keyboard and press the sostenuto pedal while the note s are held those notes will be sustained as long as the pedal is held as if the damper pedal had been pressed but all subsequently played notes will not be sustained This makes it possible to sustain a chord for example while other notes are played staccato NOTE Organ and string...

Page 18: ...range is from 1 through 127 The default setting is 64 NOTE This setting does not change the weight of the keyboard The touch sensitivity type and volume set in the FIXED mode will become the common setting for all voices Transposition Use the NO or YES button while holding the TRANS POSE button to transpose down or up as required The transposition range is from 12 down one octave through 0 normal ...

Page 19: ...ch time a key in this range is pressed the pitch is decreased by approximately 0 2 Hz The NO and YES buttons can also be used to tune down or up respectively in approximately 1 Hz decrements increments Press the NO and YES buttons simultaneously to recall standard tuning A3 440 Hz CRelease the A 1 and A 1 keys To Restore Standard Pitch ZTo restore the default pitch A3 440 Hz hold the A 1 A 1 and B...

Page 20: ... YES buttons simultaneously while holding the METRONOME button to recall the default setting 0 no accent Metronome Volume Function The volume of the metronome sound can be adjusted via the Metro nome Volume function in the Function mode page 27 Tempo Control The tempo of the metronome and recorder playback the recorder is described in the next section can be set from 32 to 280 beats per minute by ...

Page 21: ...he record ready mode cannot be engaged while the demo piano song mode is engaged Select the Record Track When the record mode is engaged in the previous step the last recorded track will automatically be selected for recording and its indica tor i e the 1 or 2 button indicator will glow red If you want to record on a different track press the appropriate track button so that its indicator glows re...

Page 22: ...erased from either of the recorder s tracks by engag ing the record mode selecting the track you want to erase and then pressing the START STOP button twice without recording any data Changing the Initial Settings The initial voice tempo reverb type and reverb depth settings made in step 1 of the recording procedure are actually recorded by theYDP 101 These initial settings can be changed after th...

Page 23: ... indicators light before starting recorder playback It is also a good idea to press the track buttons to check if the tracks contain data before recording If the green indicator lights when the corresponding track button is pressed that track contains data which will be erased and replaced by the newly recorded data If the metronome is being used during playback the metronome will automatically st...

Page 24: ...7 and Backup F8 functions you will have to press the YES button once to enter the respective sub mode after the function has been selected and then use the FUNCTION and buttons again to select the desired sub function NOTE The Dual mode must be engaged before the F3 function can be selected If the Dual mode is not engaged F3 will appear on the display and the Dual sub mode will not be available VS...

Page 25: ...lue 440 440 0 4 40 440 2 44 0 440 4 440 440 6 4 40 440 8 F2 1 Scale In addition to the standard Equal Temperament tuning the YDP 101 includes 6 classic tunings that you can select and use to play music of the corresponding period or experiment with in a more modern context The tunings are 1 Equal Temperament 5 Mean Tone 2 Pure Major 6 Werckmeister 3 Pure Minor 7 Kirnberger 4 Pythagorean Use the NO...

Page 26: ... set one voice as the main voice and another voice as a softer mixed voice F3 2 Dual Detune This function makes it possible to detune the 1st and 2nd dual mode Voices to create a thicker sound Use the NO and YES buttons to set the amount of detuning as required The detune range is from 10 through 10 A setting of 0 sets both voices to the same pitch Settings below 0 increase the pitch of the 2nd Vo...

Page 27: ... 0 produces no sound while a setting of 20 produces maximum volume Press the NO and YES buttons simultaneously to recall the default setting 5 Adjust the part volume to a comfortable level to use the canceled part as a guide to play along with Set to 0 if you don t want to hear the part SHORTCUT You can jump directly to the metronome functions by pressing the FUNC TION button while holding the MET...

Page 28: ... used in fairly sophisticated MIDI systems Tone Generator MIDI Cable MIDI IN MIDI OUT YDP 101 YDP 101 Data Being Recorded Playback Data MIDI IN MIDI IN MIDI OUT MIDI OUT Sequencer After selecting F7 Y press the YES button to engage the MIDI function sub mode then use the FUNCTION and buttons to select the desired MIDI function as listed below NOTE Always use a high quality MIDI cable to connect MI...

Page 29: ...ol On since the internal tone generator is controlled locally by its own keyboard Local control can be turned OFF however so that the YDP 101 keyboard does not play the internal voices but the appropriate MIDI information is still transmitted via the MIDI OUT connec tor when notes are played on the keyboard At the same time the internal tone generator responds to MIDI information received via the ...

Page 30: ...urrent YDP 101 panel settings selected voice etc to be transmitted via the MIDI OUT terminal This is particularly useful if you will be recording performances to a MIDI sequence recorder which will be used to control the YDP 101 on playback By transmitting the YDP 101 panel settings and recording them on the MIDI sequence recorder prior to the actual performance data the YDP 101 will be automatica...

Page 31: ...8 2 MIDI Turns backup of the MIDI functions listed below on or off Use the NO and YES buttons to turn backup On or OFF The default backup mode is OFF Channel Transmit Receive Local ON OFF Program Change ON OFF Control Change ON OFF MIDITransmitTranspose F8 3 Tuning Turns backup of the tuning functions listed below on or off Use the NO and YES buttons to turn backup On or OFF The default backup mod...

Page 32: ...Work If the damper pedal doesn t work or notes are sustained even when the pedal is not pressed make sure that the pedal cord is properly plugged into the main unit page 42 3 The YDP 101 Reproduces Radio or TV Sound This can occur if there is a high power transmitter in your vicinity Contact your Yamaha dealer 4 Intermittent Static Noise This is usually due to turning ON or OFF a house hold applia...

Page 33: ...6 La Viollette op 99 1 L Streabbog 37 Blumenlied G Lange 38 Heidenröslein G Lange 39 The harvest time G Lange 40 Barcarolle Les Saisons P I Tchaikovsky 41 Melody in F A G Rubinstein 42 Spinnerlied A Ellmenreich 43 Tango España I Albéniz 44 La Fille aux Cheveux de Lin C A Debussy 45 Arabesque 1 C A Debussy 46 Clair de lune C A Debussy 47 The Entertainer S Joplin 48 Maple leaf rag S Joplin 49 Radetz...

Page 34: ...Receive Channel ALL F7 3 Local Control ON F8 2 F7 4 Program Change Send Receive ON F7 5 Control Change Send Receive ON F7 6 MIDI Transmit Transpose 0 F8 Backup All OFF Always backed up Factory Setting List Liste der Vorgabeeinstellungen Liste des réglages Lista de ajustes de fábrica Default Backup Group Voice GRAND PIANO Dual Mode OFF Reverb Type Preset for each voice Reverb Depth Preset for each ...

Page 35: ...isez un ordinateur pour commander votre matériel de musique au moyen de messages MIDI générés par ordinateur les données suivantes vous seront utiles et vous aideront à commander le YDP 101 SI usted está ya familiarizado con MIDI o si emplea una computadora para controlar sus aparatos musicales con mensajes MIDI generados por computadora los datos proporcionados en esta sección le ayudarán a contr...

Page 36: ...o program change data is transmitted or received Also Bank MSB LSB is not transmitted or received Normal Voice VARIATION Voice MSB LSB P C MSB LSB P C GRAND PIANO 0 112 0 0 113 0 E PIANO 0 112 5 0 112 88 HARPSICHORD 0 112 6 0 115 6 STRINGS 0 112 48 0 113 49 PIPE ORGAN 0 112 19 0 113 19 P C Program Change number 7 SYSTEM EXCLUSIVE MESSAGES Universal System Exclusive 1 Universal Realtime Message Dat...

Page 37: ...nding the YDP 101 another message XG Native Parameter Change message may contain two or four bytes of parameter data depending on the parameter size For information about the Address and Byte Count values refer to Table 1 below Note that the table s Total Size value gives the size of a bulk block Only the top address of the block 00H 00H 00H is valid as a bulk data address 9 SYSTEM EXCLUSIVE MESSA...

Page 38: ...EM ON 00 XG sytem ON 7F 00 RESET ALL PARAMETERS 00 ON receive only TOTAL SIZE 07 1 Values lower than 020CH select 50 cents Values higher than 05F4H select 50 cents 2 Values from 28H through 33H are interpreted as 12 through 1 Values from 4DH through 58H are interpreted as 1 through 12 Table 2 MIDI Parameter Change table EFFECT 1 Refer to the Effect MIDI Map for a complete list of Reverb type numbe...

Page 39: ... Bender X X Control Change 0 32 O O Bank Select 07 X O Volume 11 X O Expression 64 O O Damper 66 O O Sostenuto 67 O O Soft pedal 91 O O Reverb Depth 120 X O All sounds off 121 X O Reset All Controllers Program O O Change True System Exclusive O O System Song Position X X Song Select X X Common Tune X X System Clock O O Real Time Commands O O Aux Local ON OFF X O All Notes Off O O 123 127 Messages ...

Page 40: ...r Montage darauf bei jedem Arbeitsgang alle Schrauben festzuziehen Für die Demontage muß die angegebene Reihenfolge umgekehrt befolgt werden ZÖffnen Sie den Karton und nehmen Sie alle Teile heraus Im Karton sollten die oben abgebildeten Teile enthalten sein Prüfen Sie zunächst bitte ob alle Teile vollständig vorhanden sind XEntfernen Sie den Kabelbinder Lösen Sie den Kabelbinder um das unten am Pe...

Page 41: ...e les pédales ressortent dans le même sens que le panneau latéral aux pieds Conjunto del soporte del teclado Observe cuidado para no confundir las piezas y asegúrese de montar todas ellas en el sentido correcto Proceda al montaje en el orden indicado a continuación El montaje deberá realizarse al menos por dos personas Procure utilizar los tornillos del tamaño adecuado según se indica arriba El em...

Page 42: ...der Füße auf Schrauben Sie dann die Rückwand oben mit zwei 4 x 10 mm Halbrundschrauben 2 so an den Seitenwänden fest daß kein Spiel zwischen Rück wand und Seitenwänden verbleibt Schrauben Sie die Rückwand abschließend noch mit vier 4 x 16 mm Schneidschrauben 3 an den Pedalkasten BMontieren Sie die Tastatureinheit A Setzen Sie die Tastatureinheit A so auf den fertigen Ständer daß die beiden Schraub...

Page 43: ...é sur la face arrière du clavier Une fois branché fixez les attaches de câble sur la face arrière en procédant de la façon représen tée sur la figure puis emboîtez le câble dans les attaches VMonte el panel trasero B Con la superficie tosca del panel trasero encarada hacia afuera y el panel un poco inclinado en ángulo como se muestra en la ilustración bájelo al borde saliente de las patas de la pa...

Page 44: ...elector de tensión está provisto para ciertos destinos 7 8 MSpannungswähler und Netzkabel Bevor Sie nun das Netzkabel anschließen müssen Sie den Spannungswähler falls vorhanden auf die örtliche Netz spannung einstellen Zum Verstellen drehen Sie den Spannungs wähler mit einem Schlitzschraubendreher bis der richtige Spannungswert 110 127 220 oder 240 an der Pfeil markierung steht Bei der Auslieferun...

Page 45: ...cart des portes et de toute autre struc ture mobile Déplacer le YDP 101 vers un emplacement approprié Lorsque vous secouez quelque peu le YDP 101 entendez vous un cliquetis Serrer convenablement toutes les vis Le pédalier fait il du bruit ou s écarte t il lorsque vous appuyez sur les pédales Tourner le stabilisateur de sorte qu il repose fermement sur le sol Le cordon de pédale est il enfoncé corr...

Page 46: ...h your Yamaha dealer Die technischen Daten und Beschreibungen in dieser Bedienungsanleitung dienen nur der Information Yamaha Corp behält sich das Recht vor Produkte oder deren technische Daten jederzeit ohne vorherige Ankündigung zu verändern oder zu modifizieren Da die technischen Daten das Gerät selbst oder Sonderzubehör nicht in jedem Land gleich sind setzen Sie sich im Zweifel bitte mit Ihrem...

Page 47: ...antik Gedung Yamaha Music Center Jalan Jend Gatot Subroto Kav 4 Jakarta 12930 Indonesia Tel 21 520 2577 KOREA Cosmos Corporation 131 31 Neung Dong Sungdong Ku Seoul Korea Tel 02 466 0021 5 MALAYSIA Yamaha Music Malaysia Sdn Bhd Lot 8 Jalan Perbandaran 47301 Kelana Jaya Petaling Jaya Selangor Malaysia Tel 3 703 0900 PHILIPPINES Yupangco Music Corporation 339 Gil J Puyat Avenue P O Box 885 MCPO Maka...

Page 48: ... non blanchi au chlore avec de l encre d huile de soja Este documento se ha impreso en papel sin cloro alguno con tinta de soja M D G Pro Audio Digital Musical Instrument Division Yamaha Corporation 1999 Yamaha Corporation V308530 012POCP5 2 11E0 Printed in Japan Yamaha Manual Library English versions only http www2 yamaha co jp manual english ...

Reviews: