background image

Components 

The XW-CS-700 kit includes the following components.  Please check that you received all of them: 

Revolabs

 HD dual

:

  The HD dual includes the Receiver for the wireless microphone, the Charger to charge up 

to two microphones, and the required power adapters. 

Revolabs HD

 omni-directional wireless microphone.


Proprietary audio cable to connect the HD dual Receiver to the CS-700. 

User guide (this document). 


Preparing the wireless Receiver 

Before enabling the wireless extension microphone with the CS-700, the wireless Receiver needs to be configured and a 
connection between the wireless extension microphone and the Receiver needs to be created. 

Charging the microphones 

First,  please  charge  the microphone  battery  for at  least  an hour to ensure that enough charge  is in the  battery to go 
through the process.  To charge, connect the Charger to the main powers using one of the provided 5VDC AC Adapters 
and using an appropriate power outlet 110-240 AC, 50-60Hz. The power LED on the Charger will illuminate.  Place the 
microphone in the Charger and ensure that it is seated well in the charging bay.  Either a solid red LED (charging) or solid 
green LED (100% charged) light will appear to confirm that the microphone is inserted properly. While in the Charger, the 
microphones are not transmitting audio to the Receiver. In normal use, batteries should fully charge in about 2 hours, but 

will “quick

-

charge” to 80% capacity in approximately 1 hour and 20 minutes. Fully charged mic

rophones left in the Charger 

remain solid green.  Before first use of the microphone it should be charged for several hours or until the LED on the 
microphone turns green in the Charger.   

Whenever microphones are not in use, they should be inserted into the Charger. It is important to ensure that all 
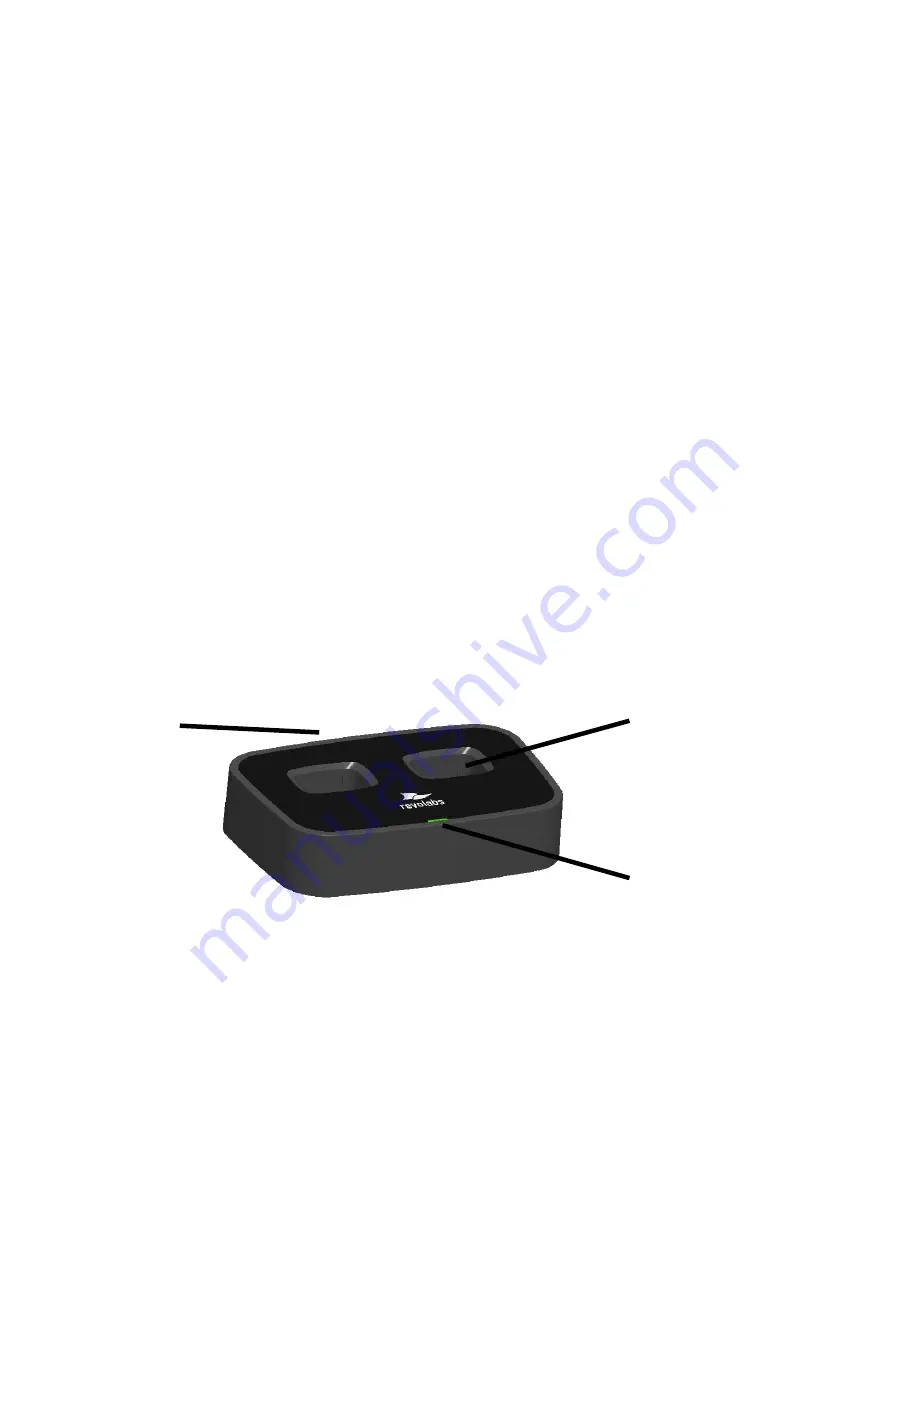
microphones are inserted fully so that charging will occur. Features of the Charger are shown in the following image. 


1. LED indicator 

 power status indicator   


2. Charger Bays 

 charges up to 2 Microphones 


3. Power Cord Receptacle 

 power supply input, 5 VDC (on rear) 


Important

The Serial Number of the Microphones used with the XW-CS-700 should start with a 7010 or 8020.  

Serial numbers starting with numbers different than 7010 or 8020 are not approved to be used with the CS-700 
extension microphone kit!  In the supported microphones the Lithium Polymer rechargeable batteries that 
power the microphones are field replaceable.  Replace the batteries only with the manufacturer and model 
battery type recommended by Yamaha Unified Communications.  Please contact Yamaha Unified 
Communications (uc.yamaha.com) for correct manufacturer approved and recommended replacement type 
batteries. 

Caution

: Risk of explosion if batteries are mishandled or replaced by an incorrect type.  Do not disassemble 

batteries or attempt to charge outside the system.   Do not dispose of batteries in fire.   Dispose of batteries in 
accordance with manufacturer’s instructions and local regulations.  


Summary of Contents for XW-CS-700

Page 1: ...e pick up in a room without having to wire the room with audio cables allowing for a clean extension of the microphone capture of the Yamaha CS 700 Please read the safety documentation for the components that are part of the XW CS 700 kit carefully and follow their instructions The components in this kit will require to be prepared before first use Please follow the set up instructions as provided...

Page 2: ...rge in about 2 hours but will quick charge to 80 capacity in approximately 1 hour and 20 minutes Fully charged microphones left in the Charger remain solid green Before first use of the microphone it should be charged for several hours or until the LED on the microphone turns green in the Charger Whenever microphones are not in use they should be inserted into the Charger It is important to ensure...

Page 3: ...icrophone is ON press and hold the Mute button for 10 seconds until the LED turns solid red then release the button to turn the unit off do not release the button when you hear two beeps 2 Place the microphone unit into pairing mode by holding the button down for seven seconds The LED will first turn green then solid red Release the button once the LED is red The microphone is now in pairing mode ...

Page 4: ...ms hd wireless microphone system 2 Connect the PC to the HD Single Dual Receiver via USB 3 Allow the PC to recognize the hardware and install the necessary operating system drivers 4 Install the software downloaded in Step 1 which requires Windows 7 or newer 5 Launch the Revolabs HD Control Panel program Configuration Settings The Revolabs HD Control Panel controls most of the HD Single Dual Recei...

Page 5: ...een the microphone and the Receiver In most cases of installations this cannot be achieved but trying to achieve an installation that comes as close as line of sight will ensure best wireless reception Examples for places to be avoided for the Receiver during installation are behind metal objects whether meshed or solid The Receiver should not be placed behind displays in the room as they cause wi...

Page 6: ...rophone does not need to be pointing in any particular direction as sound pick up is from all directions It is always better to place the microphone as close to the person speaking as possible but avoid placing the microphone where it might be blocked by equipment or paperwork Make sure that the microphone is always placed lying on its rubber feet atop a flat surface 5 To turn the microphone off r...

Page 7: ...Radio congestion it is not possible to make a radio connection because there are already too many nearby users or there is heavy radio interference Possibilities include some types of digital wireless devices or other Revolabs products in the vicinity Groups of five rapid RED flashes OFF Unit is faulty Contact your AV service provider for advice Adding a second wireless microphone The Receiver of ...

Page 8: ...ireless Boundary Microphone 01 HDTBLMIC DR 11 HD Wearable Wireless Microphone 01 HDEXEMIC 11 HD XLR Microphone Wireless Adapter 01 HDXLRMIC 11 HD Wireless Adapter for Countryman Microphone 01 HDCOMAN 11 Trouble shooting The microphone does not want to go into pairing mode Before the microphone can be put into pairing mode it needs to be shut off Hold the button for several seconds until the LED tu...

Page 9: ...aken out of the charger should always blink green The mute LED on the CS 700 indicates whether audio is flowing to the far end of the call The LED on the microphone is blinking green red The microphone is not yet paired to the Receiver or was unpaired from the receiver Follow the pairing instructions in this manual to pair the microphone and the Receiver I have two microphones paired to the Receiv...

Page 10: ... Yamaha Corporation All Rights Reserved Published 05 2019 SC XWCS 201905 EN 2950305 00 V 1 0 Manufacturer Yamaha Unified Communications Inc Address 144 North Road Suite 3250 Sudbury MA 01776 USA ...

Reviews: