background image

THR30IIA Wireless

   Reference Manual

    9

Connection

Charging the built-in battery

Connect the supplied power adaptor to the DC IN jack located on the rear side of the THR30IIA Wireless. The 
LED of the power button lights in green while charging.

* For further details of the Power Button LED status, refer to the Power Button LED status list (

page 17

).

NOTICE

• When you use the THR30IIA Wireless in an environment of extreme temperatures, charging may 

not be possible.

• Charge the built-in rechargeable battery once every six months to maintain the function.

Charging the Relay G10T

Connect the Relay G10T*

1

 to the [GUITAR] jack located on the top of the THR30IIA Wireless. The built‐in 

rechargeable battery starts*

2

 charging automatically. If you have disconnected the Relay G10T from the [GUI-

TAR] jack of the THR30IIA Wireless and want to resume charging, wait for more than two seconds before recon-
necting the device to the [GUITAR] jack.

*

1

Refer to the manual of Relay G10T for explanations of the LED display indications on the Relay G10T.

*

2

If the supplied power adapter is not connected to the THR30IIA Wireless, charging of the Relay G10T will not start.

NOTICE

• After charging, unplug the Relay G10T from the THR30IIA Wireless.

• When the THR30IIA Wireless is turned off and the power adapter is connected, the Relay G10T is 

charged by simply connecting. However, the THR30IIA Wireless is initially set to turn off the power 
when the Relay G10T charging is finished. In this state, leaving the Relay G10T connected to the 
THR30IIA Wireless may result in depletion of the Relay G10T’s battery power. Turn off the THR30IIA 
Wireless’s ECO setting to prevent this.

Changing the Relay G10T’s ECO setting

 *

*

2

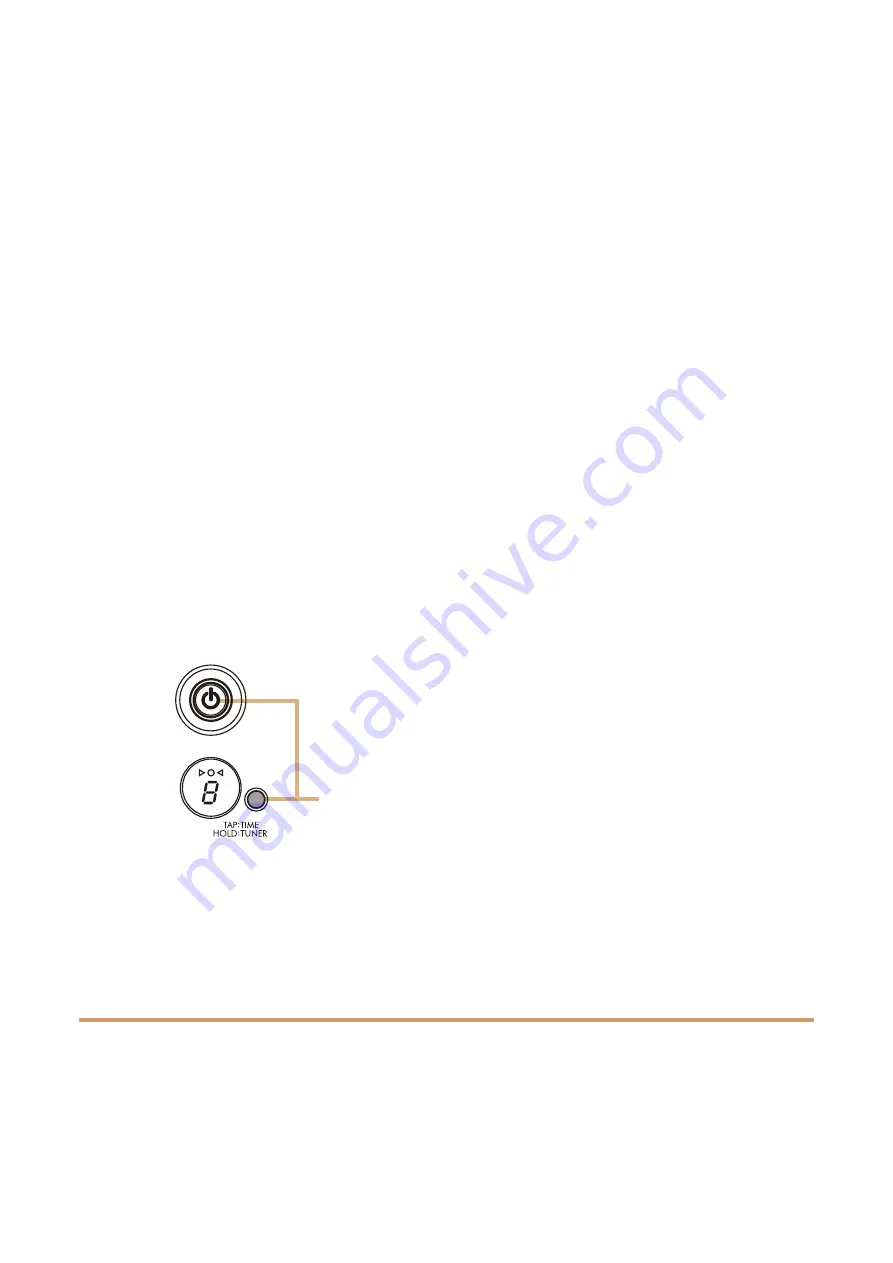
1. Switch on the power of THR30IIA Wireless

2. Switch off the power of THR30IIA Wireless while holding the [TAP/TUNER] button


*

3


*

1

You can change the ECO setting from the THR Remote.

*

2

ECO on and ECO off are toggle. When you change the ECO setting, perform the steps 1 to 2 again. 

*

3

Since the ECO setting changes to ECO off when charging is started on the Relay G10T, “C” will appear on the LED 
display.

Connecting to guitar by wireless

The THR30IIA Wireless can connect with the Relay G10T by wireless. The optimal transmission channel is set 
automatically when the Relay G10T to the [GUITAR] jack on the top of the THR30IIA Wireless has been con-
nected for at least 10 seconds. For details on wireless connection, refer to the reference manual.

Switch off the power while 
holding the [TAP/TUNER] 
button.

Summary of Contents for THR30IIA Wireless

Page 1: ...essories 2 Names and Functions 3 Control Panel 3 Rear Panel 6 Connection 7 Connection Example 7 Power 8 Connecting to guitar by wireless 9 Connecting to a smart device 10 Connecting to a computer 12 Troubleshooting 14 Specifications 16 Technical Specifications 16 Power Button LED status list 17 Signal Flow Diagrams 18 ...

Page 2: ... wireless use Bluetooth capability enables playing of music sources and editing of the amp s sound settings from a smart device or computer Built in rechargeable battery enables use without a power adaptor Yamaha s original Extended Stereo technology enables an exceptionally wide stereo image much wider than the unit s compact size Stereo Imager enables an even more expansive guitar sound and is a...

Page 3: ...ction When the tuner function is set to ON the guitar is muted The sounds from the AUX jack USB jack and Bluetooth are out put to the main speaker and PHONES jack Tap Tempo Function When a CHORUS DELAY or DELAY effect is selected with the EFFECT knob 0 control the tempo of the delay can be set by tapping more than twice on the switch Extended Stereo Setting Hold the TAP TUNER button for more than ...

Page 4: ...h the actual pickup sound of the guitar Maximum setting produces the mic sound only Minimum setting produces the direct pickup sound only u BASS knob Tone adjustment for the guitar s sound Turn the knob clockwise to boost the low range frequencies i MIDDLE knob Tone adjustment for the guitar s sound Turn the knob clockwise to boost the mid range frequencies o TREBLE knob Tone adjustment for the gu...

Page 5: ...tandard phone jack used to connect a guitar to the THR30IIA Wireless The GUITAR jack starts charging the Relay G10T automatically when the Relay G10T is connected The optimal transmission channel is set automatically when the Relay G10T to the GUITAR jack has been connected for at least 10 seconds 6 PHONES jack This is a stereo mini phone jack used to connect stereo headphones to the THR30IIA Wire...

Page 6: ...for connection to external devices handling line level signals These jacks can be connected to phone type balanced unbalanced plugs 3 USB jack This jack is used to connect the THR30IIA Wireless to a computer via a USB cable 4 15V DC IN connector For connection to the supplied power adaptor 2 3 4 About the Default Settings To reset all contents stored in the user memory switch on the power while ho...

Page 7: ...rom those on your instrument NOTE If a cable is connected to the INPUT jack the wireless guitar receiver can not be used Playing music audio NOTE Make sure to adjust the device s level appropriately to avoid distortion Wireless tone editing with the iOS Android app THR Remote Wireless control with a third party Bluetooth footswitch via THR Remote Wireless connection Audio output from an audio play...

Page 8: ... via the power adaptor or with the built in rechargeable battery When you use the THR30IIA Wireless with the built in rechargeable battery the maximum output volume is reduced page 16 When using the power adaptor Connect the supplied power cord to the power adapter and then connect the supplied power adaptor to the 15V DC IN jack located on the rear panel of the THR30IIA Wireless Finally connect t...

Page 9: ...t start NOTICE After charging unplug the Relay G10T from the THR30IIA Wireless When the THR30IIA Wireless is turned off and the power adapter is connected the Relay G10T is charged by simply connecting However the THR30IIA Wireless is initially set to turn off the power when the Relay G10T charging is finished In this state leaving the Relay G10T connected to the THR30IIA Wireless may result in de...

Page 10: ...configuration of the smart device within 3 minutes after entering pairing mode For details on Bluetooth configuration refer to the manual of your smart device or follow the onscreen instructions 5 Check that the at the top of the LED DISPLAY lights in green connected Confirm sound output from the THR30IIA Wireless by playing music from the smart device NOTE When the Bluetooth connection registrati...

Page 11: ...e 2 Search for the THR Remote app 3 Download and install the THR Remote app following the onscreen instructions Configuring Bluetooth MIDI 1 Start the THR Remote 2 Touch the Bluetooth icon on the display 3 Connect to LE_THRII following the onscreen instructions Starting the THR Remote app Start the THR Remote app on the smart device Press the desired USER MEMORY button for 2 seconds to save the se...

Page 12: ... audio files from a computer through the THR30IIA Wireless Configuring and Operating Select the THR30IIA Wireless as the computer s audio output setting Windows Control Panel Sound Sound tab Mac System Preferences Sound Output tab Connect the computer s USB connector to the USB connector on the THR30IIA Wireless as shown in the dia gram below You can play your guitar along with the audio played on...

Page 13: ...uter s USB connector to the USB connector on the THR30IIA Wireless as shown in the dia gram below See the USB Connection diagram on page 12 NOTE For more information on operating refer to the Help Menu within Cubase AI see illustration below Editing effects and tone controls on a computer Installing the THR Remote app Windows Mac 1 Access the following website and extract the THR Remote file after...

Page 14: ...usical instrument Properly connect the mic or electronic musical instrument to the MIC INST jack see page 7 Make sure that the volume control on the elec tronic musical instrument is turned up properly Use only a dynamic microphone the THR30IIA Wireless cannot supply phantom power if a con denser microphone is connected No audio from Bluetooth source Confirm the status of the LED display When the ...

Page 15: ...ay be a problem with the built in rechargeable battery If the problem persists consult your Yamaha dealer The Relay G10T cannot be charged If the Relay G10T has been disconnected from the INPUT jack connect to the INPUT jack on the THR30IIA Wireless again after 2 seconds Volume is low Keep the THR30IIA Wireless at room tempera ture and do not use it until the built in recharge able battery reaches...

Page 16: ...AR IN 10 dBu AUX IN 10 dBu MIC IN 50 dBu INST IN 10 dBu PHONES Output Level 10 mW Rated Output 30 W 15 W 15 W Maximum output during built in recharge able battery operation 15 W 7 5W 7 5W Power Source Power Adaptor or built in rechargeable battery Power Adaptor YNT345 1530 Built in rechargeable battery Power Consumption 22 W Dimensions W x H x D 420 x 195 x 155 mm 16 5 7 7 6 1 Weight 4 4 kg 9 lbs ...

Page 17: ... and the power is ON The battery is full and the power is OFF Red Unlit Green Red Unlit Charging error indication When the power is on Indicates charging error When the power is off Indicates charging error If the built in rechargeable battery has a charging error immediately turn off the THR30IIA Wireless power unplug the power adapter and consult your Yamaha dealer Flashes green red Flashes gree...

Page 18: ...AR VOLUME Sync Compressor Stereo Imager TONE Simulator AUX In Guitar Reverb Dry Output gain App control Chorus Delay Mix gain App control Sync Direct Switch Mic In Guitar In MIC INST VOLUME Mic HPF Mic 3 Band EQ Mic Reverb Extended Stereo is turned off when head phones are connected Manual Development Department 2020 Yamaha Corporation Published 10 2020 PO A0 ...

Reviews: