STAGEPAS 300
8
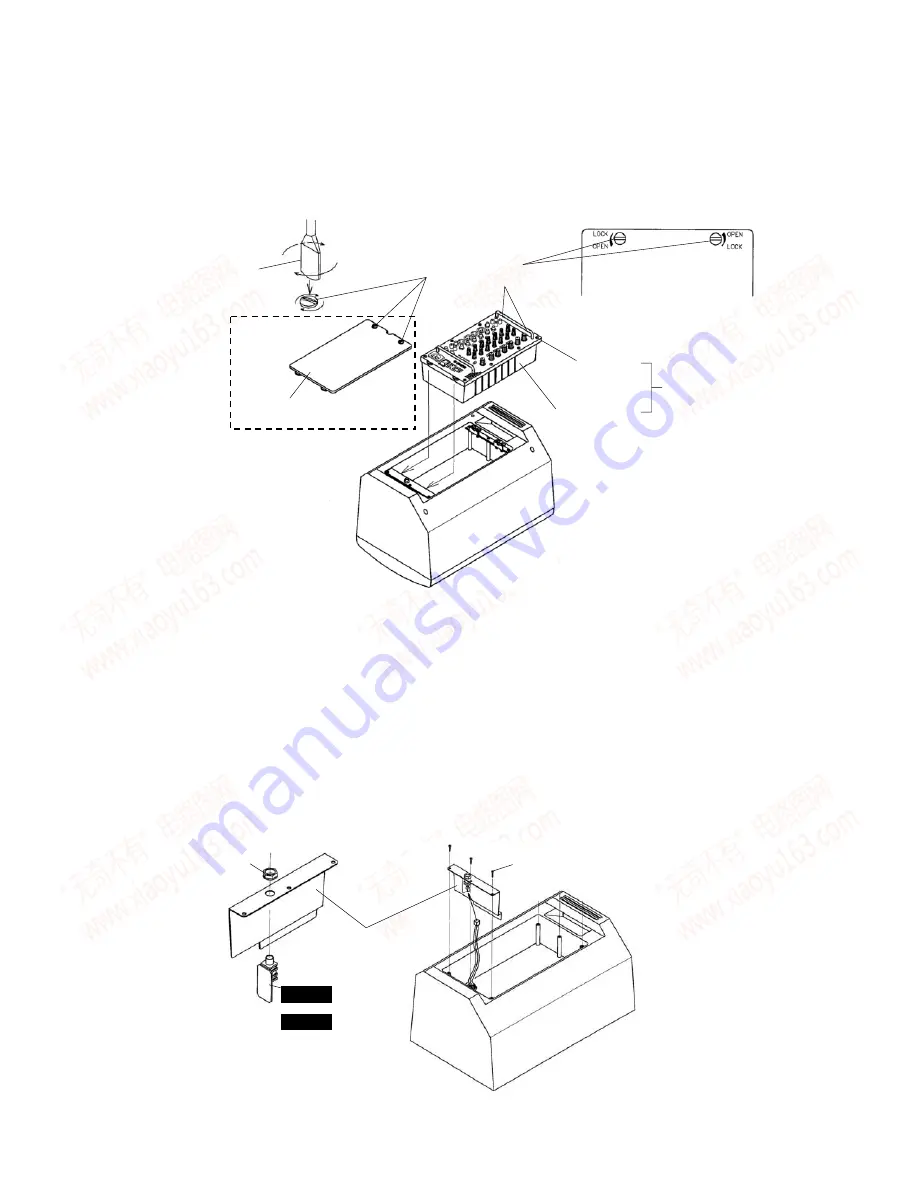
Fastner head
(
ファスナーヘッド
)
Mixer assembly
(
ミキサー
Ass'y)
Rear case side
(
リアケース側
)
Panel side
(
パネル側
)
Cover mold assembly
(
カバーモールド
Ass'y)
Coin driver or minus driver
(
コインドライバーまたは
マイナスドライバー
)
Fig.5 (
図 5
)
Mount bracket assembly
(
マウントブラケットAss'y
)
[16] X 3
JACK1A
JACK1B
or
[16]:
Bind Head Tapping Screw-B (
+バインド B タイト
) 4.0X10 NI-BL (AAX61680)
[140a]: Hexagonal Nut (
特殊六角ナット
) M15.0 BL
Fig.6 (
図 6
)
6.
ミキサー Ass'y、カバーモールド Ass'y
(所要時間:約 1 分)
6-1
コインドライバーまたはマイナスドライバーで、
ファスナーヘッドのマイナス形溝 2 箇所を OPEN
の位置まで回して、ミキサー Ass'y またはカバー
モールド Ass'y を外します。
(図 5)
7.
JACK1A シートまたは JACK1B シート
(所要時間:約 2 分)
7-1
ミキサー Ass'y またはカバーモールド Ass'y を外し
ます。
7-2
[16]のネジ 3 本を外して、JACK1A シートまたは
JACK1Bシートと共にマウントブラケットAss'y を
外します。
(図 6)
7-3
[140a]の特殊六角ナット 1 個を外して、マウントブ
ラケット Ass'y から JACK1A シートまたは JACK1B
シートを外します。
(図 6)
6.
Mixer Assembly, Cover Mold Assembly
(Time required: About 1 minute)
6-1
Rotate the two (2) straight slots on the fastener
heads with a coin driver or minus driver until each
straight slot is in alignment with the OPEN position.
The mixer assembly or cover mold assembly can
then be removed. (Fig.5)
7.
JACK1A Circuit Board or JACK1B Circuit
Board
(Time required: About 2 minutes)
7-1
Remove the mixer assembly or cover mold
assembly. (See procedure 6)
7-2
Remove the three (3) screws marked [16]. The
mount bracket assembly can then be removed
together with the JACK1A circuit board or JACK1B
circuit board. (Fig.6)
Remove the hexagonal nut marked [140a]. The
JACK1A circuit board or JACK1B circuit board can
then be removed from the mount bracket assembly.
(Fig.6)
www. xiaoyu163. com
QQ 376315150
9
9
2
8
9
4
2
9
8
TEL 13942296513
9
9
2
8
9
4
2
9
8
0
5
1
5
1
3
6
7
3
Q
Q
TEL 13942296513 QQ 376315150 892498299
TEL 13942296513 QQ 376315150 892498299


