background image

SHS-500 Owner’s Man

u

al

19

1.

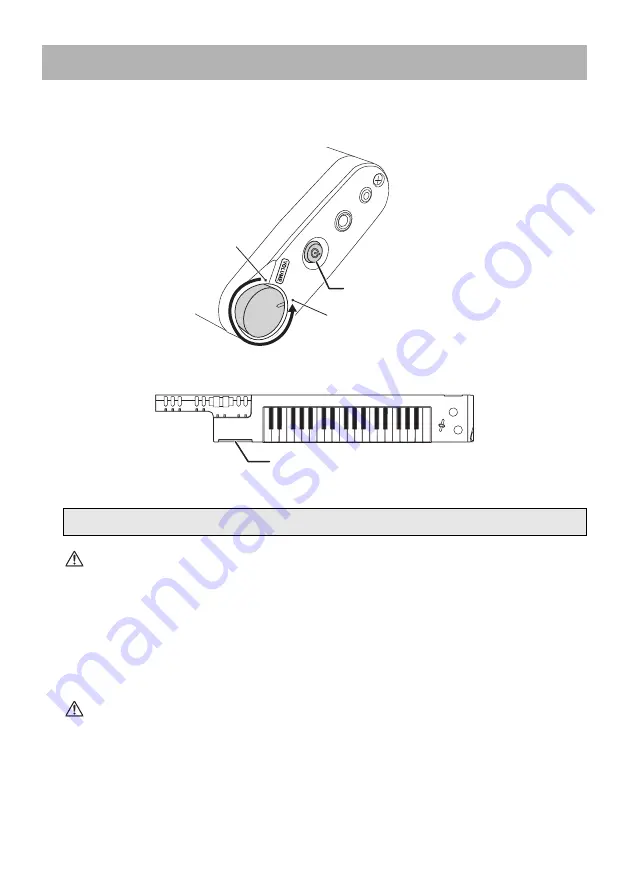
Turn down the [VOLUME] dial to the minimum.

2.

Press the [

P

] (Standby/On) switch to turn the power on.

The product name appears in the display, followed by the normal display.

Adjust the volume as desired while playing the keyboard.

CAUTION

Do not use the instrument or headphones for a long period of time at a high or uncomfortable volume 
level, since this can cause permanent hearing loss.

NOTICE

While turning on the power, do not attempt any other operations, such as pressing the keys. Doing so 
may cause the instrument to malfunction.

3.

Press and hold the [

P

] (Standby/On) switch for about a second to turn the power 

off.

CAUTION

Even when the power switch is turned off, electricity is still flowing to the product at the minimum level. 
When you are not using the product for a long time, make sure to unplug the power cord from the wall AC 
outlet.

T

u

rning the Power On/Stand

b

y

If the overall vol

u

me is low, or no so

u

nd is heard, please confirm “Tro

ub

leshooting” on page 33

1.

2.

Maxim

u

m

Minim

u

m

Power On

Turn the Volume to minimum

Display

Summary of Contents for Sonogenic SHS-500

Page 1: ...EN Owner s Manual Before using the instrument be sure to read PRECAUTIONS on pages 5 7 ...

Page 2: ...onmentally friendly We sincerely believe that our products and the production methods used to produce them meet these goals In keeping with both the letter and the spirit of the law we want you to be aware of the following Battery Notice This product MAY contain a small non rechargeable battery which if applicable is soldered in place The average life span of this type of battery is approximately ...

Page 3: ...n the users manual may cause interference harmful to the operation of other elec tronic devices Compliance with FCC regulations does not guarantee that interference will not occur in all installations If this product is found to be the source of interference which can be determined by turning the unit OFF and ON please try to eliminate the problem by using one of the following mea sures Relocate e...

Page 4: ...ed or grounding type plug A polarized plug has two blades with one wider than the other A grounding type plug has two blades and a third grounding prong The wide blade or the third prong are provided for your safety If the provided plug does not fit into your outlet consult an electrician for replacement of the obsolete outlet 10 Protect the power cord from being walked on or pinched particularly ...

Page 5: ... it Only use the voltage specified as correct for the instrument The required voltage is printed on the name plate of the instrument Use the specified adaptor page 35 only Using the wrong adaptor can result in damage to the instrument or overheating Check the electric plug periodically and remove any dirt or dust which may have accumulated on it Do not open This instrument contains no user service...

Page 6: ...r and consult a doctor Battery fluid is corrosive and may possibly cause loss of sight or chemical burns If you notice any abnormality When one of the following problems occur immediately turn off the power switch and disconnect the electric plug from the outlet If you are using batteries remove all batteries from the instrument Then have the device inspected by Yamaha service personnel The power ...

Page 7: ...the instrument device or headphones for a long period of time at a high or uncomfortable volume level since this can cause permanent hearing loss If you experience any hearing loss or ringing in the ears consult a physician When using a strap make sure the strap is securely attached to the instrument Do not lift the instrument by the strap It can cause serious injury or damage to the instrument Do...

Page 8: ...l use This product incorporates and bundles contents in which Yamaha owns copyrights or with respect to which Yamaha has license to use others copyrights Due to copyright laws and other relevant laws you are NOT allowed to distribute media in which these contents are saved or recorded and remain virtually the same or very similar to those in the product The contents described above include a compu...

Page 9: ...er right corner of the display as illustrated above or the value BLE MIDI Bluetooth MIDI is selectable in the lower of the display this means that the product is equipped with Bluetooth functionality To confirm that the value BLE MIDI is selectable or not press the FUNCTION button repeatedly to call up the Function menu MIDI Select in the upper of the display then rotate the SELECT knob to select ...

Page 10: ...e for future reference This instrument has the following documents and instructional materials Owner s Manual this book Explains how to get started with the instrument and how to use main feature Jam function For more detailed information refer to online manual Reference Manual below Reference Manual Online Manual Provides more detailed information To obtain online manual PDF access the Yamaha Dow...

Page 11: ... automatically match the song so you don t have to worry about fingering or even knowing the proper scales and chords You can simply lose yourself in the performance just as if you were jamming with your favorite artist For information on devices that are compatible with Chord Tracker check the Yamaha website Control interface for authentic playing pages 15 22 In addition to a Pitch Bend wheel and...

Page 12: ...ble damage first turn on the power to the instrument then to the external device When turning off the power first turn off the power to the external device then to the instrument 5 AUX IN jack 3 5 mm mini stereo phone For inputting the sound of an audio player and listening to it through the built in speaker of the instrument with 3 5 mm mini stereo phone plug To adjust the input volume from AUX I...

Page 13: ...orks as a value selector for the Function 9 EFFECT selector page 22 For selecting the effect which is applied to the Voice This selector is used in conjunction with the EFFECT CONTROL knob EFFECT CONTROL knob page 22 For setting the value of the effect which is selected by EFFECT selector Turning the knob clockwise increases the depth of the effect MIDI transmission reception Make sure to match th...

Page 14: ...me OCTAVE buttons For shifting the pitch of the keyboard up or down by one octave Pressing simultaneously resets to the default setting The current setting is shown in the display TRANSPOSE buttons For transposing the pitch of the keyboard up or down in semitones Pressing simultaneously resets to the default setting The current setting is shown in the display B A Normally indicates the Voice name ...

Page 15: ...oard Roll the wheel upward to increase the effect depth or downward to minimize it The MODULATION wheel can also be used to control the effect depth in the same way as the EFFECT CONTROL knob if you set it via the Function mode For the operation see the NOTE at the bottom of page 22 A FUNCTION button Enter the Function mode indicator lights The Function mode enables you to set various settings suc...

Page 16: ... as you like CAUTION This strap is designed for use with only this instrument Do not use for any other purpose When using a strap make sure the strap is securely attached to the instrument Do not lift the instrument by the strap Doing so can cause damage to the instrument or injury Never loosen the screws mounting the strap pins Attach the Strap Adjuster SHS 500 bottom Strap pin Strap ...

Page 17: ...ric shock or fire Never touch the metallic section when attaching the plug To avoid electric shock short circuit or damage also be careful that there is no dust between the AC adaptor and plug CAUTION When setting up the product make sure that the AC outlet you are using is easily accessible If some trouble or malfunction occurs immediately turn the power off and disconnect the plug from the outle...

Page 18: ...y occur When this happens make sure to replace all batteries with new ones or already recharged ones NOTE This instrument cannot be used to charge the batteries Use only the specified charger device when charging Power will be automatically drawn from the AC adaptor if an AC adaptor is connected while batteries are installed in the instrument Setting the battery type Depending on the battery type ...

Page 19: ...turning on the power do not attempt any other operations such as pressing the keys Doing so may cause the instrument to malfunction 3 Press and hold the P Standby On switch for about a second to turn the power off CAUTION Even when the power switch is turned off electricity is still flowing to the product at the minimum level When you are not using the product for a long time make sure to unplug t...

Page 20: ...ower on while holding down the lowest key on the keyboard A message AutoOff Disabled appears briefly Enabling Auto Power Off To enable the Auto Power Off function change the setting via the Function mode or initialize the instrument page 32 NOTICE Some of the data of this instrument page 32 are retained when the power is turned off If your instrument is connected to other equipment such as amplifi...

Page 21: ...iano and others NOTE If the FUNCTION button is lit turn it off by pressing the EXIT button since the SELECT knob behavior varies depending on whether the FUNCTION button is lit or not 1 Rotate the SELECT knob You can see the selected Voice name on the display NOTE For a list of the available Voices refer to the Reference Manual Selecting and Playing a Voice ...

Page 22: ...FECT CONTROL knob function can be conveniently assigned to the MODULATION wheel page 15 so that you can enhance or change the effect in real time using the MODULATION wheel with your left hand while playing the keyboard with your right To do this press the FUNCTION button repeatedly to call up the Function menu Modulation in the upper of the display then rotate the SELECT knob to select EfctCtrl i...

Page 23: ... fingering or even knowing the proper scales and chords About the Jam Function J F nc i Jam and perform along with your favorite song Try out the Jam function now and have fun with it it s an amazingly easy way to perform music allowing you to instantly play in any key and in any style Before you dive in though you really should find out more about the various Jam features and operations to get th...

Page 24: ...utton repeatedly until the indicator goes off Playing along with a Demo Song Demo Song TryAcmp1 Recommended Voice 001 SawLead1 Jam mode Backing Jam mode Backing is automatically selected page 30 This mode is ideal for playing backing Play along with the demo song Playing backing along with the demo Before you start out try to feel the rhythm of the song Then play a chord in time with the music You...

Page 25: ...at it adds harmonies to the notes played on the keyboard so that you can play full backing parts with even just one finger Playing backing along with the demo To turn off the Jam function press the JAM button repeatedly until the indicator goes off Tip Watch the display during playback and you will see marks such as C m7 shown in sequence along with song playback These indicate the chords used in ...

Page 26: ...B cable Downloading App Download the free app Chord Tracker iOS Android Chord Tracker free This app corresponds to iOS and Android devices For information on release dates and the latest system requirements see the website below https www yamaha com kbdapps Playing Along with a Favorite Song Download app Connect your keyboard to app via Bluetooth or USB cable Play with app ...

Page 27: ...page 1 Turn the power to the instrument to on 2 Activate the Bluetooth function of the smart device 3 Start the app Chord Tracker and tap the Setting Bluetooth MIDI Device SHS 500 When connection is done successfully Connected is shown All screen captures are from iPhone If the instrument cannot be connected to the app via Bluetooth refer to Troubleshooting on page 33 Check if your keyboard is equ...

Page 28: ...ge the setting of the instrument from Bluetooth to TO HOST terminal Press the FUNCTION button repeatedly to call up the Function menu MIDI Select in the upper of the display then rotate the SELECT knob to select the value USB MIDI in the bottom of the display If you want to connect to the Chord Tracker app with Bluetooth restore the value to BLE MIDI TO HOST USB B USB A 1 2 3 3 2 If the device s c...

Page 29: ... detected chord data on your smart device like below NOTE Chord Tracker can analyze chord data with a high degree of accuracy but in some cases the detected chord progression may differ from that of the original song 3 Turn the Jam function on 4 Select a Jam mode As five Jam modes are provided next page select one matching the style you want to play Pressing the JAM button repeatedly selects modes...

Page 30: ... backing parts even with just one finger An example using a preset demo song is given on page 25 Backing Ideal for playing backing parts An example using a preset demo song is given on page 24 Melody A Ideal for playing the melodies Try these modes in order A B C to find the most suitable one matching the style An example using Melody B with a preset demo song is given on page 25 Melody B Melody C...

Page 31: ...pp on the smart device NOTICE The demo songs will not be played back correctly if you disconnect the Bluetooth or pull out the USB cable without closing the app because this interrupts the link between the app and the instrument NOTE For details on how to use this app refer to the app manual Transpose cannot be used during the Jam mode Using headphones When connected with Bluetooth you may want to...

Page 32: ...ations on items above which have no corresponding page references refer to the online manual Reference Manual NOTICE Backup is executed automatically when the power is turned off When the power is turned off in the following cases backup is not executed Disconnected AC adaptor Power failure Low or no battery power You can initialize the backup data 1 Turn the power of the keyboard off 2 While hold...

Page 33: ...oth Then try connecting again Q The instrument cannot be connected to the app via USB cable A Check that the value of the Function menu MIDI Select is set to USB MIDI as described on page 28 step 3 Then try connect again Q Vibrato is added to the sound A Check that the MODULATION wheel is set to the appropriate position Roll the wheel downward so that the vibrato effect is not added Q MIDI data ca...

Page 34: ...hased the product Refer to page 9 for details Bluetooth Ver 4 0 GATT Comply with Bluetooth Low Energy MIDI Specification Range of transmit frequency 2402 2480 MHz Maximum RF output power E I R P 4 dBm Control Interface Keyboard 37 HQ High Quality Mini Keys Other Controllers PITCH bend wheel MODULATION wheel TRANSPOSE button OCTAVE button RWD button PLAY PAUSE button FF button SUSTAIN button EFFECT...

Page 35: ...recommended by Yamaha Six AA size alkaline LR6 manganese R6 or Ni MH rechargeable HR6 batteries Power Consumption 3W When using PA 130 AC adaptor Auto Power Off Yes Size W x D x H Weight 821 mm x 121 mm x 65 mm 32 5 16 x 4 3 4 x 2 9 16 1 5 kg 3 lb 5 oz not including batteries Included Accessories AC adaptor Strap MIDI breakout cable Owner s Manual Online Member Product Registration May not be incl...

Page 36: ...TROL knob 22 EFFECT selector 22 EXIT button 15 F FILTER 22 FUNCTION button 15 H Headphones 14 31 I Initialization 32 J JAM button 15 Jam function 23 29 Jam modes 30 L LINE OUT jack 12 M MIDI terminal 13 MODULATION wheel 15 O Octave 14 OCTAVE buttons 14 Online manual 10 OTHER 22 P PITCH bend wheel 15 Power requirement 17 R Reference Manual 10 REVERB 22 S SELECT knob 21 Specifications 34 Strap 16 SU...

Page 37: ...tions The speed of signal transfer and the distance at which communication is possible differs according to the distance between the communicating devices the presence of obstacles radio wave conditions and the type of equipment Yamaha does not guarantee all wireless connections between this unit and devices compatible with Bluetooth function For U S A This transmitter must not be co located or op...

Page 38: ...compliance doc html LV Latvian VIENKĀRŠOTA ES ATBILSTĪBAS DEKLARĀCIJA Ar šo Yamaha Music Europe GmbH deklarē ka radioiekārta SHS 500 atbilst Direktīvai 2014 53 ES Pilns ES atbilstības deklarācijas teksts ir pieejams šādā interneta vietnē https europe yamaha com en support compliance doc html LT Lithuanian SUPAPRASTINTA ES ATITIKTIES DEKLARACIJA Aš Yamaha Music Europe GmbH patvirtinu kad radijo įre...

Page 39: ...SHS 500 Owner s Manual 39 ...

Page 40: ... or forgery of proof of purchase documents will cause this warranty to be void This warranty covers only the Original Owner and is not transferable In Order to Obtain Warranty Service Warranty service will only be provided for defective products within the Warranted Area Contact your local authorized Yamaha dealer who will advise you of the procedures to be followed If this is not successful conta...

Page 41: ...herwise arise from inappropriate waste handling For more information about collection and recycling of old products and batteries please contact your local municipality your waste disposal service or the point of sale where you purchased the items For business users in the European Union If you wish to discard electrical and electronic equipment please contact your dealer or supplier for further i...

Page 42: ...42 SHS 500 Owner s Manual MEMO ...

Page 43: ......

Page 44: ...Yamaha Global Site https www yamaha com Yamaha Downloads https download yamaha com Manual Development Group 2018 Yamaha Corporation Published 07 2018 MWES A0 VAF5630 ...

Reviews: