background image

YAMAHA  ELECTRONICS  CORPORATION,  USA

  6660  ORANGETHORPE  AVE.,  BUENA  PARK,  CALIF.  90620,  U.S.A.

YAMAHA  CANADA  MUSIC  LTD.

  135  MILNER  AVE.,  SCARBOROUGH,  ONTARIO  M1S  3R1,  CANADA

YAMAHA  ELECTRONIK  EUROPA  G.m.b.H.

  SIEMENSSTR.  22-34,  25462  RELLINGEN  BEI  HAMBURG,  F.R.  OF  GERMANY

YAMAHA  ELECTRONIQUE FRANCE  S.A.

  RUE  AMBROISE  CROIZAT  BP70  CROISSY-BEAUBOURG  77312  MARNE-LA-VALLEE  CEDEX02,  FRANCE

YAMAHA  ELECTRONICS  (UK)  LTD.

  YAMAHA  HOUSE,  200  RICKMANSWORTH  ROAD  WATFORD,  HERTS  WD1  7JS,  ENGLAND

YAMAHA  SCANDINAVIA  A.B.

  J  A  WETTERGRENS  GATA  1,  BOX  30053,  400  43  VÄSTRA  FRÖLUNDA,  SWEDEN

YAMAHA  MUSIC  AUSTRALIA  PTY,  LTD.

  17-33  MARKET  ST.,  SOUTH  MELBOURNE,  3205  VIC.,  AUSTRALIA

Printed in Malaysia  

      WA69370

RX-V740RDS

GB

OWNER’S MANUAL

MODE D’EMPLOI

BEDIENUNGSANLEITUNG

BRUKSANVISNING

MANUALE DI ISTRUZIONI

MANUAL DE INSTRUCCIONES

GEBRUIKSAANWIJZING

RX-V740RDS

AV Receiver
Ampli-tuner audio-vidéo

TECHNISCHE GEGEVENS

AUDIO GEDEELTE

• Minimum RMS uitgangsvermogen voor hoofd, midden, achter,

midden achter

20 Hz t/m 20 kHz, 0,06% THV, 8 

Ω .....................................

90 W

1 kHz, 0,7% THV, 8 

Ω ........................................................

110 W

• DIN Standaard uitgangsvermogen

[Model voor Europa]
1 kHz, 0,7% THV, 4 

Ω ........................................................

140 W

• IEC uitgangsvermogen

[Modellen voor het V.K., Europa en Singapore]
1 kHz, 0,06% THV, 8 

Ω ......................................................

105 W

• Maximum uitgangsvermogen (EIAJ)

[Modellen voor China, Korea en algemene modellen]
1 kHz, 10% THV, 8 

Ω .........................................................

130 W

• Dynamisch uitgangsvermogen (IHF) 8/6/4/2 

[Modellen voor de VS en Canada] ................. 130/160/190/235 W
[Overige modellen] ......................................... 120/145/185/230 W

• Dempingsfactor

20 Hz t/m 20 kHz, 8 

Ω ................................................

100 of meer

• Frequentierespons

CD naar Hoofd L/R .............................. 10 Hz t/m 100 kHz, –3 dB

• Totale Harmonische Vervorming

20 Hz t/m 20 kHz, 45 W, 8 

, Hoofd L/R ............................ 0,06%

• Signaal-ruis verhouding (IHF-A Netwerk)

PHONO MM naar OUT (REC) (kortgesloten 5 mV)

[Modellen voor de VS, Canada, China, Korea en algemene
modellen] ........................................................................... 86 dB
[Overige modellen] ............................................................ 81 dB

CD (kortgesloten 250 mV) naar Hoofd L/R, Effect uit ...... 100 dB

• Residuele ruis (IHF-A Netwerk)

Hoofd L/R ......................................................... 150 

µ

V of minder

• Kanaalscheiding (1 kHz/10 kHz)

CD (5,1 k

 getermineerd) naar Hoofd L/R .............. 60 dB/45 dB

• Toonregeling (Hoofd L/R)

BASS versterking/verzwakking .............................. ±10 dB/50 Hz
TREBLE versterking/verzwakking ....................... ±10 dB/20 kHz

• Uitgangsvermogen hoofdtelefoon ............................. 150 mV/100 

• Ingangsgevoeligheid

CD, etc .................................................................... 150 mV/47 k

6CH INPUT ............................................................ 150 mV/47 k

• Uitgangsniveau

OUT (REC) ........................................................... 150 mV/1,2 k

OUTPUT MAIN/CENTER/REAR CENTER/

REAR (SURROUND) ............................................ 2,4 V/1,2 k

OUTPUT SUBWOOFER ............................................. 4 V/1,2 k

ZONE 2 [modellen voor de VS, Canada en Australië]

............................................................................ 150 mV/1,5 k

VIDEO GEDEELTE

• Videosignaal-type ....................................................... NTSC of PAL

• Signaal-ruis verhouding .......................................................... 50 dB

• Frequentierespons (MONITOR OUT)

Composiet, S-Video ............................... 5 Hz t/m 10 MHz, –3 dB
Component ............................................. 5 Hz t/m 30 MHz, –3 dB

FM GEDEELTE

• Afstembereik

[Modellen voor de VS en Canada] ................ 87,5 t/m 107,9 MHz
[Overige modellen] .................................... 87,50 t/m 108,00 MHz

• 50 dB Rustgevoeligheid (IHF, 100% mod.)

Mono/Stereo ........................ 2,0 

µ

V (17,3 dBf) /25 

µ

V (39,2 dBf)

• Bruikbare gevoeligheid (IHF, mono) .................... 1,0 

µ

V (11,2 dBf)

• Signaal-ruis verhouding (IHF)

Mono/Stereo .............................................................. 76 dB/70 dB

• Harmonische vervorming (1 kHz)

Mono/Stereo ................................................................. 0,2%/0,3%

• Stereoscheiding (1 kHz) .......................................................... 42 dB

• Frequentierespons ............................. 20 Hz t/m 15 kHz +0,5, –2 dB

AM GEDEELTE

• Afstembereik ........................................ 530/531 t/m 1710/1611 kHz

• Bruikbare gevoeligheid .................................................... 300 

µ

V/m

ALGEMEEN

• Stroomvoorziening

[Modellen voor de VS en Canada] ...... 120 V wisselstroom/60 Hz
[Model voor Australië] ........................ 240 V wisselstroom/50 Hz
[Modellen voor het V.K., Europa en Singapore]

.......................................................... 230 V wisselstroom/50 Hz

[Model voor Korea] ............................. 220 V wisselstroom/60 Hz
[Modellen voor China en algemene modellen]

............................... 110/120/220/240 V wisselstroom, 50/60 Hz

• Stroomverbruik

[Modellen voor de VS en Canada] ......................... 320 W/420 VA
[Overige modellen] .............................................................. 320 W
Standby-stand ........................................................ ongeveer 0,9 W

• Netstroom-aansluitingen

[Modellen voor de VS, Canada, Europa en Singapore]

......................................................... 2 (maximum totaal 100 W)

[Modellen voor China en algemene modellen]

........................................................... 2 (maximum totaal 50 W)

[Modellen voor het V.K. en Australië] .......... 1 (maximum 100 W)

• Afmetingen (b x h x d) ..................................... 435 x 171 x 390 mm

• Gewicht .................................................................................. 13,0 kg

* Technische gegevens kunnen zonder voorafgaande kennisgeving

gewijzigd worden.

0100RX-V740_cv-GB.p65

03.2.10, 9:45 AM

1

Summary of Contents for RX-V740RDS

Page 1: ...GB OWNER S MANUAL MODE D EMPLOI BEDIENUNGSANLEITUNG BRUKSANVISNING MANUALE DI ISTRUZIONI MANUAL DE INSTRUCCIONES GEBRUIKSAANWIJZING RX V740RDS AV Receiver Ampli tuner audio vidéo ...

Page 2: ...this unit with a voltage other than specified 13 To prevent damage by lightning disconnect the power cord from the wall outlet during an electrical storm 14 Do not attempt to modify or fix this unit Contact qualifiedYAMAHA service personnel when any service is needed The cabinet should never be opened for any reasons CAUTION READ THIS BEFORE OPERATING YOUR UNIT 15 When not planning to use this uni...

Page 3: ...ER LEVELS 53 Adjusting the volume during playback 53 Using the test tone 53 PREPARATION CONNECTIONS 9 Before connecting components 9 Connecting video components 10 Connecting audio components 12 Connecting the antennas 13 Connecting an external amplifier 14 Connecting an external decoder 14 Connecting the speakers 15 Connecting the power supply cords 18 Turning on the power 18 ON SCREEN DISPLAY OS...

Page 4: ...Main 90 W 90 W Center 90 W Rear 90 W 90 W Rear center 90 W Multi mode digital sound field processing Dolby Pro Logic Dolby Pro Logic II decoder Dolby Digital Dolby Digital EX decoder DTS DTS ES Matrix 6 1 Discrete 6 1 DTS Neo 6 Decoder CINEMA DSP Combination of YAMAHA DSP technology and Dolby Pro Logic Dolby Digital or DTS Virtual CINEMA DSP SILENT CINEMA DSP Sophisticated AM FM Tuner 40 Station r...

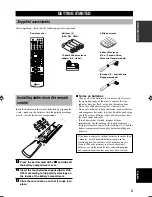
Page 5: ...into contact with clothing etc Clean the battery compartment thoroughly before installing new batteries If the remote control is without batteries for more than 2 minutes or if exhausted batteries remain in the remote control the contents of the memory may be cleared When the memory is cleared insert new batteries set up the manufacturer code and program any acquired functions that may have been c...

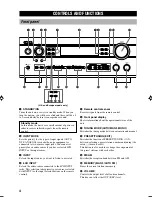
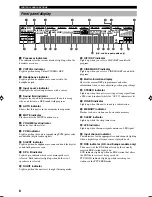
Page 6: ...ives signals from the remote control 6 Front panel display Shows information about the operational status of the unit 7 TUNING MODE AUTO MAN L MONO Switches the tuning mode between automatic and manual 8 PRESET TUNING EDIT Switches the function of PRESET TUNING l h between selecting a preset station number and tuning the colon turns on or off This button is also used to exchange the assignment of ...

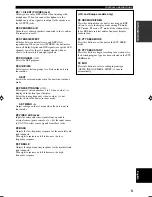
Page 7: ...er mode SET MENU Adjust settings on the set menu when the unit is not in tuner mode i VIDEO AUX jacks Inputs for audio and video signals from a portable external source game console etc Set the input source to V AUX to select source signals from these jacks o BASS Adjusts the low frequency response for the main left and right channels Turn right to increase or left to decrease the low frequency re...

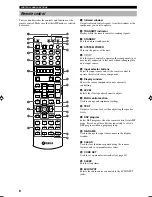
Page 8: ...not necessarily connected to this unit without changing this unit s input source 6 Input selector buttons Select the input source and set the remote control to operate the selected source component 7 Display window Shows the source component you are currently controlling 8 LEVEL Selects the effect speaker channel to adjust 9 Multi control section Used to change and implement settings 0 TEST Output...

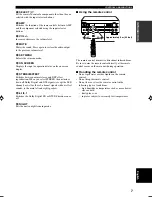
Page 9: ...s to the main left and right speakers f 6 1 5 1 Switches the Dolby Digital EX or DTS ES decoder on or off g NIGHT Sets the unit in night listening mode Using the remote control The remote control transmits a directional infrared beam Be sure to aim the remote control directly at the remote control sensor on the main unit during operation Handling the remote control Do not spill water or other liqu...

Page 10: ... main speakers is selected Both indicators light up when both sets of speakers are selected w NIGHT indicator Lights up when the unit is set to night listening mode e HiFi DSP indicator Lights up when you select a Hi Fi DSP sound field program r CINEMA DSP indicator Lights up when you select a CINEMA DSP sound field program t Multi information display Shows the current DSP program name and other i...

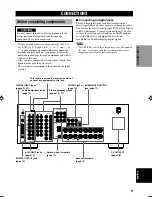
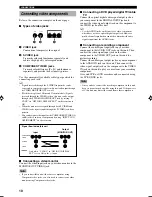
Page 11: ...mponent you wish to connect to this unit After you have completed all connections check them again to make sure they are correct The jack names correspond to the names on the input selector Connecting to digital jacks This unit has digital jacks for direct transmission of digital signals through either coaxial or fiber optic cables You can use the digital jacks to input PCM Dolby Digital and DTS b...

Page 12: ...cks you also need to connect your video monitor using Component video jacks Connecting a DVD player digital TV cable TV Connect the optical digital audio signal output jack on your component to the DIGITAL INPUT jack and connect the video signal output jack on the component to the VIDEO jack on this unit y Use the AUDIO jacks on this unit for a video component which does not have optical digital o...

Page 13: ...EO AUDIO AUDIO 1 2 3 4 5 MD CD R MD CD R DVD D TV CBL OPTICAL OPTICAL COAXIAL VCR 1 OUT IN MONITOR OUT OUT VCR 2 DVR IN DVD D TV CBL MD CD R OUT REC IN PLAY SURROUND MAIN CD CD S VIDEO VIDEO S VIDEO VIDEO R L TUNER 75Ω UNBAL FM ANT GND AM ANT R L REAR CENTE REAR SURROUND MAIN OUTPUT PR DVD A PB Y COMPORNENT VIDEO D TV CBL B MONITOR OUT AUDIO OUTPUT AUDIO INPUT L R L R VIDEO INPUT VIDEO OUTPUT O OP...

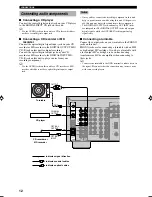
Page 14: ...TAL INPUT MD CD R jack on this unit to play a source from your recording component y Use the AUDIO jacks on this unit for a CD recorder or MD recorder which does not have optical digital input or output jack indicates signal direction Turntable CD player Notes Once you have connected a recording component to this unit keep its power turned on while using this unit If the power is off this unit may...

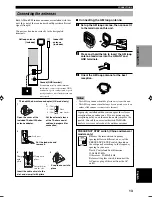
Page 15: ...area North Central and South America 100 kHz 10 kHz Other areas 50 kHz 9 kHz Before setting this switch disconnect the AC power plug of this unit from the AC outlet 100kHz 10kHz FREQUENCY STEP 50kHz 9kHz FM AM Ground GND terminal For maximum safety and minimum interference connect the antenna GND terminal to a good earth ground A good earth ground is a metal stake driven into moist earth Indoor FM...

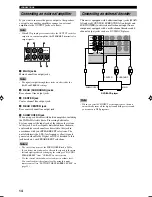
Page 16: ...requency effect signals generated when Dolby Digital or DTS is decoded to this jack based on your SPEAKER SET selections Notes The cut off frequency of the SUBWOOFER jack is 90 Hz If you do not use a subwoofer allocate the signals to the main left and right speakers by changing the settings of SOUND 1 SPEAKER SET item 1E BASS on the set menu Use the control on the subwoofer to adjust its volume le...

Page 17: ... field quality with a 6 speaker system using main left and right speakers rear left and right speakers a center speaker and a rear center speaker If you use different brands of speakers with different tonal qualities in your system the tone of a moving human voice and other types of sound may not shift smoothly We recommend that you use speakers from the same manufacturer or speakers with the same...

Page 18: ...banana plug connector into the end of the corresponding terminal 1 2 MAIN CENTER REAR CENTER REAR A OR B A B 4ΩMIN 8ΩMIN 6ΩMIN 6ΩMIN 6ΩMIN SPEAKER SPEAKER SPEAKER SPEAKER SPEAKER IMPEDANCE SELECTOR SET BEFORE POWER ON MAIN CENTER REAR CENTER REAR A OR B A B 8ΩMIN 16ΩMIN 8ΩMIN 8ΩMIN 8ΩMIN SPEAKER SPEAKER SPEAKER SPEAKER SPEAKER IMPEDANCE SELECTOR switch WARNING Do not change setting of the IMPEDANC...

Page 19: ... unit will direct low bass signals distributed from the main center and or rear channels to this jack in accordance with your SPEAKER SET selections The LFE low frequency effect signals generated when Dolby Digital or DTS is decoded are also directed to this jack in accordance with your SPEAKER SET selections Notes The cut off frequency of the SUBWOOFER jack is 90 Hz If you do not use a subwoofer ...

Page 20: ...50 60 Hz VOLTAGE SELECTOR Turning on the power When all connections are complete turn on the power of this unit 1 Press STANDBY ON SYSTEM POWER on the remote control to turn on the power of this unit The level of the main volume and then the current DSP program name appear on the front panel display STANDBY ON POWER SYSTEM or Remote control Front panel General model REAR CENTER AC OUTLETS SWITCHED...

Page 21: ...een in the same format as on the front panel display The set menu and test tone display appear regardless of the OSD mode Full display Short display Selecting the OSD mode 1 Turn on the video monitor connected to this unit 2 Press AMP to set the remote control in AMP mode Check that AMP is showing in the display on the remote control 3 Press ON SCREEN on the remote control repeatedly to change the...

Page 22: ...to change the display to the setting you want to alter SETUP Changes the speaker and amplifier settings to suit the size of the room you are using Refer to Setting the unit to match your speaker system for more information SP LEVEL Adjusts the output levels of the speakers Refer to Setting speaker output levels for more information 5 Press j i to enter the desired setting mode 6 Change the unit se...

Page 23: ...r of YES NO 1 L R Adjust the balance between the main left and right speakers 2 C Adjust the balance between the main left and center speakers 3 RL Adjust the balance between the main left and rear left speakers 4 RC Adjust the balance between the rear left and rear center speakers 5 RR Adjust the balance between the rear left and rear right speakers NO SET YES CANCEL BASIC SYSTEM SETTINGS After a...

Page 24: ... the test tone varies between speakers press j i to change the display to NO The unit will automatically enter the 2 SP LEVEL mode If the test tone is output at the same volume from all of the speakers select CHECK OK YES The unit will exit from the SETUP menu Notes The unit cycles the test tone around each of the speakers in turn twice The indicator of the speaker currently outputting the test to...

Page 25: ... panel display or or Remote control Remote control Front panel Front panel Selected input source Remote control Front panel or INPUT AUTO MANUAL MONO MAN L AUTO FM TUNING MODE MEMORY EDIT PRESET TUNING FM AM OPTICAL R AUDIO L VIDEO S VIDEO EFFECT PRESET TUNING A B C D E SET MENU NEXT PROGRAM STEREO SPEAKERS B A 6CH INPUT INPUT MODE SILENT PHONES TREBLE VOLUME BASS VIDEO AUX STANDBY ON 1 6 4 6 4 7 ...

Page 26: ...e remote control to set this unit in standby mode 5 Start playback or select a broadcast station on the source component Refer to the operation instructions for the component 6 Adjust the volume to the desired level The volume level is displayed digitally Example 70 dB Control range VOLUME MUTE minimum to 0 dB maximum The volume level indicator also shows the current volume level as a bar graph If...

Page 27: ...ency greater than 48 kHz is input to this unit You cannot use any DSP programs The unit will output sound as 2 channel stereo from the main left and right speakers only Therefore you cannot adjust the level of the effect speakers while listening to such a source Notes on playing DTS CD LDs If the digital output data of the player has been processed in any way the unit may not be able to perform DT...

Page 28: ... when the input mode is set to AUTO the DSP program No 7 9 automatically switches to the appropriate decoding program When the unit is reproducing a monaural source with PRO LOGIC or PRO LOGIC Enhanced or PRO LOGIC II Movie no sound is output from the main and rear speakers Sound can only be heard from the center speaker If 1A CENTER on the set menu is set to NON the center channel sound is output...

Page 29: ... sound 6 1 channel playback is not possible even if you press 6 1 5 1 in the following cases 1 When 1C REAR LR is set to NON 2 When effects are turned off 3 When the source connected to the 6CH INPUT jack is being played 4 When the unit is reproducing a Dolby Digital KARAOKE source 5 When headphones are connected to the PHONES jack The input mode resets to AUTO when you turn the unit power off Sel...

Page 30: ...causes this unit to automatically switch to the appropriate decoder for playback Virtual CINEMA DSP With Virtual CINEMA DSP you can enjoy all DSP programs without rear speakers It creates virtual speakers to reproduce a natural sound field You can listen to virtual CINEMA DSP by setting 1C REAR LR in the set menu to NON Sound field processing changes to VIRTUAL CINEMA DSP automatically Note This u...

Page 31: ...s the strength and delay time of the signals output from the four effect speakers to localize the virtual sound sources and fully encompass the listener Hi Fi DSP programs The following list gives you a brief description of the sound fields produced by each of the DSP programs Keep in mind that most of these are precise digital recreations of actual acoustic environments No 1 2 3 4 Program CONCERT...

Page 32: ...coder for Dolby Surround sources Dolby Pro Logic II decoder for Dolby Surround and 2 channel sources Dolby Digital DTS decoder for multi channel sources and Dolby Digital EX or DTS ES decoder for adding a rear center channel You can select CINEMA DSP programs to optimize these decoders and the DSP sound patterns depending on the input source CINEMA DSP Programs The following list gives you a brief...

Page 33: ...oward the screen restraining the echo effect of conversations without losing clarity The built in decoder reproduces source sounds and sound effects precisely No DSP effect is applied in this program This program ideally simulates the multi surround speaker systems of the 35 mm film theaters Dolby Pro Logic decoding Dolby Digital decoding or DTS decoding and digital sound field processing create p...

Page 34: ...ed movie theater without sacrificing the clear separation of all channels Dolby Digital EX DTS ES DSP sound field effect These programs provide you with the maximum experience of the spacious surround effects by adding an extra rear center DSP sound field created from the rear center channel Dolby Pro Logic DSP sound field effect Most movie material has 4 channel left center right and surround sou...

Page 35: ...ective when station signals are strong and there is no interference Automatic tuning 1 Rotate the INPUT selector or press TUNER on the remote control to select TUNER as the input source 2 Press FM AM to select the reception band FM or AM appears on the front panel display 3 Press TUNING MODE AUTO MAN L MONO so that the AUTO indicator lights up on the front panel display If the colon appears on the...

Page 36: ... tuning If the station you want to store is weak in signal strength tune in to it manually in the monaural mode and store it by following the procedure described in Manually presetting stations Automatic preset tuning options You can select the preset number from which this unit will store FM stations and or begin tuning toward lower frequencies After pressing MEMORY in step 3 1 Press A B C D E an...

Page 37: ...instructions When tuned to a station the front panel display shows the frequency of the station received 2 Press MEMORY MAN L AUTO FM The MEMORY indicator flashes for about 5 seconds 3 Press A B C D E repeatedly to select a preset station group A to E while the MEMORY indicator is flashing The group letter appears Check that the colon is showing on the front panel display Flashes TUNING Preset gro...

Page 38: ...hange of stations has been completed Front panel Remote control or Front panel Remote control or TUNING INPUT AUTO MANUAL MONO MAN L AUTO FM TUNING MODE MEMORY EDIT PRESET TUNING FM AM OPTICAL R AUDIO L VIDEO S VIDEO EFFECT PRESET TUNING A B C D E PROGRAM STEREO SPEAKERS B A 6CH INPUT INPUT MODE SILENT PHONES TREBLE VOLUME BASS VIDEO AUX STANDBY ON SET MENU NEXT 2 1 TV INPUT SET MENU A B C D E LEV...

Page 39: ...ress this button prior to this This is because this unit has not finished receiving all of the RDS data on the station RDS data not offered by the station cannot be selected This unit cannot utilize the RDS data service if the signal received is not strong enough In particular the RT mode requires a large amount of data so it is possible that the RT mode may not be displayed even if other RDS mode...

Page 40: ...AIRS or SPORT the unit automatically searches for all preset RDS stations that are scheduled to broadcast a program of the required type and switches from the station being currently received to the new station when the broadcasts starts Note This function can only be used when an RDS station that offers the EON data service is being received When the unit is tuned to such a station the EON indica...

Page 41: ...OUTLET S The sleep timer can only be set with the remote control y By connecting a commercially available timer to this unit you can also set a wake up timer Refer to the operation instructions of the timer Setting the sleep timer 1 Select a source and start playback on the source component 2 Press SLEEP repeatedly to set the amount of time Each time you press SLEEP the front panel display changes...

Page 42: ...L INPUT jacks Check the copyright laws in your country if you wish to record from records CDs radio etc Recording of copyrighted material may infringe copyright laws If you playback a video source that uses scrambled or encoded signals to prevent it from being dubbed the picture itself may be disturbed due to those signals Special considerations when recording DTS material The DTS signal is a digi...

Page 43: ...xplanation 1 SETUP 2 SP LEVEL Speaker level SOUND The SOUND area contains parameters for altering sound output It consists of the following menus that you can use to alter the quality and tone of the sound output by the system 1 SPEAKER SET 2 SP DISTANCE Speaker distance 3 LFE LEVEL Low frequency effect level 4 D RANGE Dynamic range 5 CENTER GEQ Center graphic equalizer 6 HP TONE CTRL Headphone to...

Page 44: ...ccidentally enter the BASIC 1 SETUP menu select CANCEL to return to the BASIC menu page 21 TV VOL PRESET PRESET TV MUTE TV VOL SELECT CH CH TV VOL PRESET PRESET TV MUTE TV VOL SELECT CH CH TV VOL PRESET PRESET TV MUTE TV VOL SELECT CH CH SOUND 1 SPEAKER SET speaker mode settings Use this feature to select suitable output modes for your speaker configuration Note Some menu item settings have no eff...

Page 45: ...es LRG large SML small NON none LRG Select this if you have a large rear center speaker The unit directs the entire range of the rear center channel signal to the rear center speaker SML Select this if you have a small rear center speaker The unit directs the low frequency signals 90 Hz and below of the rear center channel to the speakers selected with 1E BASS NON Select this if you do not have a ...

Page 46: ...g by meters Control range 0 3 to 24 00 m for main L R center rear L R rear center Initial settings 3 00 m for main L R center rear L R 2 10 m for rear center Setting by feet Control range 1 to 80 ft for main L R center rear L R rear center Initial settings 10 0 ft for main L R center rear L R 7 0 ft for rear center Note No delay will be set if you set the same distance for the main L R and center ...

Page 47: ...o 3 TRBL treble 6 to 3 Initial setting BASS 0 dB TRBL 0 dB INPUT 1 I O ASSIGN input output assignment You can assign jacks according to the component to be used if this unit s COMPONENT VIDEO input jack or DIGITAL INPUT OUTPUT jack settings component names for jacks differ from those of the component This lets you to change the jack assignment and effectively connect more components Once assigned ...

Page 48: ...te signals to S video signals OFF Select OFF to stop the conversion of composite signals to S video signals INPUT 2 INPUT MODE initial input mode Use this feature to designate the input mode for sources connected to the DIGITAL INPUT jacks when you turn this unit on see page 25 for details about the input mode Choices AUTO LAST AUTO Select this setting to allow the unit to automatically detect the...

Page 49: ... sound output by 50dB 20dB Reduces the volume of the present sound output by 20dB OPTION 4 ZONE SET SP B speaker B set Use this feature to select the location of the main speakers connected to the SPEAKERS B terminals Choices MAIN ZONE B MAIN Select this to turn on off SPEAKERS A and B when the speakers connected to the SPEAKERS B terminals are set in the main room ZONE B Select this if the speake...

Page 50: ... POWER TV AMP REC AUDIO VOL TV INPUT SET MENU A B C D E LEVEL TITLE TV VOL TV VOL TV MUTE SELECT MENU MUTE CH TEST ON SCREEN STEREO EFFECT DISPLAY RETURN CH PRESET PRESET HALL JAZZ CLUB ROCK CONCERT ENTER TAINMENT MUSIC VIDEO TV THEATER MOVIE THEATER 1 MOVIE THEATER 2 DTS SUR 1 2 3 4 5 6 7 8 9 10 11 12 NIGHT 6 1 5 1 0 CHP INDEX 10 POWER AV DISC SKIP TRANSMIT RE NAME CLEAR CODE SET SYSTEM POWER STA...

Page 51: ...ing for Amplifier library is YPC You cannot assign Amplifier library to any of the input selector buttons or Å ı Ç Notes If the manufacturer of your component has more than one code try each of them until you find the correct one Check to see if the selected code works in step 4 If you wait for more than 30 seconds during step 3 the setup process cancels If this happens start again from step 2 Set...

Page 52: ...window on the remote control if you want to use a different name than the factory preset This is useful when you have set the input selector buttons to control different components 1 Press an input selector button or Å ı Ç to select the source component to rename The selected component name appears in the display window 2 Press RE NAME using a ballpoint pen or similar object DISC SKIP POWER TV AMP...

Page 53: ... to the default factory settings L component name Clears setup manufacturer code for the component control Clearing renamed source names and setup manufacturer codes 1 Press an input selector button or Å ı Ç to select the component control for which you want to clear the name function or manufacturer code 2 Press CLEAR using a ballpoint pen or similar object Note If you do not press any button wit...

Page 54: ...FEATURES 1 TV POWER 2 REC DISC SKIP 3 w y t d a 4 e 5 TITLE TV INPUT 6 TV VOL u TV VOL d CH i CH j TV MUTE SELECT 7 RETURN 8 1 11 9 AV POWER 0 AUDIO q r w MENU A B C D E e DISPLAY r 12 CHP INDEX DVD player 2 TV power Disc skip Play Skip forward Skip backward Pause Stop Search backward Title Up Down Right Left Select Return Numeric buttons 1 Power Audio Search forward Menu Display Title Index VCR 2...

Page 55: ...e SETTING THE SPEAKER LEVELS Adjusting the volume during playback You can adjust the volume of the speakers while listening to sound playback 1 Press AMP to set the remote control in AMP mode Check that AMP is showing on the remote control display 2 Press LEVEL repeatedly to select the speaker you want to adjust The unit cycles through the speakers in the following order each time you press LEVEL ...

Page 56: ...ance floor or virtually any size room at all This ability to create sound fields at will is exactly what YAMAHA has done with the digital sound field processor Sound field program parameters DSP programs consist of some parameters to determine the apparent room size reverberation time distance from you to the performer etc In each program these parameters are set with values precisely calculated b...

Page 57: ...rameters Although you do not have to change the initial settings you can change some of the parameters to better suit the input source or your listening room Use the remote control to make adjustments y It is advisable to use on screen display when changing the settings 1 Press AMP to set the remote control in AMP mode 2 Turn on the video monitor and press ON SCREEN repeatedly to select the full d...

Page 58: ...adjust the values of certain digital sound field parameters so the sound fields are recreated accurately in your listening room Not all of the following parameters are found in every program DSP LEVEL Function This parameter adjusts the level of all the DSP effect sounds within a narrow range Description Depending on the acoustics of your listening room you may want to increase or decrease the DSP...

Page 59: ... center room size Function This parameter adjusts the apparent size of the rear center sound field Control range 0 1 to 2 0 RC LIVENESS Rear center liveness Function This parameter adjusts the apparent reflectivity of the virtual wall in the rear center sound field Control range 0 to 10 10 0 Large reflected sound Small reflected sound Sound source Live Time Time Time Dead Sound source Level Level ...

Page 60: ...ion sound begins A later reverberation sound give the impression of being in a larger acoustic environment Control range 0 to 250 msec 5 0 s 1 0 s Sound source REV TIME REV TIME REV TIME Early reflections Reverberation Sound source Reverberation REV TIME Reverberation time Function This parameter adjusts the amount of time it takes for the reverberation sound to decay by 60 dB at 1 kHz This change...

Page 61: ... either towards the front or towards the rear Control range 3 towards the rear to 3 towards the front initial setting is STD standard CT WIDTH Center width Function Adjusts the center image from all three front speakers to varying degrees A larger value adjusts the center image towards the main left and right speakers Control range 0 center channel sound is output only from center speaker to 7 cen...

Page 62: ...e The main speakers have not been selected properly The volume is turned down The sound is muted Digital signals which this unit cannot reproduce are being received from a source component e g a CD ROM The output and input for the picture are connected to different types of video jacks Remedy Connect the power cord firmly Set the switch fully to the left or right position when this unit is in stan...

Page 63: ...MAIN when a Dolby Digital or DTS signal is being played SOUND 1E BASS on the set menu is set to SWFR or MAIN when a 2 channel source is being played The source does not contain low bass signals 90 Hz and below SOUND 1E BASS on the set menu is set to SWFR or BOTH and your system does not include a subwoofer The speaker mode settings main center rear or rear center on the set menu does not match you...

Page 64: ...re is no source component connected to the DIGITAL INPUT jacks of this unit OPTION 2 MEM GUARD in the set menu is set to ON The internal microcomputer has been frozen by an external electric shock such as lightning or excessive static electricity or by a power supply with low voltage The speaker cables are short circuited This unit is too close to the digital or high frequency equipment The intern...

Page 65: ... antenna Use the manual tuning method Adjust the antenna position to eliminate multipath interference Use a high quality directional FM antenna Use the manual tuning method Re store the stations Tighten the AM loop antenna connections and orient it for best reception Use the manual tuning method Use an outdoor antenna and a ground wire This will help somewhat but it is difficult to eliminate all n...

Page 66: ...hannel and 2 rear left and right channels instead of only 1 rear channel for conventional Pro Logic technology A music mode is also available for 2 channel sources in addition to the movie mode DTS Digital Theater Systems Digital Surround DTS digital surround was developed to replace the analog soundtracks of movies with a 6 channel digital sound track and is now rapidly gaining popularity in movi...

Page 67: ... range of rates that can be played back is determined based on the sampling rate while the dynamic range representing the sound level difference is determined by the number of quantized bits In principle the higher the sampling frequency the wider the range of frequencies that can be played back and the higher the number of quantized bits the more finely the sound level can be reproduced S video s...

Page 68: ...R SURROUND 2 4 V 1 2 kΩ OUTPUT SUBWOOFER 4 V 1 2 kΩ ZONE 2 U S A Canada and Australia models 150 mV 1 5 kΩ VIDEO SECTION Video Signal Type NTSC or PAL Signal to Noise Ratio 50 dB Frequency Response MONITOR OUT Composite S Video 5 Hz to 10 MHz 3 dB Component 5 Hz to 30 MHz 3 dB FM SECTION Tuning Range U S A and Canada models 87 5 to 107 9 MHz Other models 87 50 to 108 00 MHz 50 dB Quieting Sensitiv...

Reviews: