background image

CONNECTIONS

Setting up the speaker parameters automatically (YPAO)

 En

 45

Reviewing automatic setup 
parameters

The results of automatic acoustics measurement can be 
reviewed once measurement is complete.

1

Press 

i

Cursor


B

 / 

C

 repeatedly to select 

“Result” and press 

i

ENTER

 immediately 

after the automatic measurement.

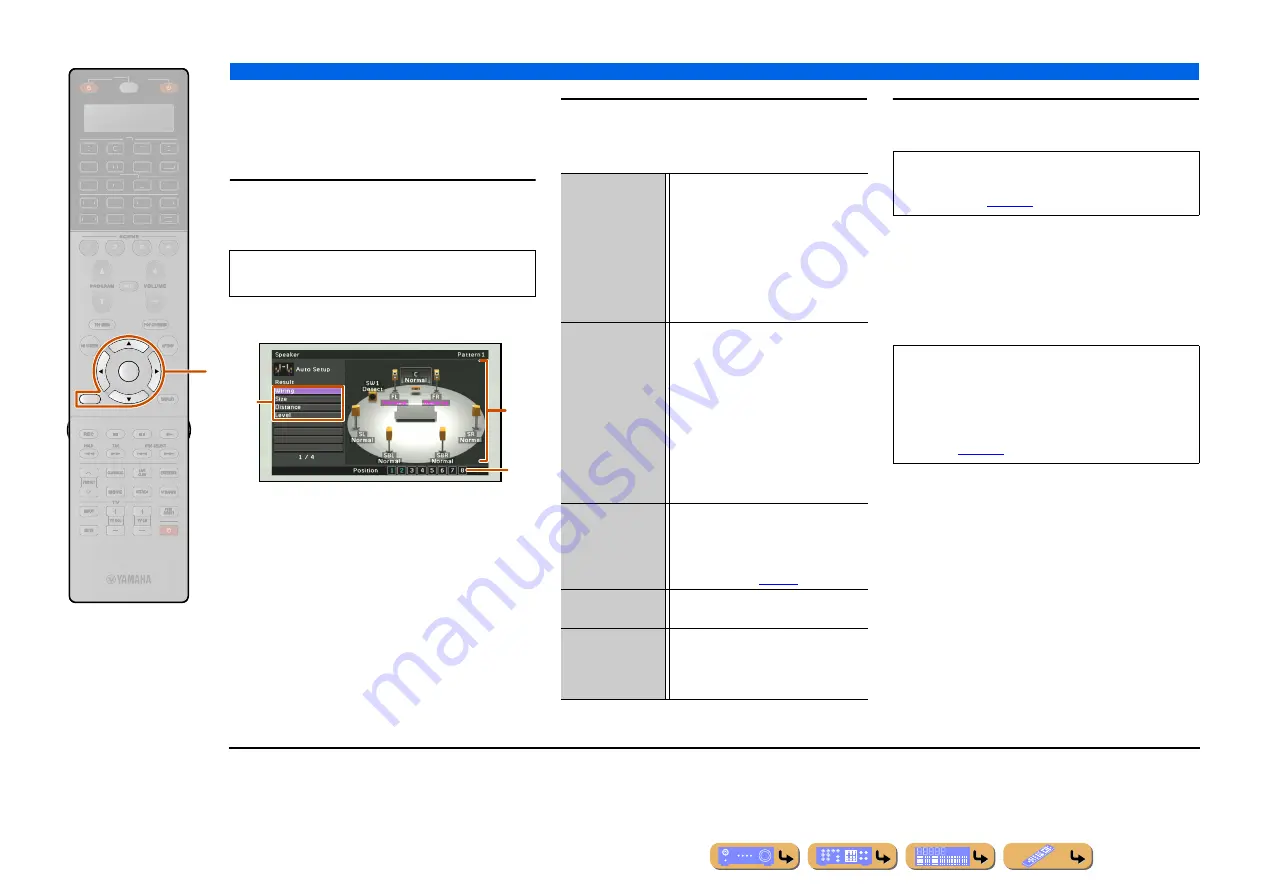
The results of acoustics measurement are displayed.

a

List of menu items

Menu items available in the Result menu are displayed.

b

Number of measurement

Indicates the number of measurements for multiple 
listening positions.

c

Diagram

Shows the speaker setup and sound adjustment as diagram.

2

Select the desired menu item (or enable a 
function) using 

i

Cursor


B

 / 

C

 / 

D

 / 

E

 and 

i

ENTER

.

3

Press 

i

RETURN

 to finish the Result menu.

Reloading automatic setup 
parameters

If you are not satisfied with the fine-adjustment of setup 
parameters with Manual Setup, the result of automatic 
setup saved on this unit can be reloaded. Select “Setup 
Reload” in the Result menu.

RETURN

ENTER

SOURCE

RECEIVER

AV

AUDIO

4

3

1

2

7

5

6

V-AUX

4

3

1

2

USB

MULTI

NET

PHONO

TUNER

DOCK

SIRIUS

[ A ]

i

The Result menu can be viewed only when the 
automatic measurement is performed.

a

b

c

Wiring

Displays the speakers connected to this 

unit and the polarity of each connected 

speaker.

“Normal” is displayed when the 

polarity of the connected speaker is 

normal.

“Reverse” is displayed when the 

polarity of the connected speaker is 

opposite.

Size

Displays the size of the connected 

speakers and the bass cross over 

frequency (“Bass Crossover”).

“Large” is displayed when the 

connected speaker has the ability to 

reproduce the low-frequency signals 

effectively.

“Small” is displayed when the 

connected speaker does not have the 

ability to reproduce the low-frequency 

signals effectively.

Distance

Displays the distance from the listening 

position to speakers. The unit for distance 

can be switched between “ft” (feet) and 

“m” (meter) by pressing 

i

Cursor


D

 / 

E

 (

p. 114

).

Level

Displays the result of the adjustment of 

each connected speaker output level.

Setup Reload

J

1

Clears the fine-adjustment with Manual 

Setup and reloads the result of automatic 

setup. For details, refer to “Reloading 

automatic setup parameters.

The result of automatic setup can be fine-tuned 
manually by “Manual Setup.” Refer to “Manual 
speaker setup” (

p. 111

) for details.

NOTE

When automatic setup parameters are reloaded, 
manually configured settings are cleared. To avoid 
clearing manually configured settings by reloading 
automatic setup parameters, see “Prohibiting setting 
changes” (

p. 126

).

J

1 :

This item is displayed after the fine-adjustment is performed with 
“Manual Setup.” Use this item to return the settings to the result 
of automatic setup.

Summary of Contents for RX-A2000

Page 1: ...Owner s Manual AV Receiver English for U S A ...

Page 2: ... 4 3 1 2 7 5 6 V AUX 4 3 1 2 USB MULTI NET PHONO TUNER DOCK SIRIUS A h i Some features are not available in certain regions This manual is created prior to production Design and specifications are subject to change in part as a result of improvements etc In case of differences between the manual and product the product has priority hON SCREEN example indicates the name of the parts on the remote c...

Page 3: ...nprocessed playback Straight decoding mode 52 Enjoying Hi Fi Sound Quality Pure Direct Mode 53 Enjoying stereo playback 53 Enjoying compressed music source with better sound quality Compressed Music Enhancer 53 Sound programs 54 Using the TV display to control this unit 56 Basic operations via the TV screen display 56 Configuring settings specific to an individual input source Option menu 58 Optio...

Page 4: ...nguage 126 Confirming information of this unit Information menu 127 Selecting information 127 Controlling the remote control to operate various functions 129 Keys connecting external components 129 Customizing the remote control 130 Setting remote control codes 130 Programming from other remote controls 132 Changing source names in the display window 134 Macro programming features 135 Clearing con...

Page 5: ...variety of sources Spatial sound playback with sound field effects CINEMA DSP 51 Playback with no sound field effects straight decoding 52 High fidelity sound playback Pure Direct 53 Enhanced sound playback for compressed sources Compressed Music Enhancer 53 Tuner playback FM AM broadcast 63 HD Radio digital broadcast 66 SIRIUS Satellite Radio broadcast 70 Playback and control via network Playback...

Page 6: ...ection 91 Perform operations such as play stop and pause using the TV screen Menu browse control 91 Configuring settings for this unit ON SCREEN menu Configure an input source Change the input source name Rename Icon Select 99 Specify a format for digital audio signals Decoder Mode 100 Enhance the sound of compressed audio Enhancer 100 Output a video signal input from another input source while pl...

Page 7: ...udio Output 120 Network settings Specify this unit s IP address IP Address 121 Accept the commands over a LAN network when this unit is in the standby mode Network Standby 121 Specify the mac address filter for this unit MAC Address Filter 121 Enable listening in multiple rooms multi zone function Adjust Zone2 Zone3 volume Zone2 Set Zone3 Set 122 Display the Zone2 Zone3 menu on the TV Monitor Out ...

Page 8: ...00 This indicator also lights up when the Yamaha Wireless System for iPod is connected to this unit p 92 c Front panel display Displays information on this unit p 11 d PURE DIRECT Switches this unit to Pure Direct Mode p 53 e INPUT selector Selects an input source from which to playback Rotate this selector to cycle through the input sources in order f VOLUME Adjusts the volume level Part names an...

Page 9: ...amplifier for speakers in another room p 149 n INFO Changes the information displayed on the front panel display p 11 o MEMORY Registers FM AM stations as preset stations p 63 or SIRIUS channels as preset channels p 72 J1 p FM AM CATEGORY l h Sets the FM AM tuner band to FM or AM p 63 J1 Selects a channel category for a SIRIUS p 72 q PRESET j i Selects an FM AM preset station p 64 or a SIRIUS pres...

Page 10: ... player that supports a multi channel output p 36 r ZONE OUT jacks Outputs sound of this unit to an external amplifier set in a different room p 147 s PRE OUT terminals For connecting a subwoofer with built in amplifier or an external power amplifier p 23 p 26 t SPEAKERS terminals For connecting the front center surround and surround back speakers p 20 Connect the presence speakers p 20 or the spe...

Page 11: ...fect that uses CINEMA DSP technology is selected l CINEMA DSP 3D indicator Lights up when CINEMA DSP 3D is activated p 52 m Cursor indicators Light up if corresponding cursors on the remote control are available for operations n MUTE indicator Blinks when audio is muted o Speaker indicators Indicate speaker terminals from which signals are output p ADAPTIVE DRC indicator Lights when the adaptive d...

Page 12: ...election keys Switch between the current sound field effect sound program and the surround decoder p 51 LIVE CLUB CLASSICAL PRESET ENTERTAIN STEREO MOVIE STRAIGHT 2 3 SOURCE RECEIVER AV AUDIO SCENE TV TV VOL TV CH MUTE RETURN DISPLAY TOP MENU POP UP MENU VOLUME PROGRAM 1 PURE DIRECT MUTE INPUT 4 4 3 1 2 7 5 6 V AUX 4 3 1 2 USB MULTI NET PHONO TUNER DOCK 4 REC ON SCREEN OPTION ENTER SIRIUS HOLD TAG...

Page 13: ...IO SCENE MUTE RETURN DISPLAY TOP MENU POP UP MENU VOLUME PROGRAM 1 4 4 3 1 2 7 5 6 V AUX 4 3 1 2 USB MULTI NET PHONO TUNER DOCK 4 ON SCREEN OPTION ENTER FM MEMORY AM INFO 3 TUN CH 2 1 6 9 8 SLEEP 7 ENT 0 LEVEL 10 PARTY ENHANCER HDMI OUT SUR DECODE ZONE SETUP 4 5 SIRIUS CATEGORY A u v t y z x A B C w MEMORY Presets radio stations FM Sets the FM AM tuner band to FM AM CATEGORY D E Sets the FM AM tun...

Page 14: ... unit Refer to SETUP p 98 for details Option menu Press pOPTION to display the Option menu Configure the optional settings for each input source Settings such as Tone Control and Volume Trim are applied to this unit regardless of the input source Refer to Configuring settings specific to an individual input source Option menu p 58 for details Content window Press dInput selector to display the con...

Page 15: ... 80 degrees from the listening position and with the speaker tops at a height of 4 9 5 9 ft 1 5 1 8 m from the floor Presence left and right speakers The presence speakers are used for front effect sounds When used in combination with the sound programs p 54 a sound with a richer and more spatial presence is possible Presence speaker layout Place the left and right presence speakers 1 6 3 3 ft 0 5...

Page 16: ...onfiguration must be assigned to this unit to activate the speakers Use the Power Amp Assign function to apply the appropriate settings shown in the table for each speaker layout Refer to Power Amp Assign p 112 for details on setting Enjoying the 7 1 channel audio source 7 1 channel speaker layout 7 speakers subwoofer Connections of speakers Assigning a speaker configuration Audio from a 7 1 chann...

Page 17: ...R speakers EXTRA SP1 jacks Presence L R speakers Power Amp Assign 7ch Normal Default Front L speaker Front R speaker Subwoofer Center speaker Surround L speaker Surround R speaker Presence R speaker Presence L speaker Surround back R speaker Surround back L speaker J1 12 in 30 cm or more This unit can mix 7 1 channel audio source down to 5 1 channel sound This enables 7 1 channel sound without sur...

Page 18: ...oofer In addition to the main room speakers in another room can also be controlled When the built in amplifier assigned to speakers in another room is turned on sound output automatically switches from the surround back speakers to the speakers in the other room J2 FRONT jacks Front L R speakers SURROUND BACK jacks Surround back L R speakers CENTER jack Center speaker SUBWOOFER PRE OUT jack Subwoo...

Page 19: ...er J1 Surround back R speaker 12 in 30 cm or more Zone2 Zone3 Front R speaker Front R speaker Front L speaker Front L speaker Main zone FRONT jacks Front L R speakers SUBWOOFER PRE OUT jack Subwoofer CENTER jack Center speaker EXTRA SP1 jacks Zone2 speakers SURROUND jacks Surround L R speakers EXTRA SP2 jacks Zone3 speakers SURROUND BACK jacks Surround back L R speakers Power Amp Assign 7ch 2ZONE ...

Page 20: ...nd the other cable into the negative black terminal Be careful that the core of the speaker cable does not touch anything or come into contact with the metal areas of this unit This may damage this unit or the speakers If the speaker cables short circuit CHECK SP WIRES will appear on the front panel display when this unit is switched on SURROUND SURROUND BACK CENTER SINGLE FRONT BI AMP FRONT 1 AV ...

Page 21: ...OUT IN OUT REMOTE TRIGGER OUT 12V 0 1A MAX MON OUT ZONE OUT ARC ARC SELECTABLE ZONE 3 AV 1 AV 2 A B 1 BD DVD SINGLE SIRIUS HD Radio GND AM FM 4 RADIO ZONE2 ZONE3 F PRESENCE AV 1 AV 2 A B MON OUT ZONE OUT SURROUND BACK SPEAKERS SINGLE BI AMP E 2 F PRESENCE SURROUND SUR B ZONE 3 FRONT CENTER FER ZONE 3 FRONT SINGLE SURROUND BACK SPEAKERS BI AMP CAUTION The EXTRA SP jacks of this unit should not be c...

Page 22: ...insulation from the ends of the speaker cables and twist the bare wires of the cables together firmly so that they will not cause short circuits 2 Loosen the speaker terminals 3 Insert the bare wire of the speaker cable into the gap on the side of the terminal 4 Tighten the terminal SPEAKER IMP 8 MIN Front L R speakers Center speaker Surround L R speakers Surround back L R speakers Presence L R sp...

Page 23: ...ailable Set to maximum SINGLE REAR SUBWOOFER FRONT PRE OUT CENTER CENTER SUR BACK SURRUND 1 2 NOTE After connection applying this setting to this unit is required to activate all speaker connections With using Power Amp Assign function you can easily apply the speaker configuration Refer to Power Amp Assign p 112 for details on using Power Amp Assign function VOLUME MIN MAX CROSSOVER HIGH CUT MIN ...

Page 24: ...s subwoofer external front presence speakers Connections of speakers Assigning a speaker configuration Advanced speaker configuration Symbols on the table Front L speaker Center speaker Front R speaker Surround L speaker Surround R speaker Surround back L speaker Surround back R speaker Front presence L speaker Front presence R speaker Speakers that output sound Speakers that output sound dependin...

Page 25: ...ce L R speakers SUBWOOFER PRE OUT jack J2 Subwoofer Power Amp Assign 7ch FPR 1ZONE L R L C R SL SR SBR SBL SW EA PR PL A richer sound field can be created with the simultaneous use of front speakers that support bi amp connection and front presence speakers FRONT jacks Front L R speakers bi amp CENTER jack Center speaker SURROUND jacks Surround L R speakers SURROUND BACK jacks Front L R speakers b...

Page 26: ... AMP PR PL NOTES When a component is connected to the PRE OUT and ZONE OUT terminals do not connect speakers to the SPEAKERS terminals corresponding to those PRE OUT and ZONE OUT terminals When an external amplifier equipped with a volume adjustment function is connected a sufficient volume level may not be achieved Use of the following components is recommended An amplifier with no volume adjustm...

Page 27: ...that has a DVI jack an HDMI DVI D cable is required COMPONENT VIDEO jacks The signal is separated into three components luminance Y chrominance blue PB and chrominance red PR Use component video pin cables with three plugs AV 1 HDMI cable COMPONEN AV 1 A Component video pin cable S VIDEO jacks To transmit S video signals that include luminance Y and chrominance C components Use S video cables VIDE...

Page 28: ...S video or video signal according to the type of video input jacks used by the TV J2 J3 HDMI OUT 1 2 MONITOR OUT ZONE OUT Y PB PR MON OUT ZONE OUT ARC ARC SELECTABLE MON OUT ZONE OUT ZONE2 ZONE3 SURROUND SURROUND BACK SPEAKERS CENT AV 1 AV 2 AV 3 AV 4 HDMI AV 5 BI AMP WORK AV 4 AV 3 AV 4 AL OPTICAL OPTICAL AUDIO 1 2 TV 3 CD AUDIO 2 AUDIO 3 AUDIO 4 FRONT SURROUND SUR BACK SUBWOOFER CENTER MULTI CH ...

Page 29: ...T SURROUND MULTI CH COMPONEN COAXIAL AV OUT a b c d e f Y PB PR 1 BD DVD SIRIUS HD Radio GND AM FM 4 RADIO AV 1 AV 1 AV 2 AV 2 A A B B MON OUT ZONE OUT HDMI HDMI HDMI HDMI HDMI HDMI HDMI input TV Projector J1 MONITOR OUT ZONE OUT Y PB PR ZONE2 ZONE3 SURROUND SURROUND BACK SPEAKERS CENTER AV 1 HDMI OUT AV 2 AV 3 AV 4 HDMI AV 5 AV SINGLE BI AMP EXTRA SP2 2 AV 3 AV 4 OPTICAL AUDIO 1 2 TV 3 CD AUDIO 2...

Page 30: ...MULTI CH COMPONEN COAXIAL AV OUT a b c d e f Y PB PR ARC ARC SELECTABLE 1 BD DVD SIRIUS HD Radio GND AM FM 4 RADIO AV 1 AV 1 AV 2 AV 2 A A B B VIDEO V V Video input TV When using other TVs To transmit sound from the TV to this unit connect the TV s audio output to the AUDIO1 4 jacks Select the input source connected via TV s audio output jack to enjoy the TV sound If the TV supports optical digita...

Page 31: ...URROUND SUR BACK SUBWOOFER CENTER MULTI CH INPUT COMPONENT VIDEO MONITOR OUT ZONE OUT ZONE OUT PRE OUT ZONE 2 FRONT F PRESENCE Y PB PR Y PB PR Y PB PR C D SURROUND SUR BACK CENTER REAR FRONT SUBWOOFER 1 1 2 IN 1 2 2 1 OUT IN OUT REMOTE TRIGGER OUT 12V 0 1A MAX ZONE 3 SINGLE HDMI HDMI HDMI HDMI output BD DVD player Receiving video signals from the HDMI jack and audio signals from jacks other than H...

Page 32: ...N OUT ZONE OUT COMPONENT Y PR PB Y PR PB O OPTICAL O Component video Audio Optical output BD DVD player Y PB PR AV 1 AV 2 A B AV 1 AV 2 A B ZONE2 ZONE3 ANTENNA 75 AV 1 HDMI OUT AV EXTRA SP2 1 2 PHONO GND 1 BD DVD AV 1 DOCK NETWORK AV 2 AV 3 AV 4 COAXIAL COAXIAL OPTICAL OPTICAL OPTICAL AUDIO 1 2 TV 3 CD AUDIO 2 AUDIO 3 AUDIO 4 FRONT SURROUND SUR MULTI CH INP ENT V COAXIAL AV OUT a b c d e f Y ARC A...

Page 33: ...Radio GND AM FM 4 RADIO AV 1 AV 1 AV 2 AV 2 A A B B MON OUT ZONE OUT OPTICAL O O S VIDEO S S video Audio Optical output BD DVD player COAXIAL COAXIAL a b ZONE2 ZONE3 ANTENNA 75 AV 1 HDMI OUT EXTRA SP2 1 2 PHONO GND 1 BD DVD AV 1 DOCK NETWORK AV 2 AV 3 AV 4 OPTICAL OPTICAL OPTICAL AUDIO 1 2 TV 3 CD AUDIO 2 AUDIO 3 AUDIO 4 FRONT SURROUND MULTI CH COMPONEN COAXIAL AV OUT c d e f Y PB PR ARC ARC SELEC...

Page 34: ...VD SIRIUS HD Radio GND AM FM 4 RADIO AV 1 AV 1 AV 2 AV 2 A A B B MON OUT ZONE OUT VIDEO OPTICAL V V O O Video Audio Optical output BD DVD player 1 BD DVD ZONE2 ZONE3 ANTENNA 75 AV 1 HDMI OUT EXTRA SP2 1 2 PHONO GND DOCK NETWORK AV 3 AV 4 OPTICAL OPTICAL OPTICAL AUDIO 1 2 TV 3 CD AUDIO 2 AUDIO 3 AUDIO 4 FRONT SURROUND MULTI CH COMPONEN COAXIAL COAXIAL AV OUT b c d e f Y PB PR ARC ARC SELECTABLE 1 B...

Page 35: ...LE 1 BD DVD SIRIUS HD Radio GND AM FM 4 RADIO AV 1 AV 1 AV 2 AV 2 A A B B MON OUT ZONE OUT OPTICAL O O CD player Audio Optical output Werecommendconnecting audiodeviceswithacoaxialdigital outputtotheAUDIO2coaxialdigitaljackonthis unit ThisconnectionallowsyoutoswitchtotheAUDIO2justbypressingthe CD SCENEkey p 50 Connect your turntable to the GND terminal of this unit to reduce noise in the signal ZO...

Page 36: ... unit to MULTI CH Be sure to turn down the volume when connecting this unit and the other devices When both the HDMI connection and the analog video audio connection are performed between the HDMI compatible device and this unit only the HDMI signal will be input HDMI HDMI HDMI HDMI output Game Console Video Camcorder etc R L V V R L S S AUDIO VIDEO VIDEO OPTICAL O O Video output Analog audio outp...

Page 37: ... 1 2 OUT IN OUT EX SURROUND SURROUND BACK SPEAKERS CENTER 1 AV 2 AV 3 AV 4 HDMI AV 5 AV 6 AV 7 SINGLE FRONT BI AMP AV 3 AV 4 SURROUND SUR BACK SUBWOOFER CENTER MULTI CH INPUT COMPONENT VIDEO MONITOR OUT ZONE OUT ZONE OUT PRE OUT ZONE 2 FRONT F PRESENCE Y PB PR PR Y PB PR C D SURROUND SUR BACK CENTER REAR FRONT SUBWOOFER 1 1 2 2 1 TRIGGER OUT 12V 0 1A MAX ZONE 3 SINGLE 1 BD DVD Remote control out R...

Page 38: ... HD EXTRA SP2 1 2 PHONO GND 1 BD DVD AV 1 DOCK NETWORK AV 2 AV 3 AV 4 AV 3 AV 4 COAXIAL COAXIAL OPTICAL OPTICAL OPTICAL AUDIO 1 2 TV 3 CD AUDIO 2 AUDIO 3 AUDIO 4 FRONT SURROUND SUR BACK SUBWOOFER CENTER MULTI CH INPUT COMPONENT VIDEO COAXIAL M ZONE OUT ZONE 2 a b c d e f Y Y PB PR Y PB PR C D ARC ARC SELECTABLE ZONE 1 BD DVD SIRIUS HD Radio GND AM FM 4 RADIO AV 1 AV 1 AV 2 AV 2 A A B B MON OUT ZON...

Page 39: ... device Connect a USB memory device or USB portable audio player to the USB port on the front panel of this unit NOTE Be careful that the USB storage device is facing the correct way when inserted into the USB port of this unit USB memory device or USB portable audio player ...

Page 40: ...IUS AV 1 AV 1 AV 2 AV 2 A A B B MON OUT ZONE OUT Indoor FM antenna AM loop antenna Position the AM antenna away from the receiver The wires of the AM antenna have no polarity You can connect either wire to the AM jack or the GND jack Connecting the AM loop antenna Release Insert Press and hold Improving FM reception We recommend using an outdoor antenna For more information consult the nearest aut...

Page 41: ... utilizing an external power amplifier for details p 16 p 24 2 Place the supplied YPAO microphone at ear height in your listening position Face the head of the YPAO microphone upwards 3 Switch this unit on Setting up the speaker parameters automatically YPAO Be aware of the following when using YPAO The amount of time for measurement varies from about two to ten minutes according to settings The t...

Page 42: ...ts in 10 seconds Display during measurement RETURN ENTER SOURCE RECEIVER AV AUDIO 4 3 1 2 7 5 6 V AUX 4 3 1 2 USB MULTI NET PHONO TUNER DOCK SIRIUS A i ENTER to Start Measurement YPAO VOLUME Multi Position is set to Yes at initial factory settings If not necessary skip this step This completes preparation To achieve more accurate results take note of the following when measuring acoustics It takes...

Page 43: ...s without any problems ENTER SOURCE RECEIVER AV AUDIO 4 3 1 2 7 5 6 V AUX 4 3 1 2 USB MULTI NET PHONO TUNER DOCK SIRIUS A i Save Exit Measure Finish YPAO VOLUME Yes No MLT Position2 YPAO VOLUME The following illustration shows how to place the optimizer microphone to optimize the setup of this unit for eight listening positions for example Up to 8 listening positions can be measured J1 6 8 7 4 5 1...

Page 44: ...s the automatic measurement J1 CANCEL Returns to the previous screen EXIT Finishes the automatic measurement without applying the result to the speaker setup When the warning message appears on this display refer to When an error message is displayed during measurement p 46 for details Press iRETURN to return to the previous screen Select Save Save Exit YPAO VOLUME Disconnect Mic FINISH YPAO VOLUM...

Page 45: ...ty of each connected speaker Normal is displayed when the polarity of the connected speaker is normal Reverse is displayed when the polarity of the connected speaker is opposite Size Displays the size of the connected speakers and the bass cross over frequency Bass Crossover Large is displayed when the connected speaker has the ability to reproduce the low frequency signals effectively Small is di...

Page 46: ...nment may reduce the accuracy When E 9 is displayed resume the aborted step RETRY Restart measurement from the beginning 4 Press iENTER to execute the selected option When E 10 is displayed 1 Press iENTER 2 Press iCursor E to select EXIT 3 Press iENTER to terminate YPAO and switch the unit to standby mode 4 Turn on the unit and use YPAO again When a warning message is displayed after measurement S...

Page 47: ... surround left right speakers is necessary E 7 No MIC The YPAO microphone has been removed While measuring take care not to touch the YPAO microphone E 8 No Signal The YPAO microphone could not distinguish a test tone Check that the YPAO microphone has been installed correctly Check that each speaker has been connected and installed correctly The YPAO microphone or the YPAO MIC jack may be broken ...

Page 48: ...lecting the active HDMI OUT jack Use this function to select the HDMI OUT jack s used to output signal Press xHDMI OUT repeatedly to select setting The HDMI output setting changes as follows Basic playback procedure AV AUDIO MUTE VOLUME 4 4 3 1 2 7 5 6 V AUX 4 3 1 2 USB MULTI NET PHONO TUNER DOCK HDMI OUT SIRIUS SOURCE RECEIVER TUN CH CATEGORY A n o d x OUT 1 2 Outputs the signal at both the HDMI ...

Page 49: ...l in the following frequency range The display returns to the previous display soon after you release the key The tone control of the speakers or headphones can be set separately Set the headphone tone control with the headphones connected TONE BALANCE PROGRAM l h VOLUME Tone Control Treble 0 5dB Adjustable range 6 0 dB to 6 0 dB Adjustment increments 0 5 dB The tone control settings are not effec...

Page 50: ...ams and HDMI Output are provided at initial factory settings Settings that are not checked are not enabled when a scene key is pressed Use Load in the Scene menu to check settings to be enabled Refer to Adjusting settings registered with the SCENE function for details p 103 Changing input settings with a single key SCENE function 2 3 SCENE 1 4 BD DVD TV CD RADIO When switching scenes also change t...

Page 51: ... You can even enjoy surround sound presence with just a minimal configuration of the front speakers only This unit will switch to Virtual CINEMA DSP mode automatically when Surround is set to None in Configuration p 113 J2 Enjoying sound programs with headphones Even when headphones are connected you can enjoy the reproduction sound field presence with ease SILENT CINEMA mode J3 Enjoying favorite ...

Page 52: ...t minimum connect the front speakers center speaker and surround speakers Enable the center speaker and surround speakers in Configuration p 112 Enable CINEMA DSP 3D in the Option menu p 60 Enjoying unprocessed playback Straight decoding mode Use straight decoding mode when you want to playback sound without sound field processing You can playback as follows in straight decoding mode 2 channel sou...

Page 53: ...nhancer improves the sound quality of the compressed music source closer to its original depth and width J3 This mode can be used along with any other DSP modes Press tENHANCER to turn Compressed Music Enhancer on ENHANCER LIVE CLUB CLASSICAL ENTERTAIN STEREO MOVIE STRAIGHT PURE DIRECT SOURCE RECEIVER AV AUDIO 4 3 1 2 7 5 6 V AUX 4 3 1 2 USB MULTI NET PHONO TUNER DOCK SIRIUS A TUN CH CATEGORY s t ...

Page 54: ...A realistic live sound field features powerful sound as if the listener is in a row in front of a small stage The Roxy Theatre This is the sound field of a rock music live house in Los Angeles with approximately 460 seats The listener s virtual seat is at the center left of the hall The Bottom Line This is the sound field at stage front in The Bottom Line a famous New York jazz club once The floor...

Page 55: ...ations that match a wide range of movie genres from serious dramas to musicals and comedies The reverberations are modest but offer an optimum 3D feeling reproducing effects tones and background music softly but cubically around clear words and center positioning in a way that does not fatigue the listener even after long hours of viewing Mono Movie This program is provided for reproducing monaura...

Page 56: ...at the bottom of the TV screen 2 Use iCursor D E to select a scene and press iENTER The scene is selected Using the TV display to control this unit RETURN ON SCREEN ENTER SOURCE RECEIVER AV AUDIO 4 3 1 2 7 5 6 V AUX 4 3 1 2 USB MULTI NET PHONO TUNER DOCK SIRIUS A i h A TV screen is required to display the ON SCREEN or Option menu Refer to Connecting a TV monitor for instructions on connecting a TV...

Page 57: ...ous menu screen Press iRETURN repeatedly to close the ON SCREEN menu Refer to Enjoying favorite sound field effect p 51 for various sound programs You can configure the detailed settings for each sound program Refer to Setting sound program parameters Sound Program menu p 105 for details NOTES Menus can be operated and the status of this unit confirmed from the following three main displays ON SCR...

Page 58: ...ormation refer to the Option menu on the next page 3 Use iCursor B C to select the desired setting and press iENTER Parameters of the selected item are displayed 4 Use iCursor D E to select the desired item or enable a function 5 Press pOPTION to close the Option menu Configuring settings specific to an individual input source Option menu AV AUDIO RETURN 4 4 3 1 2 7 5 6 V AUX 4 3 1 2 USB MULTI NET...

Page 59: ...ame value is applied to other input sources and ALL is displayed on the front panel display When settings specific to a certain input source are selected the input source name is displayed on the front panel display If the name of the input source has been changed p 99 the original name of the input source is displayed J2 Dialogue Lift can be adjusted only when the presence speakers are available ...

Page 60: ...akers are used J2 Adjustable range 6 0 dB to 6 0 dB Adjustment increments 0 5 dB Off Default Does not adjust the dynamic range automatically On Adjusts the dynamic range automatically Input Level Input Level Volume low Volume high Output Level Output Level On Off On Off The ideal dialogue position Move up to the ideal dialogue position Dialogue Lift can be adjusted only when the presence speakers ...

Page 61: ...s communication with a Bluetooth component on and off p 94 Pairing Bluetooth component Pairing Performs pairing of this unit and a Bluetooth component p 94 Adjustable range 6 0 dB to 6 0 dB Default setting 0 0 dB Adjustment increments 0 5 dB steps Auto Default Automatically selects input signal in the following order 1 HDMI 2 Digital signal 3 Analog signal HDMI Selects only HDMI signal When no HDM...

Page 62: ...tch the display between the Now Playing view and the Browse view by the following methods Press qDISPLAY to cycle between the Now Playing view and the Browse view In the Now Playing view press iENTER and use iCursor B C to select the icon Then press iENTER to switch to the Browse view In the Browse view press iCursor E and use iCursor B C to select the icon Then press iENTER to switch to the Now P...

Page 63: ...follows to select a station on 98 5 MHz VOLUME STEREO TUNED ENHANCER STEREO TUNED FM 98 5MHz Lights up when a broadcast is received from a station Lights up when a stereo broadcast is received 9 8 5 Registering stations manually Manual Preset Select stations manually and register them as presets individually 1 Tune in to the station you want to register referring to Selecting a frequency for recep...

Page 64: ...UN CH CATEGORY SOURCE RECEIVER AV AUDIO 4 3 1 2 7 5 6 V AUX 4 3 1 2 USB MULTI NET PHONO DOCK SIRIUS A v y j d i Designating a preset number for registration Press yMEMORY once to display Manual Preset on the front panel display After a small wait the preset number that the station has been registered to will appear J1 Press jPRESET F G to select the preset number to register the station to and the...

Page 65: ...RECEIVER AV AUDIO 4 3 1 2 7 5 6 V AUX 4 3 1 2 USB MULTI NET PHONO TUNER DOCK SIRIUS A i Preset Selects the previous preset number Preset Selects the next preset number Preset 8 Returns the previous page Preset 8 Goes to the next page Memory Registers the station currently received as a preset station Up to 40 FM AM stations can be registered Direct Selects a station directly by entering the preset...

Page 66: ...ned into an FM HD Radio station including only one audio program or an AM HD Radio station you cannot select audio programs Behavior of the display This unit automatically shows the HD Radio information Station Info etc on the front panel display after 3 seconds You can switch HD Radio information to be displayed p 67 Listening to the HD Radio 3 2 1 6 9 8 7 ENT 0 4 5 PRG SELECT SOURCE RECEIVER AV ...

Page 67: ...ation on the front panel display J1 Press uINFO repeatedly to toggle the HD Radio information display modes as shown below Back to Station Info Display example DSP Program INFO TAG SOURCE RECEIVER AV AUDIO 4 3 1 2 7 5 6 V AUX 4 3 1 2 USB MULTI NET PHONO TUNER DOCK SIRIUS A TUN CH CATEGORY r u Insufficient Data is displayed on the front panel display if tagging is not possible If a status or error ...

Page 68: ... Channel Category The category of the channel is displayed k Artist Name The artist name of the current song is displayed l Song Title The title of the current song is displayed m Album Name The album name of the current song is displayed n Screen button area Buttons for available operations are displayed See Screen buttons on the Now Playing view for details Screen buttons on the Now Playing view...

Page 69: ...set number Preset Selects the next preset number Preset 8 Returns the previous page Preset 8 Goes to the next page Direct Selects a station directly by entering the preset number Memory Registers the station currently received as a preset station Up to 40 FM AM stations can be registered Hold Activates the hold function The artist name and song title currently received will remain displayed Tag Ap...

Page 70: ...nd logos are trademarks of Sirius XM Radio Inc and its subsidiaries All other marks and logos are the property of their respective owners All rights reserved SIRIUS subscription sold separately Taxes and a one time activation fee may apply SIRIUS tuner required sold separately to receive the SIRIUS service All programming and fees subject to change It is prohibited to copy decompile disassemble re...

Page 71: ...sing one of the SIRIUS Satellite Radio search modes All channel search mode Selects a channel from the all channel list p 72 Category search mode Selects a channel by category p 72 Direct number access mode Selects a channel directly by entering the channel number p 72 Preset search mode Selects a channel from the preset channels p 73 You can preset channels by registering them to specific numbers...

Page 72: ...AV AUDIO 4 3 1 2 7 5 6 V AUX 4 3 1 2 USB MULTI NET PHONO TUNER DOCK SIRIUS A y v You can search for a channel quickly by pressing and holding yTUN CH H I You can skip channels to the previous or next category by pressing yCATEGORY D E If you don t operate within 10 seconds the category search mode returns to ALL All Channel Search You can search for a channel quickly by pressing and holding yTUN C...

Page 73: ...RIUS A y u j v i To cancel registration press iRETURN or do not operate the remote control for about 30 seconds Preset numbers to which no channel has been registered are skipped Preset numbers can also be selected by pressing vNumeric keys VOLUME 023 HairNatn Preset 01 001 Hits 1 Preset number Blinks Previously registered channel or if no channel has been registered Channel to be registered VOLUM...

Page 74: ...e displayed See Screen buttons on the Now Playing view for details Screen buttons on the Now Playing view To use these buttons first press iENTER Then select the desired one with iCursor B C and iENTER Radio Control Select a channel for reception Utility When the parental lock function is enabled for a particular channel that channel is skipped in all channel search mode and category search mode 1...

Page 75: ...t of preset stations is displayed b Screen button area Buttons for available operations are displayed See Screen buttons on the Browse view for details Screen buttons on the Browse view To use these buttons first press iCursor E Then select the desired one with iCursor B C and iENTER Utility 1 Page Up 1 Page Down Scrolls the list to the next or previous page Now Playing Switches the display to the...

Page 76: ...ttons on the Browse view To use these buttons first press iCursor E Then select the desired one with iCursor B C and iENTER 10 Pages Up 10 Pages Down Goes to 10 pages forwards or backwards 1 Page Up 1 Page Down Scrolls the list to the next or previous page Now Playing Switches the display to the Now Playing view 1 Press dNET repeatedly to select PC as the input source 2 Press iCursor B C to select...

Page 77: ...on menu to apply playback shuffle and repeat settings Refer to Shuffle playback p 61 and Repeat playback p 61 for details INFO ENTER PRG SELECT TUN CH CATEGORY SOURCE RECEIVER AV AUDIO 4 3 1 2 7 5 6 V AUX 4 3 1 2 USB MULTI NET PHONO TUNER DOCK SIRIUS A u g i You can switch the information displayed on the front panel display by pressing uINFO p 11 Album images are available only when the file cont...

Page 78: ...s iCursor E Then select the desired one with iCursor B C and iENTER 10 Pages Up 10 Pages Down Goes to 10 pages forwards or backwards 1 Page Up 1 Page Down Scrolls the list to the next or previous page Now Playing Switches the display to the Now Playing view 1 Connect your USB storage device to the USB port on the front panel p 39 2 Rotate the INPUT selector or press dUSB to select USB as the input...

Page 79: ...nctions with the remote control Use the following remote control keys to operate playback stop skip etc USB storage device Shuffle repeat playback Use the Option menu to apply playback shuffle and repeat settings Refer to Shuffle playback p 61 and Repeat playback p 61 for details INFO ENTER PRG SELECT TUN CH CATEGORY SOURCE RECEIVER AV AUDIO 4 3 1 2 7 5 6 V AUX 4 3 1 2 USB MULTI NET PHONO TUNER DO...

Page 80: ...ge Down Scrolls the list to the next or previous page Now Playing Switches the display to the Now Playing view 1 Press dNET repeatedly to select NET RADIO as the input source 2 Press iCursor B C to select an item to play back To select an item press iCursor B C To confirm the selection press iENTER To return to the previous menu press iRETURN 3 Press iENTER to start playback The Now Playing view a...

Page 81: ...s with the remote control Use the following remote control keys to operate playback stop the Internet Radio INFO ENTER TUN CH CATEGORY SOURCE RECEIVER AV AUDIO 4 3 1 2 7 5 6 V AUX 4 3 1 2 USB MULTI NET PHONO TUNER DOCK SIRIUS A u i g You can switch the information displayed on the front panel display by pressing uINFO p 11 s Stop Stops playback a e b d c gp Play gs Stop You can also register your ...

Page 82: ...ost anywhere Just sign in to your Rhapsody account to start letting the Rhapsody service work for you For more information http www rhapsody com Rhapsody account sign in When you select Rhapsody for the first time the sign in screen appears Sign in to your Rhapsody account to start using the Rhapsody service on this unit 1 Press hON SCREEN 2 Use iCursor B C to select Input and press iENTER 3 Use i...

Page 83: ...s The Rhapsody can be operated from the content window on the TV screen You can operate the Rhapsody from the Now Playing view or the Browse view Operating from the Browse view a Repeat icon b Shuffle icon c Play icon d Menu items e Album art Input icon f Screen button area Buttons for available operations are displayed See Screen buttons on the Browse view for details g Current menu number Number...

Page 84: ...s are displayed See Screen buttons on the Now Playing view for details h Song title i Total playback time j Progress bar k Elapsed time INFO RETURN NET ENTER TUN CH CATEGORY SOURCE RECEIVER AV AUDIO 4 3 1 2 7 5 6 V AUX 4 3 1 2 USB MULTI PHONO TUNER DOCK SIRIUS A u d i Play Plays back the song or album highlighted in the list Add track to My Library Adds the track currently selected to My Library A...

Page 85: ...eat settings Refer to Shuffle playback p 61 and Repeat playback p 61 for details ENTER PRG SELECT SOURCE RECEIVER AV AUDIO 4 3 1 2 7 5 6 V AUX 4 3 1 2 USB MULTI NET PHONO TUNER DOCK SIRIUS A i g p Play Starts playback s Stop Stops playback e Pause Stops playback temporarily b Skip Skips to the beginning of the currently playing song Press iENTER at the beginning of the song to skip to a previous s...

Page 86: ...ot been completed yet Read the description and then press iENTER J1 4 Press iCursor B C to select Sign In or SIRIUS IR Trial and then press iENTER 5 Press iENTER to enter the User Name entry screen 6 Use iCursor B C D E and iENTER to enter your user name password up to 64 characters and then select OK and press iENTER 7 Press iENTER to enter the User Password entry screen Listening to the SIRIUS I...

Page 87: ...reen buttons on the Browse view To use these buttons first press iCursor E Then select the desired one with iCursor B C and iENTER 10 Pages Up 10 Pages Down Goes to 10 pages forwards or backwards 1 Page Up 1 Page Down Scrolls the list to the next or previous page Now Playing Switches the display to the Now Playing view You can navigate the Sirius Internet Radio menu with the following remote contr...

Page 88: ... Control Stops the current playback Scroll Switches the scroll target artist name album name or song name Browse Switches the display to the Browse view Operating basic playback functions with the remote control Use the following remote control keys to operate playback stop skip etc your PC contents INFO ENTER TUN CH CATEGORY SOURCE RECEIVER AV AUDIO 4 3 1 2 7 5 6 V AUX 4 3 1 2 USB MULTI NET PHONO...

Page 89: ...umbers replace the content registered with a playlist with new content without deleting the playlist Using shortcut function MEMORY 3 2 1 6 9 8 7 0 4 5 PRESET RETURN TUN CH CATEGORY SOURCE RECEIVER AV AUDIO 4 3 1 2 7 5 6 V AUX 4 3 1 2 USB MULTI NET PHONO TUNER DOCK SIRIUS A y j v i To automatically assign the selected content to an empty preset number press and hold yMEMORYfor at least 2 seconds w...

Page 90: ... DOCK INFO SOURCE RECEIVER AV AUDIO 4 3 1 2 7 5 6 V AUX 4 3 1 2 USB MULTI NET PHONO TUNER TUN CH SIRIUS CATEGORY A u d When playing back iPod iPhone with wired connection Refer to Connecting the Universal Dock for iPod When playing back iPod iPhone with wireless connection Refer to Playing iPod iPhone with wireless connection p 92 iPod touch iPod 4th Gen 5th Gen Classic iPod nano iPod mini iPhone ...

Page 91: ...ng Switches the display to the Now Playing view Close Returns to the video playback turning off the menu display 1 Press dDOCK to switch to the DOCK input 2 Press iCursor B C to select the content music or video that you want to play and press iENTER J1 3 Press iCursor B C to select iPod iPhone menu items and press iENTER to play The Now Playing view appears during playback J2 Operating from the N...

Page 92: ... of this unit Refer to the operating instructions of the YID W10 for more information RETURN DOCK REC ENTER HOLD TAG PRG SELECT SOURCE RECEIVER AV AUDIO 4 3 1 2 7 5 6 V AUX 4 3 1 2 USB MULTI NET PHONO TUNER SIRIUS A i g d p Play Starts playback s Stop Stops playback e Pause Stops playback temporarily b Skip Skips to the beginning of the currently playing song Press iENTER at the beginning of the s...

Page 93: ...ted ANTENNA 75 PHONO GND 1 BD DVD AV 1 NETWORK AV 2 AV 3 AV 4 COAXIAL COAXIAL OPTICAL OPTICAL a b c d SIRIUS HD Radio GND AM FM 4 RADIO A B 1 23 Receiver of the Wireless System for iPod Position the receiver as far as possible from the unit Pressing dDOCK also switches the input source to DOCK iPod When a menu is operated this function is not activated When iPod Interlock Power Input in the Input ...

Page 94: ... Bluetooth component J2 Playing back tunes from Bluetooth components NOTE When playing back from a Bluetooth component for the first time you must first pair the devices register the Bluetooth components When establishing a wireless connection you must carry out pairing on both this unit and on the Bluetooth component RETURN DOCK OPTION ENTER MEMORY SOURCE RECEIVER AV AUDIO 4 3 1 2 7 5 6 V AUX 4 3...

Page 95: ...1 2 USB MULTI NET PHONO TUNER SIRIUS A i p d Depending on Bluetooth components a wireless connection is established automatically or by operating the Bluetooth components In that case it is not necessary to carry out the following procedure Not found is displayed when there is an error connecting Check that the following conditions have been satisfied and try to establish a wireless connection aga...

Page 96: ...k Standby is set to On in the Network menu this unit can turns on and Web Control Center can be displayed on the PC even if this unit was in standby mode p 121 When Network Standby is set to Off we recommend that Network Standby is set to On to use Web Control Center Selecting the input source Controlling Network USB features Power on off Adjusting the system parameters Any many other features Web...

Page 97: ...l a Zone Rename Friendly Name indicates the identification name of the device this unit connected to the PC Friendly Name or the names of zones can be changed b MAC Filter Applies the MAC address filter to this unit Web Control Center can only be accessed from a computer with the same address as the MAC address registered here c Auto Reload Enables or disables the Auto Reload function which reload...

Page 98: ...e iCursor D E to select an input source to be configured and press iCursor B 4 Use iCursor B C to select an item and press iENTER 5 Use iCursor B C to adjust the setting 6 Press hON SCREEN to close the menu Configuring input sources Input menu RETURN ON SCREEN ENTER SOURCE RECEIVER AV AUDIO 4 3 1 2 7 5 6 V AUX 4 3 1 2 USB MULTI NET PHONO TUNER DOCK SIRIUS A i h If the selected item contains additi...

Page 99: ...e desired input source name 6 Confirm the input source name by pressing iENTER 7 Press iCursor C to select OK and press iENTER to register the new input name AV1 7 V AUX AUDIO1 4 PHONO MULTI CH USB PC NET RADIO Rhapsody SIRIUS IR DOCK iPod DOCK Bluetooth TUNER SIRIUS Rename Icon Select Decoder Mode Enhancer DMC Control Account Status Sign In Rhapsody Trial Remove Account SIRIUS IR Trial Standby Ch...

Page 100: ...ted with a free trial SIRIUS IR Trial Creates a temporary account for free 30 day trial and sign in to the account automatically Removing your account from the Rhapsody service or SIRIUS Internet Radio Remove Account Removes an account registered with the Rhapsody service or SIRIUS Internet Radio Charging an iPod iPhone in standby mode Standby Charge Charges an iPod iPhone stationed in the Univers...

Page 101: ...can be output to the video monitor For example even if an audio and video component such as a DVD player that does not support a multi channel digital audio output the video signal can be output to the video monitor while reproducing a multi channel analog audio signal Power Input Starting playback of iPod iPhone turns on this unit and switches the input source to DOCK iPod automatically when this...

Page 102: ... be edited and press iCursor B 4 Use iCursor B C to select an item and press iENTER 5 Use iCursor B C D E to adjust the setting 6 Press hON SCREEN to close the menu Editing the SCENE function Scene menu RETURN ON SCREEN ENTER SOURCE RECEIVER AV AUDIO 4 3 1 2 7 5 6 V AUX 4 3 1 2 USB MULTI NET PHONO TUNER DOCK SIRIUS A i h If the selected item contains additional items use iCursor B C to select the ...

Page 103: ...th DETAIL DETAIL Specifies SCENE IR function and displays settings registered with the SCENE function in detail For more information see SCENE IR and Detail at right Off Disables the SCENE IR function Yamaha BD DVD Player1 Select this when a Yamaha BD DVD player is connected to this unit Yamaha BD DVD Player2 Select this if the player dose not turn on when Yamaha BD DVD Player1 is selected Yamaha ...

Page 104: ... Compressed Music Enhancer or HDMI OUT you want to register 3 Press the eSCENE key until SET Complete appears on the front panel display 2 3 AV AUDIO SCENE 1 4 4 3 1 2 7 5 6 V AUX 4 3 1 2 USB MULTI NET PHONO TUNER DOCK 4 ENTER SIRIUS SOURCE RECEIVER A i e d Scene names may consist of up to 20 characters To cancel the operation without applying changes select CANCEL and then press iENTER To clear t...

Page 105: ...CREEN to close the Sound Program menu Setting sound program parameters Sound Program menu RETURN ON SCREEN ENTER SOURCE RECEIVER AV AUDIO 4 3 1 2 7 5 6 V AUX 4 3 1 2 USB MULTI NET PHONO TUNER DOCK SIRIUS A i h Sound programs Sound program parameters Settings When there are multiple parameters in the selected sound program repeat steps 4 and 5 to adjust other parameters To initialize sound program ...

Page 106: ...ound and the subsequent reflections By controlling the time between the reflected sounds you can change the apparent size of the virtual venue Changing this parameter from one to two doubles the apparent length of the room Adjustable range 6 dB to 3 dB Default setting 0 dB Adjust DSP Level as follows The effect sound is too soft There are no differences between effects of the sound programs Increa...

Page 107: ... dB at 1 kHz This changes the apparent size of the acoustic environment over an extremely wide range Set a longer reverberation time to get more sustaining reverberation sound and set a shorter time to get articulate sound Reverb Delay Reverberation delay Adjusts the time difference between the beginning of the direct sound and the beginning of the reverberation sound The larger the value the late...

Page 108: ...ack R channel J2 Front Presence L Level Adjusts the volume of the front presence L channel J2 Adjustable range 0 to 100 PLIIx Movie PLII Movie Selects the Dolby Pro Logic IIx Movie or Dolby Pro Logic II Movie decoder Neo 6 Cinema Selects the Neo 6 Cinema decoder Level Source sound Time Rev Level Auto Default Outputs sound by bypassing the DSP circuit and tone control circuit when both tone control...

Page 109: ...Music is selected Center Image Adjusts the front left and right channel output relative to the center channel to make the center channel more or less dominant as necessary Adjustable range 0 to 100 Default setting 33 Pro Logic Reproduces sound using the Dolby Pro Logic decoder This is suitable for all kinds of audio sources PLIIx Movie PLII Movie Reproduces sound using the Dolby Pro Logic IIx or D...

Page 110: ...und Sets functions related to audio output such as adjustment of maximum volume and of dynamic range p 115 Video Sets video output functions such as video conversion settings resolution and aspect ratio p 117 HDMI Sets HDMI functions such as the HDMI Control function and output destination for HDMI sound p 118 Network Sets network status such as IP Address or MAC Address Filter p 121 Multi Zone Se...

Page 111: ...e Auto Power Down Input Assignment Display Set Trigger Output1 Trigger Output2 Memory Guard Speaker Sound Video Multi Zone Function Language HDMI Control Control Select ARC Audio Return Channel TV Audio Input Audio Output Standby Through HDMI IP Address Network Standby MAC Address Filter Network Auto Setup Optimizes the speaker configuration automatically Manual Setup Manually adjusts parameters f...

Page 112: ...nd back speakers p 25 5ch BI AMP SB FPR Enables the bi amp connection external surround back and presence speakers p 26 In the Configuration you can select the speaker size characteristic Large or Small Select the size sound reproduction capacity that matches your speakers When speaker size is set to Small low frequency components of the speakers that you configured are produced from the subwoofer...

Page 113: ...ically change to None You can set surround back audio signals including from the playback source to be mixed down and produced from a single speaker 6 1 channel layout or produced from left and right surround speakers 5 1 channel layout Use Default Select this when front presence speakers are connected None Select this when front presence speakers are not connected Use Default Select this when sub...

Page 114: ...djust the parameter and use iCursor B C repeatedly to adjust the gain 3 Press iENTER to exit the edit window 4 Repeat steps 1 to 3 to configure other parameters 5 Press hON SCREEN to close the menu ON SCREEN ENTER LEVEL SOURCE RECEIVER AV AUDIO 4 3 1 2 7 5 6 V AUX 4 3 1 2 USB MULTI NET PHONO TUNER DOCK TUN CH SIRIUS CATEGORY A i A h Adjustable range 1 0 ft to 80 0 ft 0 30 m to 24 00 m Default sett...

Page 115: ...urn the test tone off when you have finished making adjustments Lipsync Adjusts the delay between video and audio output Dynamic Range Selects the dynamic range adjustment method for Dolby Digital and DTS playback Max Volume Sets the maximum volume for this receiver Initial Volume Sets the initial volume for when this receiver is turned on Pure Direct Mode Selects whether or not this unit outputs ...

Page 116: ... volume for regular home use MIN AUTO MIN Sets the dynamic range suitable for low volume or a quiet environment such as at night for bitstream signals except for Dolby TrueHD signals AUTO Adjusts the dynamic range for Dolby TrueHD signals based on input signal information Adjustable range 30 0 dB to 16 5 dB maximum volume Default setting 16 5 dB Adjustment increments 5 0 dB Adjustable range Off Mu...

Page 117: ...gnals interchangeably 480p 576p 1080i and 720p resolution video signals can not be output at the S video and video jacks of MON OUT ZONE OUT p 161 The converted video signals are only output at the MONITOR OUT jacks When composite video or S video signals from a VCR are converted into component video signals the picture quality may suffer depending on your VCR Unconventional signals input at the c...

Page 118: ... enhancement function Resolution Enhancement When this item is set to Auto image resolution is enhanced Off Default disables the resolution enhancement function Noise Reduction When this item is set to Auto image noise is reduced Off Default disables the noise reduction function Brightness Adjusts image brightness Control range 100 to 100 Initial setting 0 Contrast Adjusts image contrast Control r...

Page 119: ...io signals from TV while the HDMI Control function is on When the TV is set to output sounds via this unit the TV audio input is automatically selected to the input source assigned here J2 TV1 TV2 Off Default Sets HDMI Control to Off On Sets HDMI Control to On J1 If this unit is connected to HDMI devices that do not support the HDMI Control function these functions will not operate OUT1 TV1 Applie...

Page 120: ...his unit On Default Audio is output through this unit When this setting is selected audio from the external component is output in a format compatible with this unit Off Default Audio is not output through a TV connected via the HDMI OUT 1 jack On Outputs audio through a TV connected via the HDMI OUT 1 jack When this setting is selected audio from the external component is output in a format compa...

Page 121: ...work when this unit is in standby mode MAC Address Filter Sets the MAC address filter to restrict network access to this unit Off Default Select this setting to specify IP address manually On Select this setting to acquire IP address from the network s DHCP server automatically IP Address Specifies the IP address assigned to this unit An IP address used by another device on the same network may no...

Page 122: ...enus of Zone2 or Zone3 on the TV monitor Party Mode Set Enable or disable the party mode function Zone Scene Rename Changes the scene names of Zone2 or Zone3 Zone Rename Changes the name of Zone2 or Zone3 Fixed Disables volume level adjustment of Zone2 or Zone3 speakers Variable Default Enables volume level adjustment of Zone2 or Zone3 speakers When setting the Power Amp Assign function Volume is ...

Page 123: ...r and press iCursor D E to enter the selected character 5 Repeat step 4 to enter the desired zone name 6 Confirm the zone name by pressing iENTER 7 Press iCursor C to select OK and press iENTER to register the new zone name Making the receiver easier to use Function setup items ENTER SOURCE RECEIVER AV AUDIO 4 3 1 2 7 5 6 V AUX 4 3 1 2 USB MULTI NET PHONO TUNER DOCK SIRIUS A i To cancel the operat...

Page 124: ...press iENTER 3 Press iCursor D E to select c and then press iENTER Select None to clear the existing assignment 4 Press iRETURN to apply change and return to the previous screen RETURN ENTER SOURCE RECEIVER AV AUDIO 4 3 1 2 7 5 6 V AUX 4 3 1 2 USB MULTI NET PHONO TUNER DOCK SIRIUS A i 4Hours Goes into standby mode when you have not operated this unit for four hours 8Hours Goes into standby mode wh...

Page 125: ...V screen when there is no video signal Power Default TRIGGER OUT 1 or 2 jack function is synchronized with the power status of the zone specified with Target Zone Source TRIGGER OUT 1 or 2 jack function is synchronized with input switching in the zone specified with Target Zone Electronic signal is transmitted according to the Target Source setting Manual Select this to manually switch the output ...

Page 126: ... when the input source specified with this option is selected High Default J2 Electronic signal is transmitted when the input source specified with this option is selected This setting is available only when Trigger Mode is set to Source Low J1 Stops the electronic signal transmission High Default J2 Transmits the electronic signal This setting is available only when Trigger Mode is set to Manual ...

Page 127: ...d as 3 2 0 1 Bitrate The number of bits passing a given point per second Dialogue The dialogue normalization level preset to the current input bitstream signal is displayed when this unit cannot display the corresponding information Some high definition audio bitstream contents may not include the discrete surround back left and right channel signals but are encoded at a sampling rate of 192 kHz E...

Page 128: ...P address of the primary and secondary DNS Domain Name System servers MAC Address Displays the MAC address filter set to this unit Status Displays the network status of this unit Remote ID Displays the Remote ID set to this unit TV Format Displays the TV format set to this unit Speaker Impedance Displays the speaker impedance set to this unit System ID Displays the system ID of this unit Firmware ...

Page 129: ...G SELECT A TUN CH CATEGORY i g q v d m b k g mSOURCE RECEIVER glows orange when operation of this unit is enabled mSOURCE RECEIVER glows green when operation of an external component is enabled Playback Stop DVD player CD player Playback Stop DVD player CD player The remote control keys for controlling external components are available only when the external components have corresponding control k...

Page 130: ...ntrol area 134 MACRO Macro programming mode Use this feature to set the macro program 135 CLEAR Clearing mode Use this feature to clear the configurations of this unit 136 ERASE Erase mode Use this feature to erase the learned functions of each button 137 EX IR Extended IR code mode This feature is for the authorized custom installers only NOTE If no operation is performed for 30 seconds this unit...

Page 131: ...emote control code 2064 using vNumeric keys A remote control code can be entered using iCursor B C D E 3 2 1 6 9 8 7 ENT 0 SETUP 4 5 TV TV VOL TV CH MUTE INPUT 2 ENTER TUN CH CATEGORY SOURCE RECEIVER AV AUDIO 4 3 1 7 5 6 V AUX 4 3 1 2 USB MULTI NET PHONO TUNER DOCK SIRIUS A i v k B d Perform each of the following steps within 30 seconds Settings will be automatically stopped if more than 30 second...

Page 132: ... to select LEARN and press iENTER 2 3 SCENE 1 2 4 ENTER SETUP SOURCE RECEIVER AV AUDIO 4 3 1 7 5 6 V AUX 4 3 1 2 USB MULTI NET PHONO TUNER DOCK TUN CH SIRIUS CATEGORY A i B d e If you continuously want to set up another code for another control area repeat steps 4 to 7 If operation is not possible and the manufacturer of your component has more than one code try each of them until you find the cor...

Page 133: ...rs in the display window if learning was unsuccessful In this case start over from step 3 AV AUDIO TV TV VOL TV CH MUTE INPUT 4 4 3 1 2 7 5 6 V AUX 4 3 1 2 USB MULTI NET PHONO TUNER DOCK ENTER SIRIUS A SOURCE RECEIVER i d l k NOTE When remote control functions are assigned for this mode it may be impossible to operate this unit using the remote control Mode Keys SOURCE Keys for operating external ...

Page 134: ...ously This remote control can learn approximately 200 functions However depending on the signals learned FULL may appear in the display before you program 200 functions In this case clear unnecessary programmed functions to make room for further learning p 137 Learning may not be possible in the following cases when the batteries in the remote control for this unit or other components are weak whe...

Page 135: ...of a button Be sure to set up remote control codes or perform learning operations before programming the macro 1 Press BSETUP SETUP appears in the display window 2 Press iCursor B C repeatedly to select MACRO and press iENTER 3 Press iCursor B C repeatedly to select EDIT and press iENTER 4 Press the macro button lRECEIVER A or dInput selector that you want to assign the macro operations to AV AUDI...

Page 136: ...ou want to and press iENTER Operations assigned to the following modes can be cleared 4 Press dInput selector lRECEIVER A or kA to select the desired clear mode J1 5 Press and hold iENTER for about 3 seconds When the clearing is successful OK appears in the display window 6 Press BSETUP again to exit from the setup mode ZONE SETUP 2 3 SOURCE RECEIVER AV AUDIO SCENE 1 4 4 3 1 2 7 5 6 V AUX 4 3 1 2 ...

Page 137: ...to clear for about 3 seconds If clearing is successful OK appears in the display window 6 Press BSETUP again to exit from the setup menu SETUP AV AUDIO 4 4 3 1 2 7 5 6 V AUX 4 3 1 2 USB MULTI NET PHONO TUNER DOCK ENTER SIRIUS A TUN CH CATEGORY SOURCE RECEIVER d l i k B To continue resetting other keys repeat step 3 to 5 Once you clear a learned function the button reverts to the factory setting or...

Page 138: ... Select the input source p 48 J1 VOLUME Adjust the volume level p 48 MUTE Mutes the audio output p 48 Input source operation keys Operate song playback stop and skip functions for USB or DOCK or select an audio program for HD Radio SLEEP Switches this unit to standby mode automatically after a specified period of time has elapsed sleep timer p 13 These buttons function as well as the following ide...

Page 139: ...ont panel of this unit Extended functionality that can be configured as needed Advanced Setup menu PROGRAM l h MAIN ZONE A STRAIGHT SPEAKER IMP Sets the impedance of speakers REMOTE SENSOR Activate or deactivate the signal receiving capability of the remote control sensor REMOTE CON AMP Changes the remote control ID of a receiver SIRIUS PIN Resets the parental lock code for the SIRIUS Satellite Ra...

Page 140: ...i l B ID1 Default Receives the remote control signals set in ID1 ID2 Receives the remote control signals set in ID2 ID1 is set for both remote control and receiver by default To avoid crossing remote control change the remote control ID for both remote control and receiver REMOTE CON AMP ID1 To change the remote control ID 1 Press BSETUP 2 Press iCursor B C repeatedly to select PRESET and press iE...

Page 141: ...he applicable default settings will be restored when the unit switches to standby mode YES Default Video output signals of a resolution not supported by the TV will not be transmitted SKIP This unit ignores the TV s support capability and transmits input video signals to the TV MONITOR CHECK YES RECOVERY Restores settings for this unit that have been saved BACKUP Saves the current settings of this...

Page 142: ...ware version Check the version of firmware currently installed on this unit USB Default Updates the firmware of this unit using a USB flash drive NETWORK Updates the firmware of this unit over a network Do not use this feature unless the firmware must be updated Be sure to read the information supplied with updates before updating firmware FIRM UPDATE USB STRAIGHT INFO About the latest firmware Wh...

Page 143: ...owing operations by using the TV remote control Power On Off Volume Control Switching between audio output devices Using the HDMI Control function NOTE The following is an example of how to connect this unit a TV and a DVD BD player Follow the instructions in your TV and DVD BD player manuals as well as the ones written below Set the TV s HDMI Control function to On Follow the AV amplifier connect...

Page 144: ...V AUDIO 4 3 1 2 7 5 6 V AUX 4 3 1 2 USB MULTI NET PHONO TUNER DOCK SIRIUS A h i ZONE2 ZONE3 ANTENNA 75 AV 1 HDMI OUT EXTRA SP2 1 2 PHONO GND 1 BD DVD AV 1 DOCK NETWORK AV 2 AV 3 AV 4 COAXIAL COAXIAL OPTICAL OPTICAL AUDIO 1 2 TV 3 CD AUDIO 2 AUDIO 3 AUDIO 4 FRONT SURROUND MULTI CH COMPONEN COAXIAL OPTICAL AV OUT a b c d e f Y PB PR ARC ARC SELECTABLE 1 BD DVD SIRIUS HD Radio GND AM FM 4 RADIO AV 1 ...

Page 145: ...his unit to the TV or audio output from the TV to this unit can be transmitted through a single HDMI cable Audio Return Channel function Audio signals transmitted from the TV to this unit can be assigned to any input source 1 Connect this unit and the TV with an HDMI cable 2 Press hON SCREEN J1 3 Press iCursor B C repeatedly to select Setup and press iENTER 4 Press iCursor D E repeatedly to select...

Page 146: ... which the HDMI audio signals will be assigned and press iRETURN 10 Press iCursor B C to select ARC Audio Return Channel and press iENTER J1 11 Press iCursor C to select On The Audio Return Channel function will turn on 12 Press hON SCREEN to close the Setup menu If the TV hereafter transmits audio output signals this unit will automatically switch to the input source chosen in step 9 RETURN ON SC...

Page 147: ...If you want to output sound from Zone2 or Zone3 connect an external component to AV1 4 AUDIO1 4 or V AUX by analog connection For example if you want to output sound from an HDMI DVD player in Zone2 you must connect the component to this unit by both HDMI and analog connections Since there are many possible ways to connect and use this unit in a multi zone configuration we recommend that you consu...

Page 148: ...Zone2 or Zone3 configure Monitor Out Assign p 122 When Monitor Out Assign is set to Zone2 or Zone3 the content window and Option menu of the input selected for the assigned zone can also be displayed on the TV monitor in the assigned zone MON OUT ZONE OUT MON OUT ZONE OUT MONITOR OUT ZONE OUT Y PB PR PB Y PR V Video in e g Zone2 Component video in Source component This unit Video monitor or Featur...

Page 149: ...nt panel repeatedly to select Balance 3 Press PROGRAM l h to adjust balance The display returns to the previous display soon after the key is released Controlling the content window on the TV monitor in another room When Monitor Out Assign is set to Zone2 or Zone3 the following items can be set with Option menu in the Zone2 or Zone3 Adjusting the Tone Control for the Zone2 or Zone3 Setting the Rep...

Page 150: ...r charge Replace all batteries 13 The unit enters standby mode The protection circuitry has been activated because of a short circuit etc Check that the speaker with an impedance of at least 6 Ω Check that the speaker impedance settings are correct 21 Check that the speaker wires are not touching each other then turn the unit back on The sleep timer has turned off the unit Turn on the unit and pla...

Page 151: ...eaker Manual Setup Level 114 Sound may not be output from certain channels depending on the input source or sound program Try another sound program 51 Problem Cause Remedy See page Only the center speaker outputs substantial sound When a monaural source sound program is applied for some surround decoders sound from all channels is output from the center speaker Try another sound program 51 No soun...

Page 152: ...storted or the volume may decreased due to the nature of AV receivers Turn on all components connected to this unit Max Volume is set to a low value Set it to a higher value 116 Problem Cause Remedy See page Problem Cause Remedy See page The front panel display HDMI indicator is flashing An error with the HDMI connection has occurred Try re inserting the HDMI cable Confirm that HDMI video that is ...

Page 153: ...n preset does not work Automatic station preset is not available for AM stations Use manual station preset 63 Continuous crackling and hissing noises are heard The supplied AM loop antenna is not connected Connect the AM loop antenna correctly even if you use an outdoor antenna 40 The noises may be caused by lightning fluorescent lamps motors thermostats or other electrical equipment It is difficu...

Page 154: ...nt Tag data has been transferred to your iPod iPhone Problem Cause Remedy See page SIRIUS Satellite Radio information is not displayed properly The hold function is enabled Press HOLD to disable the hold function 74 Display Cause Remedy See page ANTENNA ERROR The antenna is not connected to the SiriusConnect tuner properly Check the connection of the antenna and SiriusConnect tuner 70 SIRIUS LOADI...

Page 155: ...es and directories in the USB device cannot be viewed The music files and directories are placed in locations other than the FAT area Place music files and directories in the FAT area You are attempting to browse directory hierarchies of over 8 levels or a directory with more than 500 files Modify the data structure on your USB device The PC server Internet Radio does not function properly The IP ...

Page 156: ...oblem Cause Remedy See page Access error This unit cannot access your USB storage device or USB portable audio player Try another USB storage device or USB portable audio player There is a problem with the signal path from your USB storage device or USB portable audio player to this unit Turn off this unit and reconnect your USB storage device or USB portable audio player to the USB port of this u...

Page 157: ...ected with this unit via wireless transmission Unable to play The unit cannot playback the songs currently stored on your iPod iPhone Check that songs are currently stored on your iPod iPhone Display Cause Remedy See page Searching The Yamaha Bluetooth Wireless Audio Receiver and the Bluetooth component are in the process of pairing The Yamaha Bluetooth Wireless Audio Receiver and the Bluetooth co...

Page 158: ... battery of remote control runs out immediately The power of battery is not enough Replace the battery with alkaline battery Externalcomponents cannot be controlled using the remote control The remote control code is not correctly set Set the remote control code correctly using Remote control code search on the CD ROM Try setting another code for the same manufacturer using Remote control code sea...

Page 159: ...er channel and 2 surround left and right channels instead of only 1 surround channel for conventional Pro Logic technology There are three modes available Music mode for music sources Movie mode for movie sources and Game mode for game sources Dolby Pro Logic IIx Dolby Pro Logic IIx is a new technology enabling discrete multichannel playback from 2 channel or multi channel sources There are three ...

Page 160: ... small unit of time Standing for Pulse Code Modulation the analog signal is encoded as pulses and then modulated for recording Sampling frequency and number of quantized bits When digitizing an analog audio signal the number of times the signal is sampled per second is called the sampling frequency while the degree of fineness when converting the sound level into a numeric value is called the numb...

Page 161: ...r high definition video as well as multichannel digital audio using a single cable HDMI transmits all ATSC HDTV standards and supports 8 channel digital audio with bandwidth to spare to accommodate future enhancements and requirements When used in combination with HDCP High bandwidth Digital Content Protection HDMI provides a secure audio video interface that meets the security requirements of con...

Page 162: ... Video etc Bitstream High definition audio Dolby TrueHD Dolby Digital Plus DTS HD Master Audio DTS HD High Resolution Audio DTS Express Blu ray Disc HD DVD etc NOTES When CPPM copy protected DVD Audio is played back video and audio signals may not be output depending on the type of the DVD player This unit is not compatible with HDCP incompatible HDMI or DVI components Refer to the supplied instru...

Page 163: ...ed Under License From iBiquity Digital Corp U S and Foreign Patents HD Radio and the HD Radio logo are proprietary trademarks of iBiquity Digital Corp Bluetooth Bluetooth is a registered trademark of the Bluetooth SIG and is used by Yamaha in accordance with a license agreement HDMI the HDMI logo and High Definition Multimedia Interface are trademarks or registered trademarks of HDMI Licensing LLC...

Page 164: ... FLAC Max Audio Support fs 48 kHz 24 bit Cover Art Format PNG JPEG Ethernet 100Base TX 10Base TX 1 Internet Radio Audio Format MP3 WMA PC Server Audio Format MP3 WMA WAV MPEG 4 AAC FLAC Max Audio Support fs 96 kHz 24 bit Cover Art Format PNG JPEG DLNA Version 1 5 DMP DMR support Audio Format MP3 WMA WAV MPEG 4 AAC FLAC Max Audio Support fs 96 kHz 24 bit Cover Art Format PNG JPEG U S A model Intern...

Page 165: ... 100 110 120 160 200 Hz H P F FRONT CENTER SURROUND SURROUND BACK Small 12 dB oct L P F SUBWOOFER 24 dB oct Video Section Video Format MONITOR OUT ZONE OUT Wall Paper OSD U S A and Canada models NTSC PAL Australia model PAL NTSC Video Signal Type Video Conversion NTSC PAL Signal Level Composite 1 Vp p 75 Ω S Video NTSC 1 Vp p 75 Ω Y 0 286 Vp p 75 Ω C PAL 1 Vp p 75 Ω Y 0 3 Vp p 75 Ω C Component 1 V...

Page 166: ...106 CLEAR 136 Clear All Preset 65 69 75 Clear Preset 65 69 75 Close DOCK iPod 91 COAXIAL jack 27 COMPONENT VIDEO jack 27 Compressed Music Enhancer 53 Configuration Manual Setup Speaker setup 112 Connect Option menu 61 Connecting speakers 20 Connecting to network 38 Connecting USB storage device 39 Connections 15 Content window 62 Control Select HDMI setup 119 Controlling Zone2 or Zone3 149 Cursor ...

Page 167: ...u 61 Panorama Sound Program menu 109 Parametric EQ Speaker setup 114 Parental Lock 75 Party mode 149 Party Mode Set Multi Zone setup 122 PC 76 PHONES jack 9 Play Control DOCK iPod 92 Play Control Internet Radio 81 Play Control PC 77 85 Play Control USB 79 Power Amp Assign Manual Setup Speaker setup 112 PREOUT connection 26 Presence speaker 15 Presence speaker connection 20 Presence speaker layout ...

Page 168: ...lay Sound Program menu 106 Surround L Level Sound Program menu 108 Surround Liveness Sound Program menu 107 Surround R Level Sound Program menu 108 Surround Room Size Sound Program menu 106 Surround speaker 15 S VIDEO jack 27 System Information menu 128 T Test Tone Speaker setup 115 Tone control 49 Tone Control Option menu 60 Transmitter of the Wireless System for iPod 92 Trigger connection 37 Tri...

Page 169: ... 2010 Yamaha Corporation YC712A0 OMEN1 ...

Page 170: ... this unit during operation External components TV Cable Cables for connecting external components may differ depending on the components you are connecting Speaker cables a quantity to match the number of speakers you are connecting Audio pin cable for subwoofer Playback device such as BD Blu ray Disc DVD players Use speakers with an impedance of at least 6 Ω 4 Ω speakers can also be used as the ...

Page 171: ...er parameters automatically YPAO This unit TV Subwoofer 1 1 1 1 2 2 3 3 4 4 BD DVD player recorder Center speaker Surround speaker R Surround speaker L Surround back speaker L Surround back speaker Surround back speaker R Front speaker R Front speaker L 7 1 Connect when using with 7 1 channel speaker layout Place the surround back speakers L R 12 in 30 cm or more away from each other 6 1 Connect w...

Page 172: ...t circuits 2 Loosen the speaker terminals 3 Insert the bare wire of the speaker cable into the gap on the side of the terminal 4 Tighten the terminal Connecting the subwoofer 1 Connect the subwoofer input jack to the SUBWOOFER 1 jack on this unit with an audio pin cable SINGLE PRE OUT CENTER CENTER SUR BACK SURRUND 1 2 FRONT REAR SUBWOOFER FRONT 2 Set the subwoofer volume as follows Volume Set to ...

Page 173: ... COAXIAL AV A A OUT a a b c d Y M MO ON N O OU UT T T T T T Z Z O ON NE E O OU UT T OPTICAL O O Audio output Audio output from TV Input jack on this unit Optical digital output AUDIO1 Coaxial digital output AUDIO2 Analog output AUDIO1 AUDIO2 AUDIO3 or AUDIO4 HDMI Audio Return Channel Described in the right column HDMI OUT 1 or HDMI OUT 2 Connecting to AUDIO1 allows you to playback TV audio just by...

Page 174: ...1A MAX Power cable 5 3 3 Connect playback devices such as BD DVD players and recorders If your playback device has multiple audio video outputs connect with the following priority A to D to enjoy a higher quality sounds and images Plug the supplied power cable into the AC inlet after all other connections are complete then plug the power cable into an AC wall outlet 4 4 Connect the power cable Ref...

Page 175: ...ition When positioning the microphone we recommend that you use equipment that allows you to adjust the height such as a tripod as a microphone stand When using a tripod use the tripod screws to fix the microphone in place Measuring for multiple listening positions is also available For more information refer to Setting up the speaker parameters automatically YPAO in the Owner s Manual 3 Press REC...

Page 176: ...ally YPAO for details on Multi Position in the Owner s Manual The display at right appears if measurement finishes without any problems Result Displays the results of automatic acoustics measurement For details refer to Reviewing the automatic setup parameters in the Owner s Manual Save Exit Applies the result to the speaker setup and finishes the automatic measurement Note If a problem occurs an ...

Page 177: ...ith a single key Refer to Default scene settings on page 5 for details on the settings assigned to this unit D Adjusts the volume level The current volume level is displayed on the front panel display VOLUME M a i n V o l u m e E Mutes the sound The MUTE indicator blinks while the sound is muted F Selects sound field programs and sound decoders Front panel Remote control Description LIVE CLUB CLAS...

Page 178: ...9 0277 0323 0342 0343 0344 Contec Cony 0012 0058 Continental Edison 0345 Cosmel 0323 0343 Craig 0058 0179 Crosley 0010 0037 0171 0339 Crown 0058 0161 0171 0179 0320 0323 0343 0349 0350 0351 CS Electronics 0277 0340 0342 CTC Clatronic 0341 CTX 0205 Curtis Mathes 0007 0008 0010 0019 0021 0026 0049 0050 0178 CXC 0058 0179 Cybertron 0340 Cytron 0152 Daewoo 0007 0008 0026 0037 0053 0167 0266 0275 0277 ...

Page 179: ...368 0377 0466 0471 0478 LG GoldStar 0164 Liesenk 0349 Liesenkotter 0320 Life 0337 0343 Lifetec 0320 0323 0337 0343 Lloyds 0323 Loewe 0161 0168 0265 0320 0330 0352 Loewe Opta 0339 0349 0350 Logik 0054 Luma 0320 0323 0346 0349 Lumatron 0282 0320 0346 0349 0350 Lux May 0350 Luxman 0008 0026 Luxor 0282 0342 0346 LXI 0010 0019 0021 0026 0027 0031 0049 0111 M Electronic 0342 0343 0345 0347 0349 0350 MAG...

Page 180: ...41 Sinudyne 0320 0339 0341 0349 Skantic 0347 Solavox 0347 Sonitron 0161 0282 Sonoko 0282 0320 0323 0337 0342 0343 0349 0350 Sonolor 0321 0347 Sontec 0161 0320 0349 0350 Sony 0038 0044 0045 0047 0055 0104 0105 0107 0110 0123 0184 0220 0248 0249 0251 0252 0254 0326 0343 0344 0371 0374 0457 0475 Sound Vision 0340 0341 Soundesign 0008 0026 0031 0058 0059 0179 Soundwave 0320 0349 0350 Squareview 0051 S...

Page 181: ...no Hit 1008 1009 1025 1028 1029 1030 Innovation 1024 Instant Replay 1068 Interbuy 1008 1031 Interfunk 1028 Intervision 1009 1026 Irradio 1008 1029 1031 ITT 1027 ITV 1009 1025 1031 JC Penney 1064 1065 1068 1070 1071 JCL 1068 JVC 1007 1018 1027 1039 1064 1065 1066 1067 1078 1089 1092 1093 1094 1095 1113 1208 1209 1212 1213 1215 1218 Kaisui 1008 1029 Karcher 1028 Kendo 1008 1024 1025 1030 Kenwood 102...

Page 182: ...2356 2358 2360 2370 Denzel 2380 Desay 2205 Diamond 2354 2355 DiamondVision 2225 2232 Disney 2010 2028 DK Digital 2339 Dmtech 2176 Dual 2380 Durabrand 2136 DVX 2355 Easy Home 2359 Eclipse 2354 E Dem 2364 Electrohome 2362 Elin 2362 Elta 2341 2361 2362 Emerson 2129 2137 2150 Enterprise 2129 Enzer 2380 Epson 2247 ESA 2137 Finlux 2354 2362 2367 Fintec 2377 Fisher 2134 Funai 2137 Gateway 2051 GE 2029 21...

Page 183: ...Pioneer 2212 2506 Samsung 2045 2113 2498 Sharp 2194 2220 2221 2497 2502 2503 Sony 2075 2453 2458 2459 2507 Toshiba 2462 Yamaha 2064 2448 2449 2474 2505 DVR Bush 2110 Hitachi 2090 Panasonic 2066 2067 2093 2116 2117 2119 2120 2122 2123 Philips 2108 2111 Pioneer 2016 2017 2018 2019 2092 2094 2095 2109 RCA 2105 Samsung 2113 2219 Sharp 2088 2091 Sony 2084 2085 2087 Toshiba 2086 Yamaha 2089 2118 DVD Rec...

Page 184: ...pressvu 4117 Fenner 4024 4212 4217 Ferguson 4006 4052 4214 Fidelity 4218 Finlandia 4006 Finlux 4006 FinnSat 4050 4052 Flair Mate 4217 Foxtel 4222 Freecom 4001 4049 4218 FTEmaximal 4024 4217 Fuba 4001 4008 4014 4015 4024 4055 4215 Galaxis 4005 4008 4009 4024 4048 4050 4215 4222 GE 4066 4093 4111 4197 General Instrument 4019 4073 GMI 4011 GOI 4117 Goldbox 4213 GoldStar 4049 Goodmans 4002 4006 4029 G...

Page 185: ... 4115 STVI 4031 Sumida 4011 Sunny Sound 4024 Sunsat 4217 Sunstar 4011 4024 4054 Supermax 4223 Tandberg 4052 Tandy 4004 Tantec 4006 TCM 4008 Techniland 4012 TechniSat 4014 4021 4026 4027 4038 4039 4053 4212 4213 4218 Technology 4222 Technosat 4223 Technowelt 4219 Teco 4011 4054 Telanor 4007 Telasat 4215 4219 Telecom 4217 Telefunken 4001 4017 4216 Teleka 4004 4011 4014 4218 4219 Telemaster 4010 Tele...

Page 186: ...AV Receiver English Safety Brochure ...

Page 187: ...TICE DO NOT MODIFY THIS UNIT This product when installed as indicated in the instructions contained in this manual meets FCC requirements Modifications not expressly approved by Yamaha may void your authority granted by the FCC to use the product 2 IMPORTANT When connecting this product to accessories and or another product use only high quality shielded cables Cable s supplied with this product M...

Page 188: ... dangerous and may cause fire damage to this unit and or personal injury Yamaha will not be held responsible for any damage resulting from use of this unit with a voltage other than specified 13 To prevent damage by lightning keep the power cable and outdoor antennas disconnected from a wall outlet or this unit during a lightning storm 14 Do not attempt to modify or fix this unit Contact qualified...

Page 189: ...In such a case install new batteries and set the remote control code Dispose of batteries according to your regional regulations FOR CANADIAN CUSTOMERS To prevent electric shock match wide blade of plug to wide slot and fully insert This Class B digital apparatus complies with Canadian ICES 003 IMPORTANT Please record the serial number of this unit in the space below MODEL Serial No The serial num...

Page 190: ... 2010 Yamaha Corporation YC712A0 SBEN ...

Page 191: ... settings aren t implemented yet We have made no provision for supporting the hierarchical or lossless processes defined in the standard We provide a set of library routines for reading and writing JPEG image files plus two sample applications cjpeg and djpeg which use the library to perform conversion between JPEG and some other popular image file formats The library is intended to be reused in o...

Page 192: ...uded in this distribution by permission of L Peter Deutsch sole proprietor of its copyright holder Aladdin Enterprises of Menlo Park CA ansi2knr c is NOT covered by the above copyright and conditions but instead by the usual distribution terms of the Free Software Foundation principally that you must include source code if you redistribute it See the file ansi2knr c for full details However since ...

Page 193: ...chreports E TR 098 htm A PostScript version of the JFIF document is available at http www ijg org files jfif ps gz There is also a plain text version at http www ijg org files jfif txt gz but it is missing the figures The TIFF 6 0 file format specification can be obtained by FTP from ftp ftp sgi com graphics tiff TIFF6 ps gz The JPEG incorporation scheme found in the TIFF 6 0 spec of 3 June 92 has...

Page 194: ... the same disclaimer and license as libpng 0 96 with the following individuals added to the list of Contributing Authors Tom Lane Glenn Randers Pehrson Willem van Schaik libpng versions 0 89 June 1996 through 0 96 May 1997 are Copyright 1996 1997 Andreas Dilger Distributed according to the same disclaimer and license as libpng 0 88 with the following individuals added to the list of Contributing A...

Page 195: ...ECT INCIDENTAL SPECIAL EXEMPLARY OR CONSEQUENTIAL DAMAGES INCLUDING BUT NOT LIMITED TO PROCUREMENT OF SUBSTITUTE GOODS OR SERVICES LOSS OF USE DATA OR PROFITS OR BUSINESS INTERRUPTION HOWEVER CAUSED AND ON ANY THEORY OF LIABILITY WHETHER IN CONTRACT STRICT LIABILITY OR TORT INCLUDING NEGLIGENCE OR OTHERWISE ARISING IN ANY WAY OUT OF THE USE OF THIS SOFTWARE EVEN IF ADVISED OF THE POSSIBILITY OF SU...

Reviews: