background image

RM Series Wireless Microphone System Reference Manual

29

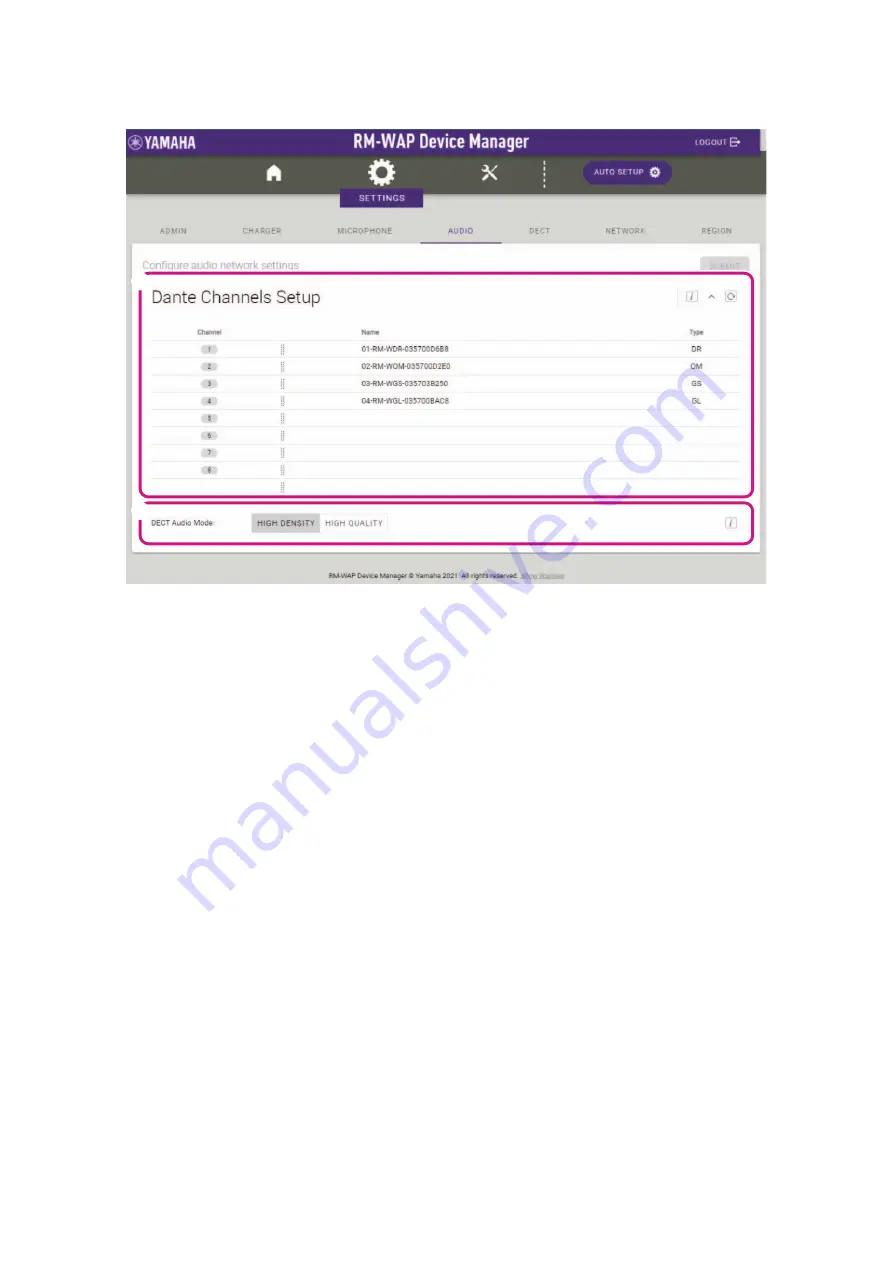
[AUDIO]

1

[Dante Channels Setup]

• Allows you to check the Dante channel assigned to each microphone.

• Allows you to change the channel assignment by dragging the microphone name to the row of the desired Dante channel.

2

[DECT Audio]

Allows you to set the access point to High Density mode or High Quality mode. High Quality mode has better audio quality than High 
Density mode, but the maximum number of microphones that can be used may be limited.

1

2

Summary of Contents for RM Series

Page 1: ...correct and safe use of the products be sure to first read this manual carefully together with the Owner s Manual included with each product Information The illustrations and images shown in this man...

Page 2: ...ce Manager 1 Download the application RM Device Finder from the Yamaha website U S A and Canada https uc yamaha com support Other countries https download yamaha com and then start it 2 Using a LAN ca...

Page 3: ...ophone System Reference Manual 3 5 Specify a password in the password settings window and then click the SET PASSWORD button 6 Type the password into the login window and then click the LOGIN button T...

Page 4: ...crophones or the microphone connection may be unexpectedly cut We recommend thoroughly examining the environment before installation AUTO SETUP After products have been installed their settings can be...

Page 5: ...to continue the setup 1 Site Survey Check the contents of the window and then click the CONTINUE button The window shows the number of microphones that can be used in the installation environment It a...

Page 6: ...the title of the next window in this case 2 General Settings to display the next window Once the window has been displayed the circled number in the window title is replaced with Clicking a window ti...

Page 7: ...CONTINUE button NOTE The access point settings can be changed if necessary 1 3 2 1 AP Name Allows you to select whether to specify the name of the access point automatically or manually 2 Locale Allow...

Page 8: ...om panel of the charger for at least two seconds The access point and charger are paired When pairing is finished the charger name appears in the window NOTE Pairing means that the products register e...

Page 9: ...d from the beginning step 1 does not need to be performed 2 Place the microphone s on the charger The microphone firmware is updated During the update the Mic indicators on the top panel of the microp...

Page 10: ...press the ACTIVATE button on the top panel of the charger for at least two seconds The access point and microphone s are paired When pairing is finished the name s of the microphone s change from appe...

Page 11: ...CONTINUE button NOTE You can change the channel assignment by dragging the microphone name to the row of the desired Dante channel 7 Summary Check the microphone settings and then click the FINISH but...

Page 12: ...ify icon in Web GUI clicked Flashes white Responding to Identify function Updating firmware Flashes white quickly Firmware being updated Updating firmware After flashing white quickly Flashes white tw...

Page 13: ...pting audio Therefore please note the following When using managed switches turn off the EEE function on all ports used for Dante Do not use a switch that does not allow the EEE function to be turned...

Page 14: ...in Web GUI clicked Flashes white Responding to Identify function Updating firmware Flashes white quickly Firmware being updated Updating firmware After flashing white quickly Flashes white twice Firm...

Page 15: ...15 hours Charging the unit Lit red Charging available operating time of less than 3 hours Charging the unit Unlit Charging finished Battery button pressed Lit green for two seconds Remaining operatin...

Page 16: ...e as described for RM WOM and RM WDR 2 Ring indicator Flashes together with the Mic indicators 3 Battery button 4 Battery indicator Functions in the same way as the Battery button indicator of the RM...

Page 17: ...least 2 seconds After flashing blue quickly Flashes blue twice Access point and microphone s paired successfully ACTIVATE button long pressed for at least 2 seconds After flashing blue quickly Flashe...

Page 18: ...PAIR button long pressed for at least 2 seconds Flashes blue quickly Waiting for pairing Pairing PAIR button long pressed for at least 2 seconds After flashing blue quickly Flashes blue twice Paired...

Page 19: ...y Settings Deployment Server Settings Syslog Settings ADMIN REGION Time Settings Locale Daylight Saving Settings NETWORK AP Name Settings IP Address Settings AUDIO Dante Channels Setup DECT Audio DECT...

Page 20: ...information about the item Reload button Click to update the window contents Identify button Click to cause the indicator of the corresponding device to flash Link button Click to go to another window...

Page 21: ...o check the status of the Dante word clock Leader or Follower appears If there is an abnormality in the word clock this appears in orange Allows you to check the status of the DECT frame synchronizati...

Page 22: ...hone Battery Status Shows the battery charge as a percentage Indicates the remaining charge of the battery by a color Red 3 to 10 1 to 3 hours Yellow 10 to 50 3 to 15 hours Green 50 or more 15 hours o...

Page 23: ...Deployment Server Settings By using a deployment server the device configuration file can be automatically acquired and applied to the device Enable Deployment Server Allows you to select whether to u...

Page 24: ...he PAIR NEW button to put the access point in pairing standby mode and then long press the PAIR button on the bottom panel of the charger for at least two seconds When pairing is finished the charger...

Page 25: ...icons Start Mode Starts up in Start Up mode Starts up in Standby mode Start Mute Mode Starts up with the microphone turned off Starts up with the microphone turned on Mic Button Behavior The Mic butto...

Page 26: ...n to one of the following TOGGLE Turn on off the microphone by touching the Mic button PUSH TO TALK The microphone is on while the Mic button is touched Multiple devices cannot be used to talk at the...

Page 27: ...HIGH 12 dB With RM WGS select one of the following OFF 0 dB LOW 6 dB MEDIUM 12 dB HIGH 18 dB With RM WGL select one of the following OFF 0 dB LOW 6 dB MEDIUM 12 dB HIGH 18 dB Adaptive Echo Canceller A...

Page 28: ...ve when used in combination with a processor other than RM CR Band Type Q Freq Gain Bypass Allows you to specify PEQ settings for each of the six bands For Type under Band A or Band F select one of th...

Page 29: ...ne Allows you to change the channel assignment by dragging the microphone name to the row of the desired Dante channel 2 DECT Audio Allows you to set the access point to High Density mode or High Qual...

Page 30: ...ignal strength 2 DECT Synchronization Allows you to select whether to synchronize the DECT frame across multiple access points When multiple access points are used turn on Enable DECT Synchronization...

Page 31: ...ss is specified in Auto IP mode if there is no DHCP server If settings have been incorrectly specified press the Reset button on the front of the RM WAP to reset the network related settings 2 AP Name...

Page 32: ...EGION 1 Time Settings Allows you to specify the date and time Allows you to select whether to use NTP 2 Locale Allows you to specify the time zone 3 Daylight Saving Settings Allows you to select wheth...

Page 33: ...examining the environment before installation Allows you to check the measurement results and the number of microphones that can be used in the installation environment by clicking the RSSI SCAN MODE...

Page 34: ...RM Series Wireless Microphone System Reference Manual 34 Allows you to check for DECT masters in the installation environment as well as their signal strength by clicking the SYSTEM LIST MODE button...

Page 35: ...llows you to update the firmware of access points wireless microphones and chargers from the UPDATE window IMPORTANT Be sure to click the TURN ON FWU MODE button before updating the firmware Be sure t...

Page 36: ...Upload New Firmware Allows you to update the firmware of the access point Click select the firmware and then click the UPLOAD UPDATE AP button NOTE Alternatively you can drag the firmware directly to...

Page 37: ...to import settings Click select a settings file and then click the IMPORT CONFIGURATION button NOTE Create the settings file to be imported by editing the one exported in 1 Alternatively you can drag...

Page 38: ...RM Series Wireless Microphone System Reference Manual 38 LOGS 1 Logs Allows you to download logs by clicking the DOWNLOAD LOGS button 1...

Page 39: ...s Manual this document 1 Dante PoE port Dante audio Dante control External control PoE Cable requirements CAT5e or higher STP Sampling rate 48 kHz Bit depth 24 bit Audio input output Dante 8 out out1...

Page 40: ...requirement RM WBT lithium ion battery Output 3 60 V 2350 mAh Maximum power consumption 5 V 0 7 A In operation Temperature 0 C 40 C Humidity 20 85 no condensation In charging Temperature 5 C 40 C Humi...

Page 41: ...3 dBA SPL SNR Ref 94 dB SPL at 1 kHz RM WOM 117 0 dBA RM WDR 118 7 dBA RM WGL RM WGS 113 3 dBA Sensitivity RM WOM 5 4 dBFS Pa RM WDR 6 2 dBFS Pa RM WGL RM WGS 12 2 dBFS Pa Dynamic range RM WOM 122 4 d...

Page 42: ...P16V2 4A R AC adaptor 1 Power cord 1 or 3 Owner s Manual this document 1 Supported standard 1 9 GHz DECT standard Radio frequency USA Canada 1920 0 MHz 1930 0 MHz Europe Northern Europe UK Australia...

Reviews: