background image

4-79

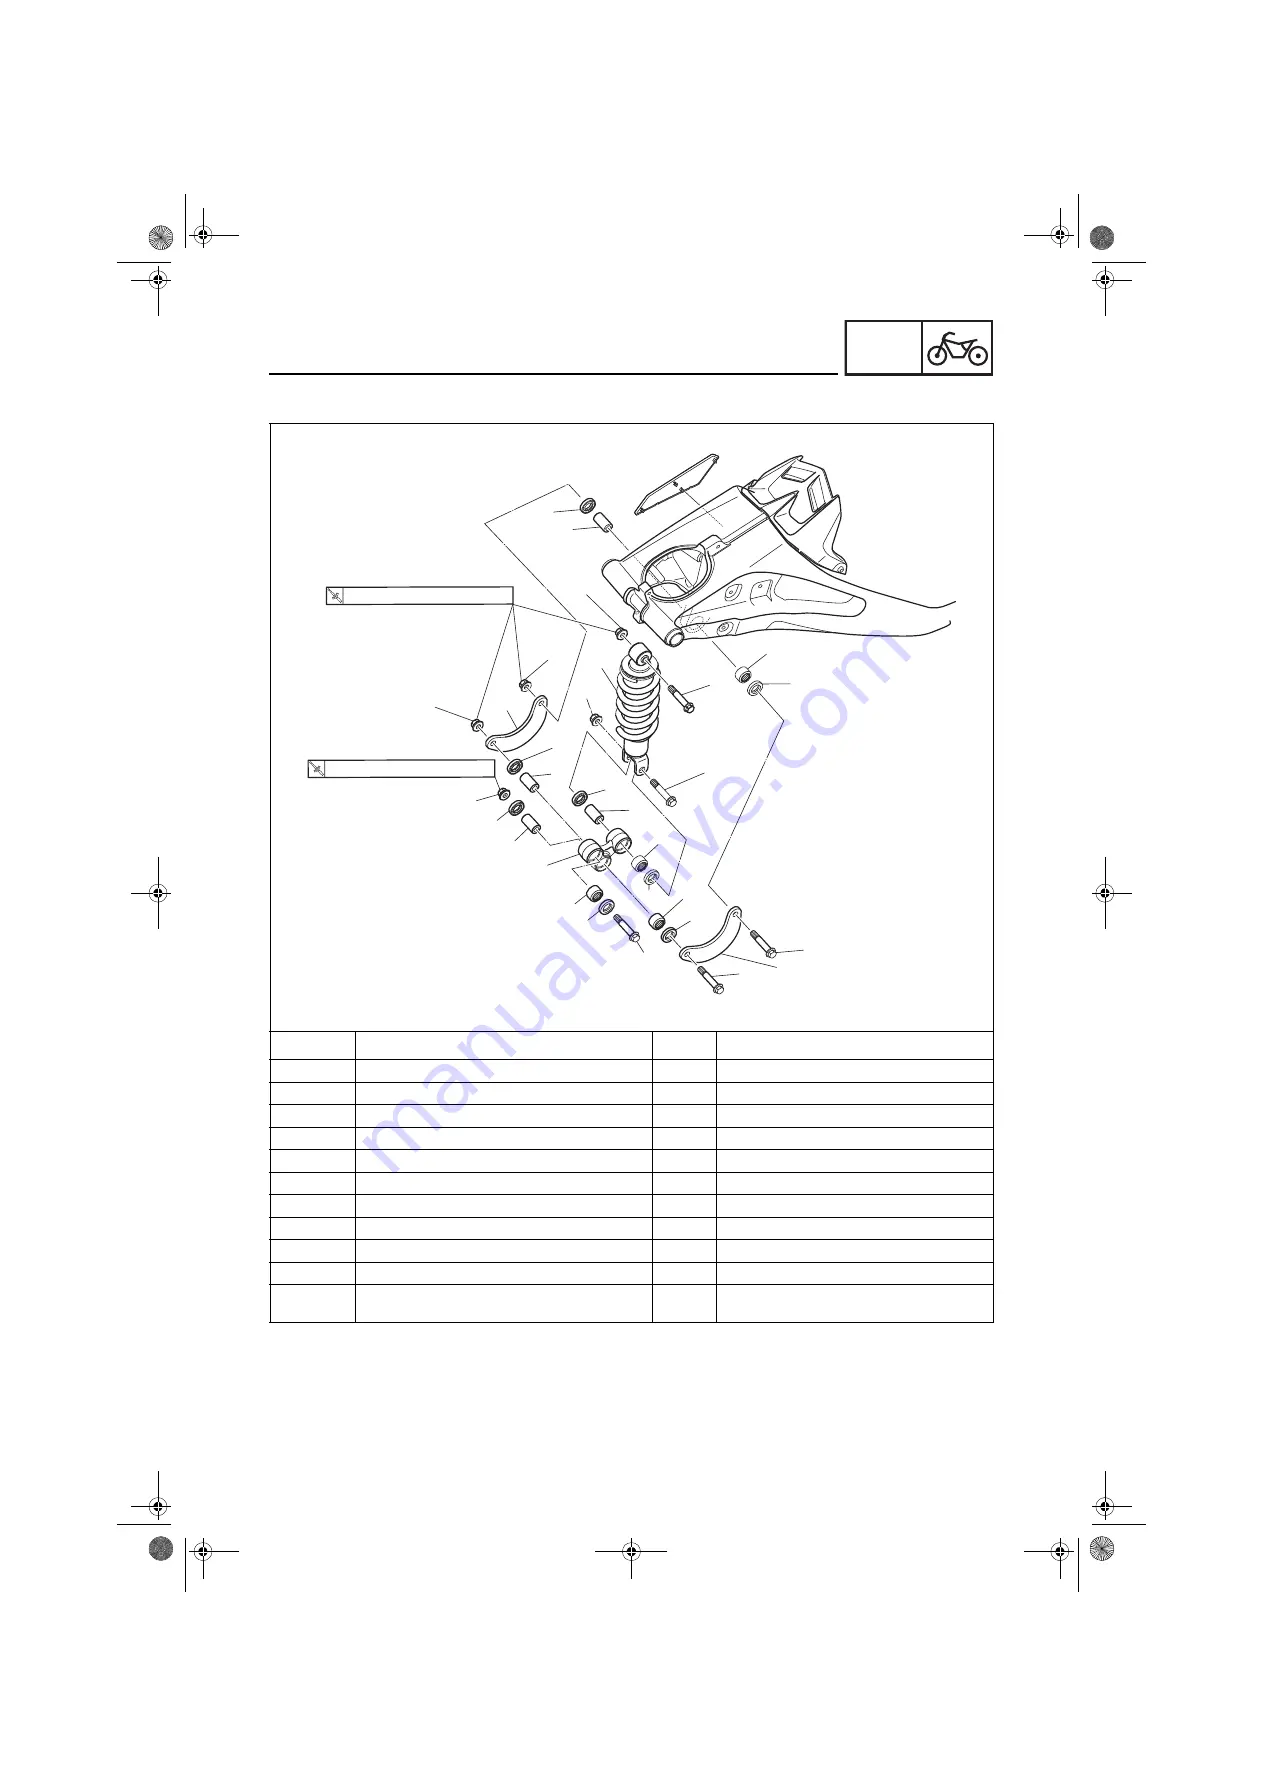
REAR SHOCK ABSORBER ASSEMBLY

CHAS

EAS20036

REAR SHOCK ABSORBER ASSEMBLY

Removing the rear shock absorber assembly

Order

Job/Parts to remove

Q’ty

Remarks

1

Rear shock absorber assembly lower nut/bolt

1/1

2

Rear shock absorber assembly upper nut/bolt

1/1

3

Connecting arm nut/bolt

2/2

M10 

×

 63 mm

4

Relay arm along with connecting arm

1

5

Rear shock absorber assembly

1

6

Relay arm nut/bolt

1/1

7

Connecting arm

2

8

Spacer

4

9

Oil  seal

8

10

Bearing

4

For installation, reverse the removal proce-
dure.

8

1

2

3

3

4

3

1

2

5

6

6

7

8

9

7

8

8

9

9

9

9

10

10

10

10

9

9

9

3

NOTE

: Apply “Lithium-soap-based grease” on part serial number :-  1,2,3,6,8,9,10

44

(4.4 kgf·m, 32 lb·ft)

N·m

44

(4.4 kgf·m, 32 lb·ft)

N·m

BCWF8197E0.book  Page 79  Thursday, November 18, 2021  9:18 AM

Summary of Contents for R15 2022

Page 1: ...2022 SERVICE MANUAL BCW F8197 E0 YZF155D A YZF155 A BCWF8197E0 book Page 1 Thursday November 18 2021 9 18 AM...

Page 2: ...ere applicable TIP Designs and specifications are subject to change without notice EAS20081 IMPORTANT MANUAL INFORMATION Particularly important information is distinguished in this manual by the follo...

Page 3: ...smaller print than the section title To help identify parts and clarify procedure steps there are exploded diagrams 3 at the start of each removal and disassembly section Numbers 4 are given in the o...

Page 4: ...ngine mounted Molybdenum disulfide oil Filling fluid Brake fluid Lubricant Wheel bearing grease Special tool Lithium soap based grease Tightening torque Molybdenum disulfide grease Wear limit clearanc...

Page 5: ...ENTS GENERAL INFORMATION 1 SPECIFICATIONS 2 PERIODIC CHECKS AND ADJUSTMENTS 3 CHASSIS 4 ENGINE 5 COOLING SYSTEM 6 FUEL SYSTEM 7 ELECTRICAL SYSTEM 8 TROUBLESHOOTING 9 BCWF8197E0 book Page 1 Thursday No...

Page 6: ...BCWF8197E0 book Page 2 Thursday November 18 2021 9 18 AM...

Page 7: ...CCU Communication Control Unit 1 22 HANDLEBAR SWITCHES 1 23 INDICATOR LIGHTS AND WARNING LIGHTS 1 24 DISPLAY 1 25 MENU MODE 1 31 IMPORTANT INFORMATION 1 34 PREPARATION FOR REMOVAL AND DISASSEMBLY 1 34...

Page 8: ...CLE IDENTIFICATION NUMBER The vehicle identification number 1 is stamped into the steering head pipe EAS30004 ENGINE SERIAL NUMBER The engine serial number 1 is stamped into the crankcase X X X X X X...

Page 9: ...pping according to the difference between the wheel speeds If the slip ping exceeds the preset value the ECU controls the slipping using integrated control of the ignition timing and fuel cut off The...

Page 10: ...fuel cut off so that the amount of slip is less than the preset value The traction control system indicator light in the meter assembly flashes when the traction control system has activated 1 A B D...

Page 11: ...stem has been set to OFF the indicator light will come on TCS OFF TCS OFF turns the traction control system off TCS ON TCS ON turns the traction control system on NOTICE ECA19650 Use only the specifie...

Page 12: ...F 2 Wait a few seconds and then turn key back to ON 3 The indicator light should turn off and the system be enabled 4 Check the vehicle and turn off the warning light TIP If the indicator light or the...

Page 13: ...e to deliver more performance and cleaner exhaust gases increase it becomes necessary to control the air fuel ratio in a more precise and finely tuned manner To accom modate this need this model has a...

Page 14: ...d by the ECU Signals that are input from the throttle position sensor crankshaft position sensor intake air pressure sensor intake air temperature sensor lean angle sensor coolant temperature sensor a...

Page 15: ...pact and lightweight design to help maintain the basic maneuverability of the vehicle ABS layout 1 Yamaha diagnostic tool coupler ABS test coupler 2 ABS control unit fuse 3 ABS solenoid fuse 4 ABS mot...

Page 16: ...ratio is the value that shows the rate of wheel slippage and is defined by the following formula Slip ratio Chassis speed Wheel speed Chassis speed 100 0 There is no slipping between the wheel and th...

Page 17: ...pressure is reduced it increases the hydraulic pressure point B in the following figure The hydraulic pressure is initially increased quickly and then it is increased gradually ABS operation and vehi...

Page 18: ...caused by applying the brakes The ABS cannot prevent wheel lock on slippery surfaces such as ice when it is caused by engine braking even if the ABS is operating Electronic ABS features The Yamaha ABS...

Page 19: ...nstalled in the wheel sensor generates pulses The pulse frequency which is proportional to the wheel speed is converted into a wave in the hall IC so that it can be output The ABS ECU calculates the w...

Page 20: ...ight will go off when the vehicle is ridden or pushed at a speed of 10 km h 6 3 mi h or faster NOTICE ECA20950 If the rear wheel is raced with the vehicle on a suitable stand the ABS warning light may...

Page 21: ...ed in the inlet solenoid valve varies proportionally with the duty cycle control voltage that is supplied to it Since this voltage is continuously variable the solenoid valve moves smoothly and the hy...

Page 22: ...aliper side Buffer chamber The buffer chamber accumulates the brake fluid that is depressurized while the ABS is operating ABS ECU The ABS ECU is integrated with the hydraulic unit to achieve a compac...

Page 23: ...n and troubleshooting 1 Battery 2 AC magneto 3 Rectifier regulator 4 Main fuse 5 ABS motor fuse 6 ABS solenoid fuse 7 Main switch 8 ABS control unit fuse 9 Rear brake light switch 10 Front brake light...

Page 24: ...uring this test a clicking noise can be heard from under the seat and if the brake lever or brake pedal is even slightly operated a vibration can be felt at the lever and pedal but these do not indica...

Page 25: ...increases and the brake fluid is sent to the brake caliper At this time the inlet and outlet check valves of the hydraulic pump are closed As a result of eliminating the orifice the brake master cylin...

Page 26: ...id valve is opened the brake fluid is sent to the buffer chamber As a result the hydraulic pressure in the brake caliper is reduced The brake fluid stored in the buffer chamber is pumped back to the b...

Page 27: ...t solenoid valve opens the brake line from the brake master cylinder opens allowing the brake fluid to be sent to the brake caliper 1 Brake master cylinder 2 Brake light switch 3 ABS motor 4 Hydraulic...

Page 28: ...ke pedal When the ABS is activated the grip between the road surface and tires is close to the limit The ABS cannot prevent wheel lock on slippery surfaces such as ice when it is caused by engine brak...

Page 29: ...TIP Yamaha Motorcycle Connect may not work on all smartphone models and OS operating sys tem versions 2 Remove the passenger seat 3 Pull out the CCU and scan its QR code with the Yamaha Motorcycle Co...

Page 30: ...s or when the throttle cable is stuck EAUN2211 Hazard lights switch OFF The hazard lights simultaneous flashing of all turn signal lights are used in case of an emer gency such as to warn other driver...

Page 31: ...nd goes off after starting riding If the warning light comes on while riding the anti lock brake system may not work correctly WARNING EWA16043 If the ABS warning light does not turn off af ter reachi...

Page 32: ...two different main screen dis play modes STREET MODE and TRACK MODE Most of the functions are viewable in ei ther mode but the layout differs slightly The fol lowing items can be found on the display...

Page 33: ...h until the hour digits of the clock begin to flash 3 Use the TRIP INFO switches to cycle the numbers Press and hold long push the TRIP INFO switch to confirm the hour value 4 Use the TRIP INFO switch...

Page 34: ...dually re set The fuel reserve tripmeter TRIP F will only be available when active due to low fuel level The display items are grouped into 2 separate displays The upper display is controlled using th...

Page 35: ...L 100km TIP If traveling at speeds under 10 km h will be displayed Average fuel consumption Shows the average amount of fuel consumed since last reset The average fuel consumption display can be set...

Page 36: ...If the battery voltage is less than 9 0 V _ _ _ is displayed Coolant temperature The coolant temperature is displayed from 30 C 22 F to 114 C 237 F in 1 C 1 F increments TIP If the vehicle coolant te...

Page 37: ...and reset the lap timer 4 Press the TRIP switch to pause the timer and return to standby mode Press the PASS switch to resume the timer 5 Press and hold long push the TRIP INFO switch to reset the ti...

Page 38: ...DE Cycle between the two main screen display modes STREET MODE and TRACK MODE The icon for the currently selected mode will flash at the top of the screen BACKLIGHT BRIGHTNESS This module allows you t...

Page 39: ...min is reached OFF disables the shift indicator light TIP The shift indicator lights will come on off and flash as the settings are adjusted RPM This module allows the r min range of the shift indicat...

Page 40: ...units can be changed between km h and MPH The selected unit type will flash FUEL CONSUMPTION If the speed measurement units are set to km h the fuel consumption units can be changed between km l and...

Page 41: ...parts away from any source of fire EAS2000902 REPLACEMENT PARTS Use only genuine Yamaha parts for all replace ments Use oil and grease recommended by Yamaha for all lubrication jobs Other brands may b...

Page 42: ...the bearing surfaces EAS20240 CIRCLIPS Before reassembly check all circlips carefully and replace damaged or distorted circlips Al ways replace piston pin clips after one use When installing a circli...

Page 43: ...udes from the fastener head then insert the fastener into the part to be secured and push the pin in with a screwdriver Make sure that the pin is flush with the fastener s head Screw type 1 Remove Qui...

Page 44: ...extremely dangerous TIP If a battery lead is difficult to disconnect due to rust on the battery terminal remove the rust us ing hot water NOTICE ECA16760 Be sure to connect the battery leads to the c...

Page 45: ...the terminals and be sure to keep the contacts clean TIP When resetting the ECU by turning the main switch to OFF be sure to wait approximately 5 seconds before turning the main switch back to ON Chec...

Page 46: ...urely and then disconnect the coupler There are many types of coupler locks therefore be sure to check the type of cou pler lock before disconnecting the cou pler NOTICE ECA16790 When disconnecting a...

Page 47: ...When checking the wire harness perform steps 1 to 3 As a quick remedy use a contact revitalizer available at most part stores 6 Check Resistance TIP The resistance values shown were obtained at the s...

Page 48: ...1 41 GEN INFO BASIC SERVICE INFORMATION BCWF8197E0 book Page 41 Thursday November 18 2021 9 18 AM...

Page 49: ...tool YSST 265 90890 01135 This tool is used to remove the crankshaft from the crankcase Crankshaft installing tool with spacer YSST 266 90890 01284 YSST 767 These tools are used for installing the cr...

Page 50: ...sed to remove the bearing Bearing puller YSST 623 This tool is used to remove the camshaft bearing Bearing puller YSST 624 This tool is used to remove the bearing of main axle front wheel and rear whe...

Page 51: ...s tool is used to adjust valve clearance Tappet adjusting socket YSST 706A This tool is used to loosen and tighten the valve clear ance adjust screw locknut Steering nut socket YSST 721 This tool is u...

Page 52: ...loosen ing tightening clutch boss nut Drive chain cutter riveting tool YSST 734 This tool is used to dismantling the drive chain Fixing tool bearing steering lower YSST 870 This tool is used to insta...

Page 53: ...tool Funnel with long tail S 1119 This funnel is used to fillengine oil in crankcase Bearing punch with pilot driver YSST 951 This tool is used to install bearings oil seals Rotor holder tool S1113 90...

Page 54: ...ion at spark plug Compression gauge INS 009 90890 03081 This tool is used to measure engine compression Injector coupler INS 017 90890 03210 This tool is used to connect injector to injector cleaner Y...

Page 55: ...to hold the fuel infector on injector cleaning machine Yamaha bond No 1215 90890 85505 Three bond No 1215 B This bond is used to seal two mating surfaces e g crankcase mating surfaces Tool name Tool...

Page 56: ...1 49 GEN INFO SPECIAL TOOLS BCWF8197E0 book Page 49 Thursday November 18 2021 9 18 AM...

Page 57: ...2 8 TIGHTENING TORQUES 2 10 GENERAL TIGHTENING TORQUE SPECIFICATIONS 2 10 ENGINE TIGHTENING TORQUES 2 11 CHASSIS TIGHTENING TORQUES 2 15 LUBRICATION POINTS AND LUBRICANT TYPES 2 20 ENGINE 2 20 CHASSI...

Page 58: ...90 mm 78 3 in Overall width 725 mm 28 5 in Overall height 1135 mm 44 7 in Wheelbase 1325 mm 52 2 in Ground clearance 170 mm 6 69 in Minimum turning radius 2 8 m 9 19 ft Weight Curb weight 142 kg 313 l...

Page 59: ...SO standard MA Lubrication system Wet sump Engine oil quantity Oil change 1 00 L 1 06 US qt 0 88 Imp qt With oil filter removal 1 00 L 1 06 US qt 0 88 Imp qt Quantity disassembled 1 05 L 1 11 US qt 0...

Page 60: ...de diameter intake 5 000 5 012 mm 0 1969 0 1973 in Valve guide inside diameter exhaust 5 000 5 012 mm 0 1969 0 1973 in Valve stem to valve guide clearance limit intake 0 080 mm 0 0032 in Valve stem to...

Page 61: ...antity 1 pcs Warpage limit 0 10 mm 0 004 in Clutch plate thickness 2 20 2 40 mm 0 087 0 094 in Plate quantity 1 pcs Warpage limit 0 10 mm 0 004 in Clutch spring free length limit 39 51 mm 1 56 in Driv...

Page 62: ...speed 1300 1500 r min O2 feedback control Active Coolant temperature 80 100 C 176 212 F CO 0 0 1 3 Fuel line pressure at idle 220 300 kPa 2 2 3 0 kgf cm 31 9 43 5 psi Throttle grip free play 3 0 5 0...

Page 63: ...easured on cold tires 1 person Front 200 kPa 2 00 kgf cm 29 psi 2 00 bar Rear 225 kPa 2 25 kgf cm 33 psi 2 25 bar 2 persons Front 200 kPa 2 00 kgf cm 29 psi 2 00 bar Rear 225 kPa 2 25 kgf cm 33 psi 2...

Page 64: ...ion Oil 01 Quantity left 300 0 cm 10 14 US oz 10 58 Imp oz Quantity right 363 0 cm 12 27 US oz 12 80 Imp oz Level left 100 mm 3 9 in Level right 119 mm 4 7 in Rear suspension Shock absorber Hydraulic...

Page 65: ...00 k Lean angle sensor Operating angle 50 Output voltage up to operating angle 0 4 1 4 V Output voltage over operating angle 3 7 4 4 V Charging system Charging system AC magneto Standard output 14 0...

Page 66: ...0 05 in Fuel sender unit Sender unit resistance full 10 0 14 0 Sender unit resistance empty 267 0 273 0 Fuel injection sensor Crankshaft position sensor resistance 228 342 Intake air temperature sens...

Page 67: ...ulti fastener assemblies in a crisscross pat tern and progressive stages until the specified tightening torque is reached Unless otherwise specified tightening torque specifications re quire clean dry...

Page 68: ...lb ft Timing chain tensioner bolt M6 2 10 N m 1 0 kgf m 7 4 lb ft Apply Yamaha bond No 1215 B 1215 to screw thread Radiator bolt M6 2 10 N m 1 0 kgf m 7 4 lb ft Radiator fan bolt M6 2 8 N m 0 8 kgf m...

Page 69: ...gf m 8 9 lb ft Short clutch push rod locknut M6 1 8 N m 0 8 kgf m 5 9 lb ft Clutch boss nut M14 1 70 N m 7 0 kgf m 52 lb ft Clutch cable locknut engine side M6 1 7 N m 0 7 kgf m 5 2 lb ft Drive sprock...

Page 70: ...de grease 2 Tighten the cylinder head bolts 1 4 to 12 N m 1 2 kgf m 8 9 lb ft 3 Tighten the cylinder head bolts 1 4 to 24 N m 2 4 kgf m 18 lb ft 4 After loosing each 4 bolt according to tightening ord...

Page 71: ...sequence Clutch cover tightening sequence Crankcase tightening sequence 2 4 4 2 5 3 1 6 8 9 11 2 12 3 13 4 5 6 1 7 10 A 1 7 11 12 3 14 4 5 6 8 9 10 16 B 15 2 13 A Left crankcase B Right crankcase BCWF...

Page 72: ...t Clutch lever holder bolt M6 1 7 N m 0 7 kgf m 5 2 lb ft Clutch lever nut M6 1 7 N m 0 7 kgf m 5 2 lb ft Clutch lever switch screw 1 0 6 N m 0 06 kgf m 0 4 lb ft Main switch bolt M6 2 7 N m 0 7 kgf m...

Page 73: ...5 2 lb ft Headlight stay bolt M8 2 35 N m 3 5 kgf m 26 lb ft Headlight mounting screw M5 2 1 8 N m 0 18 kgf m 1 3 lb ft Front upper side cowling assembly screw M5 6 1 8 N m 0 18 kgf m 1 3 lb ft Headl...

Page 74: ...bolt Rear M6 2 10 N m 1 0 kgf m 7 4 lb ft Fuel pump retainer bolt M5 4 4 0 N m 0 40 kgf m 3 0 lb ft Fuel tank cap bolt M5 3 6 N m 0 6 kgf m 4 4 lb ft Fuel tank cap and filler box bolt M5 1 6 N m 0 6...

Page 75: ...hose union bolt Hydraulic unit side M10 2 29 N m 2 9 kgf m 21 lb ft Front brake master cylinder reservoir cap screw M4 2 1 5 N m 0 15 kgf m 1 1 lb ft Brake lever bolt M6 1 6 N m 0 6 kgf m 4 4 lb ft Br...

Page 76: ...t Rear brake caliper pin bolt long 1 22 N m 2 2 kgf m 16 lb ft Rear brake pad retaining bolt 2 17 N m 1 7 kgf m 13 lb ft Rear brake caliper bleed screw 1 5 N m 0 5 kgf m 3 7 lb ft Rear wheel sensor an...

Page 77: ...am Valve stem seals Valve stem and valve stem ends Rocker arm shafts Intake rocker arm stopper pin Rocker arm inner surface Decompression arm pivoting point Oil pump driven gear shaft Oil pump inner a...

Page 78: ...m assembly Shift forks and shift fork guide bar Shift shaft Crankshaft position sensor stator assembly lead grommet Yamaha bond No 1215 Three bond No 1215 B Crankcase mating surfaces Yamaha bond No 12...

Page 79: ...seal Rear brake caliper dust seal Rear brake master cylinder boot Rear brake master cylinder piston surface Rear brake master cylinder rod and piston contact point Tube guide throttle grip inner surf...

Page 80: ...ad relay arm and rear shock absorber Bolt and nut thread swingarm and connecting arm Oil seal lips relay arm and swingarm Collars relay arm and swingarm Pivot shaft outer surface Pivot shaft and nut t...

Page 81: ...1 LUBRICATION SYSTEM CHART AND DIAGRAMS ENGINE OIL LUBRICATION CHART 1 Oil pan 2 Oil strainer 3 Oil pump 4 Oil filter element 5 Main axle 6 Drive axle 7 Crankshaft 8 Camshaft 9 Cylinder head cover BCW...

Page 82: ...2363 LUBRICATION DIAGRAMS 1 2 3 4 5 6 7 8 9 8 1 Cylinder head cover 2 Camshaft 3 Crankshaft 4 Oil filter assembly 5 Oil pump assembly 6 Oil strainer 7 Main axle 8 Drive axle 9 Clutch push lever BCWF81...

Page 83: ...RICATION SYSTEM CHART AND DIAGRAMS SPEC 1 Drive axle 2 Main axle 3 Cylinder head cover 4 Camshaft 5 Crankshaft 6 Oil filter 7 Oil pump 8 Oil strainer BCWF8197E0 book Page 26 Thursday November 18 2021...

Page 84: ...diator inlet hose 4 Radiator cap 5 Radiator 6 Radiator outlet hose 7 Hose Thermostat to water pump Insert the pipe to root White paint of hose thermostat to water pump face should be right side of the...

Page 85: ...2 28 COOLING SYSTEM DIAGRAMS SPEC 1 Air bleed bolt 2 Water pump assembly 3 Water pump inlet hose BCWF8197E0 book Page 28 Thursday November 18 2021 9 18 AM...

Page 86: ...r pump inlet hose 6 Radiator 7 Radiator outlet hose Insert the pipe to root Fix the clip before 2 4 mm from water pump inlet hose end as shown Direction of the clip up side of the vehicle Direction of...

Page 87: ...ly Direction up side of the vehicle Direction right side of the vehicle Ensure clearance is more than 10 mm Push in dropped clamp after tightening Shall not be on spool Hose clamp should be in this di...

Page 88: ...2 31 CABLE ROUTING SPEC EAS20021 CABLE ROUTING Front top view BCWF8197E0 book Page 31 Thursday November 18 2021 9 18 AM...

Page 89: ...ten after joint connector lead clamp insert into the frame component D This connector is prepare for accessory E Clamp left auxiliary light lead on surface of headlight stay F Meter assembly lead and...

Page 90: ...2 33 CABLE ROUTING SPEC Rear top view BCWF8197E0 book Page 33 Thursday November 18 2021 9 18 AM...

Page 91: ...e harness 20 Fuse box lead 21 ECU band 22 Connector cover A Lead wires shall be clamped by hook of right side fender In any random order B Wire harness assembly shall be clamped to right side of fende...

Page 92: ...2 35 CABLE ROUTING SPEC Front left view BCWF8197E0 book Page 35 Thursday November 18 2021 9 18 AM...

Page 93: ...engine assembly guide F Sidestand switch lead shall be clamped at the center of wire guide of stay G Pass the clutch cable through guide H To headlight assembly meter assembly front turn signal auxil...

Page 94: ...2 37 CABLE ROUTING SPEC Rear left view 40 min 40 min BCWF8197E0 book Page 37 Thursday November 18 2021 9 18 AM...

Page 95: ...hall be touched with engine stay D Tip of fuel drain hose and canister breather hose shall be directed as shown in drawing Cutted surface shall be directed backward E Gear position switch lead and AC...

Page 96: ...2 39 CABLE ROUTING SPEC Rear right view BCWF8197E0 book Page 39 Thursday November 18 2021 9 18 AM...

Page 97: ...A Clamp shall be touched with welding bead of fuel tank fitting bracket B Route the rear brake light switch lead through wire guide C Direct insert direction D Connector shall be inserted on plate E I...

Page 98: ...2 41 CABLE ROUTING SPEC Front right view BCWF8197E0 book Page 41 Thursday November 18 2021 9 18 AM...

Page 99: ...tape with frame component E Plastic band shall not be cut Direct tip of plastic band forward and inside ignition coil Ignition coil lead shall be clamped on white tape with frame F Insert the rubber...

Page 100: ...2 43 CABLE ROUTING SPEC Steering system FR 90 BCWF8197E0 book Page 43 Thursday November 18 2021 9 18 AM...

Page 101: ...nto rubber cover B Main switch lead routing shall be parallel with right handlebar switch lead C Clutch cable throttle cables and left handlebar switch lead shall pass through cable guide D Pass the t...

Page 102: ...2 45 CABLE ROUTING SPEC Front brake system 4 5 45 BCWF8197E0 book Page 45 Thursday November 18 2021 9 18 AM...

Page 103: ...holder application of silicone oil to front wheel sensor lead assembly shall be allowed D Fix clamp on white tape of front wheel sensor E When assembling front wheel sensor lead to frame application o...

Page 104: ...assembly 5 Hose canister to atmosphere 6 Check valve 7 Hose canister to throttle body 8 Throttle body assembly A Insert the pipe until the step of hose Fuel tank to canister assembly B Clip knob shall...

Page 105: ...er Assembly 1 Hose Fuel tank to canister assembly 2 Throttle body 3 Hose canister to atmosphere 4 Canister assembly 5 Frame component 6 Clip A Insert the hose till this end BCWF8197E0 book Page 48 Thu...

Page 106: ...anister and hose canister to check valve until this surface B White mark shall be directed upward C Clip knob shall be directed upward D Clip knob shall be set mark E Blue mark shall be directed outsi...

Page 107: ...3 Front brake hose ABS hydraulic unit to master cylinder 4 Front brake hose ABS hydraulic unit to brake caliper 5 Rear brake hose ABS hydraulic unit to brake master cylinder 6 Rear brake hose ABS hydr...

Page 108: ...racket 2 ABS hydraulic unit 3 Rear brake hose ABS hydraulic unit to brake caliper 4 Rear brake hose ABS hydraulic unit to brake master cylinder A To rear brake master cylinder B To rear brake caliper...

Page 109: ...2 52 CABLE ROUTING SPEC ABS System BCWF8197E0 book Page 52 Thursday November 18 2021 9 18 AM...

Page 110: ...l be touched with flare nut B To front brake master cylinder C To front brake caliper assembly D Front brake hose shall be touched with frame assembly E Both rear brake hose shall be touched with brak...

Page 111: ...14 CHECKING THE CYLINDER HEAD BREATHER HOSE 3 14 CHECKING THE EXHAUST SYSTEM 3 15 CHECKING THE COOLANT LEVEL 3 15 CHECKING THE COOLING SYSTEM 3 15 CHANGING THE COOLANT 3 16 CHASSIS 3 18 CHECKING THE...

Page 112: ...STAND 3 27 LUBRICATING THE SIDESTAND 3 27 LUBRICATING SHIFT PEDAL ROD JOINT 3 27 LUBRICATING THE REAR SUSPENSION 3 27 ELECTRICAL SYSTEM 3 28 CHECKING AND CHARGING THE BATTERY 3 28 CHECKING THE FUSES 3...

Page 113: ...000km 7800 mi 17000 km 10200 mi 21000 km 12600 mi 1 Fuel line Check fuel hoses for cracks or damage 2 Fuel filter Check condition Replace if necessary Every 9000 km 5400 mi 3 Spark plug Check conditio...

Page 114: ...m soap based grease Every 13000 km 7800 mi 15 Chassis fasteners Make sure that all nuts bolts and screws are properly tightened 16 Brake lever pivot shaft Lubricate with silicone grease 17 Brake pedal...

Page 115: ...ternal components of the brake master cylinder and caliper and change the brake fluid Replace the brake hose every four years and if cracked or damaged 27 Cooling system Check coolant level and vehicl...

Page 116: ...tic tool refer to the operation manual that is included with the tool 5 Install Passenger seat Refer to GENERAL CHASSIS 1 on page 4 1 ADJUSTING THE VALVE CLEARANCE The following procedure applies to a...

Page 117: ...lustration e Measure the valve clearance with a feeler gauge 1 Out of specification Adjust 6 Adjust Valve clearance a Loosen the locknut 1 b Insert a feeler gauge 2 between the end of the adjusting sc...

Page 118: ...stic tool Refer to YAMAHA DIAGNOSTIC TOOL on page 8 32 4 Check Engine idling speed Out of specification Adjust NOTICE Check the RPM when coolant temperature is at 80 100 C 5 Remove Lower side cowling...

Page 119: ...ING THE THROTTLE GRIP FREE PLAY TIP Prior to adjusting the throttle grip free play the engine idling speed should be adjusted 1 Check Throttle grip free play a Out of specification Adjust 2 Adjust Thr...

Page 120: ...specification Regap 8 Install Spark plug TIP Before installing the spark plug clean the spark plug and gasket surface 9 Connect Spark plug cap 10 Install Lower side cowling right other removed parts R...

Page 121: ...eat Refer to GENERAL CHASSIS 3 on page 4 3 EAS30656 CHECKING THE ENGINE OIL LEVEL 1 Stand the vehicle on a level surface TIP Place the vehicle on a maintenance stand Make sure the vehicle is upright 2...

Page 122: ...engine warm it up for several min utes and then turn it off 3 Place a oil pan a under the engine oil drain bolt to collect the used oil 4 Remove Engine oil filler cap dipstick 1 Engine oil drain plug...

Page 123: ...o seep from the oil check bolt If no engine oil comes out after one minute turn the engine off so that it will not seize c Check the engine oil passages the oil fil ter element and the oil pump for da...

Page 124: ...THE AIR FILTER ELEMENT TIP There is a check hose 1 at the bottom of the air filter case If dust and or water collects in this hose clean the air filter element and air filter case The air filter elem...

Page 125: ...hould be replaced more frequently if often ride in the rain or dusty areas The air filter cannot be cleaned by blowing it with compressed air It must be replaced 9 Insert a new air filter element into...

Page 126: ...nk Refer to FUEL TANK on page 7 1 2 Check Fuel hose 1 Cracks damage Replace Loose connection Connect properly TIP Before removing the fuel hose place a few rags in the area under where it will be remo...

Page 127: ...ark 3 Below the minimum level mark Add the recommended coolant to the proper level TIP To access the coolant reservoir cap 1 remove the inner fender Refer to GENERAL CHASSIS 3 on page 4 3 NOTICE ECA13...

Page 128: ...p and slowly turn the radiator cap counter clockwise toward the detent to allow any re sidual pressure to escape When the hissing sound has stopped press down on the radi ator cap and turn it counterc...

Page 129: ...different types of antifreeze 11 Install Radiator cap 12 Fill Coolant reservoir with the recommended coolant to the maxi mum level mark 1 13 Install Coolant reservoir cap 14 Start the engine warm it u...

Page 130: ...TIP Place the vehicle on a maintenance stand Make sure the vehicle is upright 2 Check Brake fluid level Below the minimum level mark 1 Add the specified brake fluid to the proper level WARNING EWA130...

Page 131: ...5 CHECKING THE FRONT BRAKE HOSE 1 Check Brake hose 1 Cracks damage wear Replace 2 Check Brake hose holder 2 Loose connection Tighten the holder bolt 3 Hold the vehicle upright and apply the front brak...

Page 132: ...m is disassembled a brake hose is loosened disconnected or replaced the brake fluid level is very low brake operation is faulty TIP Be careful not to spill any brake fluid or allow the brake master cy...

Page 133: ...D LEVEL on page 3 18 WARNING EWA13110 After bleeding the hydraulic brake system check the brake operation EAS30644 ADJUSTING THE DRIVE CHAIN SLACK TIP The drive chain slack must be checked at the tigh...

Page 134: ...smooth ly EAS30803 LUBRICATING THE DRIVE CHAIN The drive chain consists of many interacting parts If the drive chain is not maintained proper ly it will wear out quickly Therefore the drive chain shou...

Page 135: ...Adjust the steering head 3 Remove Handle crown Refer to STEERING HEAD on page 4 75 4 Adjust Steering head a Remove the lock washer 1 the upper ring nut 2 and the rubber washer 3 b Tighten the lower ri...

Page 136: ...the vehicle so that there is no danger of it falling over 2 Check Inner tube Damage scratches Replace Oil seal Oil leakage Replace 3 Hold the vehicle upright and apply the front brake 4 Check Front f...

Page 137: ...w tires have a relatively low grip on the road surface until they have been slightly worn Therefore approximately 100 km should be traveled at normal speed before any high speed riding is done TIP For...

Page 138: ...ith its movement Re place damaged outer cable and inner cables as soon as possible 1 Check Outer cable Damage Replace 2 Check Cable operation Rough movement Lubricate cable end Re place TIP Hold the c...

Page 139: ...al to metal mov ing parts and spring contact point of the sides tand LUBRICATING SHIFT PEDAL ROD JOINT Lubricate shift pedal rod joint sliding surface EAS30119 LUBRICATING THE REAR SUSPENSION Lubricat...

Page 140: ...ing it out c License plate light burnt out bulb 3 by pulling it out 2 Insert a new bulb into the socket 3 Install the socket together with the bulb by pushing it in 4 Place the license plate light uni...

Page 141: ...ing condition Headlight should be in low beam Rider weight 75 kg 1 Person Height at low beam line a 74 3 cm Limit b 20 0 cm Direction a Headlight beam is raised Direction b Headlight beam is lowered B...

Page 142: ...3 30 ELECTRICAL SYSTEM CHK ADJ BCWF8197E0 book Page 30 Thursday November 18 2021 9 18 AM...

Page 143: ...WHEEL 4 15 CHECKING THE FRONT WHEEL 4 15 ASSEMBLING THE FRONT WHEEL 4 16 MAINTENANCE OF THE WHEEL SENSOR AND SENSOR ROTOR 4 16 INSTALLING THE FRONT WHEEL 4 18 REAR WHEEL 4 20 REMOVING THE REAR WHEEL...

Page 144: ...RACKET 4 45 ASSEMBLING THE REAR BRAKE CALIPER 4 46 INSTALLING THE REAR BRAKE CALIPER 4 46 REMOVING THE REAR BRAKE MASTER CYLINDER 4 47 CHECKING THE REAR BRAKE MASTER CYLINDER 4 47 ASSEMBLING THE REAR...

Page 145: ...0 INSTALLING THE REAR SHOCK ABSORBER ASSEMBLY 4 80 SWINGARM 4 82 REMOVING THE SWINGARM 4 83 CHECKING THE SWINGARM 4 83 INSTALLING THE SWINGARM 4 83 CHAIN DRIVE 4 85 REMOVING THE DRIVE CHAIN BY USING C...

Page 146: ...emove Q ty Remarks 1 Passenger seat 1 2 Center cover between rider passenger seat 1 3 Rider seat 1 4 Negative battery lead 1 Disconnect 5 Positive battery lead 1 Disconnect 6 Battery band 1 7 Battery...

Page 147: ...o remove Q ty Remarks Passenger seat and rider seat Refer to GENERAL CHASSIS 1 on page 4 1 1 Side cover Left and right 2 2 Rear side cowling Left and right 2 3 Tail brake light outer cover 1 For insta...

Page 148: ...ft and right Refer to GENERAL CHASSIS 2 on page 4 2 Fuel tank cover Left and right Refer to FUEL TANK on page 7 1 1 Inner fender 1 2 Upper panel Left and right 1 1 3 Turn signal light connector Left a...

Page 149: ...L CHASSIS 3 on page 4 3 1 Meter assembly mounting bolt quick fastener 2 1 2 Meter coupler 1 Disconnect TIP After connect the coupler slide the rubber cover in original position 3 Meter assembly 1 4 Me...

Page 150: ...3 on page 4 3 1 Left rear view mirror 1 2 Right rear view mirror 1 3 License plate bracket 1 4 Coupler Headlight control unit headlight 1 1 Disconnect 5 Headlight control unit belt 1 6 Headlight contr...

Page 151: ...er Job Parts to remove Q ty Remarks 12 Front upper body Auxiliary light 1 13 Rubber cover 1 14 Headlight cover 1 15 Headlight assembly 1 16 Headlight stay 1 For installation reverse the removal proce...

Page 152: ...bracket to avoid the scratches at head light cowling INSTALLING THE REAR VIEW MIRROR ASSEMBLY 1 Install the collars 1 and rubber plates 2 TIP When installing the rear view mirror assembly make sure ru...

Page 153: ...over Left and right Refer to GENERAL CHASSIS 2 on page 4 2 Fuel tank Refer to FUEL TANK on page 7 1 1 Bracket rider seat fitting 1 2 Fuel hose 1 3 Air filter case cover 1 4 Air filter element 1 5 Air...

Page 154: ...0968 INSTALLING THE AIR FILTER CASE 1 Install Air filter case joint clamp TIP Align the projection a on the air filter case with the slot b in the air filter case joint clamp BCWF8197E0 book Page 9 Th...

Page 155: ...er cover Refer to GENERAL CHASSIS 2 on page 4 2 1 CCU Communication control unit 1 2 Flap guard along with tool Screwdriver grip 1 3 Tail brake light coupler 1 4 License plate light coupler turn signa...

Page 156: ...1 11 License plate light 1 12 Upper mud guard 1 13 Rear fender along with tail light 1 14 Tail brake light 1 For remove rear fender skip step 7 to 11 15 Rear fender 1 For installation reverse the remo...

Page 157: ...ge 4 3 1 QSS Quick shift system coupler 1 Disconnect 2 Shift arm bolt 1 3 Footrest bracket bolt left 2 4 QSS Quick shift system assembly along with footrest 1 5 Footrest bolt left 1 6 Footrest assembl...

Page 158: ...rake caliper 1 3 Front wheel sensor 1 4 Front wheel axle nut 1 5 Front wheel axle 1 6 Front wheel 1 7 Collar 2 8 Front brake disc 1 9 Front wheel sensor rotor 1 TIP Use Torx bit T 25 for opening tight...

Page 159: ...wheel Order Job Parts to remove Q ty Remarks 1 Oil seal 2 2 Bearing 2 Use bearing puller YSST 624 3 Spacer 1 For assembly reverse the disassembly pro cedure 3 2 New 1 2 LS 1 New LS New New BCWF8197E0...

Page 160: ...op the front wheel sensor rotor or subject it to shocks If any solvent gets on the front wheel sen sor rotor wipe it off immediately NOTICE ECA21700 Do not apply the brake lever when removing the brak...

Page 161: ...Use a socket 4 or bearing punch and suitable attachment that matches the diameter of the wheel bearing outer race and oil seal EAS31151 MAINTENANCE OF THE WHEEL SENSOR AND SENSOR ROTOR NOTICE ECA2107...

Page 162: ...dial gauge at a right angle against the wheel sensor rotor surface b Measure the wheel sensor rotor runout TIP Do not touch the surface of the wheel sensor ro tor with a sharp object c If the runout...

Page 163: ...le nut 5 Tighten Front wheel axle WARNING EWA13500 Make sure the brake hose is routed properly NOTICE ECA19760 Before tightening the wheel axle push down hard on the handlebar several times and check...

Page 164: ...LOC TITE on the mounting surface of the rotor deformation caused by an impact during ser vice and caught foreign materials If there is any defective part repair or replace the de fective part TIP Meas...

Page 165: ...ocknut 2 Loosen 5 Drive chain adjusting bolt 2 Loosen 6 Rear wheel axle nut 1 7 Washer 1 8 Rear wheel axle 1 9 Drive chain puller 2 10 Rear wheel 1 11 Collar 2 For installation reverse the removal pro...

Page 166: ...wheel drive hub damper 6 4 Rear brake disc 1 5 Rear wheel sensor rotor 1 6 Oil seal 1 7 Bearing 2 Use bearing puller YSST 624 8 Collar 1 9 Oil seal 1 10 Bearing 1 Use bearing puller YSST 624 A 11 Col...

Page 167: ...ts 3 4 Remove Rear wheel axle nut Washer Rear wheel axle along with washer Drive chain puller Collars Rear wheel along with rear brake caliper TIP Push the rear wheel forward and remove the drive chai...

Page 168: ...new one Keep any type of magnets including mag netic pick up tools magnetic screwdrivers etc away from the wheel sensor or wheel sensor rotor Do not drop or shock the wheel sensor or the wheel sensor...

Page 169: ...ricate Rear brake caliper bolt 6 Install Rear brake caliper 7 Adjust Drive chain slack Refer to ADJUSTING THE DRIVE CHAIN SLACK on page 3 21 8 Tighten Rear wheel axle nut Rear brake caliper bolt WARNI...

Page 170: ...pact during ser vice and caught foreign materials If there is any defective part repair or replace the de fective part TIP Measure the distance between the rear wheel sensor rotor and rear wheel senso...

Page 171: ...t brake caliper bolt 2 2 Front brake caliper 1 3 Brake pad clip 2 4 Brake pad pin 1 5 Brake pad inner 1 6 Brake pad outer 1 7 Brake pad spring 1 8 Brake pad support 1 For installation reverse the remo...

Page 172: ...cylinder reservoir diaphragm 1 4 Front brake light switch 1 5 Brake hose union bolt 1 6 Copper washer 2 7 Front brake hose 1 8 Brake lever 1 9 Front brake master cylinder holder 1 10 Front brake mast...

Page 173: ...ront brake master cylinder Order Job Parts to remove Q ty Remarks 1 Brake master cylinder kit 1 2 Brake master cylinder body 1 For assembly reverse the disassembly pro cedure 2 1 New BCWF8197E0 book P...

Page 174: ...STEM ABS on page 3 20 1 Front brake hose union bolt brake caliper side 1 2 Brake hose gasket 2 3 Front brake hose brake hose joint to brake caliper 1 4 Front brake caliper bolt 2 5 Front brake caliper...

Page 175: ...alipers 1 Brake pad clip 2 2 Brake pad pin 1 3 Front brake pad 2 4 Brake pad spring 1 5 Brake pad support 1 6 Brake caliper bracket 1 7 Brake caliper piston 2 8 Brake caliper piston dust seal 2 9 Brak...

Page 176: ...sc a Place the vehicle on a maintenance stand so that the front wheel is elevated b Before measuring the front brake disc run out turn the handlebar to the left or right to ensure that the front wheel...

Page 177: ...caliper 1 Measure Brake pad wear limit a Out of specification Replace the brake pads as a set 2 Install Brake pads Brake pad springs Brake pad support TIP Always install new brake pads and new brake p...

Page 178: ...p the rear wheel sensor rotor or subject it to shocks If any solvent gets on the rear wheel sensor rotor wipe it off immediately 1 Remove Brake hose union bolt 1 Brake hose gaskets 2 Front brake hose...

Page 179: ...s disassembled replace the brake caliper piston kits EAS30934 INSTALLING THE FRONT BRAKE CALIPER 1 Install Front brake caliper 1 temporarily along with wheel sensor holder Copper washer Front brake ho...

Page 180: ...specified brake fluid to the proper level Refer to CHECKING THE BRAKE FLUID LEVEL on page 3 18 7 Check Brake lever operation Soft or spongy feeling Bleed the brake sys tem Refer to BLEEDING THE HYDRA...

Page 181: ...r within the angle shown in the illustra tion While holding the brake hose tighten the brake hose union bolt as shown Turn the handlebar to the left and right to make sure the brake hose does not touc...

Page 182: ...HYDRAULIC BRAKE SYSTEM ABS on page 3 20 5 Check Brake fluid level Below the minimum level mark a Add the recommended brake fluid to the proper level Refer to CHECKING THE BRAKE FLUID LEVEL on page 3 1...

Page 183: ...brake pads Order Job Parts to remove Q ty Remarks 1 Rear brake pad retaining bolt 2 2 Rear brake pad 2 3 Brake pad shim 2 4 Brake pad spring 1 For installation reverse the removal proce dure 1 3 4 2 3...

Page 184: ...er 2 3 Rear brake hose 1 4 Footrest plate assembly 1 5 Brake fluid reservoir hose 1 6 Rear brake master cylinder 1 7 Brake fluid reservoir assembly 1 8 Brake fluid reservoir cap 1 9 Brake fluid reserv...

Page 185: ...ake master cylinder Order Job Parts to remove Q ty Remarks 1 Brake hose joint 1 2 Brake master cylinder kit 1 3 Brake master cylinder body 1 For assembly reverse the disassembly pro cedure BCWF8197E0...

Page 186: ...4 20 Brake fluid Drain Refer to BLEEDING THE HYDRAULIC BRAKE SYSTEM ABS on page 3 20 Rear wheel Refer to REAR WHEEL on page 4 20 1 Rear brake hose union bolt 1 2 Brake hose gasket 2 3 Rear brake hose...

Page 187: ...5 Brake caliper piston 1 6 Brake caliper piston dust seal 1 7 Brake caliper piston seal 1 8 Brake caliper bracket 1 9 Bleed screw 1 Skip step 1 to 8 For assembly reverse the disassembly pro cedure T...

Page 188: ...ge galling Replace 3 Measure Brake disc runout Out of specification Correct the brake disc runout or replace the brake disc Refer to CHECKING THE FRONT BRAKE DISC on page 4 31 4 Measure Brake disc thi...

Page 189: ...LEEDING THE HYDRAULIC BRAKE SYSTEM ABS on page 3 20 EAS30186 REMOVING THE REAR BRAKE CALIPER TIP Before disassembling the brake caliper drain the brake fluid from the entire brake system NOTICE ECA209...

Page 190: ...ust seal EAS30188 CHECKING THE REAR BRAKE CALIPER 1 Check Brake caliper piston 1 Rust scratches wear Replace the brake caliper piston Brake caliper cylinder 2 Scratches wear Replace the brake caliper...

Page 191: ...6360 When installing the brake hose onto the brake caliper be sure to position the brake pipe a touches the projection b in the brake caliper 3 Fill Brake fluid reservoir with the specified amount of...

Page 192: ...uid delivery passages brake master cylinder body Obstruction Blow out with compressed air 2 Check Brake master cylinder kit Damage scratches wear Replace the brake master cylinder kit 3 Check Brake fl...

Page 193: ...significantly lower the boiling point of the brake fluid and could cause vapor lock NOTICE ECA13540 Brake fluid may damage painted surfaces and plastic parts Therefore always clean up any spilt brake...

Page 194: ...er Left and right Refer to GENERAL CHASSIS 2 on page 4 2 Fuel tank Refer to FUEL TANK on page 7 1 BCWF8197E0 book Page 49 Thursday November 18 2021 9 18 AM New New New New New New New 29 N m 2 9 kgf m...

Page 195: ...ake caliper 1 6 Hydraulic unit assembly with bracket 1 7 Hydraulic unit assembly 1 8 Hydraulic unit bracket 1 For installation reverse the removal proce dure 4 New New New New New New New 1 5 7 8 3 4...

Page 196: ...re to tighten them to the specified torque and bleed the brake system 1 Disconnect ABS ECU coupler 1 TIP Push the lock a and pull the lock lever 2 of the ABS ECU coupler in the direction of the arrow...

Page 197: ...to rear brake caliper 2 and then temporarily tighten the union bolt for the brake hose front brake master cylinder to hydraulic unit c Temporarily tighten the union bolt for the rear brake hose hydra...

Page 198: ...run Refer to CHECKING THE ABS WARNING LIGHT on page 4 56 EAS30930 HYDRAULIC UNIT OPERATION TESTS The reaction force pulsating action generated in the brake lever and brake pedal when the ABS is activ...

Page 199: ...will be generated in the brake lever 1 brake pedal 2 and again in the brake lever 1 in this or der TIP ON and OFF on the tool screen indicate when the brakes are being applied and released respectivel...

Page 200: ...c tool and display the diagnosis mode screen 7 Select code No 1 ABS reaction force con firmation 8 Click Actuator Check 1 and then operate the brake lever 2 and brake pedal 3 simul taneously TIP The h...

Page 201: ...d again in the brake le ver in this order If the pulse is felt in the brake pedal before it is felt in the brake lever check that the brake hoses and brake pipes are connected correctly to the hydraul...

Page 202: ...4 75 1 Grip end left 1 2 Handlebar weight left 1 3 Handlebar grip 1 4 Clutch switch coupler 1 Disconnect 5 Handlebar switch left 1 6 Clutch switch 1 7 Clutch cable 1 Disconnect 8 Clutch lever 1 9 Clut...

Page 203: ...14 Handlebar switch right 1 15 Throttle cable 2 Disconnect 16 Throttle grip 1 17 Front brake master cylinder holder 1 18 Front brake master cylinder 1 19 Handlebar pinch bolt 1 Loosen 20 Handlebar ri...

Page 204: ...er holder 2 TIP Install the brake master cylinder holder with the UP mark facing up Align the end of the brake master cylinder hold er with the punch mark a on the handlebar First tighten the upper bo...

Page 205: ...switch with the hole b in the left handlebar 9 Connect Clutch switch coupler 10 Install Handlebar grip 1 Handlebar weight left Grip end left 2 a Apply a thin coat of rubber adhesive onto the end of th...

Page 206: ...to CABLE ROUTING on page 2 31 12 Adjust Clutch lever free play Refer to ADJUSTING THE CLUTCH LEVER FREE PLAY on page 3 11 13 Adjust Throttle grip free play Refer to ADJUSTING THE THROTTLE GRIP FREE P...

Page 207: ...wheel Refer to FRONT WHEEL on page 4 13 1 Front fender 1 To remove the front fender no need to re move front wheel 2 Handlebar pinch bolt 1 Loosen 3 Upper bracket pinch bolt 1 Loosen 4 Front fork cap...

Page 208: ...Special nut 1 4 Rubber 1 5 Dust seal 1 6 Oil seal clip 1 7 Outer tube 1 8 Inner tube bushing 1 9 Outer tube bushing 1 10 Washer 1 11 Oil seal 1 12 Dumper rod stopper 1 13 Dumper rod spring 1 14 Dampe...

Page 209: ...3 Collar 1 4 Locknut 1 5 Spacer 1 6 Fork spring 1 7 Dust seal 1 8 Oil seal clip 1 9 Outer tube 1 10 Inner tube bushing 1 11 Outer tube bushing 1 12 Washer 1 13 Oil seal 1 14 Damper rod assembly bolt 1...

Page 210: ...bolt first then loosen the cap bolt slightly without loosening the lower pinch bolt while front fork is fitted on vehicle 4 Remove Front fork leg EAS30207 DISASSEMBLING THE FRONT FORK LEG LEFT 1 Remov...

Page 211: ...l clip 5 Dust seal 6 8 Remove Damper rod assembly bolt 1 Copper washer 2 Damper rod assembly TIP Securely clamp the fender bracket in a vise with soft jaws Loosen the damper rod assembly bolt 1 by usi...

Page 212: ...om the bottom of the inner tube Be careful not to damage the inner tube 2 Tighten Damper rod assembly bolt along with the copper washer 3 Lubricate Inner tube s outer surface 4 Install Dust seal 1 Oil...

Page 213: ...ng with the O ring a Install the fork spring 1 TIP Install the fork spring with its smaller pitch a downward b Install the spacer c Tighten the locknut till end of threads d Install the collar Front f...

Page 214: ...wly be cause the fork oil may spurt out 12 Before measuring the fork oil level wait ten minutes until the oil has settled and the air bubbles have dispersed TIP Be sure to bleed the front fork leg of...

Page 215: ...th O ring from outer tube 2 Remove Cap bolt with O ring 1 from damper rod assembly a Remove cap bolt 1 by holding the special nut with front fork damper rod locknut holder YSST 778 2 3 Drain Fork oil...

Page 216: ...th the damper rod holder 1 8 Remove Damper rod assembly along with damper spring Spacer CHECKING THE FRONT FORK LEG RIGHT Refer to CHECKING THE FRONT FORK LEGS on page 4 66 ASSEMBLING THE FRONT FORK L...

Page 217: ...ect the oil seal during installation 3 Install Spacer 1 TIP Insert the collar side a of spacer upward into the inner tube Allow the spacer to slide slowly down the inner tube 2 until it protrudes from...

Page 218: ...p bolt 11 Tighten Front fork cap bolt in to outer tube by finger tighten 12 Install Oil seal 1 with front fork oil seal installer YSST 775 A 2 13 Tighten Oil seal clip 1 TIP Adjust the oil seal clip s...

Page 219: ...of any residual air 18 Measure Front fork leg oil level a from the top of the outer tube with the outer tube fully compressed and without the fork spring Out of specification Correct 19 Install Cap b...

Page 220: ...ob Parts to remove Q ty Remarks Front fork legs Refer to FRONT FORK on page 4 62 1 Horn lead 2 Disconnect 2 Horn 1 3 Steering stem bolt washer 1 1 4 Handle crown 1 Gently remove handle crown along wit...

Page 221: ...ng cover 1 11 Upper bearing inner race 1 12 Upper bearing 1 13 Lower bearing 1 14 Upper bearing outer race 1 15 Lower bearing outer race 1 16 Lower bearing inner race 1 17 Dust seal 1 18 Main switch c...

Page 222: ...earing races a Remove the bearing races from the steer ing head pipe with a long rod 1 and ham mer b Remove the bearing race from the lower bracket with a floor chisel 2 and hammer c Install a new dus...

Page 223: ...special tool upper and lower race in staller 2 3 Install Upper bracket Washer Steering stem bolt TIP Temporarily tighten the steering stem bolt 4 Install Front fork legs Refer to FRONT FORK on page 4...

Page 224: ...nut bolt 2 2 M10 63 mm 4 Relay arm along with connecting arm 1 5 Rear shock absorber assembly 1 6 Relay arm nut bolt 1 1 7 Connecting arm 2 8 Spacer 4 9 Oil seal 8 10 Bearing 4 For installation rever...

Page 225: ...ECKING THE CONNECTING ARMS AND RELAY ARM 1 Check Connecting arms Relay arm Damage wear Replace 2 Check Bearings Oil seals Damage pitting Replace 3 Check Spacers Damage scratches Replace EAS30212 INSTA...

Page 226: ...wingarm Install the connecting arms as shown in the il lustration Punch mark 1 should be outside 4 Tighten Connecting arm nuts T R Rear shock absorber assembly upper nut 44 N m 4 4 kgf m 32 lb ft T R...

Page 227: ...ORBER ASSEMBLY on page 4 79 Drive chain Refer to CHAIN DRIVE on page 4 85 1 Brake hose holder 1 2 Rear fender 1 3 Drive chain guide 1 Skip step 1 and 2 4 Drive chain adjusting bolt locknut 2 2 Skip st...

Page 228: ...Swingarm Bends cracks damage Replace 2 Check Pivot shaft Roll the pivot shaft on a flat surface Bends Replace WARNING EWA13770 Do not attempt to straighten a bent pivot shaft 3 Wash Pivot shaft Dust...

Page 229: ...Rear wheel Refer to REAR SHOCK ABSORBER ASSEMBLY on page 4 79 4 Adjust Drive chain slack Refer to ADJUSTING THE DRIVE CHAIN SLACK on page 3 21 A Left side B Right side Drive chain slack 30 0 40 0 mm 1...

Page 230: ...el axle nut and push the wheel forward 1 Drive sprocket cover 1 2 Drive chain 1 3 Chain link 1 4 O ring 4 5 Outer plate 1 6 Drive sprocket retainer 1 7 Drive sprocket 1 Use rotor holder tool S 1113 to...

Page 231: ...essure bolt EAS30230 CHECKING THE DRIVE CHAIN 1 Measure 15 link section a of the drive chain Out of specification Replace the drive chain a Measure the length a between the inner sides of the pins and...

Page 232: ...Replace the drive chain sprock ets as a set EAS30232 CHECKING THE REAR WHEEL SPROCKET Refer to CHECKING AND REPLACING THE REAR WHEEL SPROCKET on page 4 23 EAS30233 CHECKING THE REAR WHEEL DRIVE HUB R...

Page 233: ...move pressure plate and adjust the clamp to B position and screw in the pres sure bolt for flaring of rivet of both the link pins by tightening the pressure bolt TIP During flaring Ensure Cutter pin i...

Page 234: ...it 5 minutes to remove grease de position TIP Shake the cleaner well before use During washing of vehicle never use kero sene petrol or any other solvent for cleaning b Wipe the drive chain with a cle...

Page 235: ...TALLING THE CAMSHAFT AND ROCKER ARMS 5 19 VALVES AND VALVE SPRINGS 5 21 REMOVING THE VALVES 5 22 CHECKING THE VALVES AND VALVE GUIDES 5 22 CHECKING THE VALVE SEATS 5 23 CHECKING THE VALVE SPRINGS 5 25...

Page 236: ...ING THE STOPPER LEVER 5 53 INSTALLING THE SHIFT SHAFT 5 53 BALANCER GEAR 5 54 REMOVING THE PRIMARY DRIVE GEAR AND B ALANCER GEARS 5 55 CHECKING THE BALANCER GEARS AND PRIMARY DRIVE GEAR 5 55 ASSEMBLIN...

Page 237: ...SHIFT FORKS 5 68 CHECKING THE SHIFT DRUM ASSEMBLY 5 68 CHECKING THE TRANSMISSION 5 68 ASSEMBLING THE DRIVE AXLE 5 69 INSTALLING THE SHIFT FORKS AND SHIFT DRUM ASSEMBLY 5 69 BCWF8197E0 book Page 2 Thu...

Page 238: ...rder Job Parts to remove Q ty Remarks Inner fender Refer to GENERAL CHASSIS 3 on page 4 3 Upper side cowling left Refer to GENERAL CHASSIS 3 on page 4 3 1 O2 Sensor coupler Disconnect 2 Exhaust pipe n...

Page 239: ...THE ENGINE OIL on page 3 10 Coolant Drain Refer to CHANGING THE COOLANT on page 3 16 Fuel tank Refer to FUEL TANK on page 7 1 Throttle body Intake manifold Refer to THROTTLE BODY on page 7 7 Water pum...

Page 240: ...ystem QSS coupler 1 Disconnect 9 Shift arm along with quick shift system QSS 1 Disconnect TIP Loosen the left footrest bracket bolts for easy removal 10 O2 sensor lead 1 Disconnect 11 Injector lead 1...

Page 241: ...er the en gine 1 Engine mounting bolt front side 2 2 Engine mounting bolt nut rear upper side 1 1 3 Engine mounting bolt nut rear lower side 1 1 4 Engine 1 For installation reverse the removal procedu...

Page 242: ...tion Make sure that quick shift system assembly has same dimensions as shown in below illustration EAS32676 INSTALLING THE EXHAUST ASSEMBLY 1 Install Exhaust pipe gasket 1 Exhaust assembly 2 Exhaust p...

Page 243: ...5 6 ENGINE REMOVAL ENG TIP Install exhaust gasket with a claw at the cylinder head side BCWF8197E0 book Page 6 Thursday November 18 2021 9 18 AM...

Page 244: ...olant Drain Refer to CHANGING THE COOLANT on page 3 16 Exhaust assembly Refer to ENGINE REMOVAL on page 5 1 Clutch cable Disconnect Refer to CLUTCH on page 5 41 Fuel tank Refer to FUEL TANK on page 7...

Page 245: ...nder head Securely support the engine by putting scissor jack 892A under the engine so that there is no danger of it falling over 1 Crankshaft end accessing screw 1 2 Timing mark accessing screw 1 3 S...

Page 246: ...late 1 13 Cylinder head cover breather plate gasket 1 14 Oil seal 1 15 Timing chain tensioner 1 16 Timing chain tensioner gasket 1 17 Camshaft sprocket 1 18 Decompression cam 1 19 Cylinder head 1 20 C...

Page 247: ...roke align the I mark c on the camshaft sprocket with the mark d on the camshaft bearing stopper plate 4 Loosen Camshaft sprocket bolt 1 TIP While holding the magneto rotor nut with a wrench 2 loosen...

Page 248: ...of specification Resurface the cylinder head a Place a straightedge 1 and a feeler gauge 2 across the cylinder head b Measure the warpage c If the limit is exceeded resurface the cylin der head as fol...

Page 249: ...HE DECOMPRESSION SYSTEM 1 Check Decompression system a Check the decompression system with the camshaft sprocket and the decompres sion cam installed to the camshaft b Check that the decompression lev...

Page 250: ...r improper valve timing e While holding the camshaft temporarily tighten the camshaft sprocket bolt f Remove the wire from the timing chain 4 Install Timing chain tensioner gasket Timing chain tension...

Page 251: ...the possibil ity of the bolt coming loose and damaging the engine 8 Install Water pump assembly with its new O ring and tighten the water pump housing bolts with specified tightening torque Radiator a...

Page 252: ...5 15 CYLINDER HEAD ENG 10 Install All removed parts Refer to GENERAL CHASSIS 1 on page 4 1 Seats Refer to GENERAL CHASSIS 1 on page 4 1 BCWF8197E0 book Page 15 Thursday November 18 2021 9 18 AM...

Page 253: ...2 Locknut 4 3 Rocker arm shaft 2 4 Exhaust rocker arm 1 5 Adjusting screw exhaust side 2 6 Plate 1 7 Spring 1 8 Washer 1 9 Intake rocker arm 1 10 Adjusting screw intake side 2 11 Camshaft assembly 1 1...

Page 254: ...he camshaft assembly TIP Screw the long cylinder head bolt 7 into the threaded end of the camshaft and then pull out the camshaft EAS30257 CHECKING THE CAMSHAFT 1 Check Camshaft lobes Blue discolorati...

Page 255: ...aft outside diameter a Out of specification Replace REMOVING AND INSTALLING THE CAMSHAFT BEARING 1 Remove Camshaft bearing with bearing puller 1 and plate bearing installer 2 as shown in the il lustra...

Page 256: ...nd intake rocker arm 2 3 and then push the intake rocker arm stopper pin 4 in the direction of the arrow shown in the illustration b While pushing intake rocker arm 1 2 and intake rocker arm 2 3 in th...

Page 257: ...1 are parallel with the edge b of the cyl inder head and that the camshaft stopper plate bolt holes in the cylinder head and rocker arm shafts are aligned T R Camshaft stopper plate bolt M5 16 8 N m...

Page 258: ...on page 5 7 Rocker arms Camshaft Refer to CAMSHAFT on page 5 16 1 Valve cotter 8 2 Upper spring seat 4 3 Valve spring 4 4 Intake valve 2 5 Exhaust valve 2 6 Valve stem seal 4 7 Lower spring seat 4 Fo...

Page 259: ...ring compressor and the valve spring compressor attachment 2 3 Remove Upper spring seat 1 Valve spring 2 Valve 3 Valve stem seal 4 Lower spring seat 5 TIP Identify the position of each part very caref...

Page 260: ...l of the valves and valve seats 1 Eliminate Carbon deposits from the valve face and valve seat 2 Check Valve seat Pitting wear Replace the cylinder head 3 Measure Valve seat contact width a Out of spe...

Page 261: ...face and valve seat are evenly polished then clean off all of the lapping compound TIP For the best lapping results lightly tap the valve seat while rotating the valve back and forth be tween your ha...

Page 262: ...ring seat 1 Valve stem seal 2 Valve 3 Valve spring 4 Upper spring seat 5 into the cylinder head TIP Make sure each valve is installed in its original place Install the valve springs with the larger pi...

Page 263: ...ly tap the valve tip with a soft face hammer NOTICE ECA13800 Hitting the valve tip with excessive force could damage the valve Valve spring compressor YSST 603 90890 04019 Valve spring compressor atta...

Page 264: ...o CYLINDER HEAD on page 5 7 1 Cylinder 1 2 Cylinder gasket 1 3 Dowel pin 2 4 Piston pin clip 2 5 Piston pin 1 6 Piston 1 7 Top ring 1 8 2nd ring 1 9 Oil ring 1 For installation reverse the removal pro...

Page 265: ...on wall Cylinder wall Vertical scratches Replace the cylinder and replace the piston and piston rings as a set 2 Measure Piston to cylinder clearance a Measure cylinder bore C with the cylin der bore...

Page 266: ...Piston ring end gap Out of specification Replace the piston ring TIP The oil ring expander spacer end gap cannot be measured If the oil ring rail gap is excessive re place all three piston rings EAS3...

Page 267: ...s 3 TIP Apply engine oil to the piston pin Make sure the punch mark a on the piston points towards the exhaust side of the cylinder Before installing the piston pin clips cover the crankcase opening w...

Page 268: ...ompressing the piston rings with one hand install the cylinder with the other hand Pass the timing chain and timing chain guide intake side through the timing chain cavity a Top ring b 2nd ring c Uppe...

Page 269: ...er side cowling left Refer to GENERAL CHASSIS 3 on page 4 3 Drive sprocket cover Refer to CHAIN DRIVE on page 4 85 1 Crankshaft position sensor coupler 1 Disconnect 2 Stator coil coupler 1 Disconnect...

Page 270: ...lutch gear 1 14 Bearing 1 15 Washer 1 16 Starter clutch idle gear shaft 1 17 Starter clutch idle gear 1 18 Starter clutch assembly 1 For installation reverse the removal procedure BCWF8197E0 book Page...

Page 271: ...P Make sure the magneto puller is centered over the magneto rotor EAS30868 REMOVING THE STARTER CLUTCH 1 Remove Starter clutch bolts 1 TIP While holding the magneto rotor 2 with the magneto holder 3 r...

Page 272: ...STARTER CLUTCH 1 Install Starter clutch assembly Starter clutch bolts 1 TIP While holding the magneto rotor 2 with the magneto holder 3 tighten the starter clutch bolts Do not allow the magneto holde...

Page 273: ...the crankshaft position sensor stator assembly lead grommet 4 Install Magneto cover TIP Tighten the magneto cover bolts in the proper tightening sequence as shown T R Magneto rotor nut 70 N m 7 0 kgf...

Page 274: ...rter motor Order Job Parts to remove Q ty Remarks Lower side cowling Refer to GENERAL CHASSIS 3 on page 4 3 1 Starter motor 1 2 Starter motor lead 1 Disconnect For installation reverse the removal pro...

Page 275: ...emarks 1 O ring 1 2 Starter motor yoke 1 3 Gasket 1 4 Commutator 1 5 Starter motor front cover brush holder set 1 6 Brush set 1 7 Brush 2 8 Brush spring 2 For assembly reverse the disassembly procedur...

Page 276: ...ce the starter motor a Measure the armature assembly resis tances with the multimeter b If any resistance is out of specification re place the starter motor 5 Measure Brush length a Out of specificati...

Page 277: ...ush holder set EAS30326 ASSEMBLING THE STARTER MOTOR 1 Install Starter motor front cover brush holder set 1 Starter motor yoke 2 TIP Align the marks a on the starter motor yoke and starter motor front...

Page 278: ...GINE OIL on page 3 10 Lower side cowling right Refer to GENERAL CHASSIS 3 on page 4 3 1 Clutch cable 1 Disconnect 2 Oil filter element cover 1 3 Oil filter element 1 4 Clutch cover 1 5 Clutch cover ga...

Page 279: ...d holder 1 7 Ball 1 8 Long clutch push rod 1 TIP Take out with the help of magnetic driver 9 Friction plate 1 Black color Thinner width 1 10 Clutch plate 1 Thinner width 1 11 Friction plate 2 Brown co...

Page 280: ...r Job Parts to remove Q ty Remarks 15 Lock washer 1 16 Clutch boss 1 17 Thrust washer 1 18 Clutch housing 1 19 Conical spring washer 1 For installation reverse the removal procedure BCWF8197E0 book Pa...

Page 281: ...remove Q ty Remarks Pressure plate 2 Refer to CLUTCH on page 5 41 1 Clutch push lever 1 2 Clutch push lever spring 1 3 Circlip 1 4 Oil seal 1 5 Bearing 1 For installation reverse the removal procedure...

Page 282: ...lack color Thicker width X The gap between the friction lining mate rial in friction plate 1 Y The gap between the friction lining mate rial in friction plate 2 Z The gap between the friction lining m...

Page 283: ...eplace the clutch housing EAS30353 CHECKING THE CLUTCH BOSS 1 Check Clutch boss splines Damage pitting wear Replace the clutch boss TIP Pitting on the clutch boss splines will cause er ratic clutch op...

Page 284: ...clutch housing as a set EAS32680 CHECKING THE CLUTCH PUSH RODS 1 Check Long clutch push rod Cracks damage wear Replace the long clutch push rod 2 Measure Push rod bending limit Out of specification Re...

Page 285: ...l Clutch push lever 9 Install Bearing Oil seal Lock Clutch push lever along with spring 10 Lubricate Long push rod Ball 11 Install Long push rod Ball 12 Install Pressure plate Clutch springs 1 Clutch...

Page 286: ...ss and outside surface of oil seal Oil seal spring direction b shall be cover in side Oil seal lip shall be free from damage 15 Install Clutch cover TIP Tighten the clutch cover bolts in the proper ti...

Page 287: ...y Remarks Clutch housing Refer to CLUTCH on page 5 41 Balancer drive gear Refer to BALANCER GEAR on page 5 54 1 Oil pump baffle plate 1 2 Oil pump assembly 1 3 Oil pump drive gear 1 For installation r...

Page 288: ...3 INSTALLING THE OIL PUMP 1 Install Oil pump assembly NOTICE ECA20620 After tightening the screws make sure the oil pump turns smoothly 2 Install Oil pump baffle plate bolt TIP Apply locking agent LOC...

Page 289: ...y Remarks Clutch housing Refer to CLUTCH on page 5 41 Shift pedal Refer to ENGINE REMOVAL on page 5 1 1 Shift shaft 1 2 Circlip 1 3 Shift shaft spring 1 4 Stopper lever 1 5 Stopper lever spring 1 6 Oi...

Page 290: ...ll Stopper lever 1 Stopper lever spring 2 TIP Install the stopper lever spring as shown in the illustration Hook the ends of the stopper lever spring onto the stopper lever and the crankcase boss 3 Me...

Page 291: ...n gear nut 1 3 Washer 1 4 Primary drive gear 1 5 Spacer 1 6 Balancer drive gear 1 7 Straight key 1 8 Lock washer 1 9 Balancer driven gear plate 1 1 10 Balancer driven gear assembly 1 11 Straight key 1...

Page 292: ...ar Cracks damage wear Replace 2 Check Primary drive gear Refer to CHECKING THE PRIMARY DRIVE GEAR on page 5 47 ASSEMBLING THE BALANCER DRIVEN GEAR 1 Assemble Buffer boss 1 Balancer driven gear 2 TIP A...

Page 293: ...balancer driven gear nut Place the aluminum plate b between the bal ancer drive gear 3 and the balancer driven gear 4 and then tighten the primary drive gear nut 3 Bend the lock washer tab along a fl...

Page 294: ...n Refer to CYLINDER AND PISTON on page 5 27 Clutch housing Refer to CLUTCH on page 5 41 Oil pump assembly Refer to OIL PUMP on page 5 50 Shift shaft Refer to SHIFT SHAFT on page 5 52 Starter motor Ref...

Page 295: ...ain guide intake side 1 3 Chain cover 1 4 Timing chain 1 5 Engine oil drain plug 1 6 Spring 1 7 Engine oil strainer 1 8 Gear position switch 1 9 Crankcase right 1 10 Dowel pin 2 11 Crankcase left 1 Fo...

Page 296: ...remove Q ty Remarks Crankshaft Balancer Refer to CRANKSHAFT on page 5 63 Transmission Refer to TRANSMISSION on page 5 66 1 Oil seal 1 2 Bearing retainer 1 3 Bearing 7 For installation reverse the rem...

Page 297: ...rings with help of the bearing puller or with help of bearing punch and suit able attachment as mentioned below A Crankcase right B Crankcase left A B 1 Bearing puller YSST 624A YSST 624 Cup C Cup B Y...

Page 298: ...S31766 CHECKING THE BEARINGS AND OIL SEAL 1 Check Bearings Clean and lubricate the bearings and then rotate the inner race with your finger Rough movement Replace Oil seal Damage wear Replace EAS31603...

Page 299: ...In this position the shift drum segment teeth will not contact the crank case during crankcase installation 4 Install Crankcase bolts TIP Tighten each bolt 1 4 of a turn at a time in stag es and in th...

Page 300: ...he crankshaft and balancer Order Job Parts to remove Q ty Remarks Crankcase Separate Refer to CRANKCASE on page 5 57 1 Balancer 1 2 Crankshaft 1 For installation reverse the removal procedure BCWF8197...

Page 301: ...ks damage wear Replace the crank shaft 4 Check Crankshaft journal Scratches wear Replace the crankshaft Crankshaft journal oil passage Obstruction Blow out with compressed air EAS31077 INSTALLING THE...

Page 302: ...t top dead center TDC with one hand while turning the nut of the crankshaft installer bolt with the other Turn the crankshaft installer bolt until the crankshaft bot toms against the bearing BCWF8197E...

Page 303: ...5 57 1 Shift fork guide bar 1 2 Spring 2 3 Shift drum assembly 1 Use torx bit T 30 YSST 611 for dismantling shift drum assembly and cam shifter seg ment 4 Neutral point 1 5 Spring 1 6 Shift fork R 1 7...

Page 304: ...d wheel gear 1 4 6th wheel gear 1 5 Washer 1 6 1st wheel gear 1 7 Spacer 1 8 5th wheel gear 1 9 Circlip 1 10 Toothed washer 1 11 4th wheel gear 1 12 3rd wheel gear 1 13 Drive axle 1 For assembly rever...

Page 305: ...guide bar as a set EAS30432 CHECKING THE SHIFT DRUM ASSEMBLY 1 Check Shift drum groove Damage scratches wear Replace the shift drum assembly Shift drum segment 1 Damage wear Replace the shift drum as...

Page 306: ...irclip so that its sharp edge a is facing away from the toothed wash er and gear Be sure the circlip ends b are positioned at the axle spline groove c 2 Install 2nd pinion gear 1 TIP Press the 2nd pin...

Page 307: ...ugh movement Repair TIP Apply engine oil to each gear and bearing thor oughly Before assembling the crankcase make sure that the transmission is in neutral and that the gears turn freely BCWF8197E0 bo...

Page 308: ...5 71 TRANSMISSION ENG BCWF8197E0 book Page 71 Thursday November 18 2021 9 18 AM...

Page 309: ...THERMOSTAT 6 5 CHECKING THE THERMOSTAT ASSEMBLY 6 5 INSTALLING THE THERMOSTAT ASSEMBLY 6 5 WATER PUMP 6 6 DISASSEMBLING THE WATER PUMP 6 8 CHECKING THE WATER PUMP 6 8 ASSEMBLING THE WATER PUMP 6 8 INS...

Page 310: ...Refer to CHANGING THE COOLANT on page 3 16 Fuel tank Refer to FUEL TANK on page 7 1 Throttle cables Refer to THROTTLE BODY on page 7 7 1 Coolant reservoir breather hose 1 2 Coolant reservoir hose 1 3...

Page 311: ...diator Order Job Parts to remove Q ty Remarks 8 Radiator cap 1 9 Radiator 1 10 Radiator fan 1 11 Radiator cover 1 12 Thermostat 1 For installation reverse the removal procedure BCWF8197E0 book Page 2...

Page 312: ...Replace Malfunction Check and repair Refer to COOLING SYSTEM on page 8 24 EAS30440 INSTALLING THE RADIATOR 1 Fill Cooling system with the specified amount of the recom mended coolant Coolant air bleed...

Page 313: ...e indicated pressure with the gauge 3 Measure Radiator cap opening pressure Below the specified pressure Replace the radiator cap Refer to CHECKING THE RADIATOR on page 6 3 BCWF8197E0 book Page 4 Thur...

Page 314: ...cy of the thermostat is in doubt re place it A faulty thermostat could cause serious overheating or overcooling EAS30445 INSTALLING THE THERMOSTAT ASSEMBLY 1 Fill Cooling system with the specified amo...

Page 315: ...Refer to CHANGING THE COOLANT on page 3 16 Lower side cowling left Refer to GENERAL CHASSIS 3 on page 4 3 1 Radiator bracket bolt 2 2 Coolant reservoir hose 1 Remove from radiator bracket 3 Clutch cab...

Page 316: ...ket 1 3 Water pump housing cover 1 4 Water pump housing cover gasket 1 5 Circlip 1 6 Impeller shaft 1 7 Water pump seal 1 8 Bearing 1 TIP For removing use YSST 723 9 Water pump housing 1 For assembly...

Page 317: ...h the special tools to the specified depth as shown in the illustra tion 2 Lubricate Water pump seal 3 Install Impeller shaft 1 Circlip TIP After installation check that the impeller shaft ro tates sm...

Page 318: ...NG THE COOLANT on page 3 16 Coolant air bleed from engine Refer to CHANGING THE COOLANT on page 3 16 3 Check Cooling system Leaks Repair or replace any faulty part Refer to INSTALLING THE RADIATOR on...

Page 319: ...G THE FUEL PUMP ASSEMBLY 7 4 INSTALLING THE FUEL TANK 7 5 CHECKING THE FUEL PRESSURE 7 5 THROTTLE BODY 7 7 REMOVING THE THROTTLE BODY 7 9 CHECKING THE FUEL INJECTOR 7 9 INSTALLING THE FUEL INJECTOR 7...

Page 320: ...5 5 2 Fuel tank cover left right 1 1 3 Fuel tank top cover 1 4 Fuel tank mounting bolt 4 5 Fuel pump coupler 1 Disconnect 6 Fuel sender coupler 1 Disconnect 7 Hose fuel tank to canister 1 8 Fuel over...

Page 321: ...e Q ty Remarks 11 Fuel tank mounting bracket 2 12 Fuel pump retainer 1 13 Fuel pump assembly 1 14 Fuel pump gasket 1 15 Fuel sender unit assembly 1 For installation reverse the removal proce dure MO T...

Page 322: ...ling left and right Refer to GENERAL CHASSIS 3 on page 4 3 1 Canister mounting bolt Collar 2 2 2 Hose canister to throttle body 1 Disconnect 3 Hose fuel tank to canister 1 Disconnect 4 Hose canister t...

Page 323: ...e removed TIP Do not set the fuel tank down on the installation surface of the fuel pump Be sure to lean the fuel tank against a wall or the like EAS26640 REMOVING THE FUEL PUMP 1 Remove Fuel pump ret...

Page 324: ...onnect Fuel hose Fuel overflow hose Hose fuel tank to canister Fuel sender coupler Fuel pump coupler EAS3C11005 CHECKING THE FUEL PRESSURE 1 Check Fuel pressure a Remove Rider seat Refer to GENERAL CH...

Page 325: ...uel pressure Below specification Replace the fuel pump e Connect the fuel hose Refer to INSTALLING THE FUEL TANK on page 7 5 4 Install Fuel tank assembly mounting bolt screws Refer to FUEL TANK on pag...

Page 326: ...e 7 1 Air filter case Refer to GENERAL CHASSIS 6 on page 4 8 1 Fuel hose 1 Disconnect 2 Fuel injector cover 1 3 Fuel injector coupler 1 Disconnect 4 Fuel injector 1 5 Fuel injector O ring 1 6 FID fast...

Page 327: ...cable 1 Disconnect 9 Throttle cable decelerator cable 1 Disconnect 10 Hose Throttle body to canister 1 Disconnect 11 Throttle body 1 NOTICE ECA22690 The throttle body should not disassem bled 12 Intak...

Page 328: ...1 from the throttle body EAS3C11028 CHECKING THE FUEL INJECTOR 1 Check Fuel injector Damage Replace INSTALLING THE FUEL INJECTOR 1 Install Fuel injector TIP Lubricate the fuel injector O ring with eng...

Page 329: ...el hose will not be properly installed TIP Install the fuel hose securely onto the fuel in jector until a distinct click is heard To install the fuel hose 1 onto the fuel injector 2 slide the fuel hos...

Page 330: ...7 11 THROTTLE BODY FI BCWF8197E0 book Page 11 Thursday November 18 2021 9 18 AM...

Page 331: ...NALING SYSTEM 8 16 CIRCUIT DIAGRAM 8 16 TROUBLESHOOTING 8 18 COOLING SYSTEM 8 24 CIRCUIT DIAGRAM 8 24 TROUBLESHOOTING 8 25 FUEL INJECTION SYSTEM 8 28 CIRCUIT DIAGRAM 8 28 SELF DIAGNOSTIC FUNCTION AND...

Page 332: ...G THE BULBS AND BULB SOCKETS 8 141 CHECKING THE FUSES 8 142 REPLACING THE ECU engine control unit 8 142 REMOVING THE ECU engine control unit 8 142 INSTALLING THE ECU engine control unit 8 143 CHECKING...

Page 333: ...BCWF8197E0 book Page 2 Thursday November 18 2021 9 18 AM...

Page 334: ...R Y W Sb Or W P Y W W R 56 68 82 81 L G L G L G L G B L L G W R B W B W B B L G B W Sb Br Sb Sb Br Br R R B B B B B B W B R R R R R W R B B Br Br Br L R B L Or Y G Br Br MAIN 15A 8 CONNECTED R 23 R 1...

Page 335: ...k However the engine continues to run under the following con ditions The transmission is in gear the neutral circuit of the gear position switch is opened and the sidestand is up the sidestand switch...

Page 336: ...G AND CHARGING THE BATTERY on page 8 143 Clean the battery terminals Recharge or replace the battery 3 Check the spark plug Refer to CHECKING THE SPARK PLUG on page 3 8 Re gap or replace the spark plu...

Page 337: ...sensor Refer to CHECKING THE LEAN ANGLE SENSOR on page 8 149 Replace the lean angle sensor 11 Check the sidestand switch Refer to CHECKING THE SWITCHES on page 8 139 Replace the sidestand switch 12 C...

Page 338: ...L G L G R B R B B W Sb Sb Sb Sb Sb Br B B B W B R R R R R R B B Br R W R W MAIN 15A 8 CONNECTED B B B Y B R W R W R W B B R B B W Or R W R R R B Br L Br W L W Br W Br L L W 39 B Dg Ch Y B Y B P Br R B...

Page 339: ...switch is closed engine will start The sidestand switch prevents the starter motor from operating when neither of these conditions has been met In this instance the sidestand switch is opened so curre...

Page 340: ...e battery terminals Recharge or replace the battery 3 Check the starter motor operation Refer to CHECKING THE START ER MOTOR OPERATION on page 8 149 Starter motor is OK Perform the electric starting s...

Page 341: ...clutch switch 10 Check the engine stop start switch Refer to CHECKING THE SWITCHES on page 8 139 The start engine stop start switch Replace the right handlebar switch 11 Check the sidestand switch Ref...

Page 342: ...CUIT DIAGRAM R R Br Br W R R R L SPARE SPARE Br R R 1 5 3 4 12 R R B B R R R R R R B W W W W W W B B B MAIN 15A 8 1 AC magneto assembly 3 AC magneto 4 Rectifier regulator 5 Fuse box 8 Main fuse 12 Bat...

Page 343: ...Check the battery Refer to CHECKING AND CHARGING THE BATTERY on page 8 143 Clean the battery terminals Recharge or replace the battery 3 Check the stator coil Refer to CHECKING THE STA TOR COIL on pag...

Page 344: ...8 11 CHARGING SYSTEM ELEC BCWF8197E0 book Page 11 Thursday November 18 2021 9 18 AM...

Page 345: ...Y B B R Dg W B L B B W 6 5 11 12 15 14 23 39 40 43 50 60 61 68 69 74 76 83 85 84 86 87 88 41 B B B B B Y B Y B B B B B B L Y R Y B Y B Y L R W B Y B W B W B B B R Y R Y L B R Br Br Br Y L L B Y B Y B...

Page 346: ...0 Main switch 41 Meter assembly 43 Multi function display 50 High beam indicator light 60 Handlebar switch left 61 Dimmer pass switch 68 Junction 1 69 Junction 2 74 Brake Taillight assembly 76 Taillig...

Page 347: ...ulb s and bulb sock et s 2 Check the fuses Refer to CHECKING THE FUSES on page 8 142 Replace the fuse s 3 Check the battery Refer to CHECKING AND CHARGING THE BATTERY on page 8 143 Clean the battery t...

Page 348: ...8 15 LIGHTING SYSTEM ELEC BCWF8197E0 book Page 15 Thursday November 18 2021 9 18 AM...

Page 349: ...18 23 32 35 34 36 28 39 40 43 42 45 46 47 48 49 51 52 53 55 56 60 63 62 64 59 66 67 68 69 70 71 74 75 76 77 78 79 80 41 B B B B Ch Ch Ch Ch Br W Br W Y L R W B Y B W B W B B B R W R W R Y L P W Y W O...

Page 350: ...re warning light 47 Shift indicator light 48 Incoming notification indicator light 1 49 Incoming notification indicator light 2 51 Turn signal indicator light Right 52 Turn signal indicator light Left...

Page 351: ...fuses Main fuse Refer to CHECKING THE FUSES on page 8 142 Replace the fuse s 2 Check the battery Refer to CHECKING AND CHARGING THE BATTERY on page 8 143 Clean the battery terminals Recharge or repla...

Page 352: ...he rear brake light switch Refer to CHECKING THE SWITCHES on page 8 139 Replace the rear brake light switch 3 Check the entire signaling system wiring Refer to CIRCUIT DIAGRAM on page 8 16 Properly co...

Page 353: ...r to CHECKING THE SWITCHES on page 8 139 Replace the gear position switch 2 Check the entire signaling system wiring Refer to CIRCUIT DIAGRAM on page 8 16 Properly connect or replace the wire har ness...

Page 354: ...her than OFF 4 Check that the quick shift switch coupler is connected Connect the quick shift switch coupler 5 Check the quick shift switch Refer to DIAGNOSTIC CODE SENSOR OPERATION TABLE on page 8 44...

Page 355: ...the front wheel sensor 2 Check the entire signaling system wiring Refer to CIRCUIT DIAGRAM on page 8 16 Properly connect or replace the wire har ness Replace the hydraulic unit assembly ECU meter asse...

Page 356: ...TEMPERATURE SENSOR on page 8 152 Replace the coolant temperature sensor 2 Check the entire signaling system s wiring Refer to CIRCUIT DIAGRAM on page 8 16 Properly connect or repair the signaling syst...

Page 357: ...B B B B B R R R R R B B B Br Br Br R B L W Y G R Br Br MAIN 15A 8 B Ch Y B B R R W L G R B P W Or B W Y W R Y B L V G Br R Lg L W G R Y G Y L L B B L Y R B Y L Lg W W B B L B W Gy G Y W B L P B Or B L...

Page 358: ...Replace the fuse s 2 Check the battery Refer to CHECKING AND CHARGING THE BATTERY on page 8 143 Clean the battery terminals Recharge or replace the battery 3 Check the main switch Refer to CHECKING TH...

Page 359: ...system wiring Refer to CIRCUIT DIAGRAM on page 8 24 Properly connect or replace the cooling system wiring Replace the ECU or meter assembly Refer to REPLACING THE ECU engine control unit on page 8 142...

Page 360: ...8 27 COOLING SYSTEM ELEC BCWF8197E0 book Page 27 Thursday November 18 2021 9 18 AM...

Page 361: ...3 44 45 58 57 68 69 70 71 41 P B Gy G Br B L B B B W L W Y P W P W Y W Y W B L B L B L B L Y W P W Br W L Y L R W W R B Y B W B W B B B R R W Y L B R B W G R Shield W B B L L Br Br Br Br R R R R R R B...

Page 362: ...t idle device 28 Coolant temperature sensor 29 VVA variable valve actuation solenoid 30 Lean angle sensor 31 Fuel pump 33 Fuel injector 34 Yamaha diagnostic tool coupler ABS test coupler 35 CCU Commun...

Page 363: ...light comes on for around 2 seconds after the main switch has been set to ON and it comes on while the start switch is being pushed If the warning light does not come on under these conditions the wa...

Page 364: ...rs Refer to SENSOR AND ACTUATOR For ECU reinstallation refer to recovering initial status in TROUBLESHOOTING DETAILS Turn the main switch to OFF and then back to ON Check if an error code is displayed...

Page 365: ...ons For information about using the Yamaha diagnostic tool refer to the operation manual that is included with the tool Features of the Yamaha diagnostic tool You can use the Yamaha diagnostic tool to...

Page 366: ...engine conditions and running conditions when it occurred Diagnosis of function Check the operation of the output value of each sensor and actuator Dynamic inspection Check the electric component cond...

Page 367: ...e diagnosis codes related to the detected malfunction are displayed A Detected malfunction B Recovered malfunction 4 ECU The types of the control units are displayed e g FI ABS 5 Status of malfunction...

Page 368: ...items or components that are the probable cause of the malfunction following the order given After the check and service of the malfunctioning part have been completed delete the fault codes dis play...

Page 369: ...s Select function Trouble List YAMAHA DIAGNOSTIC TOOL ME1RG591BJ0000130 MTN155 12 Km Deendayal FFD graph Trouble Information FFD data 203 Event Lean angle sensor FFD P1605 Recover Lean angle sensor op...

Page 370: ...bly and ECU Defective intake air pressure sensor Malfunction in ECU Engine idling speed is high Engine idling speed is unstable Engine response is poor Loss of engine power Increased exhaust emissions...

Page 371: ...t carried out Throttle opening value is fixed to 15 Intake air pressure is fixed to 101 3 kPa Fuel is not cut off due to the throttle opening O2 feedback is not carried out P0117 P0118 P0117 Coolant t...

Page 372: ...the intake air tem perature sensor circuit 4 8 V or more Defective coupler between throttle body sensor assem bly and ECU Open or short cir cuit in wire harness between throttle body sensor assem bly...

Page 373: ...nd ECU Open or short cir cuit in wire harness between fuel injector and ECU Defective fuel injec tor Malfunction in ECU Improperly installed fuel injector Loss of engine power Engine is difficult to s...

Page 374: ...voltage Malfunction in ECU Engine is difficult to start Increased exhaust emissions Fuel system voltage is 12 V O2 feedback is not carried out P0511 FID Fast Idle De vice solenoid FID solenoid does no...

Page 375: ...O2 sensor Defective coupler between O2 sensor and ECU Short to power cir cuit in wire harness between O2 sensor and ECU Defective O2 sen sor Malfunction in ECU Increased exhaust emissions O2 feedback...

Page 376: ...age of the lean angle sen sor circuit 4 8 V or more Defective coupler between lean angle sensor and ECU Open or short cir cuit in wire harness between lean angle sensor and ECU Defective lean an gle s...

Page 377: ...e with the tool displayed value 06 Coolant temperature Displays the coolant temper ature 30 120 C When engine is cold Dis plays temperature closer to air temperature When engine is hot Displays curren...

Page 378: ...terval Display the EEPROM writ ing error for fault code No P062F If more than one item is de fective the displays alter nates every two seconds to show all the detected num bers 01 CO adjustment value...

Page 379: ...n the YDT screen comes on each time the VVA solenoid is actuated Check that the VVA solenoid is operated five times 51 Radiator fan motor relay Actuates the radiator fan mo tor relay five times at fiv...

Page 380: ...17 Coolant temperature sensor short to ground circuit is detected P0118 Coolant temperature sensor open or short to power circuit is detected Able Able 06 P0122 P0123 P0122 Throttle position sensor op...

Page 381: ...und circuit is detected P1605 Lean angle sensor open or short to power circuit is detected Unable Unable 08 P2158 Normal signal is not received from the rear wheel sensor Able Able P2645 Normal signal...

Page 382: ...tive meter unit Malfunction in ECU Signals are not received from the ECU within the specified duration Meter operation is impossible Normally operated except for the meter Er 3 ECU internal malfunctio...

Page 383: ...ck for detached or pinching Improperly installed sensor Reinstall the throttle body as sembly Start the engine and let it idle for approximately 5 seconds Check the fault code using the malfunction mo...

Page 384: ...eck the locking condition of the coupler Disconnect the coupler and check the pins bent or broken terminals and locking condition of the pins Improperly connected Con nect the coupler securely or re p...

Page 385: ...f there is continuity replace the wire harness 3 4 For P0107 Open circuit Between intake air pressure sensor coupler and ECU coupler blue blue If there is no continuity replace the wire harness Fault...

Page 386: ...d any other ECU coupler terminal b If there is continuity replace the wire harness Fault code No P0107 P0108 Item P0107 Intake air pressure sensor open or short to ground circuit is detected P0108 Int...

Page 387: ...80 kPa 600 0 mmHg 23 6 inHg 3 15V 3000 m 9800 ft above sea lev el Approx 70 kPa 525 0 mmHg 20 7 inHg 2 76V When engine is cranking Make sure that the indication value changes The value does not change...

Page 388: ...s Improperly connected Con nect the coupler securely or re place the wire harness Turn the main switch to ON and then check the condition of the fault code using the mal function mode of the YDT Condi...

Page 389: ...the wire harness 3 4 For P0113 Open circuit Between intake air temperature sensor coupler and ECU coupler brown white brown white If there is no continuity replace the wire harness Fault code No P0112...

Page 390: ...r temperature sensor Execute the diagnostic mode Code No 05 When engine is cold Displayed temperature is close to the ambient temperature The displayed temperature is not close to the ambient temper a...

Page 391: ...and locking condition of the pins Improperly connected Con nect the coupler securely or re place the wire harness Turn the main switch to ON and then check the fault code using the malfunction mode of...

Page 392: ...ity replace the wire harness 3 4 For P0118 Open circuit Between coolant temperature sensor coupler and ECU coupler green red green red If there is no continuity replace the wire harness Fault code No...

Page 393: ...coolant temperature sensor Execute the diagnostic mode Code No 06 When engine is cold Displayed temperature is close to the am bient temperature The dis played temperature is not close to the ambient...

Page 394: ...locking condition of the pins Improperly connected Con nect the coupler securely or re place the wire harness Turn the main switch to ON and then check the fault code using the malfunction mode of th...

Page 395: ...e is continuity replace the wire harness 3 4 For P0122 Open circuit Between throttle position sensor coupler and ECU coupler blue blue If there is no continuity replace the wire harness Fault code No...

Page 396: ...and any other ECU coupler terminal b If there is continuity replace the wire harness Fault code No P0122 P0123 Item P0122 Throttle position sensor open or short to ground circuit is detected P0123 Thr...

Page 397: ...fully open A value of 92 107 is indicated An indicated value is out of the specified range Replace the throttle body Turn the main switch to ON and then check the fault code using the malfunction mod...

Page 398: ...Go to item 6 and finish the service Condition is Malfunction Start the engine and then check the fault code Condition is Recover Go to item 6 and finish the service Condition is Malfunction Go to ite...

Page 399: ...o to item 4 TIP For this check also set the engine stop start switch to ON 4 Defective O2 sensor heater Replace the O2 sensor Turn the main switch to ON and then check the fault code using the malfunc...

Page 400: ...ition is Recover Go to item 7 and finish the service Condition is Malfunction Go to item 3 3 Connection of ECU coupler Check the locking condition of the coupler Disconnect the coupler and check the p...

Page 401: ...of the coupler Disconnect the coupler and check the pins bent or broken terminals and locking condition of the pins Improperly connected Con nect the coupler securely or re place the wire harness Exec...

Page 402: ...drive vehicle Diagnostic code No Tool display Procedure Item Probable cause of malfunc tion and check Maintenance job Confirmation of service com pletion 1 Connection of crankshaft posi tion sensor co...

Page 403: ...he fault code using the malfunction mode of the YDT Condition is Recover Go to item 7 and finish the service Condition is Malfunction Go to item 5 5 Defective crankshaft position sensor Check the cran...

Page 404: ...lfunction Go to item 2 2 Connection of ECU coupler Check the locking condition of the coupler Disconnect the coupler and check the pins bent or broken terminals and locking condition of the pins Impro...

Page 405: ...radiator fan motor relay is actuated five times by listening for the operating sound Item Probable cause of malfunc tion and check Maintenance job Confirmation of service com pletion 1 Connection of...

Page 406: ...ault code has a condition of Recover using the YDT and then delete the fault code Fault code No P0500 Item Front wheel sensor normal signals are not received from the front wheel sensor Fail safe syst...

Page 407: ...harness continuity Open or short circuit Replace the wire harness Between front wheel sensor coupler and ABS ECU coupler red red green green Between ABS ECU coupler and ECU coupler white white Execut...

Page 408: ...solenoid is actuated five times by listening for the op erating sound Item Probable cause of malfunc tion and check Maintenance job Confirmation of service com pletion 1 Connection of FID solenoid cou...

Page 409: ...k that the engine trouble warning light goes off Confirm that the fault code has a condition of Recover using the YDT and then delete the fault code Fault code No P0560 P0563 Item P0560 Battery chargi...

Page 410: ...main switch to ON Check that the engine trouble warning light does not come on Fault code No P062F Item EEPROM fault code number an error is detected while reading or writing on EEPROM Fail safe syst...

Page 411: ...at item 1 If the same number is indicated go to item 4 3 12 is indicated in the diagnos tic mode Code No 60 EEPROM data error for O2 feedback learning values Turn the main switch to OFF Turn the main...

Page 412: ...idle for approximately 5 seconds Check the fault code using the malfunction mode of the YDT Condition is Recover Go to item 4 and finish the service Condition is Malfunction Go to item 2 2 Wire harnes...

Page 413: ...or re place the wire harness Turn the main switch to ON extend and retract the sides tand And then check the fault code using the malfunction mode of the YDT Condition is Recover Go to item 6 and fini...

Page 414: ...e started Turn the main switch to ON and then check the fault code using the malfunction mode of the YDT Condition is Recover Go to item 7 and finish the service Condition is Malfunction Go to item 3...

Page 415: ...le to start engine Unable to drive vehicle Diagnostic code No 08 Tool display Lean angle sensor output voltage 0 4 1 4 upright 3 7 4 4 overturned Procedure Remove the lean angle sensor and incline it...

Page 416: ...ower supply lead 4 Sensor output lead 5 Sensor ground lead 3 2 Disconnect the ECU coupler from the ECU Disconnect the lean angle sensor coupler from the lean angle sensor 3 3 For P1604 Ground short ci...

Page 417: ...nnect the couplers from the parts that are connected to the ECU Fault code No P1604 P1605 Item P1604 Lean angle sensor short to ground circuit is detected P1605 Lean angle sensor open or short to powe...

Page 418: ...n mode of the YDT Condition is Recover Go to item 6 and finish the service Condition is Malfunction Go to item 5 5 Malfunction in ECU Replace the ECU Service is finished 6 Delete the fault code and ch...

Page 419: ...ler securely or re place the wire harness Check the rear wheel speed with YDT monitor item Rotate the rear wheel by hand and check that the indicated val ue Rear wheel speed exceeds 0 km h Go to item...

Page 420: ...monitor item Rotate the rear wheel by hand and check that the indicated val ue Rear wheel speed exceeds 0 km h Go to item 9 and fin ish the service Rear wheel speed remains 0 km h Go to item 7 7 Malfu...

Page 421: ...2 sensor cou pler Check the locking condition of the coupler Disconnect the coupler and check the pins bent or broken terminals and locking condition of the pins Improperly connected Con nect the coup...

Page 422: ...on Go to item 6 Also delete this fault code which has a condition of Mal function 6 Defective O2 sensor Check the O2 sensor Replace the O2 sensor if it is defective Start the engine warm it up and the...

Page 423: ...to ON Start the engine and accelerate to 7400 r min Check the condition of the fault code using the malfunction mode of the YDT Condition is Recover Go to item 6 and finish the service Condition is Ma...

Page 424: ...nostic code No 08 Tool display Lean angle sensor output voltage 0 4 1 4 upright 3 7 4 4 overturned Procedure Remove the lean angle sensor and incline it more than 50 degrees Item Probable cause of mal...

Page 425: ...ition of the MIL MIL does not light on Finish the service MIL lights on Go to item 4 4 Malfunction in ECU Replace the ECU Service is finished 5 Delete the fault code and check that the engine trouble...

Page 426: ...played Go to item 2 2 Connection of ECU coupler Check the locking condition of the coupler Disconnect the coupler and check the pins bent or broken terminals and locking condition of the pins Improper...

Page 427: ...f ECU coupler Check the locking condition of the coupler Disconnect the coupler and check the pins bent or broken terminals and locking condition of the pins Improperly connected Con nect the coupler...

Page 428: ...heck the locking condition of the coupler Disconnect the coupler and check the pins bent or broken terminals and locking condition of the pins Improperly connected Con nect the coupler securely or re...

Page 429: ...r Check the locking condition of the coupler Disconnect the coupler and check the pins bent or broken terminals and locking condition of the pins Improperly connected Con nect the coupler securely or...

Page 430: ...angle sensor Brief abnormality de tected in lean angle sensor Same as for fault code P1604 and P1605 Perform the checks and maintenance jobs for fault code P1604 and P1605 218 Crankshaft position sens...

Page 431: ...number 244 may be indicated even if the system is normal 245 Engine stall Engine stall detected Empty fuel tank Improperly adjusted throttle cable Improperly adjusted clutch cable Defective fuel injec...

Page 432: ...Br Br Br R B B B B R R R R Br Br Br Br Y R Y R Br Br R W R W R R MAIN 15A 8 R Y R R R R B Ch Y B B R R W L G R B P W Or B W Y W R Y B L V G Br R Lg L W G R Y G Y L L B B L Y R B Y L Lg W W B B L B W G...

Page 433: ...THE BATTERY on page 8 143 Clean the battery terminals Recharge or replace the battery 3 Check the main switch Refer to CHECKING THE SWITCHES on page 8 139 Replace the main switch 4 Check the engine st...

Page 434: ...L Br L L R Lg W L B Lg L 5 10 12 9 15 14 18 23 35 34 39 40 43 54 67 68 69 70 71 72 73 41 R W W B B W B W B B W L B R B W R L Br W B W W L B W L B L R R G Br Br Y Y R Shield Shield W B W Gy B Br Br Br...

Page 435: ...3 ECU Engine control unit 34 Yamaha diagnostic tool coupler ABS test coupler 35 CCU Communication control unit 39 Engine ground 40 Main switch 41 Meter assembly 43 Multi function display 54 ABS warnin...

Page 436: ...y W W L W B Gy R W L Sb Y R Dg Ch Gy Or W R Y W Y L P G Or W W Br P W Y W B 5 4 1 2 Lg L R B Lg W 3 B W B W 1 Front wheel sensor coupler 2 Rear wheel sensor coupler 3 Yamaha diagnostic tool coupler AB...

Page 437: ...tion about using the YDT refer to B 2 DIAGNOSIS USING THE FAULT CODES on page 8 109 For troubleshooting items other than the following items follow the normal service method WARNING EWA16710 When main...

Page 438: ...hocks or pulling on them with too much force since the ABS components are precisely adjusted The ABS ECU and hydraulic unit are united assemblies and cannot be disassembled The malfunction history is...

Page 439: ...8 106 ABS ANTI LOCK BRAKE SYSTEM ELEC BCWF8197E0 book Page 106 Thursday November 18 2021 9 18 AM...

Page 440: ...checked The malfunction is not corrected There is a break in the wire harness between the ABS ECU and the meter assembly The meter assembly circuit is defective The ABS warning light circuit in the hy...

Page 441: ...f the ABS warning light comes on the ABS ECU is defective Replace the hydraulic unit assembly EAS30964 A 2 ALL INDICATOR LIGHTS FAIL TO COME ON 1 Main switch Check the main switch for continuity Refer...

Page 442: ...upler ABS test coupler Check for continuity between blue black terminal of the ABS ECU coupler and blue black terminal of the Yamaha diagnostic tool coupler ABS test coupler 4 ABS ECU malfunction Repl...

Page 443: ...ction points after terminating the connection with the Yamaha diagnostic tool and turn ing the main switch off Operation of the Yamaha diagnostic tool Fault diagnosis mode Malfunction results are disp...

Page 444: ...rvice Manual F10 to open the service manual and check the details of the fault 9 Save To save the result of diagnosis of malfunction click Save F12 TIP Must save the result for future reference 10 Upd...

Page 445: ...ation of the sensor Able Able 12 Rear wheel sensor intermittent pulses or no pulses Rear wheel sensor signal is not re ceived properly Pulses are not re ceived or are re ceived intermittently while th...

Page 446: ...en the front wheel sensor and the hydraulic unit assembly Open or short cir cuit in the wire har ness between the front wheel sensor and the hydraulic unit assembly Defective front wheel sensor or hyd...

Page 447: ...nal is not re ceived properly Missing pulses are detected in the sig nal while the vehicle is traveling Foreign material adhered around the rear wheel sensor Incorrect installa tion of the rear wheel...

Page 448: ...le Able 31 Hydraulic unit as sembly abnormal ABS solenoid pow er supply Power is not sup plied to the solenoid circuit in the hydrau lic unit assembly Blown ABS sole noid fuse Defective coupler betwee...

Page 449: ...ing Front wheel will not recover from the locking tenden cy even though the signal is transmit ted from the ABS ECU to reduce the hydraulic pres sure Incorrect installa tion of the front wheel sensor...

Page 450: ...he rear wheel sensor Incorrect installa tion of the rear wheel Defective sensor rotor or incorrect installation of the rotor Defective rear wheel sensor or in correct installation of the sensor Able A...

Page 451: ...the battery and the hy draulic unit assem bly Defective charg ing system Defective hydrau lic unit assembly Able Able 55 Hydraulic unit as sembly defective ABS ECU Abnormal data is detected in the hy...

Page 452: ...om the ABS ECU to the rear wheel sensor is too low Short circuit in the wire harness be tween the rear wheel sensor and the hydraulic unit assembly Defective rear wheel sensor Defective hydrau lic uni...

Page 453: ...ere is visible damage Refer to MAINTENANCE OF THE WHEEL SENSOR AND SENSOR ROTOR on page 4 16 4 Defective front wheel sensor or incorrect installation of the sensor Check the wheel sensor for damage an...

Page 454: ...otor and wheel sensor for foreign material such as metal particles Clean the sensor rotor and wheel sensor if necessary 2 Incorrect installation of the front wheel Check the components for looseness d...

Page 455: ...e components for looseness distortion and bends Refer to CHECKING THE REAR WHEEL on page 4 22 3 Defective sensor rotor or incorrect instal lation of the rotor Check the surface of the sensor rotor for...

Page 456: ...inal 3 and the green terminal 4 and be tween the black white terminal 3 and the red terminal 5 If there is short circuit the wire harness is defective Replace the wire harness 6 ABS ECU 7 Front wheel...

Page 457: ...there is no continuity the wire harness is defective Replace the wire harness Check that there is no short circuit between the yellow terminal 1 and the brown terminal 2 and between the yellow termin...

Page 458: ...efer to CHECKING THE FRONT WHEEL on page 4 15 3 Defective sensor rotor or incorrect instal lation of the rotor Check the surface of the sensor rotor for damage Replace the sensor rotor if there is vis...

Page 459: ...stem tail brake light or brake light switch Check the brake light switches Refer to CHECKING THE SWITCHES on page 8 139 2 Defective coupler between the signaling system tail brake light or brake light...

Page 460: ...assembly Replace if there is an open or short circuit Between ABS ECU coupler and ABS solenoid fuse red red 4 Defective hydraulic unit assembly If the above items were performed and no malfunctions we...

Page 461: ...r power supply circuit in the hy draulic unit assembly Order Item components and probable cause Check or maintenance job 1 Defective hydraulic unit assembly Replace the hydraulic unit assembly Refer t...

Page 462: ...ugh the signal is transmitted from the ABS ECU to reduce the hydraulic pressure Order Item components and probable cause Check or maintenance job 1 Incorrect installation of the rear wheel sensor for...

Page 463: ...E WHEEL SENSOR AND SENSOR ROTOR on page 4 16 4 Defective front wheel sensor or incorrect installation of the sensor Check the wheel sensor for damage and the installed condition of the sensor Repair o...

Page 464: ...is high for fault code No 51 Vehicle system power supply voltage of wheel sensor power sup ply is high for fault code No 52 Symptom Power voltage supplied to the ABS ECU in the hydraulic unit assem b...

Page 465: ...an open or short circuit Between ABS ECU coupler and ABS control unit fuse brown white brown white 4 Defective charging system Check the charging system Refer to CHARGING SYSTEM on page 8 9 Fault cod...

Page 466: ...Replace the hydraulic unit assembly Refer to ABS ANTI LOCK BRAKE SYSTEM on page 8 101 Fault code No 56 Item Hydraulic unit assembly abnormal internal power supply Symptom Abnormality is detected in th...

Page 467: ...e black white terminal 3 and the green terminal 1 If there is a short circuit the wire harness is defective Replace the wire harness 4 ABS ECU 5 Front wheel sensor 2 Defective front wheel sensor Check...

Page 468: ...e black white terminal 3 and the yellow terminal 1 If there is a short circuit the wire harness is defective Replace the wire harness 4 ABS ECU 5 Rear wheel sensor 2 Defective rear wheel sensor Check...

Page 469: ...page 4 18 and INSTALLING THE REAR WHEEL on page 4 23 3 Perform brake line routing confirmation Refer to HYDRAULIC UNIT OPERATION TESTS on page 4 53 If it does not have reaction force properly the brak...

Page 470: ...TRICAL COMPONENTS ELEC EAS20089 ELECTRICAL COMPONENTS 16 17 12 13 14 15 5 6 7 8 9 10 11 18 19 20 21 22 23 24 25 26 26 27 28 29 30 31 32 33 34 35 36 37 BCWF8197E0 book Page 137 Thursday November 18 202...

Page 471: ...tion sensor 16 ECU engine control unit 17 CCU communication control unit 18 Lean angle sensor 19 Fuse box 20 Battery 21 Starter relay 22 Rear wheel sensor 23 Rear brake light switch 24 Starter motor 2...

Page 472: ...Gy R B Dg Ch Br W Br L L W Y W P 8 B R V B W 9 B B L G B W 12 HI LO PASS Ch Y B B R Dg W B 11 OFF ON Br P R B 10 L N R Sb Or W P Y W W R Gy Sb Or P W W R Y W 1 Main switch 2 Front brake light switch 3...

Page 473: ...tions a few times The switches and their terminal connections are illustrated as in the following example of the main switch The switch positions a are shown in the far left column and the switch lead...

Page 474: ...ead other wise it may be pulled out of the terminal in the coupler 2 Check Bulb for continuity with the multimeter No continuity Replace a Connect the positive tester probe to termi nal 1 and the nega...

Page 475: ...e electri cal system cause the lighting and ignition systems to malfunction and could possibly cause a fire 4 Install Passenger seat Rider seat Refer to GENERAL CHASSIS 1 on page 4 1 EAS31005 REPLACIN...

Page 476: ...e VRLA Valve Regulated Lead Acid bat teries are sealed it is not possible to check the charge state of the battery by measuring the specific gravity of the electrolyte Therefore the charge of the batt...

Page 477: ...in full contact with the battery terminal and that they are not shorted A corroded bat tery charger lead clip may generate heat in the contact area and a weak clip spring may cause sparks If the batte...

Page 478: ...d using a constant voltage charger a Measure the open circuit voltage prior to charging TIP Voltage should be measured 30 minutes after the engine is stopped b Connect a charger and ammeter to the bat...

Page 479: ...signal relay input voltage Out of specification The wiring circuit from the main switch to the turn signal relay cou pler is faulty and must be repaired a Connect the multimeter DC 20 V to the turn s...

Page 480: ...ode for no continuity EAS30557 CHECKING THE SPARK PLUG CAP 1 Check Spark plug cap resistance Out of specification Replace a Remove the spark plug cap from the spark plug lead b Connect the multimeter...

Page 481: ...HE IGNITION SPARK GAP 1 Check Ignition spark gap Out of specification Perform the ignition system troubleshooting starting with step 5 Refer to TROUBLESHOOTING on page 8 3 TIP If the ignition spark ga...

Page 482: ...an angle sensor 2 Check Lean angle sensor output voltage Out of specification Replace Connecting the Yamaha diagnostic tool Refer to FUEL INJECTION SYSTEM on page 8 28 EAS30562 CHECKING THE STARTER MO...

Page 483: ...upler as shown b Measure the stator coil resistance EAS30680 CHECKING THE RECTIFIER REGULATOR 1 Check Rectifier regulator output voltage Charging voltage Out of specification Replace the rectifier reg...

Page 484: ...fuel sender resistance EAS31372 CHECKING THE FUEL METER This model is equipped with a self diagnosis de vice for the fuel level detection circuit 1 Check Fuel meter 1 Turn the main switch to ON Fuel m...

Page 485: ...the coolant temper ature sensor is dropped replace it 2 Check Coolant temperature sensor resistance Out of specification Replace a Connect the multimeter 100 to the coolant temperature sensor termina...

Page 486: ...the Yamaha diagnostic tool Refer to YAMAHA DIAGNOSTIC TOOL on page 8 32 EAS30597 CHECKING THE FID FAST IDLE SOLENOID 1 Remove Throttle body from vehicle Refer to THROTTLE BODY on page 7 7 2 Check FID...

Page 487: ...l injector coupler from the fuel injector b Connect the multimeter to the fuel injector coupler as shown c Measure the fuel injector resistance Multimeter INS 003 90890 03189 Positive tester probe sol...

Page 488: ...8 155 ELECTRICAL COMPONENTS ELEC BCWF8197E0 book Page 155 Thursday November 18 2021 9 18 AM...

Page 489: ...D PERFORMANCE 9 2 FAULTY GEAR SHIFTING 9 2 SHIFT PEDAL DOES NOT MOVE 9 2 JUMPS OUT OF GEAR 9 2 FAULTY CLUTCH 9 2 OVERHEATING 9 3 OVERCOOLING 9 3 POOR BRAKING PERFORMANCE 9 3 FAULTY FRONT FORK LEGS 9 3...

Page 490: ...uel tank cap breather hole Clogged or damaged fuel hose 3 Throttle body Deteriorated or contaminated fuel Sucked in air 4 Canister Hose clogged Hose band twisted Electrical system 1 Battery Discharged...

Page 491: ...FT PEDAL DOES NOT MOVE Shift shaft Bent shift shaft Shift drum and shift forks Foreign object in a shift drum groove Seized shift fork Bent shift fork guide bar Transmission Seized transmission gear F...

Page 492: ...NG Cooling system 1 Thermostat Thermostat stays opened Faulty coolant temperature sensor EAS28640 POOR BRAKING PERFORMANCE Worn brake pad Worn brake disc Air in hydraulic brake system Leaking brake fl...

Page 493: ...properly grounded circuit Faulty main switch Tail brake light does not come on Too many electrical accessories Incorrect connection Burnt out tail brake light Tail brake light bulb burnt out Wrong tai...

Page 494: ...signal indicator light Left 53 Fuel meter 54 ABS warning indicator light 55 Gear position indicator 56 Gear position switch 57 Radiator fan motor 58 Radiator fan motor relay 59 Horn 1 60 Handlebar swi...

Page 495: ...BCWF8197E0 book Page 1 Thursday November 18 2021 9 18 AM...

Page 496: ...1Y245 SM 01 1578 10 21 E BCW F8197 E0 BCWF8197E0 book Page 2 Thursday November 18 2021 9 18 AM...

Page 497: ...B W L B B B B B Y B Y B B B B B B B B B L Y R Ch Ch Ch Ch L G B W B W B W L G L G L G W Y Y B Y B Br W Br W R B R B P W P W Y W Y W B L B L B L B L Y W P W Br W L Y L R W R B R B L G W R B Y W B B W B...

Reviews: