background image

58

 PSR-S970/S770 Owner’s Manual

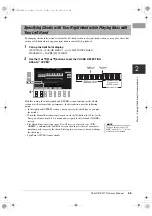
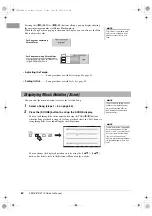
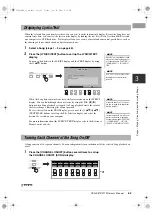
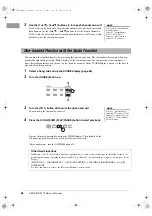
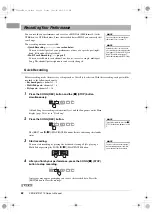
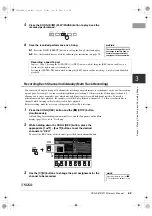
The key which divides the keyboard into two sections is referred to as “Split Point.” There are two Split Points: 
Split Point (LEFT) and Split Point (STYLE). 

• Split Point (LEFT): 

Divides the keyboard into the left-hand (LOWER) section and the right-hand 
(UPPER) section.

• Split Point (STYLE): 

Divides the left-hand (LOWER) section into the chord section and the LEFT Voice 
section.

1

Call up the Split Point display.

[FUNCTION] 

 TAB [

E

] MENU 1 

 [A] SPLIT POINT/CHORD 

FINGERING 

 TAB [

E

] SPLIT POINT

2

Set the Split Point.

Setting the Split Point

Chord section

Left-hand (LOWER) section

Split Point 

(STYLE)

LEFT Voice 

section

Right-hand (UPPER) 

section

Split Point 

(LEFT)

RIGHT 1, 2

Voices section

NOTE

You can also specify each Split Point 
by note name, using the [3 



]–[6 



] buttons. 

[F]

STYLE + 
LEFT

Sets Split Point (STYLE) and Split Point (LEFT) to the same note. Press the [F] button 
and rotate the Data dial. You can also specify the Split Point directly from the keyboard 
by pressing the desired key on the keyboard while holding the [F] button. 

[G]

STYLE

Sets each Split Point individually. Press one of the desired buttons and rotate the Data 
dial. You can also specify the Split Point directly from the keyboard by pressing the 
desired key on the keyboard while holding the appropriate button, [G] or [H].

NOTE

Split Point (LEFT) cannot be set lower than Split Point (STYLE).

[H]

LEFT

Split Point 

(STYLE + LEFT)

RIGHT 1, 2 Voices 

(Right-hand) section

Chord + LEFT 

Voice (Left-

hand) section

12psrs970_en_om.book  Page 58  Friday, June 26, 2015  3:33 PM

Summary of Contents for PSR-S970

Page 1: ...ead PRECAUTIONS on pages 5 6 Merci d avoir choisi ce Clavier Arrangeur Professionnel Yamaha Nous vous conseillons de lire attentivement ce mode d emploi afin de tirer pleinement profit des fonctions avancées et très utiles de votre instrument Nous vous recommandons également de garder ce manuel à portée de main pour toute référence ultérieure Avant d utiliser l instrument lisez attentivement la se...

Page 2: ... unit is operating as designed are not covered by the manufacturer s warranty and are therefore the owners responsibility Please study this manual carefully and consult your dealer before requesting service ENVIRONMENTAL ISSUES Yamaha strives to produce products that are both user safe and environmentally friendly We sincerely believe that our products and the production methods used to produce th...

Page 3: ...this product or the device that is being affected by the interference Utilize power outlets that are on different branch circuit breaker or fuse circuits or install AC line filter s In the case of radio or TV interference relocate reorient the antenna If the antenna lead in is 300 ohm ribbon lead change the lead in to co axial type cable If these corrective measures do not produce satisfactory res...

Page 4: ...es and the point where they exit from the apparatus 11 Only use attachments accessories specified by the manufacturer 12 Use only with the cart stand tri pod bracket or table specified by the manufacturer or sold with the apparatus When a cart is used use caution when moving the cart apparatus combination to avoid injury from tip over 13 Unplug this apparatus during lightning storms or when unused...

Page 5: ... specified adaptor page 111 only Using the wrong adaptor can result in damage to the instrument or overheating Check the electric plug periodically and remove any dirt or dust which may have accumulated on it This instrument contains no user serviceable parts Do not open the instrument or attempt to disassemble or modify the internal components in any way If it should appear to be malfunctioning d...

Page 6: ...vel since this can cause permanent hearing loss If you experience any hearing loss or ringing in the ears consult a physician Always turn the power off when the instrument is not in use Even when the Standby On switch is in standby status display is off electricity is still flowing to the instrument at the minimum level When you are not using the instrument for a long time make sure you unplug the...

Page 7: ...g MIDI data iPhone iPad Connection Manual only in English French German and Spanish Explains how to connect the instrument to smart devices such as an iPhone iPad etc To obtain these materials access the Yamaha Downloads website then enter the model name for searching the desired files The illustrations and LCD screens as shown in this manual are for instructional purposes only and may appear some...

Page 8: ...ther relevant laws you are NOT allowed to distribute media in which these contents are saved or recorded and remain virtually the same or very similar to those in the product The contents described above include a computer program Accompaniment Style data MIDI data WAVE data voice recording data a score score data etc You are allowed to distribute medium in which your performance or music producti...

Page 9: ... Repeat Playback 67 Recording Your Performance 68 4 USB Audio Player Recorder Playing Back and Recording Audio Files 71 Playing Back Audio Files 71 Recording Your Performance as Audio 74 5 Multi Pads Adding Musical Phrases to Your Performance 76 Playing the Multi Pads 76 Using Chord Match 77 Using the Multi Pad Synchro Start Function 77 Creating a Multi Pad with Audio files Audio Link Multi Pad 78...

Page 10: ...970 S770 has new and high quality effect types including Real Distortion and Real Reverb On the PSR S970 these also include VCM effects that use the same technology as the professional level processing on Yamaha s high end mixers It is provided with beautifully designed virtual panel displays with highly intuitive controls just like actual effect devices Audio files WAV or MP3 format saved to a US...

Page 11: ...ound being played or to control the volume balance between the parts such as Voice and Style Thus you can easily add variations to the sound without interrupting your performance You can also control your performance easily by using the two wheels PITCH BEND and MODULATION The PITCH BEND wheel lets you bend the notes up or down while the MODULATION wheel can be used to apply a vibrato effect to th...

Page 12: ...the tempo for Style Song and Metronome playback 8 TRANSPOSE buttons Page 38 Transposes the entire pitch of the instrument in semitone steps 9 METRONOME button Page 37 Turns the metronome on or off FADE IN OUT button Page 52 Controls fade in out of Style Song playback OTS LINK button Page 54 Turns on off the OTS Link function STYLE CONTROL buttons Page 50 Controls Style playback ASSIGN button LIVE ...

Page 13: ...plies various effects to the keyboard performance G MUSIC FINDER button Page 80 Calls up ideal panel setups for your performance H PART SELECT buttons Page 36 Selects a keyboard part I PART ON OFF buttons Page 35 Turns the keyboard part on or off J REGISTRATION MEMORY buttons Page 85 Registers and recalls panel setups K MULTI PAD CONTROL buttons Page 76 Selects and plays a rhythmic or melodic Mult...

Page 14: ...itar 6 GAIN knob Page 88 For adjusting the input level of the MIC GUITAR INPUT jack 7 MIC GUITAR switch Page 88 For switching between MIC and GUITAR for proper use of the MIC GUITAR INPUT jack 1 2 3 4 5 6 7 Air Vents NOTICE This instrument has special air vents in the top panel and rear panel Do not place objects where they might block the air vent since this may prevent adequate ventilation of th...

Page 15: ...minal Page 100 For connecting a USB device such as a USB flash drive RGB OUT terminal PSR S970 Page 99 For connecting to an external monitor 8 9 Using the Headphones Connect a pair of headphones to the PHONES jack CAUTION Do not listen with the headphones at high volume for long periods of time Doing so may cause hearing loss Standard stereo phone plug 12psrs970_en_om book Page 15 Friday June 26 2...

Page 16: ... CAUTION When setting up the product make sure that the AC outlet you are using is easily accessible If some trouble or malfunction occurs immedi ately turn the power off and disconnect the plug from the outlet NOTE Follow the order shown above in reverse when disconnecting the AC adaptor 3 1 2 AC adaptor DC IN jack page 14 AC Outlet The shape of the plug and outlet differs depending on your area ...

Page 17: ...When you are not using the prod uct for a long time make sure to unplug the power cord from the wall AC outlet NOTICE While recording or editing or while a message is displayed the power cannot be turned off even if you press the Standby On switch If you want to turn off the power press the Standby On switch after recording editing or after the message has disap peared If you need to force quit th...

Page 18: ... display for messages 1 Call up the operation display FUNCTION TAB F MENU 2 G SYSTEM TAB E OWNER 2 Use the 4 5 buttons to select the desired language Press the EXIT button several times to exit from the display Adjusting the Master Volume CAUTION Do not use the instrument at high volume for long periods of time Doing so may cause hearing loss Changing the Display Language 2 12psrs970_en_om book Pa...

Page 19: ... A E buttons to show a specific Demo Pressing one of the F J buttons plays back the overview Demo continuously calling up the various displays in sequence Sub menus may be shown on the display Press one of the A J buttons corresponding to the desired sub menu 3 Press the EXIT button several times to exit from the Demo display Playing the Demos NOTE To return to the higher level menu press the EXIT...

Page 20: ... to them Example 1 Example 2 Display based Controls 1 A J buttons 1 A J buttons 2 TAB E F buttons DIRECT ACCESS button page 23 4 Data dial and ENTER button 3 1 8 buttons 5 EXIT button 1 A J buttons In the File Selection display page 26 the A J buttons can be used to select the corresponding files The A and B buttons are used to move the cursor up or down The F and H buttons are used to select the ...

Page 21: ...1 8 buttons For menus that appear in this section of the display use the 1 8 buttons For menus that appear in this section of the display use the 1 8 buttons For list menus that appear use the 1 8 buttons to select the desired item For parameters that appear in slider or knob form use the 1 8 buttons to adjust the value To reset the desired parameter value to its default simultaneously press both ...

Page 22: ...ue also works well with pop up parameters such as Tempo and Transpose Simply press the appropriate button ex TEMPO then rotate the Data dial to set the value 4 Data dial and ENTER button Rotate the Data dial to move the cursor Press the ENTER button to actu ally select the file The selected file is highlighted Rotate the Data dial to adjust the selected parameter Select the desired parameter with ...

Page 23: ...pting you to press the appropriate button 2 Press the button or move the knob wheel or connected pedal corresponding to the desired setting display to instantly call up that display For example pressing the GUIDE button calls up the display in which the Guide mode can be set A message information or confirmation dialog sometimes appears on the screen to facilitate operation When the message appear...

Page 24: ... 58 5 MIC Guitar input level indicator PSR S970 When a microphone guitar is connected this indicates the input level Adjust the level with the GAIN knob on the rear panel so that the indicator lights in green or yellow but not in red For details on connecting a microphone guitar refer to page 88 Pressing the B C D buttons calls up the Vocal Harmony Type Selection display 6 Style name and related i...

Page 25: ... page 40 Vocal Harmony type PSR S970 Displays the currently selected Vocal Harmony type page 91 USB Audio Player Recorder information Displays information for the selected audio file in the connected USB flash drive page 71 including the elapsed playback time file name and Repeat mode icon When the audio recording is in standby a WAITING indication appears While recording RECORDING appears Transpo...

Page 26: ...umbers P1 P2 are shown below the files Pressing the corresponding button changes the display page When other pages follow the Next button appears and for the previous page the Prev button appears 3 MENU 1 MENU 2 At the bottom of the File Selection display you can toggle the indication between MENU 1 and MENU 2 by pressing the 8 button Selecting MENU 1 shows the function names related to the curren...

Page 27: ...lable songs are copy protected to prevent illegal copying or accidental erasure They are marked by the indications at the upper left side of the file names The indications and relevant restrictions are detailed below Prot 1 Indicates Preset Songs copied to the USER drive These only can be copied moved deleted in the USER drive Prot 2 Orig Indicates Yamaha protection formatted Songs These cannot be...

Page 28: ... 6 SAVE button The Character Entry window is called up 4 Enter the file name page 32 Even if you skip this step you can rename the file at any time after saving it page 30 5 Press the 8 OK button to actually save the file The saved file will be automatically located at the appropriate position among the files in alphabetical order Saving a File NOTE Files cannot be saved to the PRESET tab or the E...

Page 29: ...ed folder will be automatically located at the appropriate position among the folders in alphabetical order Creating a New Folder NOTE A new folder cannot be made in the PRESET tab or the Expansion folder page 46 in the USER tab NOTE The maximum number of files folders which can be saved in a folder is 500 NOTE In the USER tab no more than three folder levels can be created The maxi mum total numb...

Page 30: ...ation folder You can also copy folders but not move them by using the same procedure 1 In the File Selection display select the appropriate tab PRESET USER or USB which contains the file folder you want to copy by using the TAB E F buttons 2 Make sure that MENU 2 is shown at the bottom right corner of the display If necessary press the 8 button to call up MENU 2 Renaming a File Folder NOTE Files a...

Page 31: ...tination folder by using the A J buttons 7 Press the 4 PASTE button to paste the file folder selected in step 4 The pasted file folder appears on the display at the appropriate position among the files in alphabetical order You can delete individual or multiple files folders 1 In the File Selection display select the appropriate tab USER or USB which contains the file folder you want to delete by ...

Page 32: ...a dial to move the cursor to the desired position 3 Press the 2 6 and 7 buttons corresponding to the character you wish to enter Several different characters are assigned to each button and the characters change each time you press the button To actually enter the selected character move the cursor or press another character input button Alternately you can wait for a short time and the character ...

Page 33: ...n to apply the selected icon While holding the right most key C6 on the keyboard turn the power on This resets the settings of the entire instrument referred to as the System Setup parameters to their factory default settings Refer to the Parameter Chart in the Data List on the website for details about which parameters belong to System Setup You can also reset specified settings to the factory de...

Page 34: ...estarted automatically Data Backup NOTE Before using a USB flash drive be sure to read Connecting USB Devices on page 100 NOTE You can also back up files in the USER drive such as Voice Song Style Multi Pad and Registration Memory by copying them individually to a USB flash drive as desired For instructions refer to page 30 NOTE You can also back up System settings MIDI settings User Effect settin...

Page 35: ...RIGHT 1 and or 2 parts The F 2 and lower keys are used for the LEFT part while the upper keys excluding F 2 are used for the RIGHT 1 and 2 parts The key which divides the keyboard into the left hand and right hand sections is referred to as the Split Point 1 Turn on the PART ON OFF button corresponding to the part you want to use The corresponding PART SELECT button is automatically turned on Play...

Page 36: ...button in the Voice Selection display you can call up the Voice categories folders including GM XG and GM2 which do not have any VOICE category selection buttons NOTE If you pressed the ORGAN FLUTES button in step 3 press the I PRE SETS button before proceeding to step 4 Expansion Voices Voices additionally installed page 46 User Voices Voices created with the Voice Set function refer to the Refer...

Page 37: ...ON OFF LEFT HOLD button when the LEFT part is ON the LEFT part Voice is held even when the keys are released Non decaying Voices such as strings are held continuously while decay type Voices such as piano decay more slowly as if the sustain pedal has been pressed This function is convenient when used along with Style playback since the sound of the chord matching Style playback is maintained To st...

Page 38: ... can be changed in the display called up via FUNCTION TAB E MENU 1 E MASTER TUNE SCALE TUNE The pitch can be shifted up or down between 414 8Hz and 466 8Hz in approximately 0 2 Hz increments For details refer to the Reference Manual on the website Changing the Pitch of the Keyboard Adjusting the Pitch in Semitones Transpose NOTE The Transpose functions do not affect the Drum Kit or SFX Kit Voices ...

Page 39: ... set whether the effects caused by the MODULATION wheel will be applied or not to each keyboard part independently FUNCTION TAB E MENU 1 D CONTROLLER TAB F KEYBOARD PANEL A B 2 MODULATION WHEEL Using the Wheels Using the Pitch Bend Wheel NOTE The effects produced by using the PITCH BEND wheel may not be applied to the LEFT part during Style playback depending on the Style setting PSR S970 The effe...

Page 40: ...HT 2 volume Voice Effect Cho R1 R2 Adjusts the Chorus depth for the RIGHT 1 and 2 parts Rotating the knob to the right makes it deeper 3 Voice Attack R1 R2 Adjusts the length of time until the RIGHT 1 and 2 parts reach their maximum level after the key is played Rotating the knob to the right increases it Voice Release R1 R2 Adjusts the length of time until the RIGHT 1 and 2 parts decay to silence...

Page 41: ...the resonance for all keyboard parts and the Style to change the timbre or tone of the sound Reverb Voice Style Adjusts the Reverb depth for all keyboard parts and the Style Rotating the knob to the right makes it deeper 8 MIC Gt Volume Adjusts the volume of the microphone or guitar sound input via the MIC GUITAR INPUT jack Rotating the knob to the right increases it PSR S970 MIC VH Balance Adjust...

Page 42: ...ssor effect on or off for the currently selected keyboard part The DSP VARI button is used to change between variations of the DSP effect For example this could be used to change the rotating speed slow fast of the rotary speaker effect while you play Performance effects such as harmony duet trio etc echo tremolo and trill can be applied to notes played in the right hand section of the keyboard ac...

Page 43: ...are on Multi Assign The Multi Assign effect automatically assigns notes played simultaneously on the right hand section of the keyboard to separate parts Voices Both of the keyboard parts RIGHT 1 and RIGHT 2 should be turned on when using the Multi Assign effect The RIGHT 1 and RIGHT 2 Voices are alternately assigned to the notes in the order you play 2 2 2 3 NOTE For details on the Split Point re...

Page 44: ...desired type You can set the Arpeggio volume and select the part for playing the Arpeggio in the display called up via the 7 DETAIL buttons For details refer to the Reference Manual on the website 3 Play a note or notes to trigger the Arpeggio The arpeggiated phrase differs depending on the notes played To turn off the effect turn the HARMONY ARPEGGIO button off Triggering Arpeggios with Your Righ...

Page 45: ...s Rotary Speaker and Vibrato Creating Your Original Organ Flutes Voices NOTE The term footage is a reference to the sound generation of traditional pipe organs in which the sound is pro duced by pipes of different lengths in feet NOTE Pressing the D button while holding down one of the 1 buttons can select both two footages and lets you set the same value for them by using the Data dial 3 For deta...

Page 46: ...a created by Yamaha or create your own original Expansion Pack data by using the Yamaha Expansion Manager software on your computer For instructions on how to install the Expansion Packs refer to the Reference Manual on the website For more information about Expansion Packs access the following website http www yamaha com awk To obtain the Yamaha Expansion Manager software and its manuals access t...

Page 47: ...t FUNCTION TAB E MENU 1 E MASTER TUNE SCALE TUNE TAB E MASTER TUNE Scale Tuning FUNCTION TAB E MENU 1 E MASTER TUNE SCALE TUNE TAB F SCALE TUNE Changing the part assignment of the TRANS POSE buttons FUNCTION TAB E MENU 1 D CONTROLLER TAB F KEYBOARD PANEL B 3 TRANSPOSE ASSIGN Editing parameters assigned to the LIVE CON TROL knobs ASSIGN I ASSIGN Editing Voices Voice Set Voice Selection display 8 ME...

Page 48: ...selection button several times 3 Press the ACMP button to turn on the Auto Accompaniment The specific left hand section of the keyboard page 58 becomes the chord section and chords played in this section are automatically detected and used as a basis for fully automatic accompaniment with the selected Style Playing a Style with the Auto Accompaniment NOTE For a list of preset Styles of this instru...

Page 49: ...ecifically it retains the subtle nuances and grooves that are difficult to reproduce using the preset drum percussion kit Yamaha Time Stretch Technology allows the audio to follow your tempo changes without changing pitch so everything stays in perfect sync NOTE For information on chords and Chord Fingering types refer to page 52 The chord specified in the chord section is shown on the Main dis pl...

Page 50: ...ack After pressing one of the INTRO I III buttons start playback of the Style When the Intro finishes playing Style playback automatically shifts to the Main section ENDING rit I III buttons The instrument features three different Ending sections to add an ending before stopping Style playback When you press one of the ENDING rit I III buttons while Style is playing back the Style will automatical...

Page 51: ...ton can change the value continuously Pressing both TEMPO and buttons simultaneously lets you call up the default tempo of the last selected Style or Song TAP TEMPO button During playback of a Style or Song you can change the tempo by tapping the TAP TEMPO button twice at the desired tempo When Style and Song are stopped tapping the TAP TEMPO button four times for a 4 4 time signature starts Style...

Page 52: ...left hand section of the keyboard when ACMP is turned on or the LEFT part is turned on For information on which notes to press for each chord use the Chord Tutor function page 53 or refer to the Reference Manual on the website AI FULL KEYBOARD This lets you play just about anything anywhere on the keyboard using both hands like conventional playing of a piano and still have appropriate accompanime...

Page 53: ...ent Style it also automatically turns on ACMP and SYNC START so that you can immediately start playing the Style 3 As soon as you play a chord in the chord section the selected Style starts Each Style has four One Touch Setting setups Press other ONE TOUCH SETTING 1 4 buttons to try out other setups Using the Chord Tutor Function NOTE Depending on the chord some notes may be omitted Calling up App...

Page 54: ...lly changing One Touch Settings with the Main sections OTS Link The convenient OTS One Touch Setting Link function lets you automatically have One Touch Settings change when you select a different Main section A D The Main sections A B C and D correspond to One Touch Settings 1 2 3 and 4 respectively To use the OTS Link function turn the OTS LINK button on NOTE You can change the timing in which t...

Page 55: ...ly by using both hands or play the rhythm on the Drum section for one or two measures along with the metronome The performance is analyzed over several seconds then playback of the most recommended Style starts In addition the candidates of the other recommended Styles are listed in the display Example 1 Play the following song on the Piano section The Styles that best match your performance havin...

Page 56: ...hmic chord backing parts commonly used with piano or guitar Voices PAD This part is used for sustained instruments such as strings organ choir etc PHR1 2 Phrase 1 2 These parts are used for punchy brass stabs arpeggiated chords and other extras that make the accompaniment more interesting PSR S970 AUDIO This is an audio part of the audio Style page 49 1 Press the CHANNEL ON OFF button repeatedly i...

Page 57: ...lay To change the Voice for each channel Press one of the 1 8 buttons corresponding to the desired channel to call up the Voice Selection display page 36 then select the desired Voice NOTE The Audio channel does not have a Voice and hence cannot be changed NOTE You can also turn Style channels on off for dynamic effect by using the LIVE CONTROL knobs For instructions on how to assign the functions...

Page 58: ...t Point LEFT RIGHT 1 2 Voices section NOTE You can also specify each Split Point by note name using the 3 6 buttons F STYLE LEFT Sets Split Point STYLE and Split Point LEFT to the same note Press the F button and rotate the Data dial You can also specify the Split Point directly from the keyboard by pressing the desired key on the keyboard while holding the F button G STYLE Sets each Split Point i...

Page 59: ...pecify the chord type as you play the melody When the Manual Bass function is turned on via the E button the Voice for the Bass part of the current Style is muted and assigned to the left hand LOWER section The Chord Fingering setting page 52 will be set to a specific type FIN GERED automatically in which case you should press three or more notes simultaneously to specify the chord Pressing two or...

Page 60: ...ts of a preset Style consist of a preset Drum Kit and each drum sound is assigned to a separate note You may want to change the sound and the note assignments or make more detailed settings such as volume balance effect etc By using the Drum Setup function of the Style Creator you can edit the Rhythm part of a Style and save it as an original Style For details refer to the Reference Manual on the ...

Page 61: ...ONE TOUCH SETTING 1 4 Creating editing Styles Style Creator FUNCTION TAB F MENU 2 A STYLE CREATOR Realtime Recording TAB E BASIC Step Recording TAB F EDIT G STEP REC Style Assembly TAB E F ASSEMBLY Editing the rhythmic feel TAB E F GROOVE Editing data for each channel TAB E F CHANNEL Making Style File Format settings TAB E F PARAMETER Editing the rhythm part of a Style Drum Setup TAB E BASIC G DRU...

Page 62: ...mercially available Song data SMF Standard MIDI File If you want to play back a Song in USB flash drive connect the USB flash drive containing Song data to the USB TO DEVICE terminal beforehand 1 Press the SONG SELECT button to call up the Song Selection display 2 Use the TAB E F buttons to select the location of the desired Song 3 Select the desired Song by using the A J buttons NOTE For instruct...

Page 63: ...forward continuously NOTE You can transpose the Song playback page 38 Queuing the next Song for playback While a Song is playing back you can queue up the next Song for playback This is convenient for chaining it to the next Song smoothly during live performance Select the Song you want to play next in the Song Selection display while a Song is playing back The NEXT indication appears at the upper...

Page 64: ...n You can change the displayed notation style by using the 1 8 buttons For details refer to the Reference Manual on the website NOTE Phrase Mark is a pre programmed marker in certain Song data which indicates a specific location in the Song For Songs containing Phrase Marks You can change the unit for rewinding fast forwarding by pressing the D BAR or the E PHRASE MARK button For Songs not contain...

Page 65: ...dicating the current position To view the text file on the TEXT display press one of the 5 6 TEXT FILES buttons to call up the File Selection display and select the desired file created on your computer For more information about the LYRICS TEXT display refer to the Reference Manual on the website A Song consists of 16 separate channels You can independently turn each channel of the selected Song ...

Page 66: ... yourself 4 Press the SONG F K PLAY PAUSE button to start playback Practice the muted part while viewing the SCORE display The playback of the left and extra parts will wait for you to play the notes correctly After your practice turn the GUIDE button off NOTE Usually each part is recorded to the following channels Channels 1 3 keyboard parts RIGHT 1 LEFT RIGHT 2 Channels 5 8 Multi Pad parts Chann...

Page 67: ...he SONG J STOP button The Song position returns to Point A and pressing the SONG F K PLAY PAUSE button lets you start from that point again After you ve finished practicing press the REPEAT button to turn off Repeat playback Repeat Playback NOTE You can play multiple Songs repeatedly FUNCTION TAB E MENU 1 H SONG SETTING TAB F OTH ERS G REPEAT MODE Specifying a Range of Measures and Playing them Ba...

Page 68: ...g is automatically set and the Song name on the Main display page 24 is set to NewSong 2 Press the SONG REC button The REC and F K PLAY PAUSE buttons flashes indicating the standby status 3 Start recording You can start recording by playing the keyboard starting a Style playing a Multi Pad or pressing the SONG F K PLAY PAUSE button 4 After you finish your performance press the SONG J STOP button t...

Page 69: ...ry settings such as Voice Style selection 1 Press the SONG REC button and the J STOP button simultaneously A blank Song for recording is automatically set and the Song name on the Main display page 24 is set to NewSong 2 While holding down the SONG REC button press the appropriate 1 8 buttons to set the desired channels to REC To cancel the REC status of the channel press the desired channel butto...

Page 70: ...e power off without carrying out the Save operation Advanced Features Refer to the Reference Manual on the website Chapter 3 Editing Music Notation settings SCORE 1 8 buttons Editing Lyrics Text display settings LYRICS TEXT 1 8 buttons Using the Auto Accompaniment features with Song Playback SONG J F K ACMP STYLE CONTROL SYNC START STYLE CONTROL START STOP Song Playback related parameters FUNCTION...

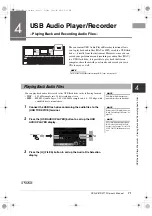
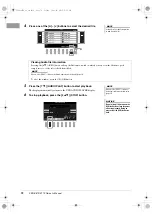
Page 71: ...e rate 16 bit resolution stereo MP3 MPEG 1 Audio Layer 3 44 1 48 0 kHz sample rate 64 320 kbps with variable bit rate mono stereo 1 Connect the USB flash drive containing the audio files to the USB TO DEVICE terminal 2 Press the USB AUDIO PLAYER button to call up the USB AUDIO PLAYER display 3 Press the H FILES button to call up the Audio File Selection display NOTE For instructions on playback an...

Page 72: ...Pressing the 6 INFO button calls up the Information window which you can view the file name path sample rate etc of the selected red framed file NOTE Make sure that MENU 1 is shown at the bottom right corner of the display page 26 To close the window press the F OK button NOTE Make sure that MENU 1 is shown at the bottom right corner of the display page 26 NOTICE Do not attempt to disconnect the U...

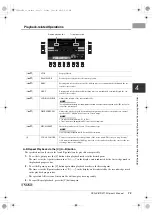
Page 73: ...e holding it moves continuously back through the cur rent file in seconds 5 NEXT Pressing this selects the next file holding it moves continuously forward through the cur rent file in seconds 6 AUDIO VOLUME Adjusts the volume of the current audio file NOTE The volume balance between the Song playback and audio file playback can be adjusted via the BAL button For instructions refer to page 74 7 TIM...

Page 74: ...nnect the USB flash drive to the USB TO DEVICE terminal 2 Make the necessary settings such as Voice Style selection and the microphone connection if you want to record your vocal Adjusting the Volume Balance Between Song and Audio Playback Pressing the BAL button once or twice calls up the BALANCE 2 2 display In this display you can adjust the volume balance between the Song MIDI and Audio by usin...

Page 75: ...ILES button NOTE The USB flash drive of USB1 is selected as the recording destination when multiple USB flash drives are connected NOTE You can use the metronome page 37 while recording however the metro nome sound will not be recorded Recordable time NOTICE Do not attempt to disconnect the USB flash drive or turn the power off during recording Doing so may corrupt the USB flash drive data or the ...

Page 76: ... Pad Bank Selection display 2 Press one of the A J buttons to select the desired bank You can call up the other pages by pressing the buttons that correspond to the page numbers P1 P2 or pressing the MULTI PAD CONTROL SELECT button repeatedly Press the 8 UP button to call up the next higher level folder to which the Multi Pads are categorized 3 Press any of the MULTI PAD CONTROL 1 4 buttons to pla...

Page 77: ...ulti Pad button starts playback at the top of the next measure When the Style or Song is stopped pressing the Multi Pad button starts playback immediately While the Style or Song is playing back pressing the STYLE CONTROL START STOP or SONG J STOP button also stops playback of the Multi Pad s While both the Style and Song is playing back pressing the SONG J STOP button stops playback of the Song S...

Page 78: ...eturn to the AUDIO LINK MULTI PAD display Creating a Multi Pad with Audio files Audio Link Multi Pad NOTE Audio Link Multi Pads can neither be created nor played back during play back recording standby or recording of audio files NOTE Before using a USB flash drive be sure to read Connecting USB Devices on page 100 NOTE Make sure that MENU 1 is shown at the bottom right corner of the display page ...

Page 79: ...Audio Link Multi Pad then carry out the same operations as in steps 3 to 10 You can play the Multi Pad to which the audio file is assigned by selecting them in the USER or USB tab of the Multi Pad Bank Selection display Although you can play them via the same operations in page 76 note the following limitations Make sure to connect the USB flash drive including the corresponding audio files WAV Au...

Page 80: ... 81 2 Use the 2 3 buttons to select the desired Record You can also use the Data dial and the ENTER button The panel settings in the Record are called up When the Record including the Style name is selected the ACMP and SYNC START buttons are turned on and the corresponding Style is called up This lets you start Style playback immediately Selecting the Desired Record Panel Settings Each entry is c...

Page 81: ...song in 2 4 and 6 8 beat can be searched but the actual Style is created by using a 4 4 beat NOTE To cancel searching press the 8 CANCEL button A MUSIC Calls up the Character Entry window page 32 to enter the song title To clear the entered title press the corresponding F CLEAR button B KEYWORD Calls up the Character Entry window page 32 to enter the keyword To clear the entered keyword press the ...

Page 82: ...ad yamaha com 2 Connect the USB flash drive which contains the Music Finder file mfd to the USB TO DEVICE terminal of the instrument 3 Press the MUSIC FINDER button to call up the MUSIC FINDER display 4 Use the 7 FILES buttons to call up the File Selection display 5 Select the Music Finder file in the USB flash drive by pressing the A J buttons to call up a message prompting you to select REPLACE ...

Page 83: ...cord is shown in the MUSIC FINDER display In the STYLE column of the Record the Song is registered as SONG the audio file as AUDIO and the Style is registered according to its Style name NOTE Even after appending or replacing the Music Finder Records you can reset them to their original factory settings by selecting the MusicFinderPreset file in PRESET tab of step 5 Registering a Song Audio or Sty...

Page 84: ...press the STYLE CONTROL START STOP button Calling up the Song Audio or Style registered to Music Finder NOTE If you want to play back a Song audio or Style file in the USB flash drive that has been registered as a Record make sure to connect the same USB flash drive to the USB TO DEVICE termi nal NOTE When searching for Songs or audio files page 81 it is necessary to set the search criteria as fol...

Page 85: ...or Voices Styles and Effects For information on the panel settings that can be registered with the Registration Memory function refer to the Registration section of the Parameter Chart in the Data List on the website 2 Press the MEMORY button in the REGISTRATION MEMORY section The display for selecting the groups to be registered appears 3 Determine the groups you want to register Select the desir...

Page 86: ...he Bank file For instructions on saving refer to page 28 NOTICE If you select the button whose lamp is lit in red or green here the panel setup previously mem orized to the button will be erased and replaced by the new settings About the lamp status Red Data registered and currently selected Green Data registered but not currently selected Off No data registered NOTE The panel setups registered in...

Page 87: ... Devices on page 100 NOTE Turning the FREEZE button on lets you disable recall of specific item s as desired For instructions refer to the Reference Manual on the website Confirming the Registration Memory Information In the REGISTRATION BANK Selection display press the 6 INFO button to call up the Information window showing which Voices and Style are memorized to the 1 8 buttons of a Registration...

Page 88: ...crophone or guitar set the GAIN knob to the minimum position 2 Set the MIC GUITAR switch When connecting a microphone set it to MIC When connecting a guitar set it to GUITAR 3 Connect the microphone or guitar to the MIC GUITAR INPUT jack 4 Turn on the power of the instrument Connecting a Microphone Guitar NOTE Make sure to use a conventional dynamic microphone NOTE When you are not using a micro p...

Page 89: ... sing into the microphone or play the guitar 4 If necessary press the C EFFECT TYPE button to call up the EFFECT page of the MIXING CONSOLE display and select the effect type NOTE You can also see the input level on the MIC GUITAR SETTING display called up by the MIC SETTING VOCAL HAR MONY PSR S970 or MIC SET TING PSR S770 button Disconnecting the microphone guitar 1 Set the GAIN knob to the minim...

Page 90: ... or play the guitar 7 Adjust the volume balance between the microphone guitar sound and the instrument sound on the BALANCE display page 57 Turning the Talk function on by pressing the F TALK button in the MIC GUITAR SETTING display lets you instantly change the settings for talking This is useful when you want to talk between songs during a performance You can also change the Talk settings to sui...

Page 91: ...tically by selecting a Vocal Harmony type Using Vocal Harmony PSR S970 4 7 Icon Mode Descriptions Microphone and man woman Chordal The harmony notes are determined by the chords you play in the chord section with ACMP turned on the left hand section with ACMP turned off and LEFT turned on or the chord data of a Song Microphone The harmony notes are determined in the same way as in Microphone above...

Page 92: ... it applied by your left hand played part or OFF in order to not to have any Vocoder effect applied by your keyboard playing For more information on the keyboard setting for controlling the Vocoder effect refer to the Reference Manual on the website 8 3 Play melodies on the keyboard or play back a Song and sing into the microphone You ll notice that you don t actually have to sing pitched notes Th...

Page 93: ...oder type 4 Make sure that the 4 HARMONY buttons in the MIC GUITAR SETTING display is set to ON If necessary use the 5 VOCAL EFFECT buttons to turn on the Vocal Harmony effect which can be set on the display called up via the 8 EDIT buttons For details refer to the Reference Manual on the website 5 Try holding down a note on the keyboard and speak or sing into the microphone Also try changing note...

Page 94: ...eters MIC SETTING VOCAL HARMONY E TYPE 8 SET UP PSR S970 Editing the Vocal Harmony Types MIC SETTING VOCAL HARMONY E TYPE TAB VOCAL HARMONY select a Vocal Harmony type 8 EDIT Editing the OVERVIEW tab parameters TAB OVERVIEW Editing the PART tab parameters TAB PART Editing the DETAIL tab parameters TAB DETAIL PSR S970 Editing the Synth Vocoder Types MIC SETTING VOCAL HARMONY E TYPE TAB SYNTH VOCODE...

Page 95: ... button to call up the MIXING CONSOLE display 2 Press the MIXER EQ button repeatedly to call up the MIXING CONSOLE display for the relevant parts The part category Panel Style Song is indicated at the top of the display Basic Procedure 3 NOTE For parts that have two pages press ing the A PART button lets you switch between the pages Entire Song part entire Style part Multi Pad part Mic or Guitar p...

Page 96: ...set the same value for the parameter to all of the parts if you simultaneously hold down one of the A J buttons and use the 1 8 buttons or the Data dial To save the PANEL display settings Register them to Registration Memory page 85 To save the STYLE display settings Save them as Style data If you want to recall the settings for future use select the Style file saved here 1 Call up the operation d...

Page 97: ...top by footswitch Connect a footswitch FC4 FC4A or FC5 to one of the FOOT PEDAL jacks To assign the function to the connected pedal select SONG PLAY PAUSE in the operation display FUNCTION TAB E MENU 1 D CONTROLLER TAB E FOOT PEDAL CAUTION Before connecting the instrument to other electronic components turn off the power of all the components Also before turning any components on or off make sure ...

Page 98: ...trument Since this instru ment s power may automatically be turned off due to the Auto Power Off function page 17 turn off the power to the external device or disable Auto Power Off when you do not intend to operate the instrument NOTICE Do not route the output from the OUTPUT jacks to the AUX IN jack If you make this connec tion the signal input at the AUX IN jack is output from the OUT PUT jacks...

Page 99: ...When you select LCD the monitor shows the same contents as shown on the instrument s LCD You can connect a microphone or guitar to the MIC GUITAR INPUT jack standard 1 4 phone jack For instruc tions refer to page 88 Connecting an External Monitor RGB OUT terminal PSR S970 CAUTION Avoid looking at the television or video monitor for prolonged peri ods of time since doing so could damage your eyesig...

Page 100: ...ormat or when accessing the USB device Failure to observe this may result in freezing of the operation of the instrument or corruption of the USB device and the data When connecting then disconnecting the USB device and vice versa make sure to wait a few seconds between the two opera tions NOTE If you intend to connect two devices at the same time to a terminal you should use a bus powered USB hub...

Page 101: ...he Format operation By pressing the USB button you can access the files which are saved in the USB flash drive Select the desired category by using the A C and F H buttons then select files by pressing one of the A J buttons Formatting a USB Flash Drive NOTICE The format operation deletes any previously existing data Make sure that the USB flash drive you are formatting does not contain important ...

Page 102: ...you can transfer data between the instrument and the computer via MIDI For details on using a computer with this instrument refer to the Computer related Operations on the website Connecting to an iPhone iPad USB TO DEVICE USB TO HOST and MIDI terminals NOTICE Do not place your iPhone iPad in an unstable position Doing so may cause the device to fall and result in damage NOTE Before using the USB ...

Page 103: ...ion about MIDI settings such as transmit receive channels on the instrument refer to the Reference Manual on the website Connecting External MIDI Devices MIDI IN OUT terminals MIDI IN MIDI OUT MIDI transmit MIDI receive playback MIDI IN MIDI OUT MIDI device NOTE For a general overview of MIDI and how you can effectively use it refer to MIDI Basics which is downloadable from the website Advanced Fe...

Page 104: ...d Creator features such as for Styles Songs and Multi Pads 1 Call up the operation display FUNCTION TAB E F MENU 1 MENU 2 2 Press one of the A J buttons to call up the desired function page For information on what you can do on each page refer to the Function List on page 105 3 Use the TAB E F buttons to call up desired page 4 Change the settings or carry out the operation Refer to the Function Li...

Page 105: ...tings such as Guide Function Channel settings Repeat settings etc Chapter 3 I MIDI For making MIDI related settings Chapter 11 J UTILITY CONFIG 1 For making general settings such as Fade in out time metronome sound Tap Tempo sound Auto Power Off page 17 Chapter 11 CONFIG 2 For making general settings such as speaker display etc page 99 Chapter 11 PARAMETER LOCK Determines the parameters effect Spl...

Page 106: ...ONSOLE VOL VOICE BAL CHANNEL ON OFF USB FUNCTION UTILITY USB USB AUDIO PLAYER AUDIO File Selection display called up only when a USB flash drive is connected TAB E F ENTER EXIT MAIN Data dial VOICE PART SELECT LEFT FUNCTION VOICE SET FILTER LEFT PART SELECT RIGHT1 RIGHT1 PART SELECT RIGHT2 RIGHT2 PART ON OFF LEFT LEFT PART ON OFF RIGHT1 RIGHT1 PART ON OFF RIGHT2 RIGHT2 LEFT HOLD SPLIT POINT CHORD ...

Page 107: ... ON OFF RIGHT 1 RIGHT 2 LEFT button to turn it on The volume of the individual parts may be set too low Raise the volume in the BALANCE display page 57 Make sure the desired channel is set to ON pages 56 65 Headphones are connected disabling the speaker output Unplug the headphones Make sure that the Speaker setting is set to ON FUNCTION TAB E MENU 1 J UTILITY TAB E F CONFIG 2 The FADE IN OUT butt...

Page 108: ...Mute function may have been assigned to the LIVE CONTROL knob s Check the knob settings and reset the value page 40 Styles in a USB flash drive cannot be selected If the size of the Style data is large about 120 KB or greater the Style cannot be selected because the data is too large to be han dled by the instrument Song Songs cannot be selected This may be because the language settings have been ...

Page 109: ...e VOICE parameter the detailed settings related to the drum voice are reset and in some cases you may be unable to restore the original sound In the case of Song playback you can restore the original sound by returning to the beginning of the Song and playing back from that point In the case of Style play you can restore the original sound by selecting the same Style again Microphone Vocal Harmony...

Page 110: ...User Part EQ 27 Parts 27 Parts Mic Guitar Effects Noise Gate Compressor 3Band EQ Noise Gate Compressor 3Band EQ Vocal Harmony Number of Presets Vocal Harmony 44 Synth Vocoder 10 Number of User Settings 60 The number is the total of Vocal Harmony and Synth Vocoder Vocal Effect 23 Styles Preset Number of Styles 450 360 Featured Styles 40 Audio 366 Pro 31 Session 10 DJ 3 Free Play 322 Pro 27 Session ...

Page 111: ... USB flash drive Connectivity DC IN 16 V 16 V Headphones Standard stereo phone jack Standard stereo phone jack Microphone Guitar Yes Yes MIDI IN OUT IN OUT AUX IN Stereo mini jack Stereo mini jack OUTPUT L L R R L L R R RGB OUT Yes FOOT PEDAL 1 SUSTAIN 2 ARTICULATION 1 Function assignable 1 SUSTAIN 2 ARTICULATION 1 Function assignable USB TO DEVICE Yes Yes USB TO HOST Yes Yes Amplifiers Speakers A...

Page 112: ...actory Reset 33 Fade In Out 52 Fast Forward 63 73 File 26 27 File Selection display 26 Fill in 51 Filter 96 Fingering type 52 Folder 29 Foot controller 97 Footage 45 Footswitch 97 Format Compatibility 8 Format USB flash drive 101 Freeze 87 Function 104 G GM 8 47 GS 8 Guide 66 Guitar 88 H Harmony 42 47 Headphones 15 I Intro Style 50 iPhone iPad 102 iPhone iPad Connection Manual 7 K Keyboard part 35...

Page 113: ... SFF Style File Format 8 49 SFX Kit 37 SMF Standard MIDI File 62 Song 62 Song Creator 70 Speaker 98 105 Specifications 110 Split 35 Split Point 58 Standard MIDI File SMF 62 Step Recording Song 70 Step Recording Style 61 Style 48 Style Creator 60 Style File Format SFF 8 49 Style Recommender 55 Style Retrigger 40 Super Articulation Voice 37 Sustain 42 Synchro Start Multi Pad 77 Synchro Start Song 63...

Page 114: ...h the coloured makings identifying the terminals in your plug proceed as follows The wire which is coloured BLUE must be connected to the terminal which is marked with the letter N or coloured BLACK The wire which is coloured BROWN must be connected to the termi nal which is marked with the letter L or coloured RED Making sure that neither core is connected to the earth terminal of the three pin p...

Page 115: ...12psrs970_en_om book Page 115 Friday June 26 2015 3 33 PM ...

Page 116: ...ty to be void This warranty covers only the Original Owner and is not transferable In Order to Obtain Warranty Service Warranty service will only be provided for defective products within the Warranted Area Contact your local authorized Yamaha dealer who will advise you of the procedures to be followed If this is not successful contact Yamaha at the address telephone number or website shown below ...

Page 117: ...adrid Spain Tel 34 91 639 88 88 GREECE Philippos Nakas S A The Music House 147 Skiathou Street 112 55 Athens Greece Tel 01 228 2160 SWEDEN Yamaha Music Europe GmbH Germany filial Scandinavia J A Wettergrensgata 1 Box 30053 S 400 43 Göteborg Sweden Tel 46 31 89 34 00 DENMARK Yamaha Music Europe GmbH Tyskland filial Denmark Generatorvej 6A DK 2730 Herlev Denmark Tel 44 92 49 00 FINLAND F Musiikki Oy...

Page 118: ...Yamaha Global Site http www yamaha com Yamaha Downloads http download yamaha com ZP52790 Manual Development Department 2015 Yamaha Corporation Published 07 2015 POZC B0 Printed in Indonesia ...

Reviews: