background image

Playing Voices

25

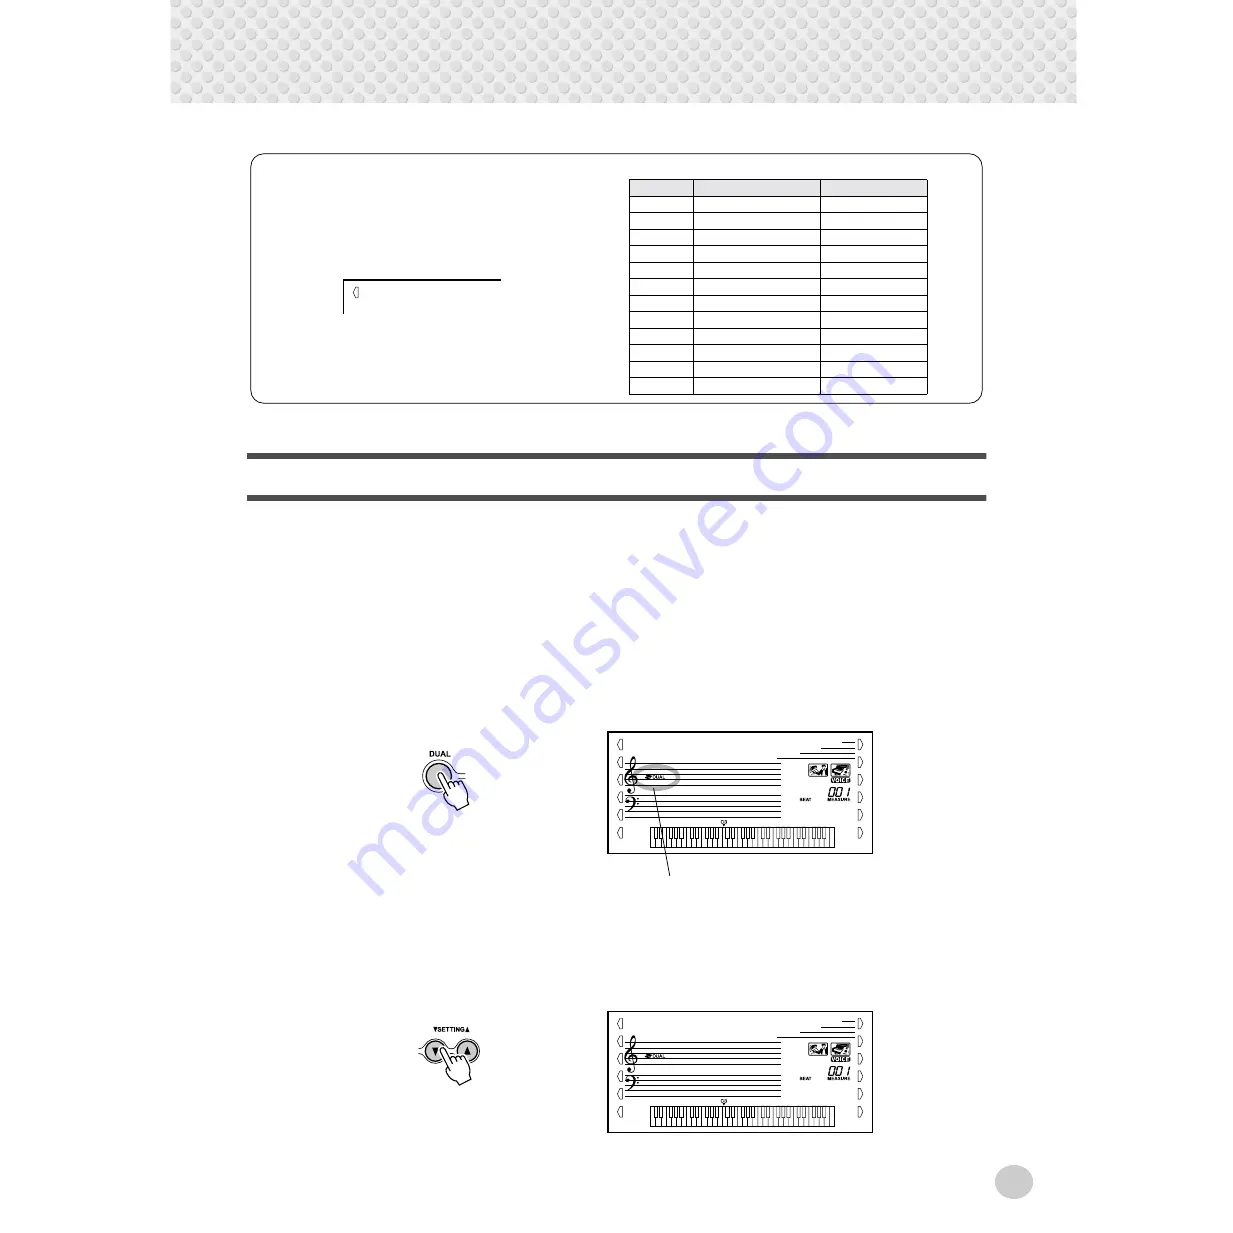
Dual Voice

The Dual Voice function lets you combine two different voices in a layer — one 
the Main voice, which is selected normally, and the other the Dual voice, which is 
selected here.  You can also set various parameters independently for these voices, 
such as giving them separate volume, octave, Reverb and DSP settings.  This lets 
you create an optimum mix for the voices, and enhance the way they blend 
together.

1

Turn the Dual voice on or off.

Press the [DUAL] button.

2

Select one of the parameters for the Main and Dual voices.

Press the [SETTING 

] or [SETTING 

] button, repeatedly if necessary, 

until the desired parameter's name appears in the display.

Drum Kit Voice Chart (voices 117 - 128)

When one of the 12 Drum Kit voices are selected you 
can play different drums and percussion instruments on 
the keyboard. 

Std.Kit1

117

No.

Name

LCD

117

Standard Kit 1

Std.Kit1

118

Standard Kit 2

Std.Kit2

119

Room Kit

Room Kit

120

Rock Kit

Rock Kit

121

Electronic Kit

Elct.Kit

122

Analog Kit

AnlogKit

123

Dance Kit

DanceKit

124

Jazz Kit

Jazz Kit

125

Brush Kit

BrushKit

126

Symphony Kit

SymphKit

127

SFX Kit 1

SFX Kit1

128

SFX Kit 2

SFX Kit2

Indicates Dual is turned on

GrandPno

001

M.Volume

104

Summary of Contents for PSR-350

Page 1: ......

Page 2: ...TION The name plate is located on the bottom of the product The model number serial number power requirements etc are located on this plate You should record the model number serial number and the date of purchase in the spaces provided below and retain this manual as a permanent record of your purchase Model Serial No Purchase Date SPECIAL MESSAGE SECTION 92 BP bottom 1 IMPORTANT NOTICE DO NOT MO...

Page 3: ...he instrument to prevent possible leakage of the battery fluid Keep batteries away from children If the batteries do leak avoid contact with the leaked fluid If the battery fluid should come in contact with your eyes mouth or skin wash immedi ately with water and consult a doctor Battery fluid is corrosive and may possibly cause loss of sight or chemical burns Before connecting the instrument to o...

Page 4: ... Education Suite a special set of learning tools that make it easy and fun to master the keyboard These tools include Lesson which guides you through the parts of a song just as a teacher would Grade Talking which evaluates your practice sessions and rates your perfor mance and Dictionary which teaches you how to play chords Instant Portable Grand function for automatically configur ing the PSR 35...

Page 5: ...egistration Memory Presets 51 Recording a Registration Memory Preset 51 Recalling a Registration Memory Preset 52 Selecting and Playing Songs 53 Selecting and Playing a Song 53 A B Repeat 54 Melody Voice Change 55 Changing the Tempo 56 Adjusting the Song Volume 57 Song Recording 58 Recording a User Song 58 Song Clear 61 Track Clear 62 Song Lesson 63 Using the Lesson Feature 63 Select the Lesson Tr...

Page 6: ...button This calls up the Dictionary function page 46 o LESSON L Left and R Right buttons These call up the Lesson exercises for the correspond ing hand left or right for the selected song See page 64 0 SONG button This is for enabling song selection See page 53 1 STYLE button This is for enabling style selection See page 35 2 VOICE button This is for enabling voice selection See page 23 Holding do...

Page 7: ... point toward the end 3 TEMPO TAP button This button is used to call up the Tempo setting let ting you set the Tempo with the numeric keypad or buttons See page 20 It also allows you to tap out the tempo and automatically start a selected song or style at that tapped speed See page 37 4 SONG MEMORY buttons These buttons RECORD 1 5 A are used for song recording letting you record up to six differen...

Page 8: ...battery voltage drops below a certain level the PSR 350 may not sound or function properly As soon as this happens replace them with a complete set of six new batteries Turning On the Power With the AC power adaptor connected or with batteries installed simply press the power switch until it locks in the ON position When the instrument is not in use be sure to turn the power off Press the switch a...

Page 9: ...of the voices The footswitch functions the same way as a damper pedal on an acoustic piano press and hold down the footswitch as you play the key board to sustain the sound Using the MIDI Terminals The PSR 350 also features MIDI terminals allowing you to interface the PSR 350 with other MIDI instruments and devices For more information see page 80 To prevent damage to the speakers set the volume o...

Page 10: ... Organ 020 Theater Organ 021 Church Organ 022 Chapel Organ 023 Reed Organ ACCORDION 024 Traditional Accordion 025 Musette Accordion 026 Bandoneon 027 Harmonica No Voice Name GUITAR 028 Classical Guitar 029 Folk Guitar 030 12Strings Guitar 031 Jazz Guitar 032 Octave Guitar 033 Clean Guitar 034 Muted Guitar 035 Overdriven Guitar 036 Distortion Guitar BASS 037 Acoustic Bass 038 Finger Bass 039 Pick B...

Page 11: ... Section 077 Big Band Brass 078 Mellow Horns 079 Synth Brass 080 Jump Brass 081 Techno Brass FLUTE 082 Flute 083 Piccolo 084 Pan Flute 085 Recorder 086 Ocarina SYNTH LEAD 087 Square Lead 088 Sawtooth Lead 089 Voice Lead 090 Star Dust 091 Brightness 092 Analogon 093 Fargo SYNTH PAD 094 Fantasia 095 Bell Pad 096 Xenon Pad No Voice Name 097 Equinox 098 Dark Moon PERCUSSION 099 Vibraphone 100 Marimba ...

Page 12: ...song x Stop the Demo song Playing Mission 001 You can also play back songs of other categories Simply select the appropriate number of the desired song during playback or The PSR 350 also has a Demo Cancel function that allows you to disable Demo playback To enable Demo Cancel simultaneously hold down the DEMO but ton and turn on the power To restore the Demo capabilities simply turn the power off...

Page 13: ... Serenade 040 Menuett 041 Canon 042 The Danube Waves 043 From The Magic Flute 044 Symphonie Nr 9 045 Piano Sonate Op 27 2 Mondschein 046 Liebesträume Nr 3 047 The Surprise Symphony 048 To A Wild Rose 049 Air de Toréador Carmen 050 O Mio Babbino Caro From Gianni Schicchi Duet 051 Ten Little Indians 052 Mary Had A Little Lamb No Song Name 053 O Du Lieber Augustin 054 Twinkle Twinkle Little Star 055 ...

Page 14: ...ake simply select the genre from the Music Database and the PSR 350 makes all the right settings for you Accompaniment section Left hand Auto accompaniment for example bass guitar drums Right hand Melody For more infomation on playing proper chords for the auto accompa niment see Using Auto Accompaniment Multi Fingering on page 43 and Looking up Chords in the Dictionary on the next page x Select a...

Page 15: ...t note Chord type Example Dict c Specify the chord type of the chord in this case M7 v Play the notes of the chord as indicated in the keyboard diagram in the display The chord name flashes when the chord is played prop erly b To leave the Dictionary function press the Dict button again Want to find out more See page 46 Accompaniment section c Play a chord with your left hand The auto accompanimen...

Page 16: ...right hand parts of each song individually simply press the appropriate button L left or R right The practice steps below apply to either hand Lesson 1 Timing This lesson step lets you practice just the timing of the notes Lesson 2 Waiting In this lesson step the PSR 350 waits for you to play the correct notes before continuing playback of the song Lesson 3 Minus One This lesson step plays back th...

Page 17: ...as a convenient Tap Tempo function that allows you to tap a new tempo in real time See page 37 This step lets you work on the timing of the notes In Les son 1 the particular note you play on the keyboard is unimportant The PSR 350 checks your timing and how rhythmically tight your playing is Want to find out more See page 65 In Lesson 2 you practice playing the notes correctly as they appear in th...

Page 18: ...eypad selects song numbers Pressing the START STOP button starts song playback Using the numeric keypad selects style numbers Pressing the START STOP button starts style playback w Overall indicator The Overall buttons on either side of the LCD let you access the Function operations and settings of the PSR 350 The currently selected setting is indicated by a dark bar that appears next to its name ...

Page 19: ... appears when the Touch function is turned on See page 29 1 Harmony indicator This appears when the Harmony effect is turned on See page 32 2 Dual indicator This appears when the Dual function is turned on See page 25 3 Sync Stop indicator This appears when the Sync Stop function is turned on See page 40 4 Accompaniment On indicator This appears when the auto accompaniment has been turned on See p...

Page 20: ...se and style 097 Stride The Portable Grand setting is designed also for playing with the special Pianist styles 097 106 When auto accompaniment is turned on these provide piano only accompaniment in a variety of music styles Using the Metronome 1 Call up the Tempo setting Press the TEMPO TAP button 2 Change the value Use the numeric keypad to set the desired Tempo value or use the buttons to incre...

Page 21: ...y 1 beats all high clicks 02 2 4 03 3 4 04 4 4 15 15 4 0 Plays no 1 beats all low clicks Indicates current beat number TIME SIG 04 Adjusting the Metronome Volume You can adjust the volume of the Metronome sound independently of the other PSR 350 sounds The volume range is 000 127 1 Call up the Metronome Volume setting Press the right Overall button until MTR VOL appears in the display 2 Change the...

Page 22: ...ced in Lesson 2 When the DJ teacher is playing the block numbers appear in the display one after another according to the rhythm 3 Press the START STOP button to stop the song DJ Set1 000 Block 1 Block 2 Block 3 Block 4 Block number 1 32 33 r1 If two sixteenth notes are to be played the appropriate block numbers appear successively at the same position If the same block is to be played twice as si...

Page 23: ...dynamic exciting voices for playing many of today s popular music styles The Voice mode also features special effect sections that let you enhance the sound of the voice These include Reverb and Harmony as well as a DSP section that provides miscellaneous effects such as tremolo echo delay equalization and wah See page 30 There s also a Touch Sensitivity control page 29 which determines how the vo...

Page 24: ...tton to select the next voice number and press the button to select the previous voice Holding down either button continuously scrolls up or down through the numbers 3 Play the selected voice Since either the Style or Song mode is active in the background as indicated by the illustration in the display you can also play styles or songs respec tively in the Voice mode by simply pressing the START S...

Page 25: ... of the parameters for the Main and Dual voices Press the SETTING or SETTING button repeatedly if necessary until the desired parameter s name appears in the display Drum Kit Voice Chart voices 117 128 When one of the 12 Drum Kit voices are selected you can play different drums and percussion instruments on the keyboard Std Kit1 117 No Name LCD 117 Standard Kit 1 Std Kit1 118 Standard Kit 2 Std Ki...

Page 26: ...tting you create an optimum mix with the Main voice Dual Voice Select D Voice name 1 618 This selects the Dual voice Dual Voice Octave D Octave 2 2 Octaves This determines the octave of the Dual voice Main Voice Reverb M RevLvl 0 127 This determines how much of the Main voice s signal is sent to the Reverb ef fect Higher values result in a louder Reverb effect for the Main voice Dual Voice Reverb ...

Page 27: ...anspose Transpose determines the key of both the main voice and the bass chord accompa niment of the selected style It also determines the pitch of the songs This allows you to easily match the pitch of the PSR 350 to other instruments or singers or play in a different key without changing your fingering The Transpose settings can be adjusted over a range of 12 semitones 1 octave 1 Select the Tran...

Page 28: ...Overall button repeatedly if necessary until TUNING appears in the display 2 Change the value Use the numeric keypad to set the desired Tuning value 100 100 To tune the pitch down simultaneously press and hold the button and use the numeric keypad to type in the negative value You can also use the buttons to increase or decrease the value Holding down either button continuously increases or decrea...

Page 29: ...e the numeric keypad or buttons to set the desired setting 1 2 or 3 explained below Settings When Touch is turned off a constant volume corresponding to a velocity value of 80 is produced 1 Soft This results in limited touch response and produces a relatively narrow dynamic range no matter how lightly or strongly you play the keys 2 Medium This lets you play over a normal dynamic range soft to lou...

Page 30: ...Reverb function 2 Set the Reverb Type if desired Use the numeric keypad or buttons to set the desired Reverb Type For a list of the available Reverb Types see page 33 To turn the Reverb effect off select Reverb Type 9 Indicates Reverb is selected Current Reverb Type name and number Hall1 1 Twelve additional Reverb Types are available when controlling the PSR 350 from a MIDI device For details See ...

Page 31: ...n appears next to DSP 2 Set the DSP Type if desired Use the numeric keypad or buttons to set the desired DSP Type For a list of the available DSP Types see page 33 To turn the DSP effect off select DSP Type 39 Indicates DSP is selected Current DSP Type name and number Stage2 06 Each voice of the PSR 350 has its own independent DSP setting Fifty one additional DSP Types are available when controlli...

Page 32: ...cessary until the dark bar indi cation appears next to HARMONY 3 Set the Harmony Type if desired Use the numeric keypad or buttons to set the desired Harmony Type For a list of the available Harmony Types see page 34 Indicates that Harmony is on Indicates Harmony is selected Current Harmony Type name and number Block 03 For the first five Harmony Types Duet Trio Block Country and Octave chords mus...

Page 33: ...2 Rotary2 21 Tremolo 1 Tremolo1 Rich Tremolo effect with both volume and pitch modulation 22 Tremolo 2 Tremolo2 23 Guitar Tremolo Guitar Tremolo Simulated electric guitar tremolo 24 Auto Pan AutoPan Several panning effects that automatically shift the sound position left right front back 25 Auto Wah AutoWah Repeating filter sweep wah effect 26 Delay Left Center Right DelayLCR Three independent del...

Page 34: ... the rhythm Triplet settings are also available 1 6 quarter note triplets 1 12 eighth note triplets 1 24 sixteenth note triplets The Trill effect Types 6 12 create two note trills alternating notes when two notes are held The Tremolo effect Types 13 19 repeat all held notes up to four The Echo effect Types 20 26 create delayed repeats of each note played 7 Trill 1 6 note Tril1 6 8 Trill 1 8 note T...

Page 35: ...res the convenient Dictionary function page 46 Dictionary provides you with a built in chord encyclopedia that teaches you how to play any chord you specify by showing you the appropriate notes in the display The PSR 350 can also be used with the included disk or commercially available Style File data allowing you to load additional styles auto accompaniment patterns to the instrument Style File d...

Page 36: ...B section will play Pressing this button alter nately enables and can cels the Sync Stop function See page 40 Pressing this button switches between the Main A and Main B sec tions automatically add ing a fill in pattern before changing the section See page 41 Pressing this button alter nately enables and can cels the bass and chord accompaniment See below Pressing this button alter nately starts a...

Page 37: ...style and the accompaniment starts automatically at the tempo you tapped You can also change the tempo while the accompaniment is playing by tapping the TEMPO TAP button twice at the desired tempo Using Sync Start The PSR 350 also has a Sync Start function that allows you to start the rhythm accompaniment by simply pressing a key on the keyboard To use Sync Start first press the SYNC START button ...

Page 38: ...paniment press the START STOP button Using Sync Start with an Intro section You can also use the Sync Start function with the special Intro section of the selected style To use Sync Start with an Intro section 1 Press the MAIN AUTO FILL button to select which section A or B is to follow the Intro 2 Press the INTRO ENDING button 3 Press the SYNC START button to enable Sync Start and start the Intro...

Page 39: ... ON OFF button can also be used to turn off and on the bass chord accompaniment while playing allowing you to create dynamic rhythmic breaks in your performance You can use the Sync Stop func tion to create a similar yet even more dramatic break With Sync Stop on page 40 you can con trol breaks in the rhythm and accompaniment simply by releas ing your fingers from the keys As long as you play and ...

Page 40: ...ment on 2 Press the SYNC STOP button Setting Sync Stop to on before starting the auto accompaniment automati cally sets Sync Start to on as well letting you immediately start the accom paniment by playing the keyboard 3 Play a chord on the keyboard in the auto accompaniment section of the keyboard The auto accompaniment starts as soon as you play a chord 4 Stop the auto accompaniment by releasing ...

Page 41: ... automatically plays a fill in pattern followed by the Main B section See illustration on page 42 You can also select either the Main A or B section to start by pressing the MAIN AUTO FILL button before starting the style When accompaniment playback is stopped and a different style is selected the tempo returns to the default setting of the new style When switching styles dur ing playback the last...

Page 42: ...2 3 1st measure 4 1 2 3 4 1 2 3 4 1 2 2nd measure 3rd measure 3 3 a fill in pattern plays immediately until the end of the measure and the Main A or B section begins here If you press the MAIN AUTO FILL button before beat 4 a fill in pattern plays from here and the Main A or B section begins here If you press the MAIN AUTO FILL button here after beat 4 About the Fill in Patterns Indicates Accompan...

Page 43: ...r seventh The illustration shows how to produce the four chord types The key of C is used here as an example other keys follow the same rules For example Bb7 is played as Bb and A Fingered Chords Using the key of C as an example the chart below shows the types of chords that can be recognized in the Fingered mode C Cm C7 Cm7 To play a major chord Press the root note of the chord To play a minor ch...

Page 44: ...7 Seventh 7 1 3 5 b7 or 1 3 5 b7 C7 C7 Seventh flatted ninth 7 b9 1 b2 3 5 b7 C7 b9 C7 b9 Seventh add flatted thirteenth 7 b13 1 3 5 b6 b7 C7 b13 C7 b13 Seventh ninth 7 9 1 2 3 5 b7 C7 9 C7 9 Seventh add sharp eleventh 7 11 1 2 3 4 5 b7 or 1 2 3 4 5 b7 C7 11 C7 11 Seventh add thirteenth 7 13 1 3 5 6 b7 C7 13 C7 13 Seventh sharp ninth 7 9 1 2 3 5 b7 C7 9 C7 9 Seventh flatted fifth 7b5 1 3 b5 b7 C7b...

Page 45: ...keypad or buttons to set the desired value 0 C 2 127 G8 To leave the Split Point function simply go on to another operation or function This setting also affects the split point for the special Split voices Split Point Auto accompani ment section Current Split Point value S POINT 054 The current Split Point is also shown in the key board section of the display Restoring the Default Split Point Val...

Page 46: ...he type of the chord major minor seventh etc Press the key on the keyboard that corresponds to the desired chord type as printed on the panel Pressing the Dict button auto matically turns on the auto accompaniment Dict Pressing this key selects the root G Dict Individual notes of chord keyboard Pressing this key selects the major seventh chord type M7 Notation of chord Chord name root and type Dic...

Page 47: ...and are the most basic and common chords in most music In this triad the lowest note is the root The root is the most important note in the chord because it anchors the sound harmonically by determining its key and forms the basis for how we hear the other notes of the chord The second note of this chord is four semitones higher than the first and the third is three semitones higher than the secon...

Page 48: ...ld be indicated to the right as well Exam ples for the key of C are shown below One important point Chords are made up of notes stacked on top of each other and the stacked notes are indicated in the chord name of the chord type as a number the number being the dis tance of the note from the root See the keyboard diagram below For example the minor 6th chord includes the 6th note of the scale the ...

Page 49: ...SR 350 has 208 panel setups in the Music Database and they are divided into eleven different categories In this example we ll select 208 Xmas Night and play the song Silent Night The sheet music is provided on the next page 3 Play the chords with your left hand and the melody lines with your right hand along with the music As soon as you play a chord with your left hand the auto accompaniment star...

Page 50: ...d selecting a number lets you instantly reconfigure all relevant settings conve niently allowing you to start playing in the desired genre with all the appropriate sounds without hav ing to make each setting one by one For each parameter refer to the following pages VOICE PARAMETERS MAIN Voice Octave Volume Reverb Depth Chorus Depth DSP Depth page 25 Dual On Off Voice Octave Volume Reverb Depth Ch...

Page 51: ...gis tration Memory can have different settings for the following parameters Voice number Tempo Transpose Reverb Type DSP Type Harmony On Off setting and Type Split Point Style number and style related settings Accompaniment On Off and Split Point Recording a Registration Memory Preset 1 Make all desired settings for the PSR 350 Virtually all of the PSR 350 s settings can be saved to a Registration...

Page 52: ...Registration Memory 52 Recalling a Registration Memory Preset 1 Select the appropriate Registration Memory bank 2 Press the desired Registration Memory preset button 1 or 2 BANK 1 REGIST1 1 ...

Page 53: ...numeric keypad to directly enter the song number or use the buttons to step up and down through the songs Song Playback Display These display the notes and name of the current chord Current measure number The indication F t appears in the display when a song having a free tempo is selected Certain songs have been composed or arranged in free tempo meaning that the tempo and or the time signature a...

Page 54: ... You can play along with the song using the currently selected voice or even select a different voice for playing along Simply call up the Voice mode while the song is playing back and select the desired voice See page 23 REPEAT A The A and B points can only be specified at the beginning of a measure beat 1 and not at any point in the middle of a measure To set the A point to the begin ning of a s...

Page 55: ...onvenient Melody Voice Change feature takes this one step further it lets you replace the original voice used for the melody of the song with the panel voice of your own selection For example if the current voice selected on the panel is piano but the song s melody is being played by a flute voice using Melody Voice Change will change the flute melody voice to piano 1 Select the desired song Press...

Page 56: ...to set the desired Tempo value or use the buttons to increase or decrease the value Also the tempo of a song returns to the default setting when selecting a dif ferent song The set tempo remains however when switching styles during playback MELODY V Current Tempo value TEMPO 120 Restoring the Default Tempo Value Each song has been given a default or standard Tempo setting If you ve changed the Tem...

Page 57: ...ng Volume value 000 127 You can also use the buttons to increase or decrease the value Hold ing down either button continuously increases or decreases the value Indicates Song Volume is selected Current Song Volume value SONG VOL 100 Song Volume cannot be changed unless the Song mode is active This function becomes Accom paniment Volume when the Style mode is active Restoring the Default Song Vol ...

Page 58: ...nt Volume Tempo Time Signature 1 Make all desired PSR 350 settings Before you actually start recording you ll need to make various settings for the song such as selecting a style setting the Tempo and selecting a voice See pages 35 41 and 23 If desired also make other settings Refer to the list above for settings that can be recorded to a song User 1 rEC Song Memory Capacity Maximum number of note...

Page 59: ...gs User 2 rEC Keep in mind that all recording operations replace the data In other words if you record to a track that already has recorded data all previous data in the track will be erased and replaced by the newly recorded data Muting Tracks During Playback While recording is enabled you can selectively mute different tracks This is useful for when you want to clearly hear certain tracks and no...

Page 60: ...return to the above condition When recording the Chord track With Sync Start on play the first chord of the song in the auto accompani ment section of the keyboard The accompaniment starts automatically and you can continue recording playing other chords in time with the accompa niment 5 Stop recording After you ve finished playing the part press the START STOP or RECORD button 6 Record to other t...

Page 61: ...ear operation page 62 1 Select the desired song Press the SONG button then use the numeric keypad or buttons to select the desired song 201 205 2 While holding down the A button press SONG MEMORY button 1 All track indications in the display flash indicating that all tracks are to be erased 3 Press the YES button 4 At the Sure prompt press the YES button or press the NO button to abort Pressing th...

Page 62: ...peration page 61 1 Select the desired song Press the SONG button then use the numeric keypad or buttons to select the desired song 201 205 2 Press and hold down the button corresponding to the track to be erased Press and hold down the appropriate SONG MEMORY button 1 5 A for at least one second 3 Press the YES button 4 At the Sure prompt press the YES button or press the NO button to abort Pressi...

Page 63: ...tures Lesson 1 Timing This lesson step lets you practice just the timing of the notes any note can be used as long as you play in rhythm Lesson 2 Waiting In this lesson step the PSR 350 waits for you to play the correct notes before continuing playback of the song Lesson 3 Minus One This lesson step plays back the song with one part muted letting you play and master the missing part yourself in rh...

Page 64: ...n in the display if the Grade Talking function is turned on page 68 After a short pause the Lesson begins again automatically 4 Press the START STOP button to stop the Lesson The PSR 350 exits from the Lesson feature automatically when the START STOP button is pressed MinusOne r3 Waiting r2 Timing r1 Lomond 022 Song Lesson off MinusOne L 3 Waiting L 2 Timing L 1 Lomond 022 Song Lesson off When the...

Page 65: ...th the rhythmic accompaniment 1 Select one of the Lesson songs 2 Select Lesson 1 Press the L or R button repeatedly if necessary until Lesson 1 is indi cated 3 Play the appropriate melody or chord with the song After the lead in the song starts automatically and the appropriate notes appear in the display In Lesson 1 simply play one note repeatedly in time with the music Regarding chords and the u...

Page 66: ... the lead in the song starts automatically and the appropriate notes appear in the display In Lesson 2 play the correct notes at your own pace until you can master playing them in rhythm Lesson 3 Minus One This lesson step lets you practice one part of the song in rhythm at the proper tempo The PSR 350 plays back the song accompaniment with one part muted either the left part or the right letting ...

Page 67: ...d master both hands at the same time Go on to this lesson step after you ve mastered each hand s part in the previous three lesson steps Practice both hands in time with the rhythm along with the notation in the display 1 Select one of the Lesson songs 2 Select Lesson 4 Press the L and R buttons simultaneously so that Lesson 4 is indicated 3 Play both the left and right hand parts with the song Af...

Page 68: ...ts through the speakers These include the Grade comments as well as the titles of the Lesson steps and the names of certain functions 1 Select the Grade Talking function Press the left Overall button repeatedly if necessary until GRADE TK appears in the display 2 Set Grade Talking to on or off as desired Use the buttons to set Grade Talking to on or off Excellen on Indicates Grade Talking function...

Page 69: ...le music data can be accurately played by any GM compatible tone generator regardless of man ufacturer The GM mark is affixed to all software and hardware products that support GM System Level 1 The PSR 350 supports GM System Level 1 You can playback song files collected on these disks using the voices defined in Yamaha s DOC format See page 71 The DOC voice allocation format provides data playbac...

Page 70: ... Read Write Head Clean the read write head regularly This instrument employs a precision magnetic read write head which after an extended period of use will pick up a layer of magnetic parti cles from the disks used that will eventually cause read and write errors To maintain the disk drive in optimum working order Yamaha recommends that you use a commercially available dry type head cleaning disk...

Page 71: ...tart the selected song Press the START STOP button 4 If you want to change to another song repeat step 2 above 5 Stop the song Press the START STOP button For details see Selecting and Playing a Song page 53 Song name and number D Song01 101 The tempo setting of some com mercially available disk songs is fixed These songs are called free tempo software When playing back free tempo song data on the...

Page 72: ...rs in the display 2 Change the Octave setting To set a positive octave value press the number button 0 1 or 2 To set a negative value simultaneously hold down the button and press the appropriate number button 1 or 2 OCTAVE 0 The Octave setting can only be changed when the Song is stopped If the SAVE button is pressed when there is no floppy disk inserted into the disk drive a No Disk message appe...

Page 73: ... cannot write over the file extension following the period at the end of the file name The A 5 and B5 keys move the cursor backward and forward within the file name Use these keys to place the cursor where you want to enter or change a character The Delete key C6 deletes the character at the cursor position 4 Press the EXECUTE button To exit from the Save screen press the UTILITY button repeatedly...

Page 74: ...d repeat the save operation If a write error occurs during a save operation an Error mes sage appears If the error reoc curs after repeating the save operation there could be some thing wrong with the disk Insert a different disk in the drive and retry the save operation Saving S U While the file is being saved the DISK IN USE lamp is lit never eject the floppy disk or turn the power off Complete ...

Page 75: ...wing display briefly appears If you do not intend to load the file press the button NO instead of the button YES To exit from the LOAD screen press the LOAD button If the LOAD button is pressed when there is no floppy disk inserted into the disk drive a No disk message appears at the top of the display and all disk opera tions will be disabled This case is user file Style file indicates L S Filena...

Page 76: ...NO instead of the button YES To exit from the UTILITY screen press the UTILITY button twice If the UTILITY button is pressed when there is no floppy disk inserted into the disk drive a No disk message appears at the top of the display and all disk opera tions will be disabled When the floppy disk s write pro tect tab is set to ON see page 70 or the disk is a purposely copy protected disk a Protect...

Page 77: ... operation is completed the following display briefly appears If you do not intend to format the disk press the button NO instead of the button YES To exit from the UTILITY screen press the UTILITY button Format CUE Sure YES If you insert an unformatted disk with the write protect tab in the ON position into the drive a Pro tect message appears Eject the disk move the protect tab to the OFF positi...

Page 78: ...tart Once started the operation cannot be canceled During formatting Formting will appear at the top of the display When the operation is completed the following display briefly appears If you do not intend to format the disk press the button NO instead of the button YES To exit from the operation press the UTILITY button If the UTILITY button is pressed when there is no floppy disk inserted into ...

Page 79: ...using the grand piano sound on the PSR 350 keyboard Unlike an acoustic instrument that puts out a resonated note the electronic instrument puts out information from the keyboard such as with what voice with which key about how strong when was it pressed and when was it released Then each piece of information is changed into a number value and sent to the tone generator Using these numbers as a bas...

Page 80: ... like Exclusive Messages that transmit data unique to each instrument manufacturer and Realtime Messages that control the MIDI device The messages transmitted received by the PSR 350 are shown in the MIDI Imple mentation Chart on page 98 Message Name PSR 350 Operation Panel Setting Note ON OFF Messages which are generated when the keyboard is played Each message includes a specific note number whi...

Page 81: ...m below When connecting to a computer with a USB interface use the Yamaha UX256 USB MIDI Interface Connect the UX256 and the computer with a standard USB cable then make the proper MIDI connections between the PSR 350 and the UX256 MIDI IN MIDI OUT MIDI OUT MIDI IN PSR 350 Computer sequencer software MIDI IN RS 422 MIDI OUT PSR 350 MIDI Interface Computer sequencer software When using a Macintosh ...

Page 82: ...ble notes both from the keyboard and from the sequencer Normally when playing the PSR 350 by itself this should be set to on 1 Select the MIDI operations Press the left Overall button repeatedly if necessary until MIDI is selected 2 Select the Local Control parameter Press 1 on the numeric keypad to select operation 1 Local Control If the LOCAL display appears instead of INITSEND in step 1 above s...

Page 83: ...ncer for recording The actual procedure may differ depending on your particular equipment and software Ideally you should leave two or more measures of silence no performance data before the song begins The Initial Setup data should then be recorded to this space in the song 2 Select the MIDI operations Press the left Overall button repeatedly if necessary until MIDI is selected 3 Select the Initi...

Page 84: ...to have style or song playback follow the external device such as a rhythm machine or a sequencer The default setting is off 1 Press the TEMPO button 2 Set the instrument to External Clock Press and hold the button until the value 280 is indicated then press the button once more to select ECL External Clock in the display To return to the Internal Clock setting simply select a Tempo value from 32 ...

Page 85: ...hat the Split Point page 45 is set to an appropriate value When playing back one of the Pianist styles 086 100 the rhythm cannot be heard This is normal The Pianist styles have no drums or bass only pi ano accompaniment The accompaniment of the style can only be heard when accompaniment is set to ON and keys are played in the auto accompaniment section of the keyboard Not all of the voices seem to...

Page 86: ...olume Touch On Off Tuning Grade Talking On Off Data Initialization All data can be initialized and restored to the factory preset condition by turning on the power while holding the highest rightmost white key on the keyboard CLr Backup will appear briefly on the display All Registration Memory and User song data plus the other settings listed above will be erased and or changed when the data init...

Page 87: ...l Accordion 025 000 112 021 Musette Accordion 026 000 113 023 Bandoneon 027 000 112 022 Harmonica GUITAR 028 000 112 024 Classical Guitar 029 000 112 025 Folk Guitar 030 000 113 025 12Strings Guitar 031 000 112 026 Jazz Guitar 032 000 113 026 Octave Guitar 033 000 112 027 Clean Guitar 034 000 112 028 Muted Guitar 035 000 112 029 Overdriven Guitar 036 000 112 030 Distortion Guitar BASS 037 000 112 ...

Page 88: ...low Grand Piano 132 000 040 000 Piano Strings 133 000 041 000 Dream 134 000 000 001 Bright Piano 135 000 001 001 Bright Piano KSP 136 000 000 002 Electric Grand Piano 137 000 001 002 Electric Grand Piano KSP 138 000 032 002 Detuned CP80 139 000 040 002 Layered CP 1 140 000 041 002 Layered CP 2 141 000 000 003 Honky tonk Piano 142 000 001 003 Honky tonk Piano KSP 143 000 000 004 Electric Piano 1 14...

Page 89: ...28 Muted Guitar Voice Bank Select MIDI Program Change Voice Name MSB LSB 241 000 040 028 Funk Guitar 1 242 000 041 028 Muted Steel Guitar 243 000 043 028 Funk Guitar 2 244 000 045 028 Jazz Man 245 000 000 029 Overdriven Guitar 246 000 043 029 Guitar Pinch 247 000 000 030 Distortion Guitar 248 000 040 030 Feedback Guitar 249 000 041 030 Feedback Guitar 2 250 000 000 031 Guitar Harmonics 251 000 065...

Page 90: ...5 061 Trumpet Trombone Section 356 000 040 061 Brass Section 2 357 000 041 061 High Brass Voice Bank Select MIDI Program Change Voice Name MSB LSB 358 000 042 061 Mellow Brass 359 000 000 062 Synth Brass 1 360 000 012 062 Quack Brass 361 000 020 062 Resonant Synth Brass 362 000 024 062 Poly Brass 363 000 027 062 Synth Brass 3 364 000 032 062 Jump Brass 365 000 045 062 Analog Velocity Brass 1 366 0...

Page 91: ...ockenspiel 472 000 040 098 Glockenspiel Chimes Voice Bank Select MIDI Program Change Voice Name MSB LSB 473 000 041 098 Clear Bells 474 000 042 098 Chorus Bells 475 000 064 098 Synth Mallet 476 000 065 098 Soft Crystal 477 000 066 098 Loud Glockenspiel 478 000 067 098 Christmas Bells 479 000 068 098 Vibraphone Bells 480 000 069 098 Digital Bells 481 000 070 098 Air Bells 482 000 071 098 Bell Harp ...

Page 92: ... Thunder 573 064 000 034 Wind 574 064 000 035 Stream 575 064 000 036 Bubble 576 064 000 037 Feed 577 064 000 048 Dog 578 064 000 049 Horse 579 064 000 050 Bird Tweet 2 580 064 000 054 Ghost 581 064 000 055 Maou 582 064 000 064 Phone Call 583 064 000 065 Door Squeak 584 064 000 066 Door Slam 585 064 000 067 Scratch Cut 586 064 000 068 Scratch Split Voice Bank Select MIDI Program Change Voice Name M...

Page 93: ... Ohh 2 Och Hit FMTB2 Organ G4 Guitar A2 Yo Kurt 061 C 3 One 062 D 3 One More Time 063 D 3 Two 064 E 3 Ohh 2 065 F 3 Ohh 1 066 F 3 Three 067 G 3 Yo Kurt 068 G 3 Four 069 A 3 Hiuhu 070 A 3 Ok 071 B 3 Huea 072 C 4 Turntable Scratch L hat open SawLead D3 Huea Clap FMTB1 Organ C5 Guitar C3 GetUp 073 C 4 Off 074 D 4 Signal 075 D 4 Lesson 076 E 4 Reverse 077 F 4 Omen FX 078 F 4 Dj 079 G 4 FMTB2 080 G 4 P...

Page 94: ...47 Pop Reggae SWING JAZZ 048 Swing 049 Big Band 1 050 Big Band Ballad 051 Jazz Ballad 052 Jazz Trio 053 Boogie 054 Bebop 055 Big Band 2 056 Dixieland RHYTHM BLUES 057 Gospel Shuffle 058 R B 059 Motown 060 Soul Shuffle 061 6 8 Blues COUNTRY 062 Country Rock 063 Country 8Beat 064 Country Pop 065 Country Swing 066 Bluegrass 067 Country Ballad LATIN 068 Samba Rio 069 Bossa Nova 070 Espanole 071 Swing ...

Page 95: ...verRain 099 Red Lady 100 ReleseMe 101 SavingLv 102 SierraMd 103 SilentSd 104 SilverMn 105 SmokyEye 106 Shore Cl 107 SweetOrh 108 Unplugd 109 WhisprSx ROCK FUSION 110 DavAgain 111 FunkyPce 112 JumpRock 113 OyComCha 114 RedRiver 115 SatsfyGt 116 Sheriff 117 SmokyWz 118 TwistAgn 119 VenusPop RHYTHM BLUES 120 Amazing 121 BabyBaby 122 BoogiePf 123 Clock Rk 124 Aligator 125 HappyDay 126 JohnnyB 127 60sO...

Page 96: ...Rock H Analog Snare 2 53 F 2 41 F 1 Floor Tom L Room Tom 1 Rock Tom 1 E Tom 1 Analog Tom 1 54 F 2 42 F 1 Hi Hat Closed Analog HH Closed 1 55 G 2 43 G 1 Floor Tom H Room Tom 2 Rock Tom 2 E Tom 2 Analog Tom 2 56 G 2 44 G 1 Hi Hat Pedal Analog HH Closed 2 57 A 2 45 A 1 Low Tom Room Tom 3 Rock Tom 3 E Tom 3 Analog Tom 3 58 A 2 46 A 1 Hi Hat Open Analog HH Open 59 B 2 47 B 1 Mid Tom L Room Tom 4 Rock T...

Page 97: ...HH Open 2 59 B 2 47 B 1 Mid Tom L Analog Tom 4 Jazz Tom 4 Brush Tom 4 Jazz Tom 4 60 C 3 48 C 2 Mid Tom H Analog Tom 5 Jazz Tom 5 Brush Tom 5 Jazz Tom 5 61 C 3 49 C 2 Crash Cymbal 1 Analog Cymbal Hand Cym L 62 D 3 50 D 2 High Tom Analog Tom 6 Jazz Tom 6 Brush Tom 6 Jazz Tom 6 63 D 3 51 D 2 Ride Cymbal 1 Hand Cym Short L 64 E 3 52 E 2 Chinese Cymbal Flute Key Click Car Engine Ignition 65 F 3 53 F 2 ...

Page 98: ... 6 38 x 2 o Data Entry 7 o o Part Volume Control 10 x o Pan 11 x 2 o Expression Change 64 o o Sustain 71 x 2 o Harmonic Content 72 x 2 o Release Time 73 x 2 o Attack Time 74 x 2 o Brightness 91 93 94 x o Effect Depth 96 97 x o RPN Inc Dec 100 101 x 2 o RPN LSB MSB 84 x 2 o Portamento Cntrl Prog o 0 127 o 0 127 Change True System Exclusive o 3 o 3 Song Pos x x Common Song Sel x x Tune x x System Cl...

Page 99: ...ter Tuning Values for ll are ignored MIDI Master Tuning F0H 43H 1nH 27H 30H 00H 00H mm ll cc F7H This message simultaneously changes the tuning value of all chan nels The values of mm and ll are used for MIDI Master Tuning The default value of mm and ll are 08H and 00H respectively Any values can be used for n and cc Reverb Type F0H 43H 1nH 4CH 02H 01H 00H mmH llH F7H mm Reverb Type MSB ll Reverb ...

Page 100: ...No Effect TYPE MSB TYPE LSB 00 01 02 08 16 17 18 19 20 000 064 No Effect 065 Chorus Chorus2 066 Celeste Chorus1 067 Flanger Flanger1 Flanger2 068 127 No Effect TYPE MSB TYPE LSB 00 01 02 08 16 17 18 19 20 000 No Effect 001 1 Hall1 2 Hall2 002 Room 3 Room1 4 Room2 003 Stage 5 Stage1 6 Stage2 004 Plate 7 Plate1 8 Plate2 005 Delay L C R 26 Delay L C R 006 27 Delay L R 007 28 Echo 008 29 Cross Delay 0...

Page 101: ...Harmony 26 types Song 100 Songs 5 User Songs Song Clear Track Clear Recording Song User Song 5 Songs Recording Tracks 1 2 3 4 5 CHORD Disk Song Playback Save Load Delete Format MIDI Initial Send Local on off Auxiliary jacks PHONES OUTPUT DC IN 12V MIDI IN OUT SUSTAIN Amplifier 3 0W 3 0W Speakers 12cm x 2 3cm x 2 Power Consumption 22 W when using PA 5C power adaptor Power Supply Adaptor Yamaha PA 5...

Page 102: ... M Main A B 41 Main Voice DSP 25 Main Voice Reverb 25 Main Voice Volume 25 MDB music database 49 Metronome 20 MIDI 79 MIDI channels 80 MIDI Implementation Chart 98 MIDI LSB Receive cancel 84 MIDI terminals 80 Multi Fingering 43 MUSIC DATABASE 49 Music Stand 19 N numeric keypad 24 O Octave 72 One Touch Setting 27 Overall buttons 18 P PHONES OUTPUT jack 7 Portable Grand 20 Q Quick Guide 10 R RECORD ...

Page 103: ... You may also contact Yamaha directly at the address provided below 2 Deliver the unit to be serviced under warranty to the retailer selling the product an authorized service center or toYamaha with an explanation of the problem Please be prepared to provide proof purchase date sales receipt credit card copy etc when requesting service and or parts under warranty 3 Shipping and or insurance costs ...

Page 104: ... Street 13 P Code 10680 Athens Greece Tel 01 364 7111 SWEDEN Yamaha Scandinavia AB J A Wettergrens Gata 1 Box 30053 S 400 43 Göteborg Sweden Tel 031 89 34 00 DENMARK YS Copenhagen Liaison Office Generatorvej 8B DK 2730 Herlev Denmark Tel 44 92 49 00 FINLAND F Musiikki Oy Kluuvikatu 6 P O Box 260 SF 00101 Helsinki Finland Tel 09 618511 NORWAY Norsk filial av Yamaha Scandinavia AB Grini Næringspark ...

Page 105: ......

Reviews: