background image

72

Disk Operations

70

Song Copy

This operation allows you to make backup copies of your important data.  Primarily,
this will come in handy when you are recording and editing song data.  For example, if
you are quantizing the track of a song (page 100) — which makes permanent changes
to the track — making a backup copy of the song allows you to restore the original
song data in case you’re not satisfied with the results of the quantization.  Having a
dedicated backup disk for every song you work on is a good idea.  In this way, you can
save a new copy of the song each time you make an important edit to it.

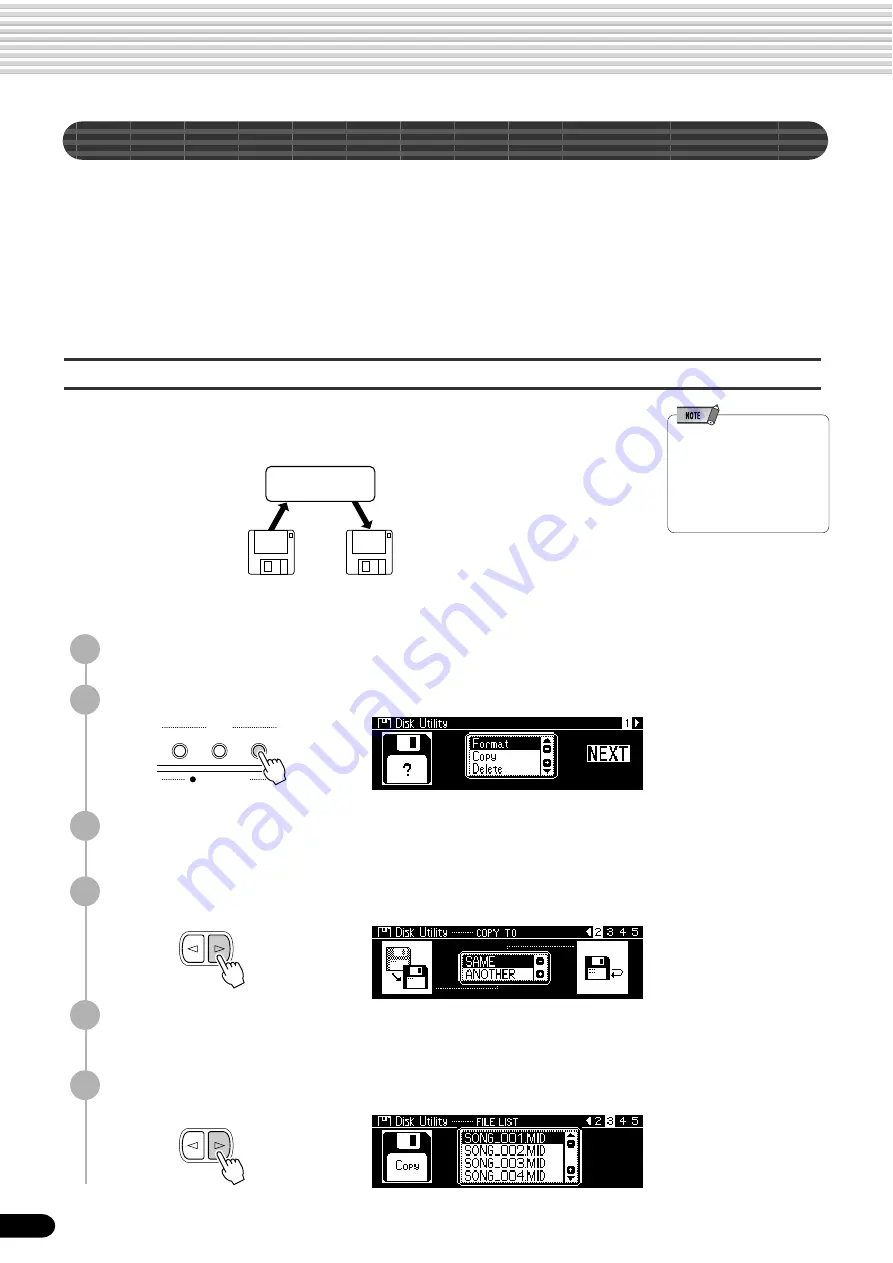
Copying song data from one floppy disk to another

Prepare a backup disk by formatting it.  One file can be copied at a time.  As shown in
the illustration below, first copy the desired file on the disk to internal memory, then
copy it to the destination disk.

If the quantity of data is large, it may be necessary for the data to be copied in parts.

• When the destination  disk’s

write-protect tab is set to ON
(see page 66) or the disk is a
purposely “copy-protected”
disk, an alert message
appears  indicating that the
Copy function is not possible.

1

Insert the disk to be copied (source disk) into the disk drive.

2

Press the [UTILITY] button.

3

Select “Copy.”

Use the data dial, the [+/YES] button or the [-/NO] button.

4

Press the [NEXT] button to display the Disk selection screen.

PSR-740/640

Internal Memory

copy

copy

Source

Destination

5

Select “ANOTHER.”

Use the data dial, the [+/YES] button or the [-/NO] button.

6

Press the [NEXT] button to display the FILE selection screen.

DISK IN USE

LOAD

SAVE

UTILITY

D I S K

BACK

NEXT

BACK

NEXT

Summary of Contents for PortaTone PSR-640

Page 1: ......

Page 2: ...et these goals In keeping with both the letter and the spirit of the law we want you to be aware of the follow ing Battery Notice This product MAY contain a small non rechargeable battery which if app...

Page 3: ...ound during use of the instrument or if any unusual smells or smoke should appear to be caused by it immediately turn off the power switch disconnect the adaptor plug from the outlet and have the inst...

Page 4: ...perability of this advanced instrument In order to make the most of your PortaTone s features and extensive performance potential we urge you to read the manual thoroughly while trying out the various...

Page 5: ...ndications of the PSR 740 640 and how to read them for optimum operation Function Tree page 22 This lists all functions of the PSR 740 640 according to their hierarchical structure letting you easily...

Page 6: ...ds 28 Functions of the Keyboard 29 Transpose 30 Pitch Bend Wheel 30 Modulation Wheel PSR 740 30 Sustain 31 Keyboard Percussion 31 Organ Flutes PSR 740 32 Organ Flutes Editing 33 Auto Accompaniment 34...

Page 7: ...ata Backup Initialization 159 Alert Message List 160 Troubleshooting 162 MIDI Data Format 163 MIDI Implementation Chart 178 Index 181 Specifications 184 Disk Operations 65 Using the Floppy Disk Drive...

Page 8: ...song recording features create your own complete fully orchestrated compositions and save them floppy disk as a User song Each User song lets you record up to sixteen independent tracks Page 92 To qui...

Page 9: ...creates SFF styles using the Style Recording feature Chorus enriches the voices by making them sound warmer and thicker as if several instruments were playing together at the same time Page 52 The DSP...

Page 10: ...16 A B C D 1 2 3 4 5 6 7 8 9 10 11 q e 6 7 4 5 9 0 8 y u r 3 t w i o 0 2 1 6 7 8 0 1 2 3 4 5 1 2 4 3 5 6 7 9 0 1 2 3 4 5 6 7 8 9 10 11 12 13 14 15 16 SONG PART ON OFF FINGERING VOICE L VOICE R1 VOICE...

Page 11: ...8 1 Number buttons 1 0 NO YES 20 2 Data dial 20 3 DISK SAVE button 17 68 LOAD button 17 70 UTILITY button 17 72 75 4 SYNC STOP button 43 5 SYNC START button 35 6 ACMP ON OFF button 25 35 7 FINGERING b...

Page 12: ...footswitch Plug an optional Yamaha FC4 or FC5 footswitch into this jack and use it to switch sustain on and off The footswitch connected to this jack can also be set to replicate the functions of som...

Page 13: ...IN jack The PSR 740 includes a microphone line input jack into which just about any standard microphone or line level source with a 1 4 phone plug can be plugged a dynamic microphone with an impedance...

Page 14: ...ces Music stand Setting Up The PSR 740 640 is supplied with a music stand that can be attached to the instru ment by inserting it into the slot at the rear of the control panel For more information on...

Page 15: ...e make sure you unplug the AC power adaptor from the wall AC outlet 2 Press the DEMO LANGUAGE button 3 Select a demo song Use the data dial the YES button the NO button or the number buttons 1 0 to sc...

Page 16: ...ot q Menu message display w Chord e Transpose r Tempo t Measure y Beat indicators u Song tracks Accompaniment tracks e Transpose Shows the current transpose value page 30 r Tempo Shows the current tem...

Page 17: ...ove DEMO LANGUAGE button pages 15 18 VOICE R1 button page 26 VOICE R2 button page 27 VOICE L button page 28 STYLE button pages 25 34 SONG button pages 25 76 MIXER button page 90 VOICE CHANGE button pa...

Page 18: ...rent operation and remains displayed until you execute the next operation Selecting the desired language of the Help messages Basic Operation How to read This message means Press the YES button to exe...

Page 19: ...ng the YES NO buttons Rotating the data dial to the right clockwise moves the cursor downward while rotating it to the left counter clockwise moves the cursor upward Basic Operation The display below...

Page 20: ...desired voice thereby immediately selecting that voice without having to step through a number of other voices To select voice number 106 for example press the 1 0 and 6 number buttons in sequence Ba...

Page 21: ...73 74 104 User Styles page 118 User Pad banks page 108 Registration Memory banks page 64 The example display below appears when naming a song on a floppy disk page 69 Basic Operation Entering a charac...

Page 22: ...of the Vocal Harmony part PSR 740 90 ORGAN FLUTES FOOTAGE Footage setting PSR 740 32 ATTACK MODE Attack mode setting PSR 740 32 ORGAN TYPE Organ type setting PSR 740 32 SPEED Speed setting PSR 740 32...

Page 23: ...smit channel setting 130 RECEIVE MIDI receive channel setting 131 LOCAL CONTROL Local control on off setting 132 CLOCK External Internal clock selection 132 INITIAL SETUP SEND Initial Setup data send...

Page 24: ...octave setting of Voice R1 VOICE R1 19 Part octave setting of Voice R2 VOICE R2 20 Split point setting ACMP ON OFF 21 Touch sensitivity setting TOUCH 22 Selecting footswitch function Footswitch 23 Sel...

Page 25: ...the Disk mode you can save and load important data page 65 In the Disk mode no panel operations can be executed except for disk operations Song record mode page 92 Rehearsal mode Sync Start off Recor...

Page 26: ...Modulation Wheel PSR 740 page 30 Transpose page 30 Sustain page 31 Touch Sensitivity page 136 Selecting a Voice 1 Press the VOICE R1 button The voice selected here is called voice R1 RIGHT 1 See page...

Page 27: ...ton Refer to the Voice List page 140 The voices available for selection here VOICE R2 are the same as those available for VOICE R1 selected on page 26 3 Play the voice 2 Play the voices Two different...

Page 28: ...meant to be played with the right hand Voice L LEFT is played with the left hand Selecting a voice for VOICE L 2 Select a voice Use the data dial the YES button the NO button or the number buttons 1...

Page 29: ...tes voice L and voice R1 R2 is called the split point The split point is set to F 2 G2 at the factory setting however you can set this to any key you wish Refer to page 135 for instructions on setting...

Page 30: ...se the PSR 740 640 pitch bend wheel to bend notes up roll the wheel away from you or down roll the wheel toward you while playing the keyboard The pitch bend wheel is self centering and will automatic...

Page 31: ...S w i r l B r u s h S w i r l B r u s h T a p S h a k e r T r i a n g l e M u t e C u i c a M u t e C l a v e s G u i r o S h o r t M a r a c a s A g o g o L T i m b a l e L C o n g a H O p e n B o n...

Page 32: ...be applied equally to all notes Attack Footage This determines the level of each volume in the percussive portion of the voice Footage settings are 4 2 2 3 and 2 Length This determines the decay of th...

Page 33: ...e edited voice 2 Press the ORGAN FLUTES button 3 Adjust the parameters as described above 1 Press one of the TRACK1 TRACK16 buttons to select the desired parameter For details about each parameter ref...

Page 34: ...ing Auto Accompaniment all tracks page 35 Additional functions for getting the most out of the auto accompaniment Accompaniment Sections page 36 Tempo Tap page 38 Accompaniment Track Muting page 39 Ac...

Page 35: ...so that its indicator lights The beat lamp also flashes in time with the tempo This condition is called synchronized start standby Refer to page 25 for details 5 As soon as you play a chord with your...

Page 36: ...button is pressed There are 4 variations on the basic pattern A D and the auto accompani ment changes harmonically based on the chords you play with your left hand FILL IN Section The fill in section...

Page 37: ...onding to the pressed button plays following an automatic fill in 10 Press the ENDING button This switches to the ending section When the ending is finished the auto accompaniment automatically stops...

Page 38: ...e tempo you tapped the button The Tempo can also be changed during playback by tapping the TEMPO TAP button twice at the desired tempo The auto accompaniment can be started at any tempo you desire by...

Page 39: ...ACMP SONG VOLUME button Track contents RHYTHM SUB RHYTHM MAIN These are the main rhythm tracks The RHYTHM tracks produce the drum and percussion sounds BASS The BASS track always plays a bass line but...

Page 40: ...PANI MENT section of the keyboard The following abbreviated chord fingerings are used The FINGERED 1 mode The Fingered 1 mode lets you finger your own chords on the AUTO ACCOMPANIMENT section of the k...

Page 41: ...5 7 or 1 3 5 7 Major seventh ninth M7 9 1 2 3 5 7 Major seventh add sharp eleventh M7 11 1 2 3 4 5 7 or 1 2 3 4 5 7 Flatted fifth b5 1 3 b5 Major seventh flatted fifth M7b5 1 3 b5 7 Suspended fourth...

Page 42: ...the root of the chord For a C major chord for example you could use E the third or G the fifth as the bass note rather than C When the FULL KEYBOARD Mode is selected the PSR 740 640 will automaticall...

Page 43: ...the abbreviation of SYNCHRO STOP 1 Press the STYLE button page 34 2 Turn AUTO ACCOMPANIMENT on page 35 3 Turn SYNCHRONIZED START on page 35 4 Turn SYNCHRONIZED STOP on Press the SYNC STOP button 5 As...

Page 44: ...For this example play a C major chord as shown below 4 Stop the accompaniment Part on off VOICE R1 R2 page 29 Voice Change setting VOICE R1 R2 page 89 Mixer setting VOICE R1 R2 page 90 Parameter Edit...

Page 45: ...complement or enhance changes made to the Groove settings above Dynamics Type This determines the type of dynamic change applied to the accompaniment Each type is a different template to which the ti...

Page 46: ...YES button or the NO button Refer to the Groove Type List page 47 3 Press the NEXT button to display the Groove SWING screen 6 Select a Dynamics Type Use the data dial the YES button the NO button or...

Page 47: ...pe List 8 16 16 TO 8 16 TO 12 12 TO 8 12 TO 16A 12 TO 16B 24 TO 8 24 TO 16 24 TO 12 THRU 8BEAT ON 8BEAT OFF 16BEAT ON 16BEAT OFF 2nd BEAT OFF DANCE DISCO TECHNO FUSION REGGAE1 REGGAE2 BOSSA NOVA TANGO...

Page 48: ...starts playing back in its entirety as soon as the pad is pressed To stop playback in the middle of the phrase press the STOP button Simply tap any of the MULTI PADs at any time to play back the corre...

Page 49: ...Pad Bank above 4 Press the NEXT button again The chord match function has no effect with pads that contain percussion phrases The chord match on off setting is restored to its original status wheneve...

Page 50: ...740 640 has special DSP effects that include additional effects usually used for a specific part such as distortion and tremolo PSR 740 The PSR 740 features five DSP systems as follows DSP This system...

Page 51: ...lected accordingly 8 Press the NEXT button Reverb Depth send level page 91 Sets the reverb depth for the specified voice or track and thus the amount of reverb effect applied to that voice or track Re...

Page 52: ...ecified voice or track and thus the amount of chorus effect applied to that voice or track Chorus Return Level See below Sets the amount of chorus effect returned from the chorus effect stage thus mak...

Page 53: ...DSP Depth Send level page 91 Sets the DSP depth for the specified voice or track and thus the amount of DSP effect applied to that voice or track DSP Return Level See below Sets the amount of DSP eff...

Page 54: ...rb All types function as system effects Chorus All types function as system effects DSP PSR 640 Depending on the selected type this functions either as a system effect or an insertion effect DSP1 3 PS...

Page 55: ...r to the Multi Effect Type List page 156 The DSP 1 2 3 type settings may automatically change when a panel voice is selected for R1 7 Press the NEXT button 8 Set the effect depth for DSP1 3 Use the da...

Page 56: ...on Harmony Echo can not be turned on when the Full Keyboard Auto accompani ment fingering mode is selected Harmony Echo will be automatically turned off if the Full Keyboard fingering mode is selected...

Page 57: ...adjusted as follows 1 Press the FUNCTION button 2 Select Digital Effect Use the data dial the YES button or the NO button 3 Press the NEXT button to display the Digital Effect screen BACK NEXT 4 Sele...

Page 58: ...RMONY PART setting screen Auto Harmony Echo notes are automatically assigned to the R1 and R2 parts in that order or priority R1 Harmony Echo is only applied to the Voice R1 If Voice R1 is off there w...

Page 59: ...MidGain HighGain The range of each frequency band can be changed by transmitting the system exclusive message from an external MIDI device to the PSR 740 640 see page 163 The digital equalizer adjusts...

Page 60: ...izer effect to the entire sound of the instrument 1 3 Use the same operation as in Reverb page 50 4 Select EQ Type Load Use the data dial the YES button or the NO button 5 Press the NEXT button 6 Sele...

Page 61: ...the same operation as in Reverb page 50 4 Select EQ Gain Use the data dial the YES button or the NO button 5 Press the NEXT button 6 Adjust the gain of each band Use the data dial the YES button the...

Page 62: ...nd build up your own data library page 65 Data stored by the Registration Memory VOICE PARAMETERS Part on off VOICE R1 R2 L page 29 Voice Change setting VOICE R1 R2 L page 89 Mixer setting VOICE R1 R2...

Page 63: ...mple the panel settings memorized to button number 3 are recalled For details about Accompa niment parameters see page 62 The Freeze function will automatically be turned on when one of the following...

Page 64: ...g the Registration Banks 1 Press the FUNCTION button 2 Select Regist Memory Use the data dial the YES button or the NO button 3 Press the NEXT to display the Regist Memory BANK screen 4 Press the NEXT...

Page 65: ...page 92 It may not be possible to record the full 60 files to a disk depending on the length of the recorded files The PSR 740 640 features special User style User pad and Registration Memory function...

Page 66: ...n the provided labels to a floppy disk Also make sure that labels are attached in the proper location To protect your data write protect tab To prevent accidental erasure of important data slide the d...

Page 67: ...y been inserted into the drive press the SONG button to call up the Song display 2 Select the desired song Use the data dial the YES button the NO button or the number buttons 1 0 3 Press the START ST...

Page 68: ...e data dial the YES button or the NO button 4 Press the NEXT button to display the Format operation screen CAUTION If data is already saved on the disk be careful not to format it If you format the di...

Page 69: ...e to save any data You can delete unneeded files on the disk page 75 or replace the disk with a new one and repeat the Save operation If a write error occurs during a save operation an alert message m...

Page 70: ...t the file to be loaded Use the data dial the YES button or the NO button 4 Press the NEXT button to display the DATA TYPE selection screen 5 Select the data type to be loaded Use the data dial the YE...

Page 71: ...ad operation Press the NO button to abort the Load operation CAUTION When data is loaded from a floppy disk to the PSR 740 640 the data already in the memory of the instrument will be replaced by the...

Page 72: ...e can be copied at a time As shown in the illustration below first copy the desired file on the disk to internal memory then copy it to the destination disk If the quantity of data is large it may be...

Page 73: ...from the source or destination disk during the Copy operation an alert message page 160 will appear on the display BACK NEXT If the quantity of data is large it may be necessary for the data to be cop...

Page 74: ...ce file Use the data dial the YES button or the NO button 8 Press the NEXT button to display the NAME screen 9 Enter the destination song name directly from the keyboard page 21 10 Press the NEXT butt...

Page 75: ...ossible 3 Select Delete Use the data dial the YES button or the NO button 4 Press the NEXT button to display the FILE selection screen 5 Select the file to be deleted Use the data dial the YES button...

Page 76: ...for the preset demo songs a floppy disk must be inserted in the disk drive to playback a song You can play back song files collected on these disks using the voices defined in the GM standard You can...

Page 77: ...INGLE REPEAT Play through the selected song repeatedly ALL Continue playback through all the songs on the floppy disk ALL REPEAT Continue playback through all the songs on the floppy disk repeatedly R...

Page 78: ...be turned off and the part will be muted Pressing the same track button again enables output of the playback sound 3 Press the START STOP button again to stop the song Song Volume Control 1 Press the...

Page 79: ...he data dial the YES button the NO button or the number buttons 1 0 6 Press the START STOP to start the song from the specified measure 7 Press the START STOP button again to stop the song 2 Press the...

Page 80: ...A button at the starting point A to be repeated 7 Press the MAIN B button at the ending point B to be re peated If only the A repeat point is specified repeat playback will occur between the A point a...

Page 81: ...elect Song Transpose Use the data dial the YES button or the NO button 4 Press the NEXT button to display the Song Transpose screen 5 Set the Transpose value Use the data dial the YES button the NO bu...

Page 82: ...hat the SIGNAL indicator is lit and the OVER indicator flashes occasionally Then reduce the INPUT VOLUME just enough to keep the OVER indicator from flashing This should be the optimum level setting I...

Page 83: ...is the same Reverb effect as described on page 50 This button determines whether the currently selected Reverb effect is applied to the microphone sound or not DSP4 The PSR 740 has a DSP effect DSP 4...

Page 84: ...the NO button The Harmony mode page 85 is automatically deter mined when the type is selected 3 Select the Lead Gender type Use the data dial the YES button or the NO button 4 Set the Pitch Correctio...

Page 85: ...meter lets you determine which notes keyboard position accompaniment or song data will control the harmony Harmony Part can only be set when the Vocal Harmony mode is set to Vocoder OFF No harmony is...

Page 86: ...button or the NO button 3 Adjust the Talk volume Use the data dial the YES button the NO button or the number buttons 1 0 4 Adjust the Total volume Use the data dial the YES button the NO button or t...

Page 87: ...he TALK button is turned off the DSP 4 type set in the Multi Effect display is recalled Vocal Harmony Type This is the same parameter as the Vocal Harmony type described on page 85 When the TALK butto...

Page 88: ...the specified voice or track and thus the amount of reverb effect applied to that voice or track Chorus depth Sets the chorus depth for the specified voice or track and thus the amount of chorus effec...

Page 89: ...settings for the RHYTHM SUB track any of the voices can be selected but no chord changes will occur when using Auto Accompaniment Make sure to first select the appropriate style for which you wish to...

Page 90: ...ment or song tracks and one for vocal harmony The illustrations below show how to select the various displays To adjust the desired volume setting use the data dial the YES button the NO button or the...

Page 91: ...arameter Edit screen 4 Adjust the parameter value from the corresponding display Use the data dial the YES button the NO button or the number buttons 1 0 You can switch among the parts just as with th...

Page 92: ...Songs page 104 This function assigns an twelve letter name to a recorded song Clearing User Song Data page 105 This function lets you delete song data either a specified part or the entire song After...

Page 93: ...cks that already contain recorded data About Quick Recording In Quick Recording you can quickly record without having to worry about the track assignments above Quick Recording automatically makes tra...

Page 94: ...or the NO button MELODY This records your keyboard performance Voices R1 R2 L without the auto accompaniment ACMP This records only the auto accompaniment When this is selected the auto accompaniment...

Page 95: ...off during recording 11 Stop recording If you ve selected MELODY in step 8 above press the START STOP button If you ve selected ACMP or MELODY ACMP in step 8 above press the START STOP button or the...

Page 96: ...a part Use the data dial the YES button or the NO button 3 Set the desired track to REC Press the NEXT button and use the data dial the YES button or the NO button Make all necessary settings to each...

Page 97: ...T STOP button Auto accompaniment cannot be turned on or off during recording 12 Stop recording If you did not enable the auto accompaniment track for recording in steps 8 above press the START STOP bu...

Page 98: ...g In the eight measure example below the third measures through the fifth measure are re recorded 1 Insert the floppy disk into the disk drive 2 Press the RECORD button to engage the Record mode 3 Sel...

Page 99: ...Press the NEXT button to display the START MEASURE screen 13Set the start measure the measure at which playback starts Use the data dial the YES button the NO button or the number buttons 1 0 14 Press...

Page 100: ...the notes in a track so that the timing is absolutely accurate to the specified note value 1 4 Use the same operation as in Re recording page 98 5 Select the Song file to be quantized Use the data dia...

Page 101: ...quarter notes 14 Press the NEXT button to display the Quantize operation screen 15 Press the YES button to execute the Quantize operation To abort the Quantize operation press the NO button CAUTION Wh...

Page 102: ...orus depth for the specified track and thus the amount of chorus effect applied to that voice or track DSP depth Sets the DSP depth for the specified track and thus the amount of DSP effect applied to...

Page 103: ...completed To cancel the save operation if you wish to redo any edits press the NO button and continue editing starting with step 11 above after the display returns to the SETUP DATA screen To save th...

Page 104: ...button 9 Select Name Use the data dial the YES button or the NO button 10 Press the NEXT button to display the NAME screen 11 Enter the desired name for the file Use the keyboard to enter the name pa...

Page 105: ...Song Edit screen 9 Select Clear Use the data dial the YES button or the NO button 10 Press the NEXT button 11 Select the track to be cleared Use the data dial the YES button or the NO button To clear...

Page 106: ...BY switch is turned off if an AC adaptor is connected page 159 It is nevertheless a good idea to save important data to floppy disk so that you can keep them indefinitely and build up your own data li...

Page 107: ...t the currently set tempo indicating that the record ready Synchro Start mode is engaged 11 Start recording Recording starts as soon as you play a key on the keyboard Recording can also be started by...

Page 108: ...ton or the NO button To select the desired pad for setting press the NEXT BACK button 11 Press the RECORD button to exit from the Record mode Naming User Pads 1 7 Use the same operation as in Chord Ma...

Page 109: ...8 Select Clear Use the data dial the YES button or the NO button 9 Press the NEXT button 10 Select the Pad number to be cleared Use the data dial the YES button or the NO button To clear the data from...

Page 110: ...eter Edit settings Tempo Reverb type and settings Chorus type and settings DSP type and settings PSR 740 Modulation wheel PSR 740 Foot Volume on off expression Up to approximately 1 950 notes for a se...

Page 111: ...he memory becomes full while recording an alert message will appear on the display and recording will stop Since recording is done in measure units you should first select a style that has the same nu...

Page 112: ...or the NO button 3 Press the NEXT button 4 Select a style to begin with Use the data dial the YES button the NO button or the number buttons 1 0 5 Press the NEXT button 6 Select Record Use the data di...

Page 113: ...s described in the first method above Since the rhythm pattern plays back repeatedly you can record by overdubbing listening to the pattern and playing the desired keys Look at the icons printed under...

Page 114: ...as in Style Recording Rhythm Track above 10 Select a Track to be recorded Use the data dial the YES button or the NO button Select from the following BASS CHORD1 CHORD2 PAD PHRASE1 and PHRASE2 Only o...

Page 115: ...the CM7 scale tones when recording the BASS and PHRASE tracks i e C D E G A and B Use only the chord tones when recording the CHORD and PAD tracks i e C E G and B Any appropriate chord or chord progre...

Page 116: ...gn all the notes in a track so that the timing is absolutely accurate to the specified note value 1 5 Use the same operation as in Style Recording Rhythm Track page 112 6 Select Edit Use the data dial...

Page 117: ...the quantized pattern in this step allowing you to hear the results of the operation before actually changing the data To audition the pattern press the START STOP button 16 Execute the Quantize oper...

Page 118: ...earing User Style Data 1 7 Use the same operation as in Quantize page 116 9 Press the NEXT button to display the SECTION selection screen 10 Select a Section to be cleared Use the data dial the YES bu...

Page 119: ...rmine how the pitch of the recorded style changes in response to chords played in the auto accompaniment section of the keyboard when using auto accompaniment NOTE LIMIT Note range Low Limit High Limi...

Page 120: ...k for setting the CTAB parameters Use the data dial the YES button or the NO button 13 Press the NEXT button 14 Select the desired CTAB parameter Use the data dial the YES button or the NO button Refe...

Page 121: ...in 9 min7 9 minMaj7 7sus4 7 b9 1 8 1 5 1 2 5 sus4 7 b13 7 9 Maj7aug 7aug 7b5 7 9 7 11 7 13 dim dim7 7 minMaj7 9 min7 11 Maj6 Maj7 Maj 9 Maj7 11 For SOURCE CHORD source chord type selected in step 14 a...

Page 122: ...you directly pluck a string and the note sounds But how does a digital instrument go about playing a note As shown in the illustration above in an electronic instrument the sampling note previously r...

Page 123: ...which are generated when the keyboard is played Each message includes a specific note number which corre sponds to the key which is pressed plus a velocity value based on how hard the key is stuck Pr...

Page 124: ...ngs page 131 Record performance data 1 16 channels using the PSR 740 640 Auto Accompani ment features on a external sequencer such as a personal computer After record ing edit the data with the sequen...

Page 125: ...EQ This sequence format is compatible with many of Yamaha s MIDI devices including the Clavinova series instruments This is a common format used with various Yamaha software The PSR 740 640 is compati...

Page 126: ...set in the MIDI position input and output in the TO HOST switch is ignored When using a Macintosh series computer set the MIDI interface clock setting in the application software to match the setting...

Page 127: ...erminal modem or printer terminal on the computer to the TO HOST terminal on the PSR 740 640 using a serial cable system peripheral cable 8 bit Set the PSR 740 640 HOST SELECT switch in the Mac positi...

Page 128: ...l appropriate transmit receive settings with a single button press 2 Select MIDI Use the data dial the YES button or the NO button 3 Press the NEXT button to display the MIDI screen 4 Select MIDI Temp...

Page 129: ...TX3 SONG OUT All transmit channels are set with the Song tracks 1 16 When outputting the song data Used to play the PSR 740 640 song data with an external tone generator and to record your entire perf...

Page 130: ...RHYTHM SUB track RHYTHM MAIN Auto Accompaniment RHYTHM MAIN track BASS Auto Accompaniment BASS track CHORD1 Auto Accompaniment CHORD1 track CHORD2 Auto Accompaniment CHORD2 track PAD Auto Accompanimen...

Page 131: ...s as a 16 channel multi timbral tone generator KEYBOARD Received MIDI data is handled in the same way as data generated by the PSR 740 640 s own keyboard In other words a remote keyboard could be used...

Page 132: ...an be played from the PSR 740 640 keyboard Clock Reception of an external MIDI clock signal can be enabled or disabled as required When disabled INTERNAL all of the time based functions Auto Accompani...

Page 133: ...tton 2 Select MIDI Use the data dial the YES button or the NO button 3 Press the NEXT button to display the MIDI screen 4 Select Initial Setup Send Use the data dial the YES button or the NO button 5...

Page 134: ...cording Turn Metronome ON or OFF with the data dial the YES button or the NO button 1 Press the FUNCTION button Each of the above functions can be set as described below The operations for each functi...

Page 135: ...e Accompaniment and Multi Pad sounds are affected by Scale Tuning Select the note to be tuned by pressing the NEXT BACK button Tune the selected note by using the data dial the YES button the NO butto...

Page 136: ...verb depth chorus depth DSP depth Voice R2 Voice number volume octave pan reverb depth chorus depth DSP depth DSP on off type return level and FAST SLOW on off Harmony Type Volume Part DSP1 3 dry wet...

Page 137: ...h has the same effect as pressing the SYNC STOP button on the panel BASS HOLD The bass root note will be held as long as you press the footswitch BREAK When you press the foot switch accompaniment wil...

Page 138: ...e ACMP SONG Controls the accompaniment song volume SUSTAIN SOSTENUTO SOFT REGISTRATION REGISTRATION START STOP SYNC STOP BREAK BASS HOLD TAP TEMPO Polarity This parameter lets you configure the foot c...

Page 139: ...s the brightness of the voices played on the keyboard Increasing the depth makes the sound brighter while decreasing it makes it softer RESONANCE Adds resonance to the voices played on the keyboard 13...

Page 140: ...on 49 0 112 21 MusetteAccordion 50 0 112 23 Tango Accordion 51 0 113 23 Bandoneon 52 0 114 21 Soft Accordion 53 0 115 21 Small Accordion 54 0 116 21 Accordion 55 0 113 22 Modern Harp 56 0 112 22 Harmo...

Page 141: ...mpet 144 0 113 56 Flugel Horn 145 0 112 59 Muted Trumpet 146 0 112 57 Solo Trombone 147 0 116 57 Trombone 148 0 114 57 Mellow Trombone 149 0 115 57 Soft Trombone 150 0 112 60 French Horn 151 0 112 58...

Page 142: ...226 0 119 80 Synth Flute 227 0 112 87 Under Heim 228 0 114 96 Clockwork Synth Pad 229 0 113 94 Insomnia 230 0 115 88 Golden Age 231 0 112 90 Krypton 232 0 113 99 Cyber Pad 233 0 112 95 Wave 2001 234 0...

Page 143: ...5 12Strings Guitar Bank Select MIDI Voice Program Voice Name Number MSB LSB Change Number 58 0 114 24 SmoothNylonGuitr 59 0 115 25 Campfire Guitar 60 0 112 26 Jazz Guitar 61 0 113 26 Octave Guitar 62...

Page 144: ...ipe Synth Lead 174 0 116 81 Fire Wire 175 0 112 80 Square Lead 176 0 112 81 Sawtooth Lead Bank Select MIDI Voice Program Voice Name Number MSB LSB Change Number 177 0 113 81 Big Lead 178 0 112 98 Star...

Page 145: ...0 24 Nylon Guitar 377 332 0 16 24 Nylon Guitar 2 378 333 0 25 24 Nylon Guitar 3 379 334 0 43 24 Velo GuitarHarmo 380 335 0 96 24 Ukulele 381 336 0 0 25 Steel Guitar 382 337 0 16 25 Steel Guitar 2 383...

Page 146: ...40 0 16 89 Thick Pad 586 541 0 17 89 Soft Pad 587 542 0 18 89 Sine Pad 588 543 0 64 89 Horn Pad 589 544 0 65 89 Rotary Strings 590 545 0 0 90 Poly Synth Pad 591 546 0 64 90 Poly Pad 80 592 547 0 65 90...

Page 147: ...64 0 34 Wind 726 681 64 0 35 Stream 727 682 64 0 36 Bubble 728 683 64 0 37 Feed 729 684 64 0 48 Dog 730 685 64 0 49 Horse 731 686 64 0 50 Bird Tweet 2 732 687 64 0 54 Ghost 733 688 64 0 55 Maou 734 68...

Page 148: ...sh Tap Swirl Reverse Cymbal Reverse Cymbal Snare Roll Castanet Hi Q 2 Hi Q 2 Snare H Soft Snare H Soft 2 Snare Electro SD Rock H Snare L SD Rock H Sticks Bass Drum Soft BD Hard L Bass Drum H Bass Drum...

Page 149: ...e Cymbal Hi Q 2 AnSD Snappy SD Jazz H Light Brush Slap L AnBD Dance 1 Bass Drum L AnSD OpenRim AnBD Dance 2 Gran Cassa AnBD Dance 3 BD Jazz BD Jazz Gran Cassa Mute Cutting Noise Phone Call Analog Side...

Page 150: ...lad 99 Two Step 100 Cowboy Boogie 101 Hoedown LATIN 102 Samba Rio 103 Bossa Nova 1 104 Bossa Nova 2 105 Reggae 106 Swing Reggae 107 Guitar Rhumba 108 Guitar Bossa 109 Salsa 110 Mambo 111 Jazz Samba 11...

Page 151: ...atinPerc1 LatinPerc2 Brassy1 O O O O Brassy2 O O O O Swingy O O O O O O O O SynBrass O O O O GuitarPlay1 O O O O O O O O GuitarPlay2 O O O O O O O O GuitarPlay3 O O O O O O O O GuitarPlay4 O O O O O O...

Page 152: ...ifferent style the appropriate chorus type will be selected accordingly DSP System Insertion effect DSP effect type depth can be set by a panel operation in the Style record mode When you select a dif...

Page 153: ...ate reverb type will be selected accordingly Chorus System effect Chorus effect type depth can be set by panel operation When you select a different style the appropriate chorus type will be selected...

Page 154: ...at sends the delayed repeats bouncing between the left and right channels ER1 2 System This effect isolates only the early reflection components of the reverb Gate Reverb System Gated reverb effect in...

Page 155: ...ystem Since a Compressor is included in the first stage steady distortion can be produced regardless of changes in input level Amp Simulator System A simulation of a guitar amp EQ Disco System Equaliz...

Page 156: ...the sound position left right front back Phaser Insertion Pronounced metallic modulation with periodic phase change Distortion Hard Insertion Hard edge distortion Distortion Soft Insertion Soft warm...

Page 157: ...pe will sometimes produce a more colorful sound 4Way Open Four note chords with open voice large intervals between the notes The result is a very open sound Since the harmony notes can be as much as t...

Page 158: ...Girl A Cappella Boy A Cappella Mix A Cappella Diatonic Falsetto Duet Falsetto Trio Falsetto Diatonic Falsetto Jazz Falsetto A Cappella 2 Unison Low 2 Unison High 3 Unison Low 3 Unison High Voice Inst...

Page 159: ...on and User Style Pad memory data plus the other settings listed above will be erased and or changed when the data initialization procedure is carried out Carrying out the data initialization procedur...

Page 160: ...be recorded Delete one or more unneeded songs using Delete and attempt the operation again When using the Copy operation the inserted disk is different from the source or destination disk Remove the...

Page 161: ...to indicate you cannot enter the function when you select Multi Pad function in the Multi Pad Recording mode The backup data page 159 is faulty Use the data initialization function page 159 All data...

Page 162: ...cted or if a percussion kit voice is selected Select an appropriate fingering mode or voice Harmony cannot be turned on when a drum kit is selected for the voice R1 The MIDI terminals can only be used...

Page 163: ...44 2C 0010 1100 45 2D 0010 1101 46 2E 0010 1110 47 2F 0010 1111 48 30 0011 0000 49 31 0011 0001 50 32 0011 0010 51 33 0011 0011 52 34 0011 0100 53 35 0011 0101 54 36 0011 0110 55 37 0011 0111 56 38 0...

Page 164: ...63 2 PSR 740 ONLY c 91 REVERB SEND LEVEL v 0 127 c 93 CHORUS SEND LEVEL v 0 127 c 94 VARIATION SEND LEVEL v 0 127 When only Connection 1 System c 98 NRPN LSB Refer to 3 4 NON REGISTERED PARAMETER NUMB...

Page 165: ...ASE 00H 40H 7FH 64 0 63 14H rrH mmH DRUM FILTER CUTOFF FREQ 00H 40H 7FH 64 0 63 15H rrH mmH DRUM FILTER RESONANCE 00H 40H 7FH 64 0 63 16H rrH mmH DRUM AEG ATTACK RATE 00H 40H 7FH 64 0 63 17H rrH mmH D...

Page 166: ...approximately 50ms to execute so sufficient time should be allowed before the next message is sent 3 6 3 1 2 XG PARMETER CHANGE binary hexadecimal 11110000 F0 Exclusive status 01000011 43 YAMAHA ID 0...

Page 167: ...00 50 Vocal Harmony Additional Parameter Control No 00000000 00 Pitch to Note Parameter No 0sssssss SS Pitch To Note switch 00H Off 01H On 11110111 F7 End of Exclusive 3 6 5 3 Vocal Harmony Pitch to N...

Page 168: ...t Depend on Reverb type 0A 1 00 7F Reverb Parameter 9 Refer to the Ef Parameter List Depend on Reverb type 0B 1 00 7F Reverb Parameter 10 Refer to the Ef Parameter List Depend on Reverb type 0C 1 00 7...

Page 169: ...tion Parameter 16 option Parameter Depend on Variation Type TOTAL SIZE 6 Table 1 5 MIDI Parameter Change table MULTI EQ PSR 740 ONLY Address Size Data Prameter Name Description Default Value H H H H 0...

Page 170: ...00 7F Insertion Effect Parameter5 Refer to the Ef Parameter List depends on insertion 1 type 07 1 00 7F Insertion Effect Parameter6 Refer to the Ef Parameter List depends on insertion 1 type 08 1 00 7...

Page 171: ...Bank Select LSB Soft Pedal Pitch EG Mono Poly Portamento Scale Tuning Table 1 9 MIDI Parameter Change table A D PART PSR 740 ONLY Address Size Data Prameter Name Description Default Value H H H H 10 n...

Page 172: ...640 TYPE MSB TYPE LSB DEC HEX 00 01 02 03 07 08 09 15 16 17 18 19 20 000 00 NO EFFECT 001 01 1 HALL1 5 HALL2 2 HALL2 3 HALL3 4 HALL4 002 02 10 ROOM1 11 ROOM2 12 ROOM3 6 ROOM1 7 ROOM2 8 ROOM3 9 ROOM4...

Page 173: ...CH CHANGE2 081 51 84 HARMONIC ENHANCER 082 52 80 TOUCH WAH 1 85 TOUCH WAH 86 TOUCH WAH 81 TOUCH DIST OVERDRIVE WAH 2 083 53 87 COMPRESSOR 084 54 88 NOISE GATE 085 55 91 VOICE CANCEL 086 56 59 2WAY ROT...

Page 174: ...on insertion block No Parameter Display Value See Table Comment Control 1 Reverb Time 0 3 30 0s 0 69 table 4 2 Diffusion 0 10 0 10 3 Initial Delay 0 1mS 99 3mS 0 63 table 5 4 HPF Cutoff Thru 8 0kHz 0...

Page 175: ...7 3 Phase Shift Offset 0 127 0 127 4 Feedback Level 63 63 1 127 5 6 EQ Low Frequency 32Hz 2 0kHz 4 40 table 3 PSR 740 50Hz 2 0kHz 8 40 table 3 PSR 640 7 EQ Low Gain 12 12dB 52 76 8 EQ High Frequency 5...

Page 176: ...ah Release 10 680ms 52 67 15 16 Dry Wet is avilable when variation connection Insertion TOUCH WAH 1 variation insertion block TOUCH WAH DIST variation block No Parameter Display Value See Table Commen...

Page 177: ...5 5 118 185 8 23 36 3 55 86 7 87 137 0 119 187 4 24 37 9 56 88 2 88 138 6 120 189 0 25 39 5 57 89 8 89 140 2 121 190 6 26 41 0 58 91 4 90 141 8 122 192 1 27 42 6 59 93 0 91 143 3 123 193 7 28 44 2 60...

Page 178: ...1 7 10 11 o o 5 x o Portamento Time 6 38 o o Data Entry Control 64 66 67 o o 65 x o Portamento Change 71 72 74 o o Sound Controller 73 x o Sound Controller 84 x o Portament Cntrl 91 93 94 o o Effect...

Page 179: ...o 6 38 o o Data Entry Control 64 66 67 o o 65 x o Portamento Change 72 o o Sound Controller 71 73 74 x o Sound Controller 84 x o Portament Cntrl 91 93 94 o o Effect SendLevel 96 97 x o Data Inc Dec 98...

Page 180: ...annel s set to Root are recognized as the bass notes in the accompaniment section The bass notes will be detected regardless of the accompaniment on off the PSR 740 640 However the following MIDI mess...

Page 181: ...l effect 50 152 Direct Access 21 24 Disk drive 66 DISK IN USE 66 Disk mode 25 Display 16 DOC 9 76 125 Drum Cancel 113 Drum Kit 31 148 DSP 50 53 54 83 Dynamics 45 46 Dynamics Type List 47 E Echo 56 157...

Page 182: ...rdub 111 P Packing List 4 PAD 39 110 Pan 88 102 Panel voice 140 Parameter Edit 88 91 Part Octave 135 PART ON OFF 27 28 29 PHRASE1 39 110 114 PHRASE2 39 110 114 Pitch Bend 30 Pitch Bend Range 139 Polar...

Page 183: ...k Setting 86 Tap 38 137 138 Tempo 38 Time signature 92 TO HOST 123 TOUCH 136 Touch Sensitivity 136 Track 39 78 93 Transmit 130 Transpose 30 81 Tremolo 57 157 Trill 57 157 Troubleshooting 162 U Upper 8...

Page 184: ...ti Effect 74 types DSP4 microphone sound 74 types Harmony Echo 22 types Master EQ 5types PSR 640 Reverb 24 types Chorus 16 types DSP system insertion 74 types Harmony Echo 22 types Registration Memory...

Page 185: ...s product is found to be the source of inter ference which can be determined by turning the unit OFF and ON please try to eliminate the problem by using one of the following measures Relocate either t...

Page 186: ...ontact Yamaha directly at the address provided below 2 Deliver the unit to be serviced under warranty to the retailer selling the product an authorized service center or to Yamaha with an explanation...

Page 187: ...usic Center Jalan Jend Gatot Subroto Kav 4 Jakarta 12930 Indonesia Tel 21 520 2577 KOREA Cosmos Corporation 1461 9 Seocho Dong Seocho Gu Seoul Korea Tel 02 3486 0011 MALAYSIA Yamaha Music Malaysia Sdn...

Page 188: ...M D G EMI Division Yamaha Corporation 1999 Yamaha Corporation V386510 909POCP3 3 03C0 Printed in Japan...

Reviews: