background image

Adjust the Volume Balance and Changing Voices — Mixing Console

PSR-2000/1000

124

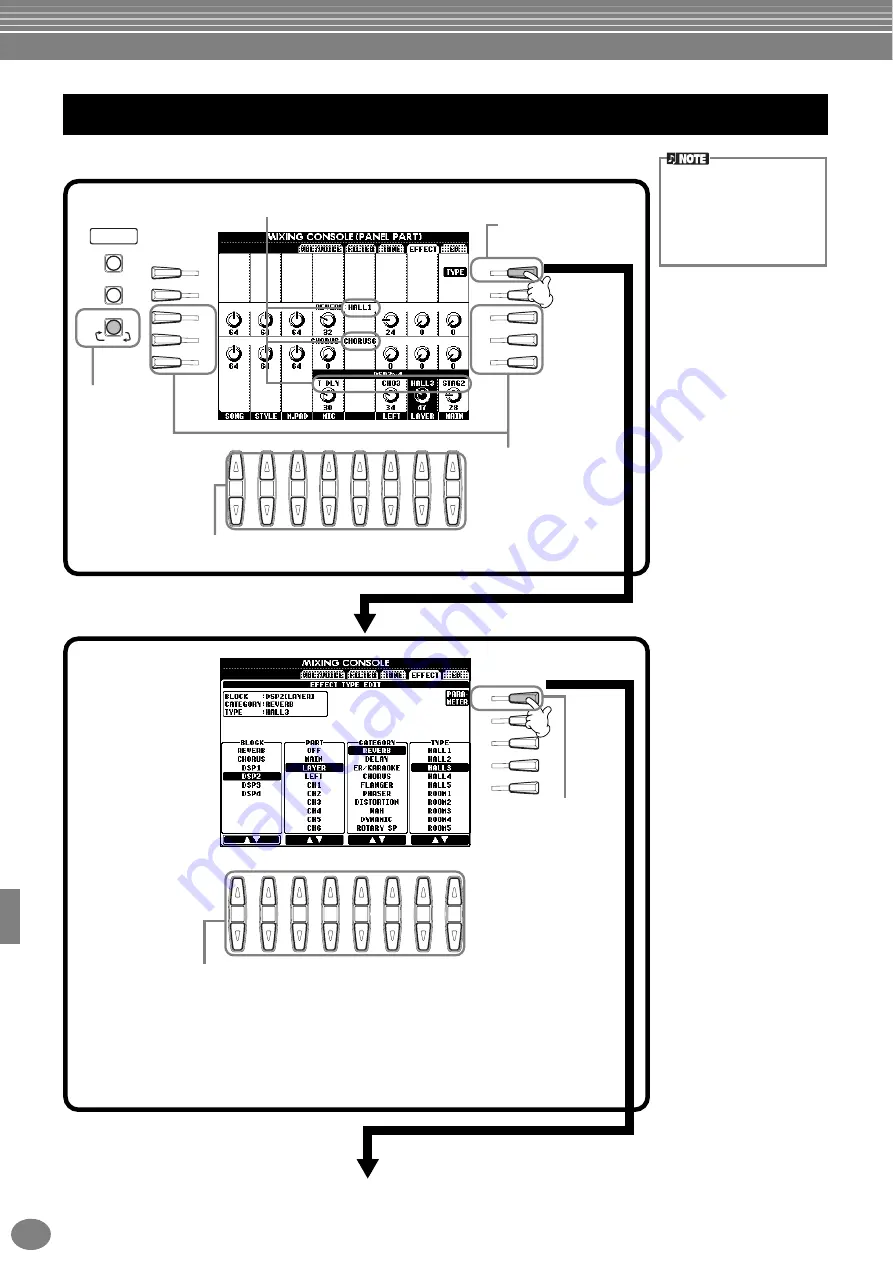
The operations for this page apply to step 2 of the procedure on page 121.

Adjusting the Effects

There are three effect sec-
tions: Reverb, Chorus, and 
DSP (which contains a vari-
ety of effect types). For 
details, refer to the Effect 
Block list (page 125).

SOUND CREATOR

DIGITAL RECORDING

MIXING CONSOLE

DIGITAL

STUDIO

I

F

J

G

H

D

A

E

B

C

8

1

2

3

4

5

6

7

PART

I

F

J

G

H

8

1

2

3

4

5

6

7

Switches among the 
effect sections: 

REVERB

CHORUS

and 

DSP

.

Determines the amount of effect that is applied to each part. For more information 
about the characteristics of each effect, see the 

Effect Block

 list on page 125.

Press this to edit and store 
the effect (page 124, 125).

These determine the effect block and let you assign the effect.

BLOCK

............ Determines the effect block (group of similar or related effects).

PART

............... Determines the part to which the Insertion effect is applied. It is effective only 

when BLOCK is set to “DSP1/DSP,” PARAMETER is set to “CONNECTION,” and 
VALUE is set to “Insertion” — or when BLOCK is set to “DSP2–4” (PSR-2000).

CATEGORY

..... The various effect programs (in 

Type

 below) are grouped into categories. This 

parameter may not be available depending on the selected block.

TYPE

............... Determines the type of effect that is assigned to the selected effect block. The 

actual effect types that are available may differ depending on the selected block.

1

2

Each press of 
this button 
switches among 
the various 
parts/channels.

Indicates the type name for each effect block.

When the 

BLOCK


parameter is set to 

REVERB

CHORUS

, or 

DSP1-4/DSP

, press this 

to call up the display 
from which you can 
change the detailed 
settings for the effects.

Summary of Contents for PortaTone PSR-1000

Page 1: ...OWNER S MANUAL OWNER S MANUAL ...

Page 2: ...function or effect works when the unit is operating as designed are not covered by the manufac turer s warranty and are therefore the owners responsibil ity Please study this manual carefully and consult your dealer before requesting service ENVIRONMENTAL ISSUES Yamaha strives to produce products that are both user safe and environmentally friendly We sincerely believe that our products and the pr...

Page 3: ...ord or plug becomes frayed or damaged or if there is a sudden loss of sound during use of the instrument or if any unusual smells or smoke should appear to be caused by it immediately turn off the power switch disconnect the adaptor plug from the outlet and have the instrument inspected by quali fied Yamaha service personnel CAUTION Always follow the basic precautions listed below to avoid the pos...

Page 4: ... high or uncomfortable volume level since this can cause permanent hearing loss If you experience any hearing loss or ringing in the ears consult a physician Saving and backing up your data Current memory data see page 39 is lost when you turn off the power to the instrument Save the data to a floppy disk the User Drive see page 39 Saved data may be lost due to malfunction or incorrect opera tion ...

Page 5: ... PSR 2000 1000 We recommend that you read this manual carefully so that you can fully take advantage of the advanced and convenient functions of the PSR 2000 1000 We also recommend that you keep this manual in a safe and handy place for future reference ...

Page 6: ...00 s various functions Data List Voice List MIDI Data Format etc Trademarks Apple and Macintosh are trademarks of Apple Computer Inc IBM PC AT is a trademark of International Business Machines Corporation Windows is the registered trademark of Microsoft Corporation All other trademarks are the property of their respective holders The illustrations and LCD screens as shown in this owner s manual ar...

Page 7: ...sed in as far as it will go the disk may not eject properly The eject button may become stuck in a half pressed position with the disk extending from the drive slot by only a few millimeters If this happens do not attempt to pull out the partially ejected disk since using force in this situation can damage the disk drive mechanism or the floppy disk To remove a partially ejected disk try pressing ...

Page 8: ... labels to a floppy disk Also make sure that labels are attached in the proper location To protect your data Write protect Tab To prevent accidental erasure of important data slide the disk s write protect tab to the protect position tab open Data backup For maximum data security Yamaha recommends that you keep two copies of important data on separate floppy disks This gives you a backup if one di...

Page 9: ... Help Messages 49 Using the Metronome 50 Adjusting the Tempo 50 Tap Tempo 51 Reference Playing the Demos 52 Voices 54 Selecting a Voice 54 Layer Left Playing Several Sounds Simultaneously 56 Layer Layering Two Different Voices 56 Left Setting Separate Voices for the Left and Right Sections of the Keyboard 57 Applying Voice Effects 57 PITCH BEND Wheel MODULATION Wheel 58 Adjusting the Octave settin...

Page 10: ...eated Accompaniment Style 113 Change the Rhythmic Feel Groove and Dynamics 113 Editing the Channel Data 115 Making Style File Format Settings Parameter 116 Creating Multi Pad Multi Pad Creator 118 Operation 118 Multi Pad Realtime Recording Record 119 Start recording 119 Stop recording 119 Step Recording or Editing Multi Pads Edit 120 Adjust the Volume Balance and Changing Voices Mixing Console 121...

Page 11: ...ystem Settings Local Control Clock etc System 145 Transmitting MIDI Data Transmit 146 Receiving MIDI Data Receive 147 Setting Root Note Channels Root 147 Setting Chord Channels Chord Detect 147 Other Settings Utility 148 Making Settings for Fade In Out Metronome Parameter Lock and Tap CONFIG 1 148 Making Settings for the Display and Voice Number Indication CONFIG 2 149 Copying and Formatting Disks...

Page 12: ...ns of the Keyboard on page 57 Changing the sound Enhancing the sound with touch and other effects Applying Voice Effects on page 57 Adjusting the Effects on page 124 Adjusting the Level Balance page 122 Combining two voices Layer Layering Two Different Voices on page 56 Playing separate voices with the right and left hands Left Setting Separate Voices for the Left and Right Sections of the Keyboar...

Page 13: ... What s MIDI on page 155 Recording your performance Playing the sounds of the PSR 2000 1000 through an external audio system and recording the sounds to an external recorder AUX OUT OUTPUT jacks on page 153 Raising the volume Playing the sounds of the PSR 2000 1000 through an external audio system and recording the sounds to an external recorder AUX OUT OUTPUT jacks on page 153 Connecting a comput...

Page 14: ...amic phrases page 73 118 By simply pressing one of the Multi Pads you can play short rhythmic or melodic phrases You can also create your original Multi Pad phrases by recording them directly from the keyboard DEMO Explore the Demos page 20 52 These not only showcase the stunning voices and styles of the instrument they introduce you to the various functions and features and give you hands on expe...

Page 15: ...n the PSR 2000 automatically produces backup vocal harmonies for lead vocals that you sing into a microphone You can even change the gender of the harmony voices for example letting you add female backup to your own male voice or vice versa VOICE Enjoy a huge variety of realistic voices page 25 54 The PSR 2000 1000 features a wealth of exceptionally authentic and dynamic voices including piano str...

Page 16: ...n the switch is in the STANDBY position electricity is still flowing to the instrument at a minimum level When not using the PSR 2000 1000 for an extended period of time be sure to unplug the AC power adaptor from the wall AC outlet When you have made all the necessary connections page 152 between your PSR 2000 1000 and any other devices make sure that all volume settings are turned down all the w...

Page 17: ...nificantly expands and improves on the GM System Level 1 standard with greater voice handling capacity expressive control and effect capability while retaining full compatibility with GM By using the PSR 2000 1000 XG voices it is possible to record XG compatible song files XF Format The Yamaha XF format enhances the SMF Standard MIDI File standard with greater functionality and open ended expandab...

Page 18: ...button P 121 MENU DEMO button P 52 HELP button P 49 FUNCTION button P 133 BALANCE FUNCTION HELP MENU DEMO SOUND CREATOR DIGITAL RECORDING MIXING CONSOLE DIGITAL STUDIO DIRECT ACCESS PART CHANNEL ON OFF D A E B C TRANSPOSE ACMP STANDBY ON PITCH BEND MODULATION PHONES INTRO START STOP MAIN ENDING rit AUTO FILL IN OTS LINK SYNC STOP SYNC START BREAK BALLAD USER LATIN POP ROCK REC REW FF START STOP TO...

Page 19: ...rminal P 154 HOST SELECT switch P 154 MIDI OUT IN terminals P 153 FOOT PEDAL 1 SWITCH jack P 153 FOOT PEDAL 2 jack P 153 AUX OUT LEVEL FIXED L R jacks P 153 OUTPUT L L R R jacks P 153 DC IN terminal P 153 USER ENTER EXIT FREEZE MEMORY DATA ENTRY ORGAN FLUTES STRINGS CHOIR PAD GUITAR MAIN BACK NEXT LEFT MUSIC FINDER LAYER I F J G H BASS PIANO HARPSI E PIANO XG UPPER OCTAVE WOODWIND PERCUSSION VARIA...

Page 20: ...ons Song playback page 21 Short demo playback of the selected voice in the Voice Open display page 26 Reference on page 52 Demo button BACK NEXT For this example FUNCTION is selected Function Demos demonstrate each of the different functions on the PSR 2000 1000 FUNCTION HELP MENU DEMO 2 Press the BACK NEXT button to select the Demo categories Voice Demos showcase the voices of the PSR 2000 1000 S...

Page 21: ...ropriate disk containing song data into the disk drive Reference on page 75 Song related buttons Floppy disk drive BALANCE and CHANNEL buttons Disks bearing this logo contain song data for voices defined in the GM standard Disks bearing this logo contain song data using the XG format an extension of the GM standard that provides a wider variety of voices and more comprehensive sonic control Disks ...

Page 22: ...o select the Voice Style Function folder D A E B C Press the BACK NEXT button to select the drive In the example display at left the PRESET page is selected at right FLOPPY DISK is selected PRESET Songs for Demos FLOPPY DISK commercially available songs your own songs etc From the MAIN display the display shown when the power is turned on you can select songs voices accom paniment styles etc D A E...

Page 23: ...FF button 2 Press the 1 8 button corresponding to the channel you wish to turn on or off REC START STOP TOP NEW SONG SYNC START To rewind or fast forward to the playback point of the song press the REW or FF button With song data software Standard MIDI format 0 that includes lyrics you can view the lyr ics on the display during playback You can also view the score PSR 2000 only See pages 80 and 83...

Page 24: ...utton 2 Press the 1 8 button corresponding to the part of which the volume you wish to adjust 8 Press the SONG START STOP button to stop playback BALANCE 8 1 2 3 4 5 6 7 You can call up a full set of mixing controls by pressing the MIXING CONSOLE button page 121 REC START STOP TOP NEW SONG SYNC START The FADE IN OUT but ton page 65 can be used to produce smooth fade ins and fade outs when starting...

Page 25: ...he MAIN screen is not displayed press the DIRECT ACCESS button followed by the EXIT button 2 Select a voice group Reference on page 54 Voice related buttons MAIN LEFT LAYER I F J G H The voice you re selecting here belongs to the MAIN part and is called the MAIN voice See page 56 for more information You ll want to hear the MAIN voice all by itself so make sure that the LAYER and LEFT parts are tu...

Page 26: ...d that s just the beginning Check out these other voice related features Create your own original voices quickly and easily by changing the settings of existing voices page 87 Set up your favorite panel settings including voices styles and more and call them up whenever you need them page 84 D A E B C For this example Strings is selected Press the corresponding buttons to select the other pages an...

Page 27: ...he keyboard that separates the two voices called the Split Point To do this simultaneously hold down the F or G button and press the desired key on the keyboard For more information see page 138 6 Play the voices The notes you play with your left hand sound one voice while the notes you play with your right sound a different voice or voices MAIN and LAYER voices are meant to be played with the rig...

Page 28: ...ion are automatically detected and used as a basis for fully automatic accompaniment with the selected style Reference on page 59 Style related buttons D A E B C BALLAD USER LATIN POP ROCK BALLROOM DANCE STYLE MARCH WALTZ SWING JAZZ For this example EuroTrance is selected For this example Dance is selected Press the BACK NEXT button to select the memory location of the style For this example PRESE...

Page 29: ...bellish and enhance your melodies with the automatic Harmony and Echo effects This powerful performance feature lets you automatically add harmony notes to the melodies you play with your right hand based on the chords you play with your left Tremolo Echo and other effects are available too 1 Turn HARMONY ECHO on 2 Turn ACMP on page 28 3 Play a chord with your left hand and play some notes in the ...

Page 30: ...ructure on the next page 7 Press the AUTO FILL IN button to add a fill in if necessary Fill in patterns play automatically between each change in the Main sections 8 Press the ENDING button This switches to the ending section When the ending is finished the style automatically stops INTRO This is used for the beginning of the song When the intro finishes playing accompaniment shifts to the main se...

Page 31: ...G button again while the ending is playing back MAIN VARIATION A MAIN VARIATION C MAIN VARIATION B MAIN VARIATION D via BREAK via BREAK via BREAK via BREAK max four patterns max four patterns INTRO page 66 ENDING page 66 An Intro doesn t necessarily have to be at the beginning If you want you can play an Intro section in the middle of your performance by simply pressing the INTRO button at the des...

Page 32: ...t style see page 67 it also automatically turns on ACMP and SYNC START so that you can immediately start playing the style 3 As soon as you play a chord with your left hand the auto accompaniment starts 4 Play melodies with your right hand and play various chords with your left hand 5 Try out other One Touch Setting setups You can also create your own One Touch Setting setups For details refer to ...

Page 33: ...utton 2 Select a record For this example press the 1 3 buttons to select a record by song title 3 Play along with the style playback Press the EXIT button to return to the MAIN display Reference on page 69 MUSIC FINDER button MUSIC FINDER 8 1 2 3 4 5 6 7 Select the desired record Press the BACK NEXT button to select the desired page of records For this example ALL is selected Split Point Auto Acco...

Page 34: ...of Search 1 and 2 appear in the correspond ingly numbered SEARCH 1 2 displays I F J G H D A E B C 8 1 2 3 4 5 6 7 I F J G H 6 Press the 8 START SEARCH button The search function calls up all records that contain the entered word or words 3 Press the F G and H to clear the previous conditions if necessary 4 For this example press the A button to call up the display for inputting the song title Refe...

Page 35: ... To save your Music Finder data call up the MUSIC FINDER Open Save window from the SYSTEM RESET page page 151 of the UTILITY display and follow the same procedure as that in the Open Save window for Voice page 40 44 To recall the saved data execute the appropriate operation from the MUSIC FINDER s Open Save window Records can be replaced or added page 71 In the instructions above all Music Finder ...

Page 36: ...button and play the part If you want you can adjust the tempo by pressing the TEMPO buttons 8 Press the SONG START STOP button to stop playback Reference on page 75 Song related buttons R TRACK 1 To cancel the left hand part press the TRACK 2 button D A E B C If the selected song does not contain lyric data lyrics are not displayed If you want to start the song right away without an intro use the ...

Page 37: ...the TRACK1 button 6 Recording starts as soon as you start playing the keyboard 7 When you ve finished recording press the REC button 8 To hear your newly recorded performance return the song to the beginning by using the TOP button and press the SONG START STOP button 9 Save the recorded data as required pages 38 44 REC REW FF START STOP TOP NEW SONG SYNC START REC SONG EXTRA TRACKS STYLE R L TRAC...

Page 38: ...heir respective file types as well Song Voice Style etc Moreover you can organize your data efficiently by putting various files of the same type into a single folder The Open Save displays for Song Voice Style Multi Pad Bank and Registration Bank can be called up from the MAIN display the display shown when the power is turned on by pressing the appropriate A J button I F J G H D A E B C The foll...

Page 39: ...reated or edited using the various functions of the PSR 2000 1000 They are stored internally to the PSR 2000 1000 FLOPPY DISK drive You can also store your original data to floppy disk Commercially available disk software can also be called up here Naturally these files are available only when the appropriate disk is inserted in the floppy disk drive File All data both pre programmed and your own ...

Page 40: ... moves among the available files folders Highlight the desired file or folder voice files are shown in the example above and press the ENTER button to call up the selected item Double clicking the appropriate A J button calls up the corresponding file and returns to the MAIN display Highlighting the desired file and double clicking the ENTER button calls up the corresponding file and returns to th...

Page 41: ...on The NAME display appears 2 Select the appropriate file folder and press the 7 OK button The currently selected file folder is highlighted To select another file folder press one of the A J buttons To cancel press the 8 CANCEL button Input the new name page 45 Press the 8 OK button To cancel press the 8 CANCEL button A file folder name can con tain up to 50 half size letters or 25 Hiragana and k...

Page 42: ... OK button To stop the operation press the 8 CANCEL button This operation cannot be used to directly move a file folder from one floppy disk to another If you want to do this cut and paste the file or folder from the first floppy disk to the USER page then change disks and paste it to the FLOPPY DISK page All files folders in a floppy disk can be copied to another disk in one batch page 150 4 Call...

Page 43: ...copy and paste the file or folder from the first floppy disk to the User page then change disks and paste it to the Floppy Disk page 4 Call up the destination display Only the USER and FLOPPY DISK pages can be selected as the destination Press the 4 PASTE button The file folder you copied is now pasted at the destination END 1 Press the 5 DELETE button The DELETE display appears 2 Select the desir...

Page 44: ...tored is 800 PSR 2000 400 PSR 1000 but this may differ depending on the length of the file names The maximum number of files which can be stored in a folder will be 250 Enter a name for the new file page 45 Press the 8 OK button To stop the operation press the 8 CANCEL button 1 Press the 6 SAVE button Enter the name of the new folder page 45 Press the 8 OK button To cancel the operation press the ...

Page 45: ... ENTER button one or several times to convert the characters into the appropriate kanji The reversed area can be changed by the DATA ENTRY dial The converted area can be changed back to hiragana by the 7 DELETE button The reversed area can be cleared at once by the 8 CANCEL button To actually enter the change press the 8 OK button or enter the next character To enter the hiragana itself without co...

Page 46: ...y rotating the DATA ENTRY dial In the example BALANCE display turning the dial adjusts the volume of the part in reverse display highlight To adjust the volume of another part first select the part by pressing the button corresponding to the part then rotate the DATA ENTRY dial Selecting items You can select the desired item or function in the display by rotating the DATA ENTRY dial The selected i...

Page 47: ...ECT ACCESS PART CHANNEL ON OFF FREEZE MEMORY DATA ENTRY ORGAN FLUTES STRINGS CHOIR PAD GUITAR MAIN BACK NEXT LEFT MUSIC FINDER LAYER I F J G H D A E B C BASS PIANO HARPSI E PIANO XG UPPER OCTAVE WOODWIND PERCUSSION VARIATION MONO TOUCH SUSTAIN DSP HARMONY ECHO LEFT HOLD SYNTH BRASS ORGAN ACCORDION VOICE EFFECT VOICE ONE TOUCH SETTING REGISTRATION MEMORY MIC EFFECT RESET VOCAL HARMONY MIC SETTING V...

Page 48: ...selection 151 HELP LCD BRIGHTNESS settings 149 FUNCTION MIDI MIDI settings 145 DIRECT ACCESS Exit from the Direct Access mode BALANCE MIXING CONSOLE SONG PART VOLUME VOICE VOLUME settings 122 CHANNEL ON OFF VOICE settings NEXT BACK VOICE PART MAIN MIXING CONSOLE TUNE OCTAVE settings 123 LAYER LEFT MUSIC FINDER MUSIC FINDER MUSIC FINDER SEARCH1 Searching the records 34 EXIT Return to the MAIN displ...

Page 49: ...ed Help topic 2 2 Call up the topic Select the Language if necessary The language selected here are also used for various Messages shown during operations Help messages can be displayed in any one of the following languages ENGLISH JAPANESE GERMAN FRENCH SPANISH ITALIAN When two or more pages available use this to select different pages Help messages also feature links to the detailed explanation ...

Page 50: ... all be changed page 148 Adjusting the Tempo USER ENTER EXIT BALANCE FUNCTION HELP MENU DEMO SOUND CREATOR DIGITAL RECORDING MIXING CONSOLE DIGITAL STUDIO DIRECT ACCESS PART CHANNEL ON OFF FREEZE MEMORY DATA ENTRY ORGAN FLUTES STRINGS CHOIR PAD GUITAR MAIN BACK NEXT LEFT MUSIC FINDER LAYER I F J G H D A E B C BASS PIANO HARPSI E PIANO XG UPPER OCTAVE WOODWIND PERCUSSION VARIATION MONO TOUCH SUSTAI...

Page 51: ...ped While a song is set to Sync Start stand by page 60 76 tapping the TAP TEMPO button starts the song playback in the same manner For songs and styles in 2 4 and 4 4 time tap four times for 3 4 time tap three times for 5 4 time tap five times TEMPO TAP TEMPO RESET Tap the TAP TEMPO button twice to change the tempo 1 Playback the song or the accompaniment style page 59 76 2 Indicates the default i...

Page 52: ...N MAX FADE IN OUT TEMPO STOP TAP TEMPO RESET NEW SONG SYNC START SONG STYLE MARCH WALTZ METRO NOME EXTRA TRACKS STYLE R L TRACK 2 TRACK 1 REPEAT SWING JAZZ MULTI PAD STYLE CONTROL MASTER VOLUME PART FUNCTION HELP MENU DEMO BACK NEXT I F J G H D A E B C 8 1 2 3 4 5 6 7 FUNCTION HELP MENU DEMO 2 3 Press one of these buttons twice once to select the desired demo and once again to start it 2 2 Use the...

Page 53: ...rts playing Select the desired word or item by using the DATAENTRY dial then press the ENTER button or number buttons 1 2 etc to call it up Use the BACK NEXT buttons in the introduction screen to call up the previ ous or next page n Press the SONG START STOP button to stop the Demo song To start the Demo again from the point at which it was stopped press the SONG START STOP button again Rewind and...

Page 54: ...LAD USER LATIN POP ROCK REC REW FF START STOP TOP BALLROOM DANCE RESET MIN MAX FADE IN OUT TEMPO STOP TAP TEMPO RESET NEW SONG SYNC START SONG STYLE MARCH WALTZ METRO NOME EXTRA TRACKS STYLE R L TRACK 2 TRACK 1 REPEAT SWING JAZZ MULTI PAD STYLE CONTROL MASTER VOLUME PART USER ORGAN FLUTES STRINGS CHOIR PAD GUITAR BASS PIANO HARPSI E PIANO XG WOODWIND PERCUSSION SYNTH BRASS ORGAN ACCORDION VOICE Se...

Page 55: ...signed keys Keep in mind that even though different kits feature different sounds some same named sounds in different kits are identical Refer to the separate Data List Drum key Assignment List for a listing of the sounds in each drum SFX kit END EXIT 4 Play the keyboard to hear the selected voice Press this to return to the MAIN display BACK NEXT I F J G H D A E B C 8 1 2 3 4 5 6 7 3 3 Select the...

Page 56: ...ECT TALK OVER SIGNAL 8 1 2 3 4 5 6 7 TRANSPOSE ACMP STANDBY ON INTRO START STOP MAIN ENDING rit AUTO FILL IN OTS LINK SYNC STOP SYNC START BREAK BALLAD USER LATIN POP ROCK REC REW FF START STOP TOP BALLROOM DANCE RESET MIN MAX FADE IN OUT TEMPO STOP TAP TEMPO RESET NEW SONG SYNC START SONG STYLE MARCH WALTZ METRO NOME EXTRA TRACKS STYLE R L TRACK 2 TRACK 1 REPEAT SWING JAZZ MULTI PAD STYLE CONTROL...

Page 57: ...he LAYER and LEFT functions together to create a combi nation layer split To do this set separate voices for the left and right sections of the keyboard as indicated and set up a layer of two different voices on the right EXIT END Press this to return to the MAIN display Applying Voice Effects USER ENTER EXIT BALANCE FUNCTION HELP MENU DEMO SOUND CREATOR DIGITAL RECORDING MIXING CONSOLE DIGITAL ST...

Page 58: ...ral richness to the overall accompaniment sound Use the PSR 2000 1000 PITCH BEND wheel to bend notes up roll the wheel away from you or down roll the wheel toward you while playing the keyboard The PITCH BEND wheel is self centering and will automatically return to normal pitch when released The Modulation function applies a vibrato effect to notes played on the keyboard PSR 2000 Moving the MODULA...

Page 59: ... REPEAT SWING JAZZ MULTI PAD STYLE CONTROL MASTER VOLUME PART ACMP INTRO START STOP MAIN ENDING rit AUTO FILL IN OTS LINK SYNC STOP SYNC START BREAK STYLE CONTROL Playing a style BACK NEXT I F J G H D A E B C 8 1 2 3 4 5 6 7 USER ENTER EXIT BALANCE FUNCTION HELP MENU DEMO SOUND CREATOR DIGITAL RECORDING MIXING CONSOLE DIGITAL STUDIO DIRECT ACCESS PART CHANNEL ON OFF FREEZE MEMORY DATA ENTRY ORGAN ...

Page 60: ... selected accompaniment style let ting you try out and use dif ferent accompaniment with the song page 77 Turn ACMP off 3 4 5 6 Sync Start Enabling this lets you start the style simply by playing the keyboard As soon as you play a chord with the auto accompaniment section the style starts For details about chord fingerings refer to page 62 Accompaniment Style Characteristics The accompaniment styl...

Page 61: ... 2 Press the STYLE START STOP button again to stop the rhythm playback END You can also start the rhythm simply by playing a key on the keyboard if Sync Start is enabled turn on the SYNC START button BALANCE PART CHANNEL ON OFF BALANCE display Adjust the output level of the Part Parts played from the keyboard MAIN LAYER LEFT STYLE part Auto Accompaniment section SONG part MIC part MULTI PAD part C...

Page 62: ...ample playing a bass note with your left hand and a chord with your right or by playing a chord with your left hand and a melody note with your right AI FINGERED This mode is basically the same as FINGERED with the exception that less than three notes can be played to indicate the chords based on the previously played chord etc AI FULL KEYBOARD When this advanced auto accompaniment mode is engaged...

Page 63: ... 13 Seventh ninth 79 1 2 3 5 7 or 3 7 2 C79 Seventh add sharp eleventh 7 11 1 2 3 4 5 7 or 1 2 3 4 5 7 C7 11 Seventh add thirteenth 713 1 3 5 6 7 or 3 6 7 C713 Seventh sharp ninth 7 9 1 2 3 5 7 C7 9 Seventh flatted fifth 7 5 1 3 5 7 C7 5 Seventh augmented 7aug 1 3 5 7 C7aug Seventh suspended fourth 7sus4 1 4 5 7 C7sus4 Suspended second sus2 1 2 5 Csus2 Chord Types Recognized in the Fingered Mode E...

Page 64: ...aks If you press the INTRO button you can play back an Intro section while an accompaniment is play ing You can dynamically con trol the level of the accompaniment by how softly or strongly you play the keys in the Auto Accompaniment section of the keyboard page 138 If you press the SYNC START button while an accompaniment is play ing the accompaniment will stop and the PSR 2000 1000 will enter Sy...

Page 65: ...n t stop when the ending is finished If you select a different style while the style is not playing the default tempo for that style is also selected If the accompa niment is playing the same tempo is maintained even if you select a differ ent style When STOP ACMP is set to on and the accompani ment is not playing you can play both chords and bass in the Auto Accom paniment section in the keyboard...

Page 66: ... A short phrase used to add variation to the style ACMP INTRO START STOP MAIN ENDING rit AUTO FILL IN OTS LINK SYNC STOP SYNC START BREAK STYLE CONTROL 1 2 Play the style and switch among the accompaniment sections as they play page 30 31 Fill in patterns play automatically between each change in the Main sections You can also add a fill in by pressing the selected MAIN button again To cancel the ...

Page 67: ...SER LATIN POP ROCK REC REW FF START STOP TOP BALLROOM DANCE RESET MIN MAX FADE IN OUT TEMPO STOP TAP TEMPO RESET NEW SONG SYNC START SONG STYLE MARCH WALTZ METRO NOME EXTRA TRACKS STYLE R L TRACK 2 TRACK 1 REPEAT SWING JAZZ MULTI PAD STYLE CONTROL MASTER VOLUME PART ONE TOUCH SETTING ACMP INTRO START STOP MAIN ENDING rit AUTO FILL IN OTS LINK SYNC STOP SYNC START BREAK STYLE CONTROL ONE TOUCH SETT...

Page 68: ... Settings 1 2 3 and 4 respectively The One Touch Settings can be set to change with the sections in one of two different timings page 138 Immediately when you press a section button At the next measure in an accompaniment style after you press a section button To cancel the OTS Link function press the OTS LINK button again END MEMORY ONE TOUCH SETTING 1 Select a style 2 Set up the panel controls s...

Page 69: ...AZZ MULTI PAD STYLE CONTROL MASTER VOLUME PART MUSIC FINDER I F J G H 8 1 2 3 4 5 6 7 MUSIC FINDER Select a record For example select the top record by pressing the 1 button to call up the recommended setups The setting data shown here is referred to as a record All Show all records FAVORITE Show the records that have added to the Favorite page SEARCH1 2 Show the results by SEARCH function page 70...

Page 70: ...a specific location for searching You can further narrow down your search by using the SEARCH 1 and 2 selections F H CLEAR Clears the entered item at left 1 TEMPO FROM You can also narrow your search by specifying a tempo range This lets you set the minimum tempo for the search Press the buttons simultaneously to instantly reset the tempo value to the minimum 2 TEMPO TO You can also narrow your se...

Page 71: ...ecord The deleted record number becomes empty When you press this button a message appears prompting you to execute abort or cancel the operation YES Press this to clear the record and close the display NO Press this to close the display without clearing the record CANCEL Press this to close the message box and return to the previous display You can also change clear a preset record To avoid chang...

Page 72: ... button to call up the display for inputting the genre name then edit the name as desired A maximum of 200 genre names can be stored The genre name you input becomes effective when the current record is edited overwritten by pressing the 8 OK button or when a new record is registered by pressing the J NEW RECORD button If you exit from the MUSIC FINDER EDIT display without actually editing or regi...

Page 73: ... the STOP button and press the pad or pads you wish to stop 1 Turn ACMP on page 60 2 Play a chord with your left hand and press any of the Multi Pads In this example the phrase for Pad 1 will be transposed into F major before playing back Try playing other chords and pressing the pads Keep in mind that you can also change chords while a pad is playing back Multi Pads Playing the Multi Pads Simply ...

Page 74: ... Multi Pad settings from one Multi Pad bank to another Multi Pad Edit I F J G H D A E B C 8 1 2 3 4 5 6 7 Select the desired Multi Pad s The same as the Open Save display on pages 41 and 44 Calls up the upper level directory page Open Save display for Multi Pads page 38 ...

Page 75: ...al MIDI file format USER ENTER EXIT BALANCE FUNCTION HELP MENU DEMO SOUND CREATOR DIGITAL RECORDING MIXING CONSOLE DIGITAL STUDIO DIRECT ACCESS PART CHANNEL ON OFF FREEZE MEMORY DATA ENTRY ORGAN FLUTES STRINGS CHOIR PAD GUITAR MAIN BACK NEXT LEFT MUSIC FINDER LAYER I F J G H D A E B C BASS PIANO HARPSI E PIANO XG UPPER OCTAVE WOODWIND PERCUSSION VARIATION MONO TOUCH SUSTAIN DSP HARMONY ECHO LEFT H...

Page 76: ...ave the volume automatically fade in and fade out at the beginning and end of the song Simply press the FADEIN OUT button at the start of song playback to fade in the song and press it again at the end of the song to fade out Adjust the tempo by using the TEMPO buttons page 50 or the TAP TEMPO button You can even change the playback speed by tapping out the tempo simply tap the TAP TEMPO button tw...

Page 77: ...ns in place of the song s chord data ACMP button ON AUTO FILL IN button ON 1 Select the song and start playback by pressing the SONG START STOP button 2 Select the desired accompaniment style 3 Start the style by pressing the STYLE START STOP button 4 While the song is playing insert a break or change sections with the STYLE section buttons Fill in patterns play when you switch sections The style ...

Page 78: ...asure this only serves as a refer ence as to how much of the song has been played back Insert the disk shutter side first and label face up REC REW FF START STOP TOP NEW SONG SYNC START During playback you can have the song return to the top and play back again from the beginning by pressing this button When playback is stopped pressing this button returns the song to the beginning Press this butt...

Page 79: ...ou specify which parts are muted when pressing the TRACK 1 TRACK 2 EXTRA TRACKS buttons Repeat Playback of a Specific Range SONG EXTRA TRACKS STYLE R L TRACK 2 TRACK 1 METRO NOME REPEAT START STOP 2 1 Play back the song page 76 78 You can also specify Points A and B when the song is stopped Set Point A by pressing the REPEAT button then use the FF button to move to the desired end location then se...

Page 80: ...ize The displayed notation is generated by the PSR 2000 1000 based on the song data As a result it may not be exactly the same as commercially available sheet music of the same song especially when displaying notation of complicated passages or many short notes n Some song data for the PSR 2000 1000 has been recorded with special free tempo settings For such song data the tempo beat measure and mu...

Page 81: ... below 5 QUANTIZE This gives you control over the note resolution in the notation letting you shift or correct the timing of all displayed notes so that they line up to a particular note value Make sure to select the smallest note value which is used in the song Note resolution 1 4 note 1 8 note 1 16 note 1 32 note 1 4 note triplet 1 8 note triplet 1 16 note triplet 1 32 note triplet When LEFT and...

Page 82: ...feggio according to the scale intervals and as such are relative to the key The root note is indicated as Do For example in the key of G major the root note of Sol would be indicated as Do As with Fixed Do the indication differs depending on the selected language 8 OK This closes the detailed setting display and starts generating the notation You can also execute this by pressing the ENTER button ...

Page 83: ...e used for lyr ics display depends on the particular lyric data If the lyrics are garbled or unreadable you can rem edy this by changing the LYRICS LANGUAGE set ting from the SONG SET TING display page 137 Start the song 4 2 REC REW FF START STOP TOP NEW SONG SYNC START SONG METRO NOME EXTRA TRACKS STYLE R L TRACK 2 TRACK 1 REPEAT REC REW FF START STOP TOP NEW SONG SYNC START SONG METRO NOME EXTRA...

Page 84: ...EGISTRATION MEMORY Registering Panel Setups Registration Memory Keep in mind that songs or styles on disk cannot registered to Registration Memory If you want to register a disk based song or style copy the relevant data to USER in the SONG STYLE display page 38 and register the data separately END I F J G H 8 1 2 3 4 5 6 7 FREEZE MEMORY REGISTRATION MEMORY FREEZE MEMORY REGISTRATION MEMORY 1 Set ...

Page 85: ...egistration Memory preset in the display the related button turns on indicator is red Name This operation is the same as that in Naming Files and Folders page 41 in Basic Operations Organizing Your Data Delete This operation is the same as that in Deleting Files Folders page 43 in Basic Operations Organizing Your Data Keep in mind that the size of the Registration bank files and the memory space t...

Page 86: ...your Registration Memory presets to be called up in sequence in any order you desire Once programmed the presets 1 8 can be selected in sequence with the BACK NEXT buttons or the pedal page 142 FREEZE MEMORY REGISTRATION MEMORY FUNCTION HELP MENU DEMO FREEZE MEMORY REGISTRATION MEMORY FREEZE MEMORY REGISTRATION MEMORY 1 8 1 2 3 4 5 6 7 Select the Freeze settings Enters a checkmark to the selected ...

Page 87: ...TEMPO RESET NEW SONG SYNC START SONG STYLE MARCH WALTZ METRO NOME EXTRA TRACKS STYLE R L TRACK 2 TRACK 1 REPEAT SWING JAZZ MULTI PAD STYLE CONTROL MASTER VOLUME PART SOUND CREATOR DIGITAL STUDIO Operation I F J G H SOUND CREATOR DIGITAL RECORDING MIXING CONSOLE DIGITAL STUDIO PART I F J G H D A E B C 1 Press the F G or H button to select the Part MAIN LAYER or LEFT containing the voice you wish to...

Page 88: ...ONSOLE page 121 EQ HIGH GAIN MIXING CONSOLE page 121 HARMONY ECHO TYPE HARMONY ECHO FUNCTION page 143 HARMONY ECHO VOLUME HARMONY ECHO FUNCTION page 143 HARMONY ECHO SPEED HARMONY ECHO FUNCTION page 143 HARMONY ECHO ASSIGN HARMONY ECHO FUNCTION page 143 HARMONY ECHO CHORD NOTE ONLY HARMONY ECHO FUNCTION page 143 HARMONY ECHO TOUCH LIMIT HARMONY ECHO FUNCTION page 143 Keep in mind that there are ce...

Page 89: ...mum The higher the value the slower the decay RELEASE Determines how quickly the sound decays to silence after the key is released The higher the value the slower the release 8 1 2 3 4 5 6 7 Determines the filter EG and vibrato settings see below In addition to making the sound either brighter or more mellow Filter can be used to produce electronic synthesizer like effects Cutoff frequency Volume ...

Page 90: ...re apply to step 3 on page 87 HARMONY The explanations here apply to step 3 on page 87 The parameters are the same as for HARMONY ECHO display of FUNCTION For details see page 144 VIBRATO Creates a wavering in the sound by periodically chang ing the pitch DEPTH SPEED DELAY Time Level 8 1 2 3 4 5 6 7 Determines the Frequency and Gain of the Low and High EQ bands PSR 2000 only The same as the Mixing...

Page 91: ...sound increasing or decreasing the response time of the initial swell and release based on the FOOTAGE controls The higher the value the slower the swell and release Vibrato Speed VIB SPEED Determines the speed of the vibrato effect controlled by the Vibrato On Off and Vibrato Depth above Mode The MODE control selects between two modes FIRST and EACH In the FIRST mode attack is applied only to the...

Page 92: ...ds USER ENTER EXIT BALANCE FUNCTION HELP MENU DEMO SOUND CREATOR DIGITAL RECORDING MIXING CONSOLE DIGITAL STUDIO DIRECT ACCESS PART CHANNEL ON OFF FREEZE MEMORY DATA ENTRY ORGAN FLUTES STRINGS CHOIR PAD GUITAR MAIN BACK NEXT LEFT MUSIC FINDER LAYER I F J G H D A E B C BASS PIANO HARPSI E PIANO XG UPPER OCTAVE WOODWIND PERCUSSION VARIATION MONO TOUCH SUSTAIN DSP HARMONY ECHO LEFT HOLD SYNTH BRASS O...

Page 93: ...me To record your keyboard performance Press either the TRACK 1 or TRACK 2 button To record the auto accompaniment and multi pad performance Press the EXTRA TRACKS button To stop recording press the REC button again If the LAYER or LEFT but ton is on before pressing the REC button the correspond ing Layer and Left parts are automatically recorded to dif ferent channels The performance of track 1 2...

Page 94: ...ment style CHORD2 Accompaniment style PAD Accompaniment style PHRASE1 Accompaniment style PHRASE2 MIDI 9 Accompaniment style RHYTHM 1 Voice MAIN LAYER LEFT Multi Pad1 Multi Pad2 Multi Pad3 Multi Pad4 Accompaniment style RHYTHM 1 Accompaniment style RHYTHM 2 Accompaniment style BASS Accompaniment style CHORD1 Accompaniment style CHORD2 Accompaniment style PAD Accompaniment style PHRASE1 Accompanime...

Page 95: ...g punch in out function is set to the pedal page 101 5 To stop recording press the REC button again You can also use the foot pedal to stop recording by releasing it if the recording punch in out function has been assigned to the pedal page 101 To pause press the SONG START STOP button To resume recording press the SONG START STOP but ton again You can also use the metro nome click as a guide whil...

Page 96: ...ng Creator display D A E B C 2 Press the DIGITAL RECORDING button 4 Using the BACK NEXT buttons select the 1 16 tab for recording melodies and other parts or select the CHD Chord tab for recording chords and after selecting the 1 16 tab select a record channel with the F CH button BACK NEXT I F J G H 5 Call up the Step Record display by pressing the G button I F J G H Any voice effect and other se...

Page 97: ...This is available only when recording the melody For information on gate time settings see below Each press of this button toggles among the three basic note selectors at the bottom of the display normal dotted and triplet This is available only when recording the melody Deletes the event at the cursor Use these to move the selected event in units of measures BAR beat and clocks For information on...

Page 98: ...e C button to move the cursor to the beginning of the song and press the SONG START STOP button to hear the newly entered notes To actually enter the recorded data press the EXIT button The entered data can be edited from the SONG CREATOR 1 16 display page 105 1 1 1 Select this note 1 3 press this 1 2 While holding down this note 2 2 2 2 3 2 4 2 1 Select this note 3 3 1 Press this button to displa...

Page 99: ...on The operations here apply to step 6 on page 97 Entering Chords and Sections Chord Step For example you can input the following chord progression by the procedure described below C F G F G7 C MAIN A BREAK MAIN B 1 Press the MAIN A button to specify the section and enter the chords as shown at right C F G MAIN A MAIN C F G Select this note value and play the chords indicated at right 001 1 000 00...

Page 100: ...3 Press the MAIN B button to specify the section and enter the chord indicated at right C F G F G7 C MAIN A BREAK MAIN B MAIN C 003 1 000 Select this note value and play the chords indicated at right To enter a fill in press the AUTO FILL IN button and press one of the MAIN A D buttons END Mark An END mark is shown in the display indicating the end of the song data The actual position of the End m...

Page 101: ...d Recording stops when you release the pedal Calls up the SONG display from which you can save the edited data Replace All This deletes all data following the point at which recording is stopped Punch Out This maintains all data following the point at which recording is stopped Punch Out At Overwrite recording continues until the indicated Punch Out measure set by the 6 buttons then stops at that ...

Page 102: ... quantized Selects the quantize size resolution See the below for the details Determines how strongly the notes will be quantized If a value less than 100 is selected notes will be moved toward the specified quantization beats only by the specified amount Applying less than 100 quantization lets you preserve some of the human feel in the recording Executes the Quantize operation After the operatio...

Page 103: ...ndone Calls up the SONG display from which you can save the edited data These select the channel to be deleted I F J G H D A E B C 8 1 2 3 4 5 6 7 Use these to select the desired edit operation Executes the Mix operation After the operation is completed this button changes to UNDO letting you restore the original data if you re not satisfied with the Mix results The Undo function only has one leve...

Page 104: ...Use these to select the desired edit operation Executes the SET UP operation Once SET UP has been executed the operation cannot be cancelled or undone Calls up the SONG display from which you can save the edited data Determines which playback features and functions will be automatically called up along with the selected song All events with the exception of KEYBOARD VOICE can be recorded only at t...

Page 105: ...e Filter display page 107 letting you select only the events you wish to shown in the Event List Calls up the SONG display from which you can save the edited data Holding this button down while using the A and B buttons lets you select multiple events For fine adjustment of the event value Cuts deletes all selected events The cut events are copied and can be pasted to another location Adds a new e...

Page 106: ...m bass etc are turned on off CH Vol Channel volume Determines the level of specific channels rhythm bass etc S Vol Style volume Determines the level of the entire accompaniment style Parameter Description ScBar Score initial measure This determines the number of the top measure The measure number is indicated in the MAIN display or in the music notation PSR 2000 only Only one value can be specifie...

Page 107: ...e lyrics text LF Deletes the currently displayed lyrics and displays the next set of lyrics I F J G H D A E B C 8 1 2 3 4 5 6 7 1 Move the cursor to the event containing the lyric star 3 Use these buttons to call up the Lyric display from which you can input lyrics From the Lyric display page 45 enter the new word your name 4 Press this button to save the newly changed lyric data 2 Move the cursor...

Page 108: ... Style page 112 This convenient feature lets you create composite styles by combining various patterns from the internal preset accompaniment styles For example if you want to create your own original 8 beat style you could take rhythm patterns from the 8 Beat 1 style use the bass pattern from 8 Beat 2 and import the chord patterns from the 60 s 8 Beat style combining the various elements to creat...

Page 109: ...soundable range 7 RTR Retrigger Rule how the pitches of the chord change Output These are the patterns recorded to the accompaniment styles page 116 This data is created by chords played in the Auto Accompaniment section of the keyboard page 62 These settings are edited from the PARAMETER display These parameters determine how the pitch of the source pattern is converted when you play chords in th...

Page 110: ...onveniently indicate the percussion instruments assigned to the keys 3 Stop recording by pressing the STYLE START STOP button again With the REC CHANNEL display shown close the display by pressing the EXIT button If you ve enabled Sync Start by pressing the SYNC START button you can start recording by simply pressing a key on the key board 1 Select the desired channel for recording by simultaneous...

Page 111: ...cutes the Pattern Length change Recording Precautions The basic chord used for the accompaniment style is called the source chord All chords that play and the pitches that sound are derived from the source chord When recording the Main and Fill In sections for a source chord of CM7 keep the following points in mind When recording to the Bass or Phrase channels try to use only the recommended notes...

Page 112: ...k the selected channels Any channels set to ON in the REC CHANNEL display page 110 are played back simultaneously OFF If the selected channel is set to ON in the REC CHANNEL display page 110 OFF does not appear and is not available 1 These let you select the accompaniment style that will be used for each channel of your original style Select the desired channel by pressing the A D F I buttons and ...

Page 113: ... notes the Swing parameter will selectively delay the 2nd 4th 6th and 8th beats of each measure to create a swing feel The settings A through E produce different degrees of swing with A being the most subtle and E being the most pronounced Fine Selects a variety of Groove templates to be applied to the selected section The PUSH settings cause certain beats to be played early while HEAVY settings d...

Page 114: ...ity while values below 100 reduce it I F J G H D A E B C 8 1 2 3 4 5 6 7 Use these to select the desired edit operation Calls up the Style display and lets you store the edited accompaniment style data Executes the Dynamics operation After the operation is completed this button changes to UNDO letting you restore the original data if you re not satisfied with the Dynamics results The Undo function...

Page 115: ... copied from one measure or group of measures to another location within the specified channel Use the 4 TOP and 5 LAST buttons to specify the first and last measures in the region to be copied Use the 6 DEST button to specify the first measure of the destination location to which the data is to be copied Bar Clear This function clears all data from the specified range of measures within the selec...

Page 116: ...e pattern Two settings are available Root Trans Root Transpose When the root note is transposed the pitch relationship between notes is maintained For example the notes C3 E3 and G3 in the key of C become F3 A3 and C4 when they are transposed to F Use this setting for channels that contain melody lines Root Fixed The note is kept as close as possible to the previous note range For example the note...

Page 117: ...limit of the note transposition for the chord root change Any notes calculated to be higher than the highest key are transposed down to the octave just below the highest key This setting is effective only when the NTR parameter page 116 is set to Root Trans Note Limit This sets the note range highest and lowest notes for voices recorded to the style channels By judicious setting of this range you ...

Page 118: ... AUTO FILL IN OTS LINK SYNC STOP SYNC START BREAK BALLAD USER LATIN POP ROCK REC REW FF START STOP TOP BALLROOM DANCE RESET MIN MAX FADE IN OUT TEMPO STOP TAP TEMPO RESET NEW SONG SYNC START SONG STYLE MARCH WALTZ METRO NOME EXTRA TRACKS STYLE R L TRACK 2 TRACK 1 REPEAT SWING JAZZ MULTI PAD STYLE CONTROL MASTER VOLUME PART MULTI PAD STOP Operation SOUND CREATOR DIGITAL RECORDING MIXING CONSOLE DIG...

Page 119: ...ad is played while Style is playing and the Chord Match function for that pad is ON the phrase will be automatically re harmonized to match the accompaniment chords Multi Pad Realtime Recording Record I F J G H D A E B C Select the desired Multi Pad for recording or editing You can also select it by pressing the MULTI PAD 1 to 4 button Selects an empty Multi Pad bank allowing you to create a new M...

Page 120: ...w You can also edit each event from the Edit page and the editing process the same as in editing songs page 105 Just as with Song Recording the End Mark position can be changed freely in the Multi Pad Creator This allows you to finely adjust the phrase length for the Pad This would be convenient for example in synchronizing repeat playback of a Pad set to Repeat On with the keyboard and auto accom...

Page 121: ...J G H D A E B C BASS PIANO HARPSI E PIANO XG UPPER OCTAVE WOODWIND PERCUSSION VARIATION MONO TOUCH SUSTAIN DSP HARMONY ECHO LEFT HOLD SYNTH BRASS ORGAN ACCORDION VOICE EFFECT VOICE ONE TOUCH SETTING REGISTRATION MEMORY MIC EFFECT RESET VOCAL HARMONY MIC SETTING VH TYPE SELECT TALK OVER SIGNAL 8 1 2 3 4 5 6 7 TRANSPOSE ACMP STANDBY ON INTRO START STOP MAIN ENDING rit AUTO FILL IN OTS LINK SYNC STOP...

Page 122: ...the settings 1 2 Each press of this button switches among the various parts channels Use these to select the VOICE PANPOT or VOLUME parameter rows Allows you to select the specific voice to be replaced Keep in mind that using the Revoice function may result in unnatural or unexpected sound depending on the particular song data ALL REVOICE Replaces all of the replaceable XG voices with the rich and...

Page 123: ... of the Voice Filter SOUND CREATOR DIGITAL RECORDING MIXING CONSOLE DIGITAL STUDIO I F J G H D A E B C 8 1 2 3 4 5 6 7 PART Switches between the HARMONIC and BRIGHTNESS parameters HARMONIC Allows you to adjust the resonance effect see Harmonic Content on page 89 BRIGHTNESS Determines the brightness of the sound by adjusting the cutoff frequency page 89 Each press of this button switches among the ...

Page 124: ...termine the effect block and let you assign the effect BLOCK Determines the effect block group of similar or related effects PART Determines the part to which the Insertion effect is applied It is effective only when BLOCK is set to DSP1 DSP PARAMETER is set to CONNECTION and VALUE is set to Insertion or when BLOCK is set to DSP2 4 PSR 2000 CATEGORY The various effect programs in Type below are gr...

Page 125: ...y Determines the effect type Determines the effect parameter to be adjusted Determines the level of the effect return level This is not available when BLOCK is set to DSP1 DSP PARAMETER is set to CONNECTION and VALUE is set to Insertion or when BLOCK is set to DSP2 4 PSR 2000 Determines the value of the selected parameter Calls up the display for naming the User Effect page 45 I F J G H 8 1 2 3 4 ...

Page 126: ... Cho Send DSP Send Unused DSP blocks are automatically assigned to the active parts Rev Send LAYER VOICE Dry Cho Send Rev Send LEFT VOICE Dry Cho Send Rev Send MIC Dry Cho Send DSP Send Rev Send STYLE each channel SONG each channel Dry Cho Send DSP Send CHORUS Master EQ REVERB DRY LINE DSP1 Chorus Return DSP Return Reverb Return DSP1 MIC Effect Vocal Harmony When DSP is set as an Insertion effect ...

Page 127: ...put of your instrument The operations for this page apply to step 2 of the procedure on page 121 Setting the Equalizer EQ PSR 2000 only I F J G H D A E B C I F J G H D A E B C 8 1 2 3 4 5 6 7 Gain Q FREQ FREQ Select the desired Master EQ type Call up the MASTER EQ EDIT display Select the EQ type to adjust the EQ LOW using the 1 8 buttons An edited PRESET or USER curve can be stored to USER 1 or 2 ...

Page 128: ...EFFECT RESET VOCAL HARMONY MIC SETTING VH TYPE SELECT TALK OVER SIGNAL 8 1 2 3 4 5 6 7 TRANSPOSE ACMP STANDBY ON INTRO START STOP MAIN ENDING rit AUTO FILL IN OTS LINK SYNC STOP SYNC START BREAK BALLAD USER LATIN POP ROCK REC REW FF START STOP TOP BALLROOM DANCE RESET MIN MAX FADE IN OUT TEMPO STOP TAP TEMPO RESET NEW SONG SYNC START SONG STYLE MARCH WALTZ METRO NOME EXTRA TRACKS STYLE R L TRACK 2...

Page 129: ...hat is applied I F J G H D A E B C 8 1 2 3 4 5 6 7 Save the changed data page 38 44 The saved settings can be named page 41 or deleted page 43 in the USER page 3 Press the EXIT button to return to the previous display Select a Vocal Harmony type Select a Vocal Harmony parameter Adjust the parameter value Return to the VOCAL HARMONY TYPE display END For details about the Vocal Har mony parameter re...

Page 130: ...nal when the input from the microphone falls below a specified level This effectively cuts off extraneous noise allowing the desired signal vocal etc to pass SW SW is the abbreviation of Switch This turns Noise Gate on or off TH TH is the abbreviation of Threshold This adjusts the input level at which the gate begins to open Making Settings for the Vocal Harmony and Microphone MICROPHONE SETTING B...

Page 131: ... set the balance between the lead vocal your own voice and Vocal Harmony Raising this value increases the volume of the Vocal Harmony and decreases that of the lead vocal When this is set to L H63 L Lead Vocal H Vocal Harmony only the Vocal Harmony is output when it is set to L63 H only the lead vocal is output MODE All of the Vocal Harmony types fall into one of three modes which produce harmony ...

Page 132: ...determines the volume of the microphone sound These set the depth of the reverb and chorus effects applied to the microphone sound This determines the amount of attenuation to be applied to the overall sound excepting the microphone input allowing you to effectively adjust the balance between your voice and the overall instrument sound I F J G H D A E B C 8 1 2 3 4 5 6 7 This turns the DSP effect ...

Page 133: ...he split point Chord Fingering page 139 USER ENTER EXIT BALANCE FUNCTION HELP MENU DEMO SOUND CREATOR DIGITAL RECORDING MIXING CONSOLE DIGITAL STUDIO DIRECT ACCESS PART CHANNEL ON OFF FREEZE MEMORY DATA ENTRY ORGAN FLUTES STRINGS CHOIR PAD GUITAR MAIN BACK NEXT LEFT MUSIC FINDER LAYER I F J G H D A E B C BASS PIANO HARPSI E PIANO XG UPPER OCTAVE WOODWIND PERCUSSION VARIATION MONO TOUCH SUSTAIN DSP...

Page 134: ...he type of Harmony or Echo effect applied to the keyboard played voices as well as the amount of effect Making MIDI Settings System page 145 These determine various system messages settings such as Clock Start Stop System Exclusive as well as Local Control on off Transmit page 146 This determines how playback data is sent to connected MIDI devices i e which parts are assigned to which MIDI Transmi...

Page 135: ... of 440 0 Hz 8 1 2 3 4 5 6 7 Determines the Scale page 136 Determines the note to be tuned and the amount of tuning The tuning range is from 64 through 0 to 63 Each increment equals one cent one cent is one hundredth of a semitone Determines the fine tuning of the selected note in 1 cent steps Press the 5 or 6 buttons simultaneously to instantly reset the value to the factory setting Determines th...

Page 136: ...ry Handel among others used this scale Werckmeister Kirnberger This composite scale combines the Werckmeister and Kirnberger systems which were themselves improvements on the mean tone and Pythagorean scales The main feature of this scale is that each key has its own unique character The scale was used extensively during the time of Bach and Beethoven and even now it is often used when performing ...

Page 137: ...a specifies a certain location in the song data I F J G H D A E B C 8 1 2 3 4 5 6 7 Turns Quick Start on off see note Allows you to play back all songs from the same folder continuously Determines the MIDI channel assigned to the TRACK2 button Determines the MIDI channel assigned to the TRACK1 button When set to ON this automatically sets the proper Track 1 and Track 2 channels Normally this shoul...

Page 138: ...lets you set the length of the key hold time Turns touch response for the accompaniment on off When this is set to ON the accompaniment volume changes in response to your playing strength in the Auto Accompaniment section of the keyboard Determines the default section that is automatically called up when selecting different accompaniment styles when accompaniment is stopped Determines the split po...

Page 139: ...ook that shows you appropriate fingerings for chords it is useful when you want to play certain chords Simply specify the desired chord via the 6 8 buttons and the fingerings for the Fingered method are indicated in the display Making Settings for the Pedals and Keyboard Controller I F J G H D A E B C 8 1 2 3 4 5 6 7 Determines the particular pedal to which a function is to be assigned Determines ...

Page 140: ...TYLE START STOP Same as the STYLE START STOP button TAP TEMPO Same as the TAP TEMPO button SYNCRO START Same as the SYNC START button SYNCRO STOP Same as the SYNC STOP button INTRO Same as the INTRO button MAIN A Same as the MAIN A button MAIN B Same as the MAIN B button MAIN C Same as the MAIN C button MAIN D Same as the MAIN D button FILL DOWN A fill in plays automatically followed by the Main s...

Page 141: ...obally Keep in mind that you can set each voice to a different touch sensitivity TOUCH SENSE For example to play a pipe organ voice most authentically you can set this so that the voice is not affected by touch page 88 8 1 2 3 4 5 6 7 KEYBOARD For this setting Transpose affects the pitch of the keyboard played voices Main Layer and Left and the accompaniment styles SONG For this setting Transpose ...

Page 142: ...is stopped Top The sequence starts again at the beginning Next Bank The sequence automatically moves to the beginning of the next Registration Memory bank in the same folder Indicates the file name of the selected Registration Memory bank Indicates the Registration Memory preset numbers in the order of the current Registration Sequence These move the cursor position in the sequence Replaces the nu...

Page 143: ... settings can be turned on or off independently for each part Normally these should all be set to ON Harmony echo cannot be set for the Layer and Left parts Setting Harmony and Echo 8 1 2 3 4 5 6 7 Determines the Harmony type For details see page 144 Determines the lowest velocity value at which the harmony note will sound This allows you to selectively apply the harmony by your playing strength l...

Page 144: ...eld on the keyboard are played alternately in time with the currently set tempo About the Harmony Assignments AUTO Harmony notes are automatically assigned the MAIN and LAYER parts Multi This automatically assigns the 1st 2nd 3rd and 4th added harmony notes to different parts voices For example if the Main and Layer parts are turned on and the Standard Duet type is selected the note you play on th...

Page 145: ...llowing pages Preset MIDI Templates Factory Set All Parts Transmit all parts including Main Layer and Left Master KBD The PSR 2000 1000 functions as a master keyboard for controlling external tone generators or other devices KBD Style Transmit Upper and Lower keyboard play instead of the individual parts Main Layer Left Song All Transmit channels are set to correspond to the Song channels 1 16 Use...

Page 146: ... Tx TRANSMIT Turns MIDI transmission of MIDI chord exclusive data chord detect root and type ON or OFF CHORD SYS EX Rx RECEIVE Turns MIDI reception of MIDI chord exclusive data generated by external equipment ON or OFF Transmitting MIDI Data Transmit This determines which parts will send MIDI data and over which MIDI channel the data will be sent Data Types in the MIDI TRANSMIT RECEIVE Display Ava...

Page 147: ...e received notes are used as the accompaniment RHYTHM 1 and RHYTHM 2 ACMP BASS The received notes are used as the accompaniment BASS ACMP CHORD1 2 The received notes are used as the accompaniment CHORD 1 and CHORD 2 ACMP PAD The received notes are used as the accompaniment PAD ACMP PHRASE1 2 The received notes are used as the accompaniment PHRASE 1 and PHRASE 2 EXTRA PART1 5 There are five parts s...

Page 148: ... Determines the time it takes for the volume to fade in or go from minimum to maximum range of 0 20 0 seconds Determines the time it takes for the volume to fade out or go from maximum to minimum range of 0 20 0 seconds Determines the time the volume is held at 0 following the fade out range of 0 5 0 seconds 8 1 2 3 4 5 6 7 Determines the level of the metronome sound Determines which sound is used...

Page 149: ... 3 4 5 6 7 Selects the desired parameter for locking unlocking Determines whether the selected parameter is locked checkmarked or unlocked empty PSR 2000 only 8 1 2 3 4 5 6 7 Determines the level of the tap sound Determines the particular sound used for the Tap Start function Any drum or percussion sound in the Standard Kit page 55 can be selected 8 1 2 3 4 5 6 7 Determines the brightness of the b...

Page 150: ...CEL 3 At the Please insert a destination disk and press the OK button prompt eject the source disk and replace it with a blank formatted disk then press OK To abort the operation press CANCEL 4 When the operation is finished or when prompted eject the destination disk Commercially available music data is subject to protection by copyright laws Copying commer cially available data is strictly prohi...

Page 151: ... to access the data properly I F J G H D A E B C 8 1 2 3 4 5 6 7 These call up the corresponding Open Save displays These let you store the corresponding data as files to disk for future recall Pressing each of these buttons calls up the corresponding Open Save display from which you can select the corresponding PRESET page From this PRESET page you can save the relevant data Restores the System S...

Page 152: ... INPUT VOLUME knob located next to the MIC LINE IN jack to set the microphone volume then trying singing into the microphone The volume should be set high enough that the SIGNAL lamp on the top panel lights steadily when you sing but not so high that the OVER lamp lights page 128 Before connecting the PSR 2000 1000 to other electronic compo nents turn off the power to all the components Before tur...

Page 153: ...out connections see What You Can Do With MIDI on page 158 MIDI IN Receives MIDI messages from an external MIDI device MIDI OUT Sends out MIDI messages generated by the PSR 2000 1000 For a general overview of MIDI and how you can effectively use it refer to the following sections What s MIDI page 155 What You Can Do With MIDI page 158 MIDI functions page 145 Use audio cables and adaptor plugs with ...

Page 154: ...ns the compressed driver file mididrv zip After extracting the file execute the installation by double clicking on the Setup exe file in the MidiDrv folder and follow the on screen directions In addition you can download this driver from the XG Library on the Yamaha Web site http www yamaha xg com You ll need an appropriate music MIDI software program such as a sequencer compatible with your compu...

Page 155: ...r and connect the UX256 UX96 to the PSR 2000 1000 with a MIDI cable Set the HOST SELECT switch on the PSR 2000 1000 to MIDI For details refer to the owner s manual of the UX256 UX96 For details about the necessary MIDI settings for computer and sequence software you are using refer to the relevant owner s manuals What s MIDI Let s consider an acoustic piano and a classical guitar as representative...

Page 156: ...g back the song data using a tone generator capable of accurately producing various instrument sounds including that of a piano Looked at in another way the relation of the sequencer and the tone generator is similar to that of the pianist and the piano one plays the other Since digital instruments handle playback data and the actual sounds independently we can hear our piano performance played by...

Page 157: ...ent sends MIDI data on a specific MIDI channel MIDI Transmit Channel via a single MIDI cable to the receiving instrument If the receiving instrument s MIDI channel MIDI Receive Channel matches theTransmit Channel the receiving instrument will sound according to the data sent by the transmitting instrument For example several tracks channels can be transmitted simultaneously including the style dat...

Page 158: ... can playback the data recorded by PSR 2000 1000 and whether or not the PSR 2000 1000 can playback commercially available song data or song data created for other instruments or on a computer Depending on the MIDI device or data characteristics you may be able to play back the data without any problem or you may have to perform some special operations before the data can be played back If you run ...

Page 159: ...is Yamaha s original style file format which uses a unique conversion system to provide high quality automatic accompaniment based on a wide range of chord types Voice Allocation Format With MIDI voices are assigned to specific numbers called program numbers The numbering standard order of voice allocation is referred to as the voice allocation format Voices may not play back as expected unless th...

Page 160: ...ormation on the maximum polyphony Accompaniment style or Song playback does not start MIDI Clock may be set to EXTERNAL Make sure this is set to INTERNAL page 146 Make sure to press the appropriate START STOP button To play an accompaniment style press the STYLE START STOP button page 61 to playback a song press the SONG START STOP button page 76 New Song a blank song has been selected Make sure t...

Page 161: ...ted or received via the MIDI terminals even when MIDI cables are connected properly Make sure the HOST SELECT switch is set to MIDI page 155 The MIDI terminals cannot be used for the other switch settings When a voice is changed the previously selected effect is changed Each voice has its own suitable preset values which are automatically recalled when the corresponding Voice Set parameters are tu...

Page 162: ...eset 3 User DSP2 3 4 88 Preset 10 User Master EQ 5 Preset 2 User Part EQ 27 Parts Vocal Harmony 49 Preset 10 User Accompaniment Style Number of Accompaniment Styles 181 169 Number of Session Styles 4 Disk 28 styles included in the accessory disk Fingering Single Finger Fingered Fingered On Bass Multi Finger AI Fingered Full Keyboard AI Full Keyboard Style Creator OTS One Touch Setting 4 Accompanim...

Page 163: ...rean Mean Tone Werckmeister Kirnberger Arabic 1 2 Touch Response 5 level Jacks Connectors DC IN PHONES MIDI OUT IN TO HOST HOST SELECT SW FOOT PEDAL1 SWITCH FOOT PEDAL2 AUX OUT LEVEL FIXED L R OUTPUT L L R MIC INPUT VOLUME MIC LINE Pedal Functions VOLUME SUSTAIN SOSTENUTO SOFT GLIDE PORTAMENTO PITCHBEND MODULATION DSP VARIATION SONG START STOP STYLE START STOP etc Amplifiers Speakers Amplifiers 12...

Page 164: ...ge the Rhythmic Feel 113 Changing Pitch related Settings 123 Changing the Automatically Selected Voice Settings 143 Changing the Icon 46 Changing the Tone of the Voice 123 Changing the Touch Sensitivity Modulation and Transpose 141 Channel 61 78 102 115 137 Channel Messages 157 Channel Muting 61 CHANNEL ON OFF 61 78 CHANNEL ON OFF button 19 61 78 Channel Transpose 104 CHD 106 Chord 94 Chord Detect...

Page 165: ... Preference 151 EQ 121 127 EQ High Organ Flutes 91 EQ Low Organ Flutes 91 Equal Temperament 136 ESEQ 159 Example Keyboard Data 157 EXIT button 19 40 exit from small pop up windows 40 Expand Compress 114 EXTRA TRACKS STYLE button 18 79 F Fade In Time Fade Out Time Fade Out Hold Time 148 FADE IN OUT button 18 65 FAVORITE 71 FF button 18 78 File 39 File Folder related Operations 41 Files folders in a...

Page 166: ...I OUT 153 MIDI Receive Parts 147 MIDI SET UP 151 MIDI terminals 153 154 Mix 103 MIXING CONSOLE button 18 121 Mode Organ Flutes 91 MODULATION 18 58 141 MONO button 19 58 MONO POLY Sound Creator 88 Moving Files Folders 42 MULTI FINGER 62 MULTI PAD 1 4 buttons 18 73 Multi Pads 14 Multi Recording 94 MUSIC FINDER button 15 19 33 69 Music Finder Record Edit 71 Music Finder Search 70 Music Stand 17 Mutin...

Page 167: ...etting 68 REGISTRATION EDIT display 85 Registration Memory 84 REGISTRATION MEMORY 1 8 buttons 19 84 REGISTRATION MEMORY CONTENTS 84 Registration Sequence 142 Regular Voice Parameters 88 RELEASE 89 Remove Event 115 Repeat Playback of a Specific Range 79 REPEAT button 18 79 Replace 71 Resonance 89 Response RESP Organ Flutes 91 Restoring the Factory programmed Settings of the PSR 2000 1000 151 Reverb...

Page 168: ...OTAL VOLUME ATTENUATOR MIC 132 TOUCH LIMIT HARMONY 90 TOUCH SENSE Sound Creator 88 TOUCH button 19 57 TRACK 1 R button 18 79 TRACK 2 L button 18 79 Transmit 146 Transmit Clock 146 Transmitting MIDI Data 146 TRANSPOSE E buttons 18 141 Transpose Assign 141 Tune 123 TUNING 123 Tuning the Overall Pitch 135 TYPE HARMONY 90 U UPPER OCTAVE button 19 58 USER drive 39 USER EFFECT Function 151 User Effect M...

Page 169: ... assistance You may also contact Yamaha directly at the address provided below 2 Deliver the unit to be serviced under warranty to the retailer selling the product an authorized service center or toYamaha with an explanation of the problem Please be prepared to provide proof purchase date sales receipt credit card copy etc when requesting service and or parts under warranty 3 Shipping and or insur...

Page 170: ... regula tions does not guarantee that interference will not occur in all installations If this product is found to be the source of interference which can be determined by turning the unit OFF and ON please try to eliminate the problem by using one of the following measures Relocate either this product or the device that is being affected by the interference Utilize power outlets that are on diffe...

Page 171: ... Navarinou Street 13 P Code 10680 Athens Greece Tel 01 364 7111 SWEDEN Yamaha Scandinavia AB J A Wettergrens Gata 1 Box 30053 S 400 43 Göteborg Sweden Tel 031 89 34 00 DENMARK YS Copenhagen Liaison Office Generatorvej 8B DK 2730 Herlev Denmark Tel 44 92 49 00 FINLAND F Musiikki Oy Kluuvikatu 6 P O Box 260 SF 00101 Helsinki Finland Tel 09 618511 NORWAY Norsk filial av Yamaha Scandinavia AB Grini Næ...

Page 172: ...Division Yamaha Corporation 2001 Yamaha Corporation AP 02B0 Printed in Indonesia Yamaha PK CLUB Portable Keyboard Home Page English only http www yamahaPKclub com Yamaha Manual Library English versions only http www2 yamaha co jp manual english ...

Reviews: