background image

4

 Es

Conectar los altavoces

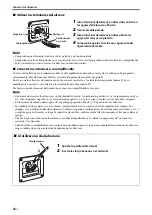
Utilizar los terminales del altavoz

• Compruebe que el terminal sujete los cables pelados y no la parte aislada.
• Compruebe que los cables pelados no se toquen entre ellos, de lo contrario podrían dañar el altavoz o el amplificador.
• Si las conexiones no son correctas, los altavoces no emitirán sonido.

Conectar los altavoces a un amplificador

Conecte cada altavoz a los terminales de altavoz del amplificador adecuados a través de los cables que ha preparado 
anteriormente. Para obtener más detalles, consulte“Diagrama de conexión” (página 3).
En el caso de los altavoces de sonido envolvente, conecte un altavoz a los terminales izquierdos (marca L) de su 
amplificador o receptor y otro altavoz a los terminales derechos (marca R).
Por favor, consulte el manual del usuario que venía con su amplificador o receptor.

• Cerciórese de conectar los altavoces con la polaridad correcta - los terminales positivos (+) a los terminales positivos 

(+), y los terminales negativos (–) a los terminales negativos (–). Si los cruza, el sonido no será natural y sin graves.

• En los ajustes de tamaño del receptor AV, especifique pequeño o Small (o “S”) para todos los altavoces.
• La unidad podría averiarse si se escucharan continuamente ciertos sonidos en el nivel máximo de volumen. Por 

ejemplo, si se escuchan ondas sinusoidales con el disco de prueba, sonidos graves de instrumentos electrónicos, etc.; o 
cuando la aguja del tocadiscos toque la superficie de un disco, reduzca el nivel de volumen para evitar que se dañe el 
equipo.

• Una vez haya conectado todos los altavoces, enchufe el amplificador y los demás componentes AV en tomas de 

corriente CA adecuadas.

• Cuando utilice un amplificador con una potencia de salida superior a la potencia nominal de entrada de los altavoces, 

tenga cuidado de no superar la entrada máxima de los altavoces.

Positivo (+)

Negativo (–)

Aflojar

Apretar

Cable pelado

1

Gire el terminal del altavoz en dirección contraria a 
las agujas del reloj para aflojarlo.

2

Inserte el cable pelado.

3

Gire el terminal del altavoz en dirección de las 
agujas del reloj para apretarlo.

4

Compruebe que la conexión sea segura tirando 
ligeramente del cable.

Recubrimient
o aislante

Al utilizar una clavija banana

Nota

Nota

1

Apriete la perilla del terminal.

2

Inserte la clavija banana en el terminal.

2

1

Clavija banana

Summary of Contents for NS-P350

Page 1: ...Speaker Package Package Enceintes NS P350 NS PC350 NS PB350 G Owner s Manual Mode d emploi Bedienungsanleitung Manual De Instrucciones Инструкция По Эксплуатации English Français Deutsch Español Русский ...

Page 2: ...uld be taken not to exceed the maximum input of the speakers 11 Do not attempt to clean the speakers with chemical solvents as this might damage the finish Use a clean dry cloth 12 Do not attempt to modify or fix the speakers Contact qualified Yamaha service personnel when service is needed The cabinet should never be opened for any reason 13 Secure placement or installation is the owner s respons...

Page 3: ...ptimize the sound quality at your listening position Refer to the illustration Placing the speakers too close to a CRT type TV may impair the picture color or cause a buzzing noise In this case move the speakers at least 20 cm 8 away from the TV This is not an issue with LCD and plasma TVs Place the two front speakers commercially available on the left and right sides of the TV facing directly for...

Page 4: ... not install the speaker on a wall using nails adhesives or any other unstable hardware Long term use and vibration may cause it to fall Be careful not to pinch the speaker cables between the speaker and the speaker bracket or speaker stand To avoid accidents resulting from tripping over loose speaker cable affix them securely to the wall When using speaker brackets commercially available to mount...

Page 5: ...r roll up excess cable Twist the bare wires tightly so the individual strands are not splayed Be careful not to injure yourself while preparing the speaker cables Connecting the speakers Note Connection diagram Center speaker Amplifier Receiver Front speakers Note The exact layout of the speaker terminals depends on your amplifier Surround speakers Right Left Right Left 15 mm 5 8 1 Remove about 15...

Page 6: ...unnatural and lack bass In your AV receiver s speaker size settings specify small or S for all of the speakers The speaker may be damaged if certain sounds are continuously output at high volume level For example if sine waves from a test disc bass sounds from electronic instruments etc are continuously output or when the stylus of a turntable touches the surface of a disc reduce the volume level ...

Page 7: ...netic shielding type Driver Woofer 13 cm 5 cone type x 2 Tweeter 3 cm 1 aluminum dome type Impedance Nominal 6 Ω Frequency response 58 Hz 45 kHz 10 dB 100 kHz 30 dB Nominal input power 100 W Maximum input power 200 W Sensitivity 90 dB 2 83 V 1 m Crossover frequency 2 8 kHz Dimensions W x H x D 500 x 174 x 202 mm 19 5 8 x 6 7 8 x 8 Weight 6 3 kg 13 lbs 14 oz Surround speakers NS PB350 Type 2 way ba...

Page 8: ...eut endommager leur finition Utilisez un chiffon sec et propre 12 Ne tentez pas de modifier les enceintes ni de les réparer Consultez le service Yamaha compétent si une réparation est nécessaire Pour quelque raison que ce soit ne démontez pas la menuiserie des enceintes 13 La détermination d un endroit convenable est de votre responsabilité Yamaha ne saurait être responsable des accidents provoqué...

Page 9: ...lité sonore dans votre position d écoute Référez vous à l illustration Si des enceintes sont trop près d un téléviseur à écran cathodique la couleur de l image peut s en ressentir et cela peut générer un bourdonnement Dans ce cas éloignez les enceintes d au moins 20 cm du téléviseur Les téléviseurs à écran LCD ou plasma ne posent aucun problème Placez les deux enceintes avant disponibles sur le ma...

Page 10: ...les enceintes au mur à l aide de clous de ruban adhésif ou d autres matériaux instables Une utilisation prolongée et les vibrations pourraient en causer la chute Veillez à ne pas coincer les câbles d enceinte entre l enceinte et l applique ou le support d enceinte Afin d éviter des accidents causés par un trébuchage sur des câbles d enceinte éparpillés fixez les au sol Quand vous utilisez les supp...

Page 11: ...e câble Torsadez étroitement les extrémités dénudées afin que les brins individuels ne soient pas éparpillés Veillez à ne pas vous blesser durant la préparation des câbles d enceintes Connexion des enceintes Remarque Diagramme de raccordement Enceinte Centrale Amplificateur Récepteur Enceintes avant Remarque La disposition exacte des bornes des enceintes dépend de votre amplificateur Enceintes Sur...

Page 12: ...epteur AV d enceintes spécifiez small ou S pour toutes les enceintes L enceinte peut être endommagée si certains sons sont continuellement émis à un niveau sonore élevé Par exemple si des ondes sinusoïdales d un disque d essai des sons de graves d instruments électroniques etc sont émis en continu ou si la pointe de lecture d une platine touche la surface d un disque réduisez le niveau de volume p...

Page 13: ...ension acoustique à 2 voies blindage non magnétique Excitateur Haut parleur grave 13 cm de type cône de type x 2 Haut parleur aigu Dôme en aluminium de 3 cm Impédance Nominale 6 Ω Réponse en fréquence 58 Hz 45 kHz 10 dB 100 kHz 30 dB Puissance d entrée nominale 100 W Puissance d entrée maximale 200 W Sensibilité 90 dB 2 83 V 1 m Fréquence de transfert 2 8 kHz Dimensions L x H x P 500 x 174 x 202 m...

Page 14: ... Falls Sie einen Verstärker mit einer Nennausgangsleistung verwenden die höher als die Nennbelastbarkeit der Lautsprecher ist dann ist Vorsicht geboten damit der maximal zulässige Eingang der Lautsprecher nicht überschritten wird 11 Reinigen Sie die Lautsprecher niemals mit chemischen Lösungsmittel da sonst das Finish beschädigt werden kann Verwenden Sie ein sauberes trockenes Tuch 12 Versuchen Si...

Page 15: ...ie in der nebenstehenden Abbildung Wenn sich eine Box zu nahe bei einem Fernseher mit Bildröhre befindet wird eventuell dessen Bild gestört Umgekehrt könnte er einen Brummton erzeugen Wenn das bei Ihnen der Fall ist müssen Sie die Boxen mindestens 20 cm vom Fernseher entfernt aufstellen Bei Fernsehern mit LCD oder Plasmabildschirm tritt dieses Problem nicht auf Stellen Sie die beiden im Fachhandel...

Page 16: ...digt werden oder jemanden verletzen Versuchen Sie niemals die Lautsprecher an Nägeln aufzuhängen bzw mit Klebemitteln oder anderen instabilen Behelfslösungen zu befestigen Nach einer gewissen Nutzungsdauer können die Vibrationen dazu führen dass ein so angebrachter Lautsprecher herunterfällt Achten Sie darauf nicht die Lautsprecherkabel zwischen Lautsprecher und Lautsprecherbügel oder Lautsprecher...

Page 17: ...len Sie die Adern so fest wie möglich sodass keine Drähtchen mehr überstehen Gehen Sie beim Vorbereiten der Kabel vorsichtig vor damit Sie sich nicht verletzen Anschließen der Lautsprecher Hinweis Anschlussschema Center Lautsprecher Verstärker Receiver Frontlautsprecher Hinweis Die Anordnung der Lautsprecheranschlüsse richtet sich nach dem verwendeten Verstärker Surround Lautsprecher Rechts Links ...

Page 18: ...tsprecherparametern des AV Receivers für alle verwendeten Lautsprecher das kleine Modell bzw S Die Lautsprecher können beschädigt werden wenn bestimmte Töne kontinuierlich bei einem hoch eingestellten Lautstärkepegel wiedergegeben werden Wenn zum Beispiel Sinuswellen von einer Test CD Tiefbassfrequenzen von elektronischen Instrumenten o ä kontinuierlich ausgegeben werden sollte der Lautstärkepegel...

Page 19: ... immer nur den Rahmen anfassen nicht aber an seiner Oberfläche ziehen oder drücken Center Lautsprecher NS PC350 Typ 2 Wege Acoustic Suspension Technik ohne magnetische Schirmung Treiber Tieftöner 13 cm Konus Bauform x 2 Hochtöner 3 cm Aluminium Kalotte Bauform Impedanz Nominal 6 Ω Frequenzgang 58 Hz 45 kHz 10 dB 100 kHz 30 dB Nenneingangsleistung 100 W Max Eingangsleistung 200 W Empfindlichkeit 90...

Page 20: ...ntrada máxima de los altavoces 11 No limpie los altavoces con disolventes químicos porque podría dañar el acabado Utilice un paño limpio y seco 12 No intente modificar o arreglar los altavoces Póngase en contacto con el personal de servicio de Yamaha cuando necesite hacer reparaciones No abra la caja bajo ninguna circunstancia 13 El propietario es el responsable de que la colocación o la instalaci...

Page 21: ...ubicaciones que optimicen la calidad de sonido en la posición de audición Consulte la ilustración Si sitúa los altavoces demasiado cerca de un televisor TRC afectaran al color de la imagen o provocarán un zumbido En ese caso aleje los altavoces del televisor como mínimo 20 cm Esto no sucede con los televisores de plasma o LCD Coloque los dos altavoces frontales a la venta en los laterales derecho ...

Page 22: ... personales No fije los altavoces en una pared utilizando clavos adhesivos o material poco seguro La utilización prolongada y las vibraciones podrían causar que los altavoces se cayeran Tenga cuidado de no pillar los cables del altavoz entre éste y el soporte o el pedestal para altavoz Para evitar tropezar con los cables de los altavoces fíjelos en la pared Cuando utilice soportes para altavoces a...

Page 23: ...nte Trence los cables pelados firmemente para que los filamentos individuales no se separen Procure no lesionarse cuando prepare los cables de altavoz Conectar los altavoces Nota Diagrama de conexión Altavoz central Amplificador Receptor Altavoces frontales Nota La distribución exacta de los terminales del altavoz depende del amplificador Altavoces Surround Derecha Izquierda Derecha Izquierda 15 m...

Page 24: ...graves En los ajustes de tamaño del receptor AV especifique pequeño o Small o S para todos los altavoces La unidad podría averiarse si se escucharan continuamente ciertos sonidos en el nivel máximo de volumen Por ejemplo si se escuchan ondas sinusoidales con el disco de prueba sonidos graves de instrumentos electrónicos etc o cuando la aguja del tocadiscos toque la superficie de un disco reduzca e...

Page 25: ...do no magneticamente Controlador Graves Altavoz con cono de 13 cm x 2 Agudos Altavoz con bóveda de aluminio de 3 cm Impedancia nominal 6 Ω Respuesta de frecuencia 58 Hz 45 kHz 10 dB 100 kHz 30 dB Potencia nominal 100 W Potencia nominal de entrada máxima 200 W Sensibilidad 90 dB 2 83 V 1 m Frecuencia de cruce 2 8 kHz Dimensiones An x Al x Pr 500 x 174 x 202 mm Peso 6 3 kg Altavoces Surround NS PB35...

Page 26: ...илителя номинальная выходная мощность которого выше чем номинальная входная мощность колонок будьте внимательны чтобы не допустить превышения максимальной входной мощности колонок 11 Не применяйте химические растворители для очистки колонок так как это может привести к разрушению покрывающего слоя Используйте чистую сухую ткань 12 Не пытайтесь модифицировать или ремонтировать колонки При необходим...

Page 27: ...о качества звука в зоне прослушивания См рисунок Размещение колонок слишком близко к телевизору с электронно лучевой трубкой может привести к ухудшению качества изображения или привести к появлению жужжания В таком случае разместите колонки на расстоянии по крайней мере 20 см от телевизора Данная проблема не является характерной для плазменных и ЖК телевизоров Установите две центральные колонки им...

Page 28: ...те колонки на стене с помощью гвоздей клея или неустойчивого оборудования Продолжительное использование и вибрация могут привести к падению колонок Соблюдайте осторожность чтобы не защемить кабели между динамиком и кронштейном или подставкой Чтобы предотвратить несчастные случаи вызванные спотыканием о незакрепленные кабели колонок зафиксируйте кабели на стене При креплении колонок на стену или по...

Page 29: ...а необходимо плотно скрутить так чтобы отдельные жилы не выступали наружу Во избежание травм соблюдайте осторожность при подготовке кабелей Подключение колонок Схема подключения Примечание Центральная колонка Усилитель ресивер Фронтальные колонки Примечание Точное расположение клемм колонок зависит от используемого усилителя Колонки объемного звучания Правая сторона Левая сторона Правая сторона Ле...

Page 30: ...ческой системы AV ресивера укажите малый размер или S для всех колонок Длительное воспроизведение определенных звуков на большой громкости может повредить колонки Например при длительном воспроизведении синусоидального сигнала с тестового диска низких частот электронных инструментов и т д а также при касании иглы проигрывателя поверхности пластинки понижайте уровень громкости во избежание поврежде...

Page 31: ...етром 13 см x 2 ВЧ динамик Алюминиевый купольного типа диаметром 3 см Номинальный импеданс 6 Ω Частотная характеристика 58 Гц 45 кГц 10 дБ 100 кГц 30 дБ Номинальная входная мощность 100 Вт Максимальная входная мощность 200 Вт Чувствительность 90 Вт 2 83 В 1 м Частота разделения канало 2 8 кГц Габаритные размеры Ш x В x Г 500 x 174 x 202 мм Масса 6 3 кг Колонки объемного звучания NS PB350 Type Двух...

Page 32: ...Printed in Indonesia ZU72690 2015 Yamaha Corporation ...

Reviews: