background image

E-

2

WARNING

This speaker weighs 5.0 kg (11 lbs.). Do not mount it
on thin plywood or a wall with soft surface material. If
mounted, the screws may come out of the flimsy
surface and the speaker may fall. This damages the
speaker or causes personal injury.

Do not install the speaker to a wall with nails,
adhesives, or any other unstable hardware. Long-
term use and vibrations may cause it to fall.

To avoid accidents resulting from tripping over loose
speaker cable, fix it to the wall.
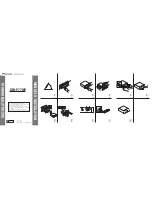
To mount the speaker on a wall by using
the attached mounting bracket

Fasten screws into a firm wall or wall support as shown
in the figure, and hang the holes of the mounting
bracket on the protruding screws.
* Make sure that the screws are securely caught by the

narrow parts of the holes.

Wall/ wall
support

Tapping screw (3.5–4 mm)
(Available at the hardware
store)

40 mm

Min.
20 mm

3 mm

You can also use the screw holes on the rear of the
speaker for installing the speaker using a commericially
available speaker bracket (if you do not use the attached
mounting bracket).

Screw holes

Diameter: 4 mm
Hole depth: 12 mm

60 mm

NS-M515 ENG(02.08.21)a

02.8.21, 8:40 PM

2

Summary of Contents for NS-M515

Page 1: ...er allow your amplifier to be driven into clipping Otherwise the speaker may be damaged When using an amplifier with a rated output power higher than the nominal input power of the speaker care should be taken never to exceed the speaker s maximum input Do not attempt to clean the speaker with chemical solvents as this might damage the finish Use a clean dry cloth Do not attempt to modify or fix t...

Page 2: ...o the wall To mount the speaker on a wall by using the attached mounting bracket Fasten screws into a firm wall or wall support as shown in the figure and hang the holes of the mounting bracket on the protruding screws Make sure that the screws are securely caught by the narrow parts of the holes Wall wall support Tapping screw 3 5 4 mm Available at the hardware store 40 mm Min 20 mm 3 mm You can ...

Page 3: ...e not to reverse the polarity If one speaker is connected with reversed polarity the sound will be unnatural and lack bass How to connect 1 Loosen the knob 2 Remove the insulation coating at the extremity of each speaker cable by twisting the coating off 3 Insert the bare wire 4 Tighten the knob and secure the cables Test the firmness of the connection by pulling lightly on the cables at the termi...

Page 4: ...otice due to product improvements Care should be taken not to exceed the input power values noted above REMOVING THE FRONT COVER The front cover is fastened to the enclosure at four points and can be removed if desired To remove the cover hold on to both sides and slowly pull straight away from the speaker To reattach line up the four holes on the inner surface of the cover with the four correspon...

Page 5: ... R OF GERMANY YAMAHA ELECTRONIQUE FRANCE S A RUE AMBROISE CROIZAT BP70 CROISSY BEAUBOURG 77312 MARNE LA VALLEE CEDEX02 FRANCE YAMAHA ELECTRONICS UK LTD YAMAHA HOUSE 200 RICKMANSWORTH ROAD WATFORD HERTS WD1 7JS ENGLAND YAMAHA SCANDINAVIA A B J A WETTERGRENS GATA 1 BOX 30053 400 43 VASTRA FRÖLUNDA SWEDEN YAMAHA MUSIC AUSTRALIA PTY LTD 17 33 MARKET ST SOUTH MELBOURNE 3205 VIC AUSTRALIA V993880 Printe...

Reviews: