NS-AP8805
4
l
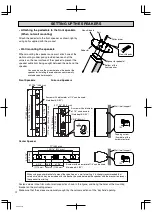
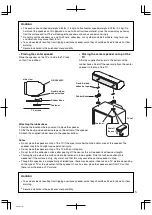
Wall mounting the speakers
When mounting the speakers on a wall, attach one of the
wall mounting rubber pads provided near each of the
corners on the rear surface of the speaker to prevent the
speaker cable from being caught between the wall and the
speaker.
Front Speakers
Surround Speakers
Center Speaker
Fasten screws into a firm wall or wall support as shown in the figure, and hang the holes of the mounting
bracket on the protruding screws.
Make sure that the screws are securely caught by the narrow sections of the “key hole” opening.
SETTING UP THE SPEAKERS
l
Attaching the pedestals to the front speakers
(When not wall mounting)
Attach the pedestal to the front speaker as shown right by
using bolts supplied with the product.
You can also use the screw holes on the back of the
speaker for installing the speakers on commercially
available speaker brackets.
When using speaker brackets to mount the speakers on a wall or ceiling, it is strongly recommended that
safety wire, which may be included with the bracket, be used between the speaker and the bracket to prevent
the speaker from falling.
Non-skid pads
7-
1/
4”
(
18
4
m
m
)
2-3/8” (60 mm)
3-11/16” (93.5 mm)
10
”
(2
54
m
m
)
3-
11
/1
6”
(9
3.
5
m
m
)
1
2
A screw with a diameter
of 1/4” can be used.
(Hole depth: 9/32”)
A screw with a diameter of 1/4” can be used.
(Hole depth: 9/32”)
A screw with a diameter of 1/4” can be used.
(Hole depth: 9/32”)
12-5/16” (312 mm)
17” (432 mm)
4-5/8”
(117.2 mm)
2-3/8”
(60 mm)
4-7/16”
(113.3 mm)
3-11/16” (93.5 mm)
12
-5
/1
6”
(
31
2
m
m
)
17
”
(4
32
m
m
)
4-
5/
8”
(1
17
.2
m
m
)
2-
3/
8”
(6
0
m
m
)
4-
7/
16
”
(1
13
.3
m
m
)
Wall / wall support
Wall / wall support
Tapping screw
(Available at the
hardware store)
Min
1”
7/32”
Min
1”
7/32”
Bottom of the
front speaker
Spacer for pedestal
Pedestal
Non-skid pad
Bolt
Philips driver

