background image

2

.

When placing the speakers, be sure to use the stands to 
increase stability.

Note

The provided stands are in two types. Two stands are for the right 
side and others are for the left side. Attach each stand to the proper 
position on the bottom of the speaker by following the figure 
below.

Use the 8 specified holes located on the base of the speaker.

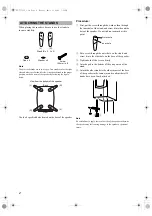
Procedure:

1

First, put the screw through the washer, then through 
the inner hole of the stand, and screw it into the outside 
hole of the speaker. Do not tighten too much at this 
point.

2

Put a screw through the outer hole on the stand, and 
screw it into the other hole on the base of the speaker.

3

Tighten both of the screws firmly. 

4

Attach a pad to the bottom of the end portion of the 
stand.

5

Attach the other stands to the other corners of the base 
of the speaker in the same way and confirm that all 4 
stands have been firmly attached.

Note

Be carefull not to apply force to the side of the speaker, otherwise 
the speaker may fall causing damage to the speaker or personal 
injury.

ATTACHING THE STANDS

(L)             (R)

Stand (R x 2,  L x 2)

Pad x 4

Washer x 4

Screw

(25mm) x 8

Back

(L)

(R)

(R)

(L)

Front

View from the bottom of the speaker 

Outer hole

Inner hole

1

2

05AAGHO2CIG6WGUFC[/CTEJ2/

Summary of Contents for NS-555

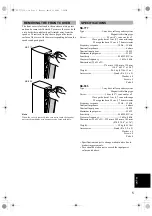
Page 1: ...erwise the speaker may be damaged When using an amplifier with a rated output power higher than the nominal input power of the speaker care should be taken never to exceed the speaker s maximum input Do not attempt to clean the speaker with chemical solvents as this might damage the finish Use a clean dry cloth Do not attempt to modify or fix the speaker Contact qualified YAMAHA service personnel ...

Page 2: ...oo much at this point 2 Put a screw through the outer hole on the stand and screw it into the other hole on the base of the speaker 3 Tighten both of the screws firmly 4 Attach a pad to the bottom of the end portion of the stand 5 Attach the other stands to the other corners of the base of the speaker in the same way and confirm that all 4 stands have been firmly attached Note Be carefull not to a...

Page 3: ... reversed polarity the sound will be unnatural and lack bass How to Connect 1 Remove the insulation coating at the extremity of each speaker cable by twisting the coating off 2 Loosen the terminal knob 3 Insert the bare wire 4 Tighten the knob and secure the cable Test the firmness of the connection by pulling lightly on the cable at the terminal Note Do not let the bare speaker wires touch each o...

Page 4: ...when the speakers are slightly angled in towards the listeners Using as main speakers in a multi channel system Position the speakers on both sides of the TV The positioning of speakers is important because it controls the whole sound quality of a multi channel system Set up the speakers on the basis of your listening position by following the owner s manual supplied with your amplifier Note This ...

Page 5: ...Sensitivity 89 dB 2 83 V m Crossover frequency 1 kHz 4 kHz Dimensions W x H x D 276 mm x 1100 mm x 390 mm 10 9 x 43 3 x 15 4 Weight 24 4 kg 53 lbs 13 oz Accessories Stand R x 2 L x 2 Washer x 4 Screw x 8 Pad x 4 NS 555 Type 3 way bass reflex speaker system Magnetic shielding type Driver 16 cm 6 5 cone woofer x 2 Wave guide horn 13 cm 5 cone mid range Wave guide horn 2 5 cm 1 dome tweeter Frequency...

Page 6: ...B 2 83 V m 交换频率 1 kHz 4 kHz 尺寸 宽 高 深 276 mm 1100 mm 390 mm 重量 24 4 kg 附件 支架 右 2 左 2 垫圈 4 螺丝 8 防滑垫 4 NS 555 种类 3 声道低频反射式扬声器系统 磁屏型 驱动器 16 cm 圆锥低音扬声器 2 波导喇叭 13 cm 圆锥中型 波导喇叭 2 5 cm 穹型低音扬声器 频率响应 35 Hz 至 35 kHz 额定阻抗 6 欧姆 额定输入功率 100 W 最大输入功率 250 W 敏感度 88 dB 2 83 V m 交换频率 1 kHz 4 kHz 尺寸 宽 高 深 222 mm 980 mm 345 mm 重量 20 kg 附件 支架 右 2 左 2 垫圈 4 螺丝 8 防滑垫 4 产品规格若有变动 恕不另行通知 请注意输入功率值不要超过上述值 卸下前盖 NS 777 NS 555 规格 ...

Reviews: