background image

Multi Mode

MOTIF-RACK XS Owner’s Manual

35

Basic Structure

V

oice

Multi

Utility

Ref

erence

The Contr

ols & 

Connector

s

Setting Up 

Listening to 

the Sound

Connections

Using a Computer

Quic

k Guide

Appendix

The Multi mode lets you set up the MOTIF-RACK XS as a multi-timbral tone generator for use with computer-based music software or 
external sequencers. If each track in a song file uses a different MIDI channel, you can independently assign each of the Parts in a 
Multi to those MIDI channels. In this way, you can play back the song data on a sequencer with each track playing a different Voice. 
You can create a Multi containing up to 16 Parts using the internal tone generator. Since there is only one bank for Multi, you need not 
select a Multi Bank. 

n

About the User Bank of Multis

When shipped from the factory, this tone generator contains a full set of specially programmed 128 User Multis in the User Bank. If a Multi in a User Bank is overwritten, 
the User Multi will be lost. When you store the edited Multi, be careful not to overwrite any important User Multis. 

Playing a Multi

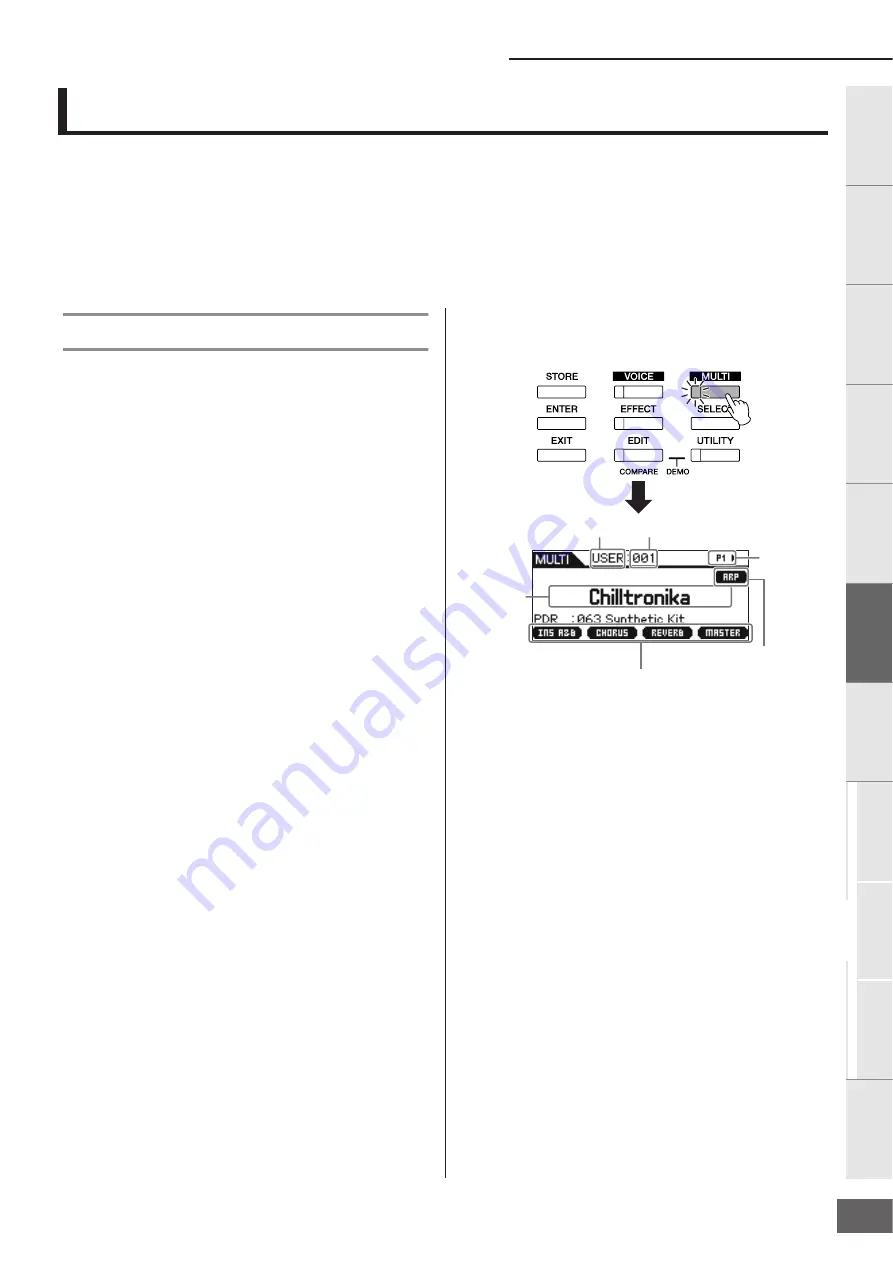
From the Multi Play display in the Multi mode, you can select 
and play any of the Multis. For more details about Multis, see 
page 25. Here, you’ll learn how to play back song files of the 
DAW software on your computer with the MOTIF-RACK XS.

1.

Connect the MOTIF-RACK XS to the computer 
following the instructions on page 17.
 

2.

On the computer, start the DAW software, then open 
the new file. 

Set the MIDI related settings such as MIDI port and MIDI 
transmit channel for each track by following the 
instructions on page 22. 

MIDI port

If you are using the internal tone generator of the MOTIF-
RACK XS, set the MIDI port for each track of the DAW 
software to “1.”

MIDI channel

Match the MIDI transmit channels of the DAW software 
with the receive channels of the Multi Parts. The receive 
channels of the Multi can be set in the Voice display of the 
Multi Part Edit mode (page 94).

For details, refer to the manual of your DAW software. 

3.

On the MOTIF-RACK XS, press the [MULTI] button to 
enter the Multi mode. 

The lamp of the [MULTI] button lights. 

4.

Select a Multi with the Cursor [

L

]/[

M

] buttons and 

Encoder knob, then set the desired parameters for 
each Part. 

Assign the various settings to each Part, such as the 
desired Voice, appropriate MIDI Receive Channels, and 
Effects for optimum playback of the song. For more 
information, refer to page 36

n

When shipped from the factory, the MOTIF-RACK XS contains a full 
set of specially programmed 128 User Multis in the User Bank. If you 
wish to initialize all settings for a selected Multi, press the [ENTER] 
button while holding the [MULTI] button.

n

You can increase the program number by 10 by simultaneously 
holding down the [

L

] button and pressing the [

M

] button. To 

decrease by 10, do the opposite; simultaneously hold down the [

M

button and press the [

L

] button.

5.

Record your song data to the DAW software. 

For details, refer to the owner’s manual of your DAW 
software. 

Multi Mode

Bank

Program number

Part

On/off status for Arpeggio 
Switch (page 91)

Multi name

On/off status for 
each Effect block

Multi Play display

Summary of Contents for Motif-Rack XS

Page 1: ...EN TONE GENERATOR OWNER S MANUAL ...

Page 2: ... a function or effect works when the unit is operating as designed are not covered by the manufacturer s warranty and are therefore the owners responsibility Please study this manual carefully and consult your dealer before requesting service ENVIRONMENTAL ISSUES Yamaha strives to produce products that are both user safe and environ mentally friendly We sincerely believe that our products and the ...

Page 3: ...f this product in a residential environment will not result in harmful interference with other elec tronic devices This equipment generates uses radio frequencies and if not installed and used according to the instructions found in the users manual may cause interference harmful to the operation of other electronic devices Compliance with FCC regulations does This applies only to products distribu...

Page 4: ...any unusual smells or smoke should appear to be caused by it immediately turn off the power switch disconnect the adaptor plug from the outlet and have the instrument inspected by qualified Yamaha service personnel CAUTION Always follow the basic precautions listed below to avoid the possibility of physical injury to you or others or damage to the instrument or other property These precautions inc...

Page 5: ...evice such as a computer Saved data to the flash ROM may be lost due to malfunction or incorrect operation Save important data to external device such as a computer Never attempt to turn off the power while data is being written to Flash ROM while an Executing or Please keep power on message is shown Turning the power off in this state results in loss of all user data and may cause the system to f...

Page 6: ...is NOT for audio visual purpose Do not attempt to play the disk on an audio visual CD DVD player Doing so may result in irreparable damage to your player Note that Yamaha does not offer technical support for the DAW software in the accessory disk About the DAW software in the accessory disk The accessory disk contains DAW software both for Windows and Macintosh n Make sure to install DAW software ...

Page 7: ...l Voices Arpeggio changes harmonically according to the chords you play helping you as you compose or perform Up to four Arpeggios can be running simultaneously and of course in perfect sync Accent feature and Random SFX feature give you even greater expressive realtime control over Arpeggio playback Five Knobs page 29 Comprehensive control with five knobs lets you adjust parameter values in real ...

Page 8: ... illustrations and LCD screens as shown in this owner s manual are for instructional purposes only and may appear somewhat different from those on your instrument This product incorporates and bundles computer programs and contents in which Yamaha owns copyrights or with respect to which it has license to use others copyrights Such copyrighted materials include without limitation all computer soft...

Page 9: ...ice Effects 33 Multi Mode 35 Playing a Multi 35 Editing the Multi 36 Effect settings in the Multi mode 38 Playing four Parts in a layer with a single MIDI keyboard 40 Using the Arpeggio Function 40 What is the Arpeggio function 40 Arpeggio playback 41 Controlling from an External MIDI Keyboard 44 External controllers supported by the MOTIF RACK XS 44 Assigning Control numbers 45 Storing the Edited...

Page 10: ...art n On the Voice Play display and Multi Play display holding down the Cursor L button then pressing the Cursor M button increases the program number by 10 while down the Cursor M button then pressing the Cursor L button decreases the program number by 10 On the Voice Edit display and Multi Edit display holding down the Cursor L button then pressing the Cursor M button moves the cursor to the par...

Page 11: ... next to the currently active parameters will light page 30 When the Knob Sel Disp Sw parameter page 99 is set to on in the General display of the Utility mode pressing this button calls up the Knob Select pop up window page 29 UTILITY button Use this button to call up the Utility parameters Pressing this button calls up the Utility Select window page 98 for the relevant Utility parameters of the ...

Page 12: ...g with a favorite outboard effect unit The Parts which can be assigned to these jacks are as follows Audio Parts in the Voice mode page 102 Drum Voice keys to which drum percussion instruments have been assigned page 85 Any Part of a Multi pages 92 and pages 95 Includes the Audio Input Part mLAN IN Part 6 OUTPUT L MONO and R jacks page 13 Line level audio signals are output via these phone jacks F...

Page 13: ...e instrument at the minimum level When not using the MOTIF RACK XS for an extended period of time be sure to unplug the AC power adaptor from the wall AC outlet Wrap the DC output cable of the adaptor around the cable clip as shown above to prevent accidental unplugging of the cable during operation Avoid tightening the cord more than necessary or pulling on the cord strongly while it is wrapped a...

Page 14: ...r off lower the volume setting on the MOTIF RACK XS and connected audio equipment 1 Turn the VOLUME knob from the STANDBY position to the ON position to turn the power on The opening message appears in the LCD After a while the default display appears n You can set the default display in the Power On Mode parameter UTILITY General window For details see page 98 n If the LCD is difficult to read yo...

Page 15: ...etails are given in the section Setting Up on page 13 1 Simultaneously hold the EDIT button and press the UTILITY button 2 From the Demo Song Play display select the desired Song by using the Encoder knob or Cursor L and M buttons 3 Press the ENTER button or Encoder knob to start the selected Demo Song Pressing the ENTER button or Encoder knob during playback stops playback at the current point in...

Page 16: ...ressing the AUDITION button produces no sound make sure the setting is appropriate by following the instructions below 1 Press the UTILITY button The Utility Select window appears 2 Select General by using the Encoder knob and Cursor buttons then press the ENTER button 3 Press the Cursor L M to call up the third page of the Utility General window then select Audition Button 4 Set the Audition Butt...

Page 17: ... MOTIF RACK XS For details refer to the Using the Thru Port page 18 Connection between the MOTIF RACK XS and a computer This section shows you how to connect the MOTIF RACK XS to a computer via a USB cable Note that the MIDI data can be transmitted through a USB cable n Since the MOTIF RACK XS has no built in speakers you ll need an external audio system or a set of stereo headphones to properly m...

Page 18: ...B cable MIDI channels and MIDI ports MIDI song data can be sent independently over sixteen separate channels and this instrument is capable of simultaneously playing sixteen separate parts via these channels While a single MIDI cable is equipped to handle data over up to sixteen channels simultaneously a USB connection or an IEEE1394 connection is capable of handling far more thanks to the use of ...

Page 19: ...eters of the MOTIF RACK XS For details see Audio signal transmission reception in the section Signal flow of audio and MIDI data via an IEEE1394 cable on page 20 5 Press the STORE button to store this setting What you can do with the IEEE1394 connection You can integrate the MOTIF RACK XS with DAW software on a computer by connecting the mLAN equipped MOTIF RACK XS which the optional mLAN16E2 is i...

Page 20: ...ved via the mLAN IN Main Out Monitor L R will be output via the OUTPUT L R jacks while the audio signal received via the mLAN IN Assignable Out Monitor L R will be output via the ASSIGNABLE OUTPUT L R jacks Setting the audio output channel on the computer determines which channel is used As for audio signals received via the mLAN terminal parameters such as volume and output channel can be applied...

Page 21: ...Check the MIDI Basic Receive Channel with the following operation UTILITY select Voice MIDI in the Utility Select window press ENTER Receive Ch Basic Receive Channel page 102 If necessary change this parameter to the same number as the MIDI Transmit Channel of the external MIDI instrument or the DAW software In the Multi mode using the MOTIF RACK XS as a multi timbral tone generator Check the MIDI...

Page 22: ... 36 Setting up the DAW on the computer 1 Set the MIDI output port of the tracks for playing the MOTIF RACK XS to Port 1 of USB or mLAN When connecting via a USB cable set this to Yamaha MOTIF R XS 1 or YAMAHA MOTIF R XS Port1 When connecting via an IEEE1394 cable set this to mLAN MIDI Out or MOTIF RACK XS 2 Enter the MIDI data to each track of the DAW on the computer The tone generator settings of...

Page 23: ...at enables you to start multiple Editors that control Yamaha hardware products remotely and to save multiple Editor settings You can run Studio Manager as a stand alone application or as a plug in within DAW applications The Studio Manager and MOTIF RACK XS Editor can be downloaded from the following URL Use them after installing all necessary software to the computer by following the Installation...

Page 24: ...making it easy to confirm the current connection or change the connection For details see the illustration below When creating a new project file within Cubase you can select the template for multi channel audio recording using the MOTIF RACK XS via an IEEE1394 cable By selecting a template you can easily perform the recording in Cubase without having to make complicated or detailed settings For d...

Page 25: ...Voices of the MOTIF RACK XS are divided into the following two types Normal Voices pitched musical instrument type sounds Drum Voices percussion drum sounds Multi Mode The Multi Mode page 35 lets you set up the MOTIF RACK XS as a multi timbral tone generator for use with computer based DAW software or external sequencers You can play various Voices up to 16 Parts simultaneously By assigning differ...

Page 26: ...gs in the Voice mode Multi mode and Utility can be stored to User memory with the store function page 46 Mode Function Entering a mode Voice mode Play Playing a Voice VOICE Common Edit Editing creating the parameters common to all Elements Keys of the selected Voice VOICE EDIT Element Key Edit Editing creating the individual Elements Keys of the selected Voice Can only be edited on the MOTIF RACK ...

Page 27: ...can select the desired Voice from various Voice Banks and play it n For details about Voices refer to Basic Structure on page 49 For a list of available Voices refer to the Voice List in the separate Data List In the following section we ll select and play some Voices The example below assumes that you have connected an external MIDI keyboard to the MOTIF RACK XS n Make sure that the MIDI Transmit...

Page 28: ...ect the Sub Category 4 Press the ENTER button Encoder knob or Cursor button to actually call up the Category The Voice List of the selected category is shown 5 Select the Voice with the Cursor L M buttons or Encoder knob If you want to change the Category press the Cursor button or EXIT button and go back to step 2 6 Press the ENTER button or Encoder knob to actually call up the Voice This closes ...

Page 29: ...Encoder knob or cursor button to actually call up the Favorite Category The list of Voices registered to the Favorite Category will be shown Using Knobs 1 5 to change the sound These let you adjust a variety of parameters for the current Voice such as effect depth attack release characteristics tonal color and others Four functions can be assigned to each knob alternatively selected via the SELECT...

Page 30: ...alue the faster the decay Knob 3 SUSTAIN AEG Sustain Level Increases or decreases the AEG Sustain Level pages 69 and 96 at which the volume will continue while a key is held after the initial attack and decay When a Drum Voice is selected this parameter cannot be set Knob 4 RELEASE AEG Release Time Increases or decreases the AEG Release Time pages 69 and 96 of the sound controlling the time that t...

Page 31: ...keys In Key Edit you can edit the parameters only on the MOTIF RACK XS Editor 1 Press the VOICE button to show the Voice Play display then select a Voice to be edited page 27 2 Press the EDIT button to enter the Common Edit mode The Voice Edit Select display appears The E Indicator About Elements An Element is the basic and the smallest unit for a Voice and is created by applying various parameter...

Page 32: ...nerator and other parameters For a complete list of the parameters refer to Element Edit page 73 and Key Edit page 84 in the Reference section When both the MOTIF RACK XS data and the MOTIF RACK XS Editor are synchronized the settings in the MOTIF RACK XS Editor will be reflected to the same as in the MOTIF RACK XS For details about how to connect the MOTIF RACK XS to the MOTIF RACK XS Editor refe...

Page 33: ... L M buttons then press the ENTER button The Effect Parameters display page 72 will appear In the display you can set the Insertion Effect types or parameters 4 Move the cursor position to the effect type parameter or the effect parameters with the Cursor L M buttons then turn the Encoder knob to change each of the parameter settings n For details about effect categories effect types and effect pa...

Page 34: ... Voice When you execute this store operation in the Utility Voice MEF window Utility Voice MEQ window the entire system settings including the MEF MEQ settings are stored To go back to the original display in the Voice mode press the EXIT button twice If the power is turned off without storing the edited settings may be lost CAUTION CAUTION Switching the Effect on off From the Effect dialog called...

Page 35: ...n the new file Set the MIDI related settings such as MIDI port and MIDI transmit channel for each track by following the instructions on page 22 MIDI port If you are using the internal tone generator of the MOTIF RACK XS set the MIDI port for each track of the DAW software to 1 MIDI channel Match the MIDI transmit channels of the DAW software with the receive channels of the Multi Parts The receiv...

Page 36: ...ctions about the Initialize function refer to the manual of the MOTIF RACK XS Editor 2 Press the EDIT button to enter the Multi Edit mode The Multi Edit Select display appears 3 Select Common or one of the 1 16 settings with the Cursor L M buttons and Encoder knob Select Common when you want to edit the Common parameters Select the desired number from 1 16 when you want to edit the individual Part...

Page 37: ...executing the Store operation The edited Multi will be lost when selecting a different Multi or turning the power off Make sure to store the Multi data to the internal memory by pressing the STORE button before selecting a different Multi or turning the power off When you execute the Store operation the settings for the destination memory will be overwritten Important data should always be backed ...

Page 38: ...s after Chorus Send Reverb Send Dry Level in the signal flow Below is an example of editing effect settings in the Multi Mode 1 Select the desired Multi for editing in the Multi mode page 35 2 Press the EDIT button to enter the Multi Edit mode The Multi Edit Select display appears 3 Choose a Part to which you want to apply the Insertion Effect with the Cursor L M buttons and Encoder knob then pres...

Page 39: ...r knob These parameters determine the depth or degree with which the Effect is applied 13 Move the cursor position to Master press the ENTER button then set the related parameters In the Master Effect MEF display page 93 you can edit the parameters for the Master Effect common to all Parts 14 Set the parameters related to the Master EQ MEQ and Part EQ When setting the Master EQ press the EXIT butt...

Page 40: ...ter 4 Press the MULTI button to call up the Multi Play display then select a Multi by using the Cursor L M buttons or the Encoder knob 5 On the external MIDI keyboard set the MIDITransmit Channel via the keyboard performance to the value same as the setting of the Receive Ch parameter page 102 in the Utility parameters of the Voice mode of the MOTIF RACK XS 6 Play a note on the keyboard connected ...

Page 41: ...rpeggio type assigned to the selected Voice While referring to page 55 play the note or notes with various styles only a single note various notes simultaneously same notes in various order etc You can hear the various Arpeggio phrases or rhythm patterns Depending on the Arpeggio type you may also trigger the special Accent Phrase by pressing the note strongly with high velocities n Some Arpeggio ...

Page 42: ...play of the Common Edit When the Audition Button parameter page 99 is set to arpeggio sw in the Utility General window you can turn the arpeggio switch parameter on off by pressing the AUDITION button on the panel When the arpeggio switch parameter is set to on the lamp of the AUDITION button lights 4 In the Arp Edit display page 96 of the Part Edit set the Arp Sw parameter of the desired Part to ...
Page 43: ...ceive Channel parameter page 102 in the Utility Voice MIDI window In this setting you can hear the multiple Arpeggio playbacks up to four types simultaneously by receiving the note data from the external MIDI sequencer or computer DAW software n Note that the MIDI Transmit Channel of the keyboard or DAW software should be set to the same value as the Receive Ch in the Utility Voice MIDI window of ...

Page 44: ...y vibrato The settings for all external controllers are referred to as a Controller Set and up to six Controller Sets can be created for each Voice n You can assign a variety of functions to Knob 3 ASSIGN 1 and Knob 4 ASSIGN 2 as well as the external controllers n You can set whether the controller affects each Element by setting the Element Switch of the Controller Set on or off as desired Note t...

Page 45: ...nnel set in the Utility mode of the MOTIF RACK XS and vice versa In the Multi mode likewise set the transmit channel of the external controller to the same one as the Receive channel for the Part you want to control of the MOTIF RACK XS and vice versa Assigning Control numbers Each external controller has a pre assigned Control Change number When operating the external controller each Control Chan...

Page 46: ...umber column with the Cursor button This step is necessary only when a Normal Voice is edited in the Voice mode 3 Select a destination Voice number or Multi number by using the Encoder knob 4 Press the ENTER button or the Encoder knob to execute the Store operation The display prompts you for confirmation Press the ENTER button or the Encoder knob to execute the Store operation A Completed message...

Page 47: ...MOTIF RACK XS enter the Voice mode or Multi mode according to the data type you want to call up from the DAW software If the bulk data is for Normal Voices select a Normal Voice in the Voice mode Likewise if the bulk data is for Drum Voices select a Drum Voice if it is for Multis select the Multi mode 3 On the DAW software play back the Project file including the bulk data The bulk data will be tr...

Page 48: ...the EXIT button to cancel the Factory Set operation For Factory Set operations that take longer to process you will see the message Now executing Factory Set during processing While such a message is shown on the display never attempt to turn off the power while data is being written to Flash ROM Turning the power off in this state results in loss of all user data and may cause the system to freez...

Page 49: ...2 Voice uses multiple samples of a real instrument s waveform Furthermore a wide variety of parameters envelope generator filter modulation and others can be applied MOTIF RACK XS Audio signal flow MIDI message flow Controller block page 57 Knobs Arpeggio block page 53 Arpeggio Playback x 4 Audio Input block page 53 mLAN Tone Generator block page 50 AWM2 Tone Generator 16 Parts Voices and Multi Ef...

Page 50: ...consists of the Element Edit parameters for each element Key Edit parameters for each key and Common Edit parameters applied commonly to all the elements keys The Common Edit parameters can be edited on the MOTIF RACK XS while the Element Edit Key Edit parameters can be edited only on the MOTIF RACK XS Editor installed to your computer n For instructions on editing a Normal Voice see page 64 For i...

Page 51: ...he Utility Controller window page 102 from the external device New sounds and new styles of playing The highly versatile functions above can be applied effectively not only to acoustic sounds but also to synthesizer and electronic Voices as well The XA feature opens up enormous potential for realizing authentic sounds performing expressively and coming up with creative new styles of playing To cre...

Page 52: ...timbral tone generator Because this mode lets you set the MIDI channel for each part of the tone generator block you can use an external MIDI sequencer to play the sounds The sequence data of each track on the external MIDI sequencer plays the corresponding Parts those having the same MIDI channel assignment in the tone generator block To play the tone generator in the Multi mode set the MIDI Port...

Page 53: ...t phrase is assigned When a type of these categories is selected it is a good idea to set the Velocity Limit of each Element to the same range as below Velocity ranges of each Arpeggio type 2Z_ 1 90 91 127 4Z_ 1 70 71 90 91 110 111 127 8Z_ 1 16 17 32 33 48 49 64 65 80 81 96 97 108 109 127 PadL_ 1 1 2 2 3 127 PadH_ 1 112 113 120 121 127 Audio Input Block Mode Display Page Voice mode Voice mLAN wind...

Page 54: ... and stops 7 Original Tempo Indicates the appropriate tempo value of the Arpeggio type Note that this tempo is not set automatically when selecting an Arpeggio type 8 Accent The circle indicates that the Arpeggio uses the Accent Phrase feature page 55 9 Random SFX The circle indicates that the Arpeggio uses the SFX feature page 55 Voice Type Indicates the voice type appropriate for the Arpeggio Ty...

Page 55: ...e played note and its octave notes Playback of a programmed sequence according to the played notes These Arpeggio types have the several sequences each of which is suited for a certain chord type Even if you press only one note the Arpeggio is played back using the programmed sequence meaning that notes other than the ones you play may be sounded Pressing another note triggers the transposed seque...

Page 56: ...e types and hear the difference n Since these types are programmed for Drum Voices using them with Normal Voices may not give musically appropriate results These arpeggio types are programmed primarily with Control Change and Pitch Bend data They are used to change the tone or pitch of the sound rather than play specific notes In fact some types contain no note data at all When using a type of thi...

Page 57: ...essed dry sound This arrangement lets you prepare an optimum balance of the effect sound and the original sound of the Parts Insertion Effects can be applied individually to each Part Insertion Effects are mainly used to directly process a single Part or Voice A insertion effect has two units A and B Different effect types can be set for each unit Insertion Effects A and B The Insertion Effect can...

Page 58: ...e applied at only 1 4 settings as shown above and output 1 Part EQ applied to each Part Can be set in the Part EQ display page 96 of Multi Part Edit 2 Selection to which Parts the Insertion Effect is applied Can be set in the Fx Send display page 97 of the Multi Part Edit and the Effect display of Multi Common Edit on the MOTIF RACK XS Editor 3 Reverb and Chorus related parameters Can be set in th...

Page 59: ...sing an algorithm derived from the Yamaha ProR3 SPX HALL Reverb emulating the acoustics of a concert hall derived from the Yamaha SPX1000 REV X ROOM Reverb emulating the acoustics of a room using the REV X technology R3 ROOM Reverb emulating the acoustics of a room using an algorithm derived from the Yamaha ProR3 SPX ROOM Reverb emulating the acoustics of a room derived from the Yamaha SPX1000 R3 ...

Page 60: ...p AMP SIMULATOR 2 A simulation of a guitar amp COMP DISTORTION Since a Compressor is included in the first stage steady distortion can be produced regardless of changes in input level COMP DISTORTION DELAY Compressor Distortion and Delay are connected in series Effect Type Ins Mas Description VCM COMPRESSOR 376 Compressor with VCM technology CLASSIC COMPRESSOR Conventional type of compressor MULTI...

Page 61: ...on AEG Phase Offsets the phase of the AEG AM Depth Determines the depth of the amplitude modulation AM Inverse R Determines the phase of the amplitude modulation for the R channel AM Speed Determines the amplitude modulation speed AM Wave Determines the wave of the amplitude modulation AMP Type Selects the amplifier type to be simulated Analog Feel Adds the characteristics of an analog flanger to ...

Page 62: ...in each of the 1st and 2nd series Feedback Time Determines the delay time of the feedback Feedback Time 1 2 L R Determines the time of the feedback delay 1 2 L and R Parameter name Description Filter Type When Lo Fi is selected this parameter selects the tonal characteristic type When Dynamic Filter is selected this parameter determines the filter type Fine 1 2 Determines the pitch finely for each...

Page 63: ...which the stereo pan position of the sound moves Pan Type Determines the pan type Pedal Control When VCM PEDAL WAH is selected this parameter determines the cutoff frequency of the wah filter For best results assign this parameter to the Foot Controller in the Controller Set display then use the Foot Controller to control this parameter Pedal Response Determines how the sound responds to the chang...

Page 64: ...can be played over the range of a keyboard can consist of up to eight Elements There are two types of Normal Voice Edit displays those for Common Edit to edit the settings common to all Elements and those for Element Edit to edit individual Elements In this section we ll cover the Normal Voice parameters Common Edit These parameters are for making global or common edits to all eight Elements of th...

Page 65: ...mum of one octave 12 semitones when the Pitch Bend wheel is moved downwards Settings 48 semi 0 semi 24 semi PB Range Lower Pitch Bend Range Lower Mono Poly Determines the playback method of the Voice monophonic single Note Only or polyphonic multiple notes Settings mono poly mono When set to mono the selected Voice is played back monophonically only a single note is played back simultaneously For ...

Page 66: ...ttings off on Arp Select Arpeggio Select Select the desired Arpeggio from Arpeggios 1 5 The 8th note icon shown in the settings indicates some Arpeggio Type other than off is selected in the Arpeggio Settings Arp 1 Arp 5 Arp Edit Arpeggio Edit Common settings for the five Arpeggios assigned to each Voice Arp Sw Arpeggio Switch Determines whether Arpeggio playback is on or off This is the same func...

Page 67: ...e Velocity Mode Adjusts the velocity of the Arpeggio notes when receiving the Note On message Settings original thru original The Arpeggio plays back at the preset velocities included in the Arpeggio sequence data thru The Arpeggio plays back according to the velocity of the received Note On message Key Mode Determines how the Arpeggio plays back when receiving Note On messages Settings sort thru ...

Page 68: ...hen this is set to on the Random SFX special sound is played with the velocity generated when the Note On message is received Settings off on Arp 1 5 Type Arpeggio 1 5 Type Specific settings for a selected Arpeggio in the Arp Select display Main Ctgry Main Category Sub Ctgry Sub Category Determines the Arpeggio Main Category and Sub Category including the desired Arpeggio type Settings See Categor...

Page 69: ...with the Arpeggio Settings 16th 8th 3 eighth note triplets 16th dotted sixteenth note 8th eighth note 4th 3 quarter note triplets 8th dotted 8th note 4th quarter notes 2nd 3 half note triplets 4th dotted quarter notes 2nd half notes whole 3 whole note triplets 2nd dotted half note 4thx4 quarter note quadruplets four quarter notes to the beat 4thx5 quarter note quintuplets five quarter notes to the...

Page 70: ...pitch F mod Filter Modulation Depth A wah effect produced by cyclically modulating the tonal brightness reso Resonance A special wah effect produced by cyclically modulating the resonance pan An effect produced by cyclically modulating the stereo pan position LFOspd Element LFO Speed When this is selected the Common LFO speed cyclically modulates the Element LFO speed n If one or more LFO Set 1 3 ...

Page 71: ... 2 Value Determines the offset value by which the functions assigned to the Assign 1 2 will be shifted from their original settings Each parameter can be changed directly via the Knob Settings 64 0 63 n The functions assigned to the Assign 1 2 Knobs can be set in Ctrl Set 1 6 Dest of Ctrl Set 1 6 Src below to which Assign 1 or Assign 2 are assigned Ctrl Set 1 6 Src Controller Set 1 6 Source Determ...

Page 72: ...ar left C center R63 far right 6 Reverb Send Adjusts the reverb send level The higher the value the more pronounced the Reverb This parameter can be changed directly via the Knob Settings 0 127 7 Reverb Return Determines the Return level of the Reverb Effect Settings 0 127 8 Reverb Pan Determines the pan position of the Reverb effect sound Settings L63 far left C center R63 far right Element Out 1...

Page 73: ...ed In other words receiving the first Note On message will sound Element 1 the second Note On message Element 2 and so on wave random When this is selected for multiple Elements each Element will sound randomly each time a Note On message is received all AF off When this is selected the Element will sound when both of the A Func 1 and 2 buttons ASSIGNABLE FUNCTION buttons are turned off AF 1 on Wh...

Page 74: ... A value of 0 results in no pitch change Settings 0 127 Pitch Key Follow Center Key Determines the central note number for Pitch Key Follow The note number set here is the same pitch as normal regardless of the Pitch Key Follow setting Settings C 2 G8 Pitch Key Follow Pitch Key Follow Sensitivity Determines the sensitivity of the Key Follow effect the pitch interval of adjacent notes assuming the ...

Page 75: ...t Determines the part of the Pitch EG affected by the EG Time Velocity Sens parameter Settings attack atk dcy decay atk rls all attack Time Vel Sens affects the Attack Time and Hold Time atk dcy attack decay Time Vel Sens affects the Attack Time Decay 1 Time and Hold Time decay Time Vel Sens affects the Decay 1 2 Time atk rls attack release Time Vel Sens affects the Attack Time Release Time and Ho...

Page 76: ...gs will cause the Cutoff Frequency to rise the more strongly you play an external keyboard A setting of 0 will cause the Cutoff Frequency not to change no matter what velocity you play Negative settings will cause the Cutoff Frequency to rise the more softly you play Settings 64 0 63 Distance Determines the distance between the two Cutoff frequencies for the Dual Filter types which feature two ide...

Page 77: ...ermines how fast the envelope falls from the maximum cutoff frequency Attack Level to the cutoff frequency specified as the Decay 1 Level Decay 2 Time Determines how fast the envelope falls from the cutoff frequency specified as the Decay 1 Level to the cutoff frequency specified as the Decay 2 Level Release Time Determines how fast the envelope falls to the cutoff frequency specified as the Relea...

Page 78: ...e Key Follow Sensitivity Center Key Determines the central note for the Time Key Follow parameter When the Center Key note is played on a keyboard the FEG behaves according to its actual settings Settings C 2 G8 Time Key Follow EG Time Key Follow Sensitivity Determines the degree to which the notes specifically their position or octave range affect the Filter EG times of the selected Element When ...

Page 79: ...urposes only the value cannot be changed Level Key Follow Determines the degree to which the notes specifically their position or octave range affect the amplitude level set above of the selected Element assuming C3 as the basic pitch A positive setting will lower the output level for lower notes and raise it for higher notes A setting of 0 will cause the output level not to change A negative sett...

Page 80: ... velocities result in a fast AEG transition speed while low velocities result in a slow speed as shown below When this is set to a negative value the opposite effect is produced High velocities result in a slow AEG transition speed while low velocities result in a fast speed When this is set to 0 the amplitude transition speed does not change no matter what the velocity Settings 64 0 63 Segment EG...

Page 81: ...longer delay time Settings 0 127 Fade in Time Determines the amount of time for the LFO effect to fade in after the Delay time has elapsed A higher value results in a slower fade in When set to 0 the LFO effect will not fade in and reach the maximum level immediately after the Delay time has elapsed Settings 0 127 P Mod Pitch Modulation Determines the amount depth by which the LFO wave varies modu...

Page 82: ...n setting to P EQ this determines the amount by which signals in the area of the center frequency will be boosted attenuated Settings 12 00dB 0 00dB 12 00dB High Gain This parameter is available only when the Type EQ Type parameter is set to 2 Band This determines the amount by which signals above the High Freq will be boosted attenuated Settings 12 00dB 0 00dB 12 00dB Q This parameter is availabl...

Page 83: ...evel AEG Release Time 6 3 Band EQ This is the same as the 3 Band EQ display in Normal Voice Common Edit page 71 7 Control This is the same as the Control display in Normal Voice Common Edit page 71 The Element Switch parameters on the MOTIF RACK XS Editor are not available for Drum Voice 8 Effect This is the same as the Effect in Normal Voice Common Edit page 72 The main difference is that the Ins...

Page 84: ...overall polyphony and it may cause sounds to be cut off Settings single multi single When this is set to single and double playback of the same note are transmitted to the internal tone generator the first note will be stopped before the next note is sounded multi When this is set to multi and double playback of the same note are transmitted to the internal tone generator all notes are sounded sim...

Page 85: ...ings will cause the Cutoff Frequency to rise the harder you play an external keyboard A setting of 0 will cause the Cutoff Frequency not to change depending on velocity Negative settings will cause the Cutoff Frequency to rise the more softly you play Settings 64 0 63 Resonance Determines the emphasis given to the Cutoff Frequency to add further character to the sound Higher values result in a mor...

Page 86: ...k Level to the Decay 1 Level Decay 2 Decay 2 Time Determines how quickly the sound decays from the Decay 1 Level to silence after a Note Off message is received Level Determines the Level settings for the Amplitude EG The Level parameters let you set the amount of the transition at each point based on the level specified in the AMP Level Pan parameter page 85 Settings 0 127 Decay 1 Level Determine...

Page 87: ... Chromatic Percussion Malet Mallet Percussion Bell SynBl Synth Bell PDrum Pitched Drum Arp Dr Pc Drum Percussion Drums Perc Percussion Synth Arp Arpeggio S EFX Sound Effect Move Moving Ambie Ambient Natur Nature SciFi Sci Fi Arp M EFX Musical Effect Move Ambie Sweep Hit Arp Ethnc Ethnic Bowed Pluk Plucked Struk Struck Blown Arp Micro Tuning No Type Micro Tuning Root Comments 1 Equal The compromise...

Page 88: ... of the filter You can then use Resonance to add further character to the sound This filter type is most popular and useful for producing classic synthesizer sounds LPF24D Compared to the LPF24A type below this filter can produce a more pronounced resonance effect LPF24A A digital dynamic low pass filter with characteristics similar to a 4 pole analog synthesizer filter LPF18 3 pole 18 dB oct low ...

Page 89: ...can edit the distance between the two Cutoff Frequencies LPF12 HPF12 A combination of a 12 dB oct low pass filter and high pass filter When this Filter Type is selected HPF Cutoff and HPF Key Follow can be set Only the LPF graph is shown on the window LPF6 HPF6 A combination of a 6 dB oct low pass filter and high pass filter When this Filter Type is selected HPF Cutoff and HPF Key Follow can be se...

Page 90: ...put Select is specified in several different places OSC Oscillator of the Drum Key Edit parameters page 85 on the MOTIF RACK XS Editor the mLAN In display of the Multi Common Edit parameter page 92 the Play Mode display of the Multi Part Editor parameters page 95 and the Voice mLAN display of the Utility parameters About drum setting see below The drum setting can be selected in the Multi Part Edi...

Page 91: ... same as the Arp Select on the Arp Select display in the Multi Part Edit The 8th note icon shown in the settings indicates that one of the Arpeggio Types other than off is selected for the Arpeggio Settings Arp 1 Arp 5 Arp Tempo Arpeggio Tempo Determines the Arpeggio Tempo This parameter can be changed directly via the Knob Settings 5 300 n If you are using this instrument with an external sequenc...

Page 92: ... Input Part signal sent to the Reverb effect The higher the value the more pronounced the Reverb This parameter can be set only when Output Select is set to L R Settings 0 127 Dry Level Determines the level of the Audio Input Part which has not been processed with the System Effects Reverb Chorus This parameter can be set only when Output Select is set to L R Settings 0 127 4 MEQ Master EQ From th...

Page 93: ...7 2 Chorus Return Determines the Return level of the Chorus Effect Settings 0 127 3 Chorus Pan Determines the pan position of the Chorus effect sound Settings L63 far left C center R63 far right 4 Reverb Return Determines the Return level of the Reverb Effect Settings 0 127 5 Reverb Pan Determines the pan position of the Reverb effect sound Settings L63 far left C center R63 far right 6 Chorus 7 R...

Page 94: ...mit channel for the real time changing of the Knob controlled data is the same as this parameter setting Settings 01 16 off 2 Play Mode Volume Determines the volume for each Part Use this parameter to adjust the balance between the current Part and other Parts This parameter can be changed directly via the Knob Settings 0 127 Pan Determines the stereo pan position for the Part This parameter can b...

Page 95: ...r pitch change time or a slow speed This parameter can be changed directly via the Knob Settings 0 127 Porta Mode Portamento Mode Determines how Portamento is applied to your keyboard performance Settings fingered fulltime fingered Portamento is only applied when you play legato playing the next note before releasing the previous one fulltime Portamento is applied to all notes Output Select Determ...

Page 96: ...r each Part Voice Cutoff Determines the common offset value of filter Cutoff Frequencies for all Elements set to each Part Voice This parameter can be changed directly via the Knob Settings 64 0 63 Resonance This parameter s function varies according to the selected Filter Type If the selected filter is an LPF HPF BPF excluding the BPFw or BEF this parameter is used to set the Resonance If the sel...

Page 97: ... available n If Control Change here is set to off Control Change related parameters are not available Settings off on 8 Fx Send Effect Send Chorus Send Determines the Send level of the selected Part signal sent to the Chorus effect The higher the value the more pronounced the Chorus This parameter can be changed directly via the Knob Settings 0 127 Reverb Send Determines the Send level of the sele...

Page 98: ...re using the MOTIF RACK XS as an audio device with the DAW software Selecting this allows you to apply VST Effects within the DAW software to the MOTIF RACK XS sound with PC Mntr The audio signal of the MOTIF RACK XS will be output directly via the OUTPUT L MONO and R jacks with the audio signal sent from the DAW software via an IEEE1394 cable This should be selected when recording the MOTIF RACK ...

Page 99: ...ulti mode this determines whether pressing the cursor button alternately moves continuously and changes from the last Bank Part to the first Bank Part and vice versa first to last When this parameter is set to on continuous change is available Settings off on LCD Contrast Sets the LCD for optimum legibility Settings 1 16 n To do this simultaneously hold down the UTILITY button and turn the Encoder...

Page 100: ...eel Aftertouch Foot Controller Breath Controller Knobs etc when switching between voices When this is set to hold the controllers are kept at the current setting When this is set to reset the controllers are reset to the default states below Settings hold reset If you select reset the controllers will be reset to the following states positions Pitch Bend Center Modulation Wheel Minimum Aftertouch ...

Page 101: ...3 When using the MOTIF RACK XS as a stand alone device without connecting to a DAW software or other MIDI devices Local control on MIDI internal Clock Out on Arp MIDI Out Sw all off 3 Controller Determines Controller Assign settings common to the entire system of the MOTIF RACK XS You can assign MIDI Control Change Numbers to the knobs on the front panel and the external controllers For example yo...

Page 102: ...ing name can contain up to 20 characters For detailed instructions on entering characters refer to Voice Multi Name settings Entering Characters in the Quick Guide page 47 C B C Tuning Offset B Tuning Offset Lets you tune the individual notes in cents to create your original Micro Tuning Settings 99 cents 0 cents 99 cents 5 Voice MIDI Determines the MIDI related parameters This window is available...

Page 103: ...ll Voices This window is available only when entering Utility from the Voice mode The parameters are the same as those in the MEQ display in Multi Common Edit page 92 9 Fctry Set Factory Set You can restore this tone generator s User memory page 46 to the factory default settings Factory Set Please note that the setting of the Power On Auto Factory Set on this window will be stored automatically b...

Page 104: ...g MIDI data Try again Mixing Voice full The Mixing Voice cannot be stored because the number of Voices already stored has exceeded the maximum capacity Now executing Factory set Indicates that the factory programmed settings are currently being restored Now receiving MIDI bulk data Indicates that this instrument is receiving MIDI bulk data Now transmitting MIDI bulk data Indicates that this instru...

Page 105: ...e of sixteen channels However we can overcome the sixteen channel limit by using separate MIDI ports each supporting sixteen channels For details see page 18 MIDI Messages Transmitted Recognized MIDI messages can be divided into two groups Channel messages and System messages Below is an explanation of the various types of MIDI messages which this tone generator can recognize transmit The messages...

Page 106: ...n offset value which will be added to or subtracted from the Voice data Attack Time Control 73 Messages which adjust the AEG attack time set for each Part The value set here is an offset value which will be added to or subtracted from the Voice data Brightness Control 74 Messages which adjust the filter cutoff frequency set for each Part The value set here is an offset value which will be added to...

Page 107: ... System Exclusive Messages System Exclusive messages control various functions of this instrument including master volume and master tuning tone generator mode effect type and various other parameters General MIDI GM System On When a General MIDI system on message is received the instrument will receive MIDI messages which are compatible with GM System Level 1 and consequently will not receive Ban...

Page 108: ...ilures It is recommended that you wear gloves to protect your hands from metallic projections on optional units and other components Touching leads or connectors with bare hands may cause finger cuts and may also result in poor electrical contact or electrostatic damage Be careful of static electricity Static electricity discharge can damage the IC chips on the mLAN16E2 Before you handle the optio...

Page 109: ... they cut off almost all the sound page 76 Is the FEG Depth parameter set too low VOICE EDIT select EG ENTER FEG Depth page 68 MULTI EDIT select any Part ENTER select EG ENTER FEG Depth page 96 Are the Effect settings appropriate pages 33 and 38 Are the velocity sensitivity settings set appropriately MULTI EDIT select any Part ENTER select Play Mode ENTER Vel Sens Depth or Vel Sens Offset page 95 ...

Page 110: ...lipping is occurring pages 65 and 91 Is the volume of each Element in the Voice mode or the volume of each Part in the Multi mode set too high pages 65 and 94 Sound is very quiet Has the MIDI volume or MIDI expression been set too low Is the cutoff frequency of the filters set too low pages 76 and 77 Playback continues without stopping When the AUDITION button is turned on press it again so that i...

Page 111: ...en playing back the song data on the computer or the MIDI instrument connected to the MOTIF RACK XS Is the MOTIF RACK XS set to the Multi mode The Voice mode may not produce the proper sound even when playing back the Song data on the MIDI instrument or the computer connected to the MOTIF RACK XS Likewise setting the Layer 1 4 Parts parameter to on may not produce the proper sound even when the MO...

Page 112: ...General Public License refer to the separate Data List booklet Specifications Tone Generator Tone Generator AWM2 with Expanded Articulation Polyphony 128 notes Wave 355MB when converted to 16 bit linear format 2 670 waveforms Voice Preset 1 024 Normal Voices 64 Drum Kits GM 128 Normal Voices 1 Drum Kit User 128 x 3 Normal Voices 32 Drum Kits Both of the User Voices are selected and copied from Pre...

Page 113: ...cryption of data received by means of the SOFTWARE may not be removed nor may the electronic watermark be modified without permission of the copyright owner 3 TERMINATION This Agreement becomes effective on the day that you receive the SOFTWARE and remains effective until terminated If any copyright law or provisions of this Agreement is violated the Agreement shall terminate automatically and imm...

Page 114: ...Power On Auto Factory Set 103 AWM2 Advanced Wave Memory 2 49 B Bank 94 Bank Select LSB Control 32 105 Bank Select MSB Control 0 105 Bank Select Sw Bank Select Switch 100 Bank Part Wrap Bank Part Wrap Around 99 BC Ctrl No Breath Controller Control Number 102 BEF Band Elimination Filter 89 BPF Band Pass Filter 88 Break Point 1 4 78 81 Brightness Control 74 106 Bulk Dump 47 Bulk Interval 100 C C B C ...

Page 115: ... 84 Key Mode 67 Key on Delay 73 Key on Reset 69 81 Key On Key Off 105 Key Out Drum Key Out 83 Key Sw Key Switch 84 Kirnberger 87 Knob Disp Time Knob Display Time 99 Knob Sel Disp Sw Knob Select Display Switch 99 Knobs 1 5 11 29 30 36 L L R Gain 99 Layer 1 4 Parts Layer 1 4 Parts Switch 98 LCD Liquid Crystal Display 10 LCD Contrast 99 legato 51 Level 75 77 78 80 85 86 Level Key Follow 79 Level Key ...

Page 116: ...gistered Parameter Number 106 S Scaling Pan 79 Segment EG Time Velocity Sensitivity Segment 75 78 80 SELECT button 11 SFX Key on Ctrl Random SFX Key on Control 68 SFX Vel Offset Random SFX Velocity Offset 68 Shape 92 single timbre 50 Sostenuto Control 66 106 Source 45 Speed 69 81 Store 46 STORE button 10 Store Compare 46 Studio Connections 24 Studio Manager V2 23 Sub 1 Ctgry Sub Category 1 65 Sub ...

Page 117: ...34 00 DENMARK YS Copenhagen Liaison Office Generatorvej 6A DK 2730 Herlev Denmark Tel 44 92 49 00 FINLAND F Musiikki Oy Kluuvikatu 6 P O Box 260 SF 00101 Helsinki Finland Tel 09 618511 NORWAY Norsk filial av Yamaha Scandinavia AB Grini Næringspark 1 N 1345 Østerås Norway Tel 67 16 77 70 ICELAND Skifan HF Skeifan 17 P O Box 8120 IS 128 Reykjavik Iceland Tel 525 5000 RUSSIA Yamaha Music Russia Offic...

Page 118: ...tal Musical Instruments Division Yamaha Corporation 2008 Yamaha Corporation 007MWTO C0 Printed in Japan WM96450 Yamaha Web Site English http www yamahasynth com Yamaha Manual Library http www yamaha co jp manual ...

Reviews: