mLAN16E MIDI IN:
Port 1 < Computer 9 Internal Motif ES
Port 2 < Computer 10 PLG150 Boards or external device
Port 3 < Computer 11 Remote for Motif Rack
Computer MIDI IN:
Port 1 < 01X: DAW Remote
Port 2 < 01X: MIDI A (back panel of 01X)
Port 3 < 01X: MIDI B (back panel of 01X)
Port 4 < 01X: Studio Manager
Port 5 < 01X: Remote Motif ES Editor
Port 6 (not available)
Port 7 (not available)
Port 8 (not available)
Port 9 < mLAN16E: Motif ES (Controller)
Port 10 < mLAN16E: PLG150 Boards or external device
Port 11 < mLAN16E: Remote for Motif Rack
Port 12 < mLAN16E: not used in this setup example
What we are doing here is setting up so that we
can (via MIDI) …
1) …remote control the 01X via Studio Manager
software. “Studio Manager” can be thought of as
mirror of the internal digital mixer.
2) …remote control the Digital Audio Workstation
(DAW) sequencer from the front panel of the 01X
(when the 01X’s red Remote is lit) – there are an
unlimited number of control channels in Remote
mode in banks of 8 channels.
3) …remote control the Motif ES via the “Multi-Part
Editor for Motif ES” from the 01X (when the red
Remote is flashing [SHIFT] + [REMOTE]). Motif ES
parameters will be shown in the 01X screen.
4) …remote control the Motif Rack via Multi-Part Editor
for Motif Rack from the Motif ES front panel – this
will be using the Motif ES’s ability to act as a
general remote control device.
Studio Manager: Mirror image of the Internal 01X
•
Open the STUDIO MANAGER program.
•
Find the MIDI SETUP box (“floats” outside the main
program). Click on it to see MIDI Setup.
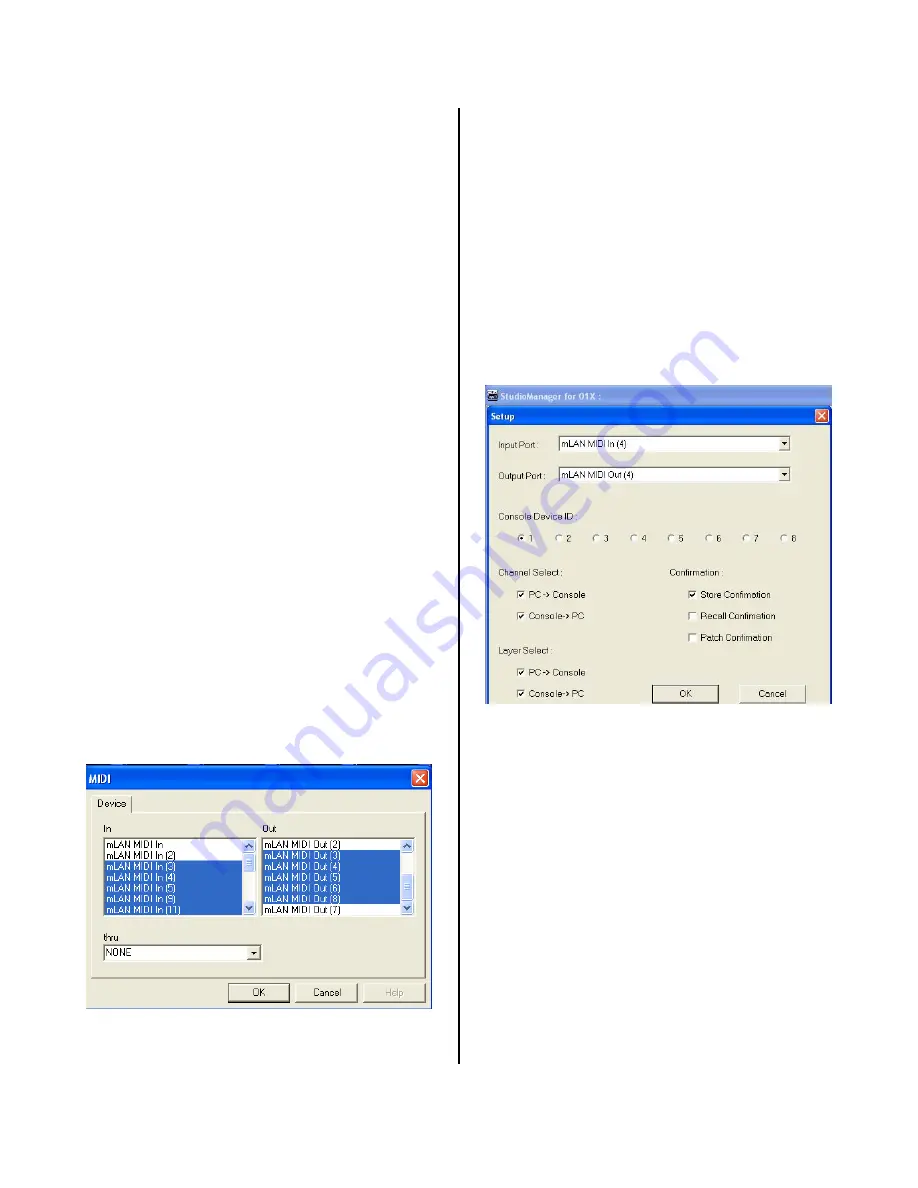
MIDI SETUP
Above is a screen shot of the MIDI SETUP dialog
box.
We will be using the following MIDI IN and OUT
devices:
mLAN MIDI In (3) Motif Rack to 01X’s MIDI-B
mLAN MIDI In (4) Studio Manager
mLAN MIDI In (5) Remote Motif ES Editor
mLAN MIDI In (9) Motif ES Controller (kbd) to Computer
mLAN MIDI In (11) Remote Motif Rack Editor
mLAN MIDI Out (3) Motif Rack from 01X’s MIDI-B
mLAN MIDI Out (4) Studio Manager
mLAN MIDI Out (5) Remote Motif ES Editor
mLAN MIDI Out (6) Motif ES (TG)
mLAN MIDI Out (8) Remote Motif Rack Editor
STUDIO MANAGER System Setup
•
Under the FILE menu find SYSTEM SETUP.
Studio Manager SYSTEM SETUP shown above –
remote control is on mLAN PORT 4. The function
of Studio Manager is to be a bi-directional and
simultaneous control over the internal 01X
digital mixer. This will become clearer as you
begin to work. When you make a change on the
front panel of the 01X it will be immediately
reflected on the Studio Manager software and vice
versa. Studio Manager will also save all your
Libraries: Input/Output Patch library, EQ library,
Dynamics library and Effects library. The beauty
of Studio Manager is it is a representation of
exactly what you are doing on the hardware 01X.
Studio Manager files (.x1x) will contain not only a
snapshot of the initial condition of the 01X for
each session – it can contain all the Library files.
That is, all your Effect setups, EQ library, Dynamic
Processor library, Scenes and Input/Output Patch
library. [See the Power User on “Studio Manager”
for more details].
7


