


2
M7CL-48ES Auto Configure Guide
Appendix: How are the channels patched?
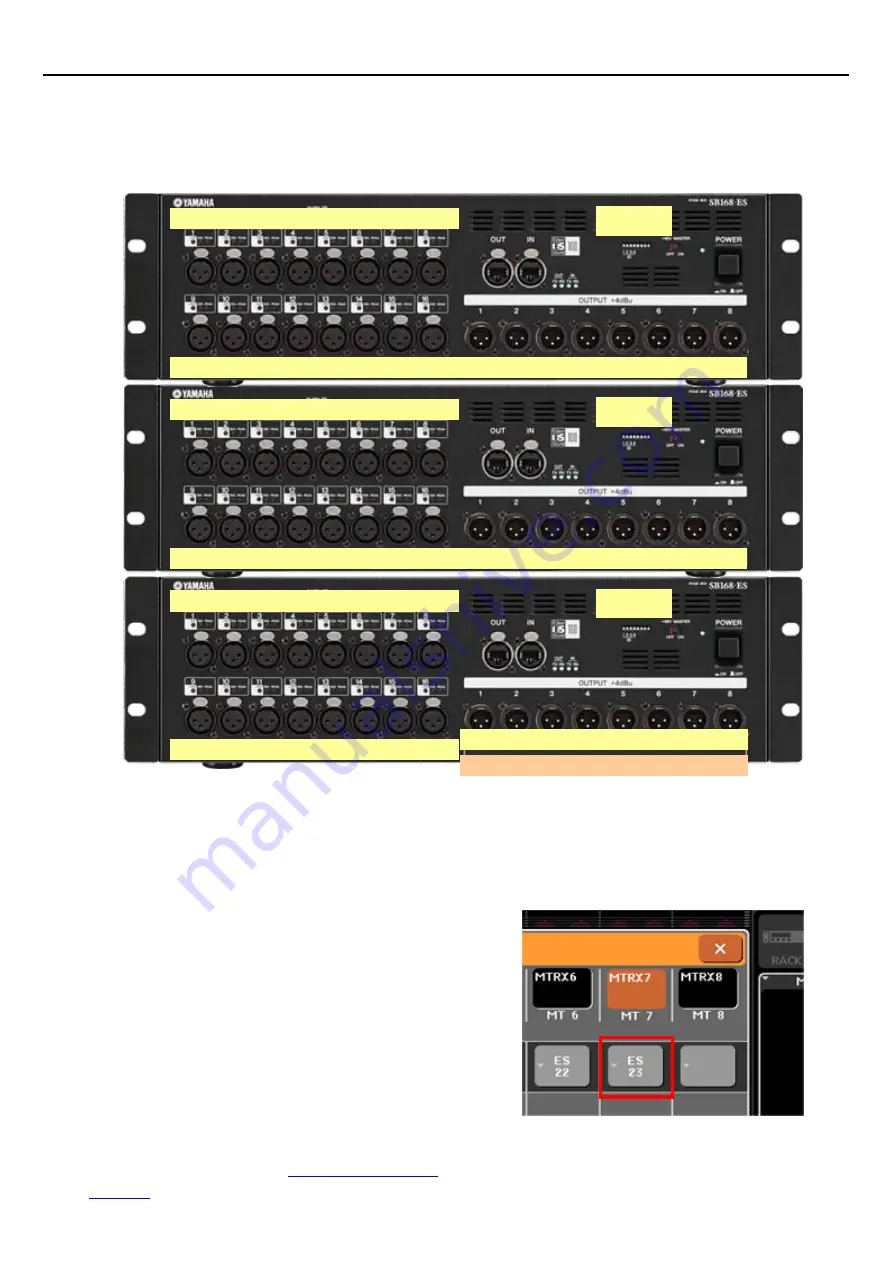
Auto Configure provides you the patching below for three SB168-ES in Daisy Chain mode.
ID #1
Ch1 Ch2 Ch3 Ch4 Ch5 Ch6 Ch7 Ch8
Ch9 Ch10 Ch11 Ch12 Ch13 Ch14 Ch15
Ch16
Ch17 Ch18 Ch19 Ch20 Ch21 Ch22 Ch23 Ch24
Ch25 Ch26 Ch27 Ch28 Ch29 Ch30 Ch31 Ch32
Ch33 Ch34 Ch35 Ch36 Ch37 Ch38 Ch39 Ch40
Ch41 Ch42 Ch43 Ch44 Ch45 Ch46 Ch47 Ch48
Mix1 Mix2 Mix3 Mix4 Mix5 Mix6 St L St R
Mix7 Mix8 Mix9 Mix10 Mix11 Mix12 St L St R
Mtrx1 Mtrx2 Mtrx3 Mtrx4 Mtrx5 Mtrx6 St L St R
ID #3
ID #2
Mix7 Mix8 Mix9 Mix10 Mix11 Mix12 St L St R
In Ring mode, there are only 16 available output channels in EtherSound network.
So ID #3 box outputs copies ID #2 box as shown in orange box.
Need custom patching?
If you need different output patch at the stagebox,
(e.g. Matrix 7&8) use the console patching system.
Only if you have additional EtherSound devices
(e.g. DME/TXn/Live Recording devices etc.), must
you use AVS-ESMonitor from AuviTran to add
them to your ES network. First disable Auto
Configure on the console then, uncheck “lock
routing” in AVS-ESMonitor.
For further information about EtherSound setup,
please refer to the “EtherSound Setup Guide”
which is available on the
Yamaha Pro Audio
website
.
Example: Matrix 7 now assigned to ES 23
- stealing patch from St L on ID #3


