6C13G11
7-32
1
2
3
4
5
6
7
8
9
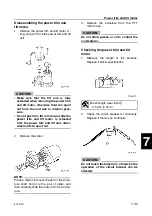
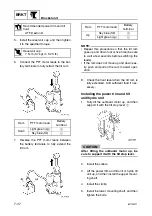
Disassembling the power trim and
tilt motor
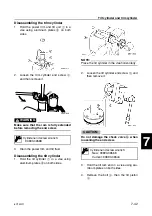
1.
Remove the power trim and tilt motor, O-
ring, and joint from the power trim and tilt
unit.
CAUTION:
• Make sure that the tilt ram is fully
extended when removing the power trim
and tilt motor, otherwise fluid can spurt
out from the unit due to internal pres-
sure.
• Do not push the tilt ram down while the
power trim and tilt motor is removed
from the power trim and tilt unit, other-
wise fluid can spurt out.
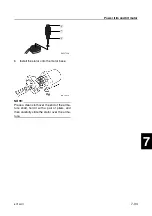
2.
Remove the stator.
NOTE:
Place a clean cloth over the end of the arma-
ture shaft, hold it with a pair of pliers, and
then carefully slide the stator off of the arma-
ture.
3.
Remove the armature from the PTT
motor base.
CAUTION:
Do not allow grease or oil to contact the
commutator.
Checking the power trim and tilt
motor
1.
Measure the length of the brushes.
Replace if below specification.
2.
Check the circuit breaker for continuity.
Replace if there is no continuity.
CAUTION:
Do not touch the bimetal
b
, otherwise the
operation of the circuit breaker can be
affected.
Brush length wear limit
a
:
4.5 mm (0.18 in)
Summary of Contents for F50F
Page 1: ...F50F FT50G F60C FT60D SERVICE MANUAL 6C1 28197 3G 11 290551 ...
Page 4: ......
Page 48: ...SPEC Specifications 2 25 6C13G11 MEMO ...
Page 190: ...LOWR Lower unit 6 47 6C13G11 Shimming FT50 FT60 6 ...
Page 195: ...6C13G11 6 52 1 2 3 4 5 6 7 8 9 MEMO Backlash FT50 FT60 ...
Page 221: ...6C13G11 7 24 1 2 3 4 5 6 7 8 9 Steering arm ...
Page 249: ...6C13G11 7 52 1 2 3 4 5 6 7 8 9 MEMO Power trim and tilt electrical system ...
Page 272: ...ELEC Electrical systems 8 21 6C13G11 MEMO ...
Page 301: ...6C13G11 i 5 1 2 3 4 5 6 7 8 9 Index MEMO ...
Page 303: ......
Page 304: ...YAMAHA MOTOR CO LTD Printed in the Netherlands Jul 2004 1 2 1 CR E_2 ...


