background image

ELS-01/01C/01X Owner’s Manual

126

Music Data Recorder (MDR)

7

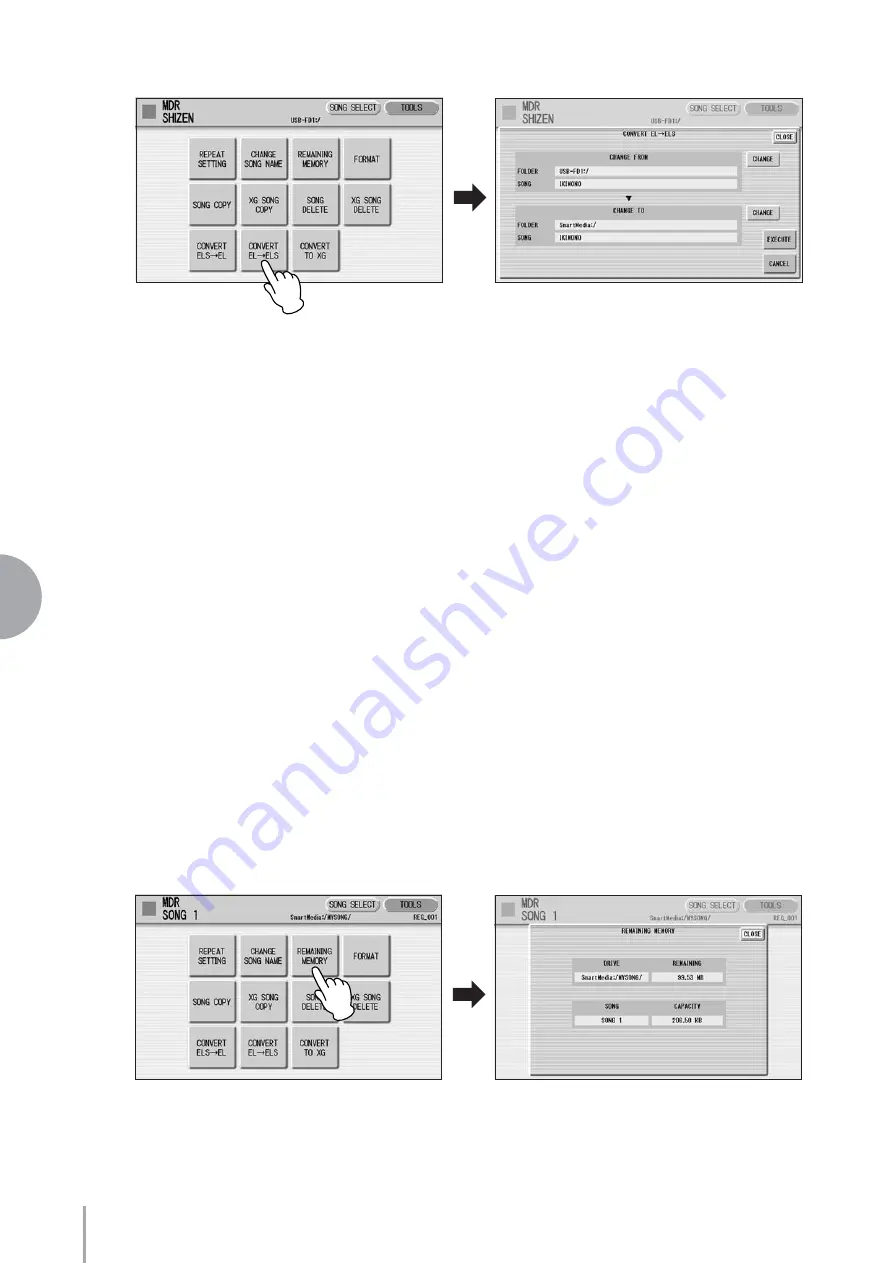
Confirm that the desired song to be converted is shown in upper 
half of the display. 

If you want to change the song, press the [CHANGE] button of the Change 
From section to call up the Song Select display and select the desired song.

Press the [CHANGE] button of the Change To section in the 
display, then select the destination.

The specified destination location must be within the range of Song 1 - 100 in 
the SmartMedia card or USB flash memory. If a destination is not selected, an 
empty song is automatically set as the destination.

Press the [EXECUTE] button in the display to start conversion.

A message appears, prompting confirmation of the operation. Select 
[CONVERT] to convert to EL format, or [CANCEL] to abort the operation. 
If the remaining memory of the SmartMedia is insufficient, conversion cannot 
be executed. (An error message appears and the operation is cancelled.)

● ● ● ● ● ● ● ● ● ● ● ● ● ● ● ● ● ● ● ● ● ● ● ● ● ● ● ● ● ● ● ● ● ● ● ● ● ●

Checking the Remaining Memory

In the TOOLS Page, press the [REMAINING MEMORY] button. This allows you to 
check the remaining memory in the media and the song data capacity of the currently 
selected song.

3

4

5

Summary of Contents for Electone Stagea ELS-01C

Page 1: ...Owner s Manual ELS 01 01C 01X EN Excellence Winner of STC s International Technical Publications Competition 2004...

Page 2: ...power switch disconnect the electric plug from the outlet and have the instrument inspected by qualified Yamaha service personnel CAUTION Always follow the basic precautions listed below to avoid the...

Page 3: ...olume level since this can cause permanent hearing loss If you experience any hearing loss or ringing in the ears consult a physician Do not place the bench in an unstable position where it might acci...

Page 4: ...01X The Yamaha Electone combines the most advanced tone generation technology with state of the art digital electronics and features to give you stunning sound quality with maximum musical versatility...

Page 5: ...pressiveness and control of an actual acoustic instrument What s more there are 183 different effect types in 15 categories that you can apply to each Voice section letting you enhance and even comple...

Page 6: ...ve companies The illustrations and LCD screens as shown in this owner s manual are for instructional purposes only and may appear somewhat different from those on your instrument The panel illustratio...

Page 7: ...the Registration data to SmartMedia card 83 Initializing Registration Memory 84 Registration Shift 84 Unifying a specific parameter 89 7 Music Data Recorder MDR 92 Calling Up the M D R Display 92 Form...

Page 8: ...D UPPER KNEE MARCH LATIN WORLD MUSIC BALLAD ROCK DANCE WALTZ POPS R B SWING JAZZ LOWER KNEE PEDAL PIANO ORGAN GUITAR CHOIR WORLD PERCUS SION 1 2 STRINGS BRASS TUTTI PAD SYNTH WOOD WIND PIANO ORGAN GUI...

Page 9: ...TIMPANI TO LOWER SYNTH BASS 1 PEDAL VOICE 2 BRILLIANCE VOLUME LEAD VOICE 2 VA VA ACOUS TIC VIRTUAL VA VA ELEC TRONIC SOLO KNEE CUSTOM 1 MASTER VOLUME DISPLAY SELECT VOICE DISPLAY FOOT SWITCH RHYTHM P...

Page 10: ...tton page 35 L ORGAN FLUTES button page 35 ROTARY SP SPEED button page 48 DISPLAY SELECT VOICE DISPLAY FOOT SWITCH RHYTHM PROGRAM UTILITY INTERNET A B C M O C MDR VOICE EDIT PATTERN SEQUENCE U ORGAN F...

Page 11: ...Selecting the Display Language 15 Muting the Touch Panel Sound 16 Adjusting the Display Brightness 16 4 Voice Display 17 5 Registration Menu 19 Selecting Registrations from the Registration Menu 19 Re...

Page 12: ...Control dial to make fine changes to the parameter value shown in the display Changing the Display Page There are some oval shaped numbered buttons at the top right of the display Pressing these butto...

Page 13: ...directly For switching on off or opening a parameter list see the instructions below To switch the function on or off You can independently mute each Voice section in the Voice Display each accompanim...

Page 14: ...ment Touching the display slider directly Press a point in the slider to which you want to adjust the parameter value The slider will move to the point you pressed Also by sliding your finger up or do...

Page 15: ...h and Japanese The default setting is English Press the UTILITY button to call up the GLOBAL Page of the Utility Display Press the desired button Japanese or English 3 LCD Display Settings NOTE The se...

Page 16: ...of the Utility Display Press the OFF button of the TOUCH PANEL SOUND to mute the sound To turn the sound on again select ON in Step 2 Adjusting the Display Brightness You can adjust the display bright...

Page 17: ...he Electone is turned on To call up the Voice Display from any other display press the VOICE DISPLAY button The Voice Display consists of two different pages that can be switched by pressing the 1 or...

Page 18: ...ows the bar beat when the rhythm is playing 6 REGISTRATION Shows the current position of the Registration Shift You can confirm the parameter values for example Reverb Volume Pan for each Registration...

Page 19: ...desired Registration by pressing the appropriate button on the display One display page contains 12 Registration buttons Pressing the numbered buttons in the display changes the display pages letting...

Page 20: ...Blues Jam B Power House B Jazz Club B Pasodoble B Dream Ballad C Blues Jam C Power House C Jazz Club C Pasodoble C Dream Ballad D Blues Jam D Power House D Jazz Club D Pasodoble D Pops Orchestra A Ev...

Page 21: ...ways save your important data to external media such as a SmartMedia card Factory Set does not reset the Internet Direct Connection settings If you want to reset the Internet Direct Connection setting...

Page 22: ...es additional exclusive VA Voices which are not available in other Voice sections Contents 1 Voices for each keyboard 22 2 Selecting Voices with the Voice buttons 23 Selecting a Voice 23 Changing the...

Page 23: ...a Voice Press one of the Voice buttons in the Upper Keyboard Voice 1 section LOWER KEYBOARD VOICE 1 BRILLIANCE BRILLIANT MELLOW VOLUME LOWER KEYBOARD VOICE 2 BRILLIANCE VOLUME MAX MIN BRILLIANT MELLO...

Page 24: ...enu will appear Select the desired Voice name from the Voice menu The Voice menu contains many Piano Voices more than can fit on one display page To change the display pages press the appropriate numb...

Page 25: ...imum of full volume Using VOLUME slider in the display fine Pressing the same Voice button on the panel again or pressing the Voice name of the selected Voice in the display calls up the Voice Conditi...

Page 26: ...ORGAN GUITAR CHOIR WORLD PERCUS SION 1 2 CAUTION Turning the Electone off erases all panel settings you have made If you wish to keep the panel settings you have made save them to a SmartMedia card or...

Page 27: ...o the Upper Keyboard except for Lead Voice 2 are playable on the Upper Keyboard Only Lead Voice 2 is muted Each time you press the Knee Lever Solo off you can play all Voices except Lead Voice 2 and e...

Page 28: ...the desired instrument category with the category buttons in the display You can also choose the USER category to select a User Voice you have created For example to call up Marimba 1 select the percu...

Page 29: ...Marimba 1 appears under the category name indicating that the Voice has been selected To directly select the desired category hold down one of the User buttons and simultaneously press the desired Voi...

Page 30: ...mbone 3 Trombone 4 Muted Trombone 1 Muted Trombone 2 5 Horn 1 Horn 2 Horn 3 Horn 4 Horn 5 Horn 6 Muted Horn 6 Tuba 1 Tuba 2 Euphonium Brass Bass 1 Brass Bass 2 Brass Bass 3 WOODWIND FLUTE 1 Flute 1 Fl...

Page 31: ...E Piano 1 DX E Piano 2 DX E Piano 3 DX E Piano 4 Stage E Piano 1 Stage E Piano 2 Stage E Piano 3 Stage E Piano 4 Stage E Piano 5 Stage E Piano 6 3 Stack E Piano 1 Stack E Piano 2 Clavi 1 Clavi 2 GUIT...

Page 32: ...oard pressure can result in flutter tonguing V Pan Pipe 2 C1 C6 Panpipe flute sound After and Initial Touch affect the pitch and timbre V Bamboo C1 C6 Bamboo panpipe sound with breath noise After Touc...

Page 33: ...er and applying keyboard pressure allows creation of hum noise 2 V Mad Tube Distorted synth lead with long release sound High After Touch settings produce an overblowing effect V Mob Distorted lead so...

Page 34: ...s so musical VA synthesis simulates the very complex vibrations resonances reflections and other acoustic phenomena that occur in an actual wind or string instrument Notes on VA Voices Since the VA Vo...

Page 35: ...the button lights and the Flute Footage Levers appear on the display On the ELS 01 U ORGAN FLUTES and L ORGAN FLUTES buttons are not active Organ Flutes does not function Select the wave type for the...

Page 36: ...ect 3 MODE Determines which notes in a held group of notes are given an attack sound This parameter is common to both Upper and Lower Organ Flute Voices FIRST Only the first note played will have atta...

Page 37: ...is displayed calls up a list of the effect types Select the desired type from among the list then close the list by pressing CLOSE button on the display Pressing U ORGAN FLUTES or L ORGAN FLUTES butt...

Page 38: ...for the entire system Priority is applied only for Lead Voice 2 Controls and Effects Reference page for changing the settings Voice sections to which the controls effects are applied Upper Keyboard L...

Page 39: ...nd tonal changes of actual instruments Two types of keyboard touch affect this function Initial Touch and After Touch 2 1 INITIAL touch Controls volume and timbre according to the velocity at which yo...

Page 40: ...r a wide register There are three settings 4 8 and 16 4 is highest and 16 is lowest A 2 setting is added to the Pedal Voice sections PRESET is the original factory setting 5 REVERB Determines the amou...

Page 41: ...of time that elapses between the playing of a key and the start of the vibrato effect Higher settings increase the delay of the vibrato onset Range 0 14 1 3 DEPTH Determines the intensity of the vibra...

Page 42: ...ngs detune for each Voice section producing a richer sound Each step represents a 1 cent change in pitch Range 64 63 You can edit the effect parameters from these two displays Both displays have the s...

Page 43: ...anging the effect type the effect parameter below is automatically changed corresponding to the selected effect type 3 Effect Parameters Effect parameters are displayed corresponding to the selected e...

Page 44: ...meter or the panel REVERB control is set to the minimum the settings in the pages that follow have no effect Range 0 24 1 TYPE Determines the reverb type for each of the Voice sections and the Organ F...

Page 45: ...the reverb length for each of the Voice sections and the Organ Flute Voice Higher settings increase the reverberance Range 0 3s 30 0s 3 ORGAN only for the ELS 01C 01X Determines the amount of reverb a...

Page 46: ...0 3s 30 0s 3 RHYTHM Determines the amount of reverb applied to the rhythm with PERCUSSION slider and accompaniment with ACCOMPANI slider Each slider corresponds to the REVERB slider in the Rhythm Con...

Page 47: ...stain is on Press the button again to turn sustain off and the lamp turns off When the lamp is off sustain does not affect the corresponding keyboard Remember to check whether the sustain button lamps...

Page 48: ...he Rotary Speaker effect Select the Rotary Speaker effect from the desired Voice When you want to set Rotary Speaker to one of the Voice section you can select the effect category of Rotary Speaker in...

Page 49: ...on the panel Once the Rotary Speaker effect has been turned on and set you can control the effect in real time from the panel or from the Left Footswitch Control the Rotary Speaker effect from the pa...

Page 50: ...T PAN 2 EP AUTO PAN ROTARY SPEAKER XG ROTARY SP ROTARY SP 1 ROTARY SP 2 ROTARY SP 3 ROTARY SP 4 ROTARY SP 5 2WAY ROT SP DUAL ROTSP 1 DUAL ROTSP 2 DIST ROT SP ODRV ROT SP AMP ROT SP DIST 2ROT SP ODRV 2...

Page 51: ...ARCH LATIN WORLD MUSIC BALLAD ROCK DANCE WALTZ POPS R B SWING JAZZ 2 1 1 1 2 1 2 3 1 2 3 A B C D RHYTHM VOLUME SEQ 2 SEQ 3 SEQ 4 SEQ MAX MIN TEMPO INTRO ENDING MAIN FILL IN BAR BEAT RHYTHM CONTROL STA...

Page 52: ...hythm you can use them to add spice to your performance and mix up the beats while you are playing You can freely change the section while the rhythm is played back INTRO This is used for the beginnin...

Page 53: ...r rhythmic pattern to spice up a repeating rhythm There are four Fill In sections that can be played by pressing the selected lit MAIN FILL IN A D buttons as desired When one measure pattern of Fill I...

Page 54: ...change the rhythm section of the Main phrase by pressing the desired MAIN FILL IN A D button The selected section s lamp above the button is lit To use the Fill In patterns As you play the Electone al...

Page 55: ...ons of the rhythm on the panel to set the desired level The buttons have seven volume settings from a minimum of 0 or no sound to a maximum of full volume Using VOLUME slider in the display fine Press...

Page 56: ...dicator the number on the left indicates the current bar or measure and the one on the right indicates the number of the beat in each bar You can also see the Tempo and Bar Beat indications in the Voi...

Page 57: ...restore the tempo to the original setting Changing the rhythm reverb You can adjust the amount of reverb applied to the rhythms and the percussion sounds used in the rhythms in the Rhythm Condition di...

Page 58: ...the desired rhythm category with the category buttons in the display You can also choose the User category to select a User rhythm you have created The currently selected rhythm category appears at th...

Page 59: ...Tijuana SingerSongWriter Surfin 8Beat Finger Pickin Heart Beat Guitar Pop 2 British 16Beat 3 16Beat 1 16Beat 2 16Beat 3 16Beat 4 Fusion Shuffle 1 Fusion Shuffle 2 Jazz Pop 16Beat Shuffle 1 16Beat Shu...

Page 60: ...Hip Hop 3 Latin DJ s Club Latin Latin Disco 1 Latin Disco 2 Garage 6 8 Trance 80 s Dance Pop Beat 1 Pop Beat 2 Funky Dance 4 Disco Philly 1 Disco Philly 2 70 s Disco 1 70 s Disco 2 Disco Funk Disco C...

Page 61: ...ing corresponding button in the display If you turn all the parts off the Accompaniment does not sound CHORD 1 CHORD 2 These are the rhythmic chord backing parts PAD This part features sustained chord...

Page 62: ...play It adds an entirely new dimension to your performance by effectively putting a full backing band at your disposal There are three modes used for producing Automatic Accompaniment patterns Before...

Page 63: ...add full continuous chords to your performance FINGERED CHORD The Fingered Chord mode automatically produces bass accompaniment for chords played in the Lower keyboard It allows you to use a wider ran...

Page 64: ...ops the rhythm The Melody On Chord M O C feature automatically adds a harmony part to the melodies you play on the Upper keyboard The harmony is derived from the chords you play on the Lower keyboard...

Page 65: ...from the keyboards and Pedalboard Keyboard Percussion has two different modes Preset and User Preset Keyboard Percussion lets you play the preset drum kit sounds from the keyboards assigned beforehand...

Page 66: ...erb applied to the Keyboard Percussion Two sliders in the K B P display determine the reverb and volume settings The settings here determine the reverb volume for the entire Keyboard Percussion setup...

Page 67: ...wirl Snare Drum Light Ride Cymbal Cup Snare Roll Synth Tom 1 Tom 3 Tambourine Castanet Snare Drum Rim 1 Splash Cymbal Snare Soft Tom 2 Sticks Hi Hat Close Kick Soft Tom 1 Open Rim Shot Hi Hat Open Kic...

Page 68: ...utting Noise 2 Door Squeak Roller Coaster Door Slam Submarine String Slap Scratch Cut Scratch H 3 Wind Chime Telephone Ring Shower Laugh Thunder Scream Wind Punch Stream Heart Beat Bubble Foot Steps F...

Page 69: ...Zagrouda L Conga L Slide Kick Soft Katem Dom Bongo H Open 1 f Cowbell Top Side Stick Katem Tak Bongo H Open 3 f Snare Soft Katem Sak Bongo H Rim Arabic Hand Clap Katem Tak Bongo H Tip Snare Drum Doff...

Page 70: ...YBOARD PERCUSSION 1 button The K B P display appears Press USER 1 on the display This procedure assigns User 1 to the KEYBOARD PERCUSSION 1 button You can call up the User 1 setting the next time you...

Page 71: ...nstrument Simultaneously hold down the CLEAR button in the display ASSIGN Page and press the key or pedal corresponding to the instrument you wish to erase 6 NOTE Though eight User Keyboard Percussion...

Page 72: ...omentarily appears on the display Press CANCEL in the display to abort the operation Copying the Keyboard Percussion settings You can copy the Preset Keyboard Percussion to one of the User locations o...

Page 73: ...he display A list appears letting you select the copy source location Select the copy source Preset 1 here from the list A message appears prompting confirmation of the operation Press the COPY button...

Page 74: ...instrument to be changed is assigned The selected instrument s name is shown on the display and you can change its settings 1 PAN Determines the position of the currently selected instrument in the s...

Page 75: ...ult values Pressing the EXECUTE button calls up the following display prompting confirmation of the operation Press the EXECUTE button in the display to restore initialize the default settings When EX...

Page 76: ...pen Hi Hat Closed Hi Hat Pedal SNARE DRUM Snare Snare Tight Snare Soft Snare Roll Side Stick Open Rim Shot Brush Tap Brush Slap Brush Swirl Brush Tap Swirl TOM Floor Tom L Floor Tom H Low Tom Mid Tom...

Page 77: ...wirl Brush Tap Swirl TOM Tom Rock 1 Tom Rock 2 Tom Rock 3 Tom Rock 4 Tom Rock 5 Tom Rock 6 BASS DRUM Kick Gate Kick 2 Kick Soft PERCUSSION 1 Conga H Open Conga L Conga H Mute Bongo H Bongo L Timbale H...

Page 78: ...r Tom L Floor Tom H Low Tom Mid Tom L Mid Tom H High Tom BASS DRUM Kick Jazz Kick Tight Kick Soft PERCUSSION 1 Conga H Open Conga L Conga H Mute Bongo H Bongo L Timbale H Timbale L Cowbell Claves Guir...

Page 79: ...lla Tak Duhulla Sak Doff Dom Doff Tak ARABIC 2 Katem Dom Katem Tak Katem Sak Tabla Dom Tabla Tak 1 Tabla Tak 2 Tabla Sak Tabla Tik Tabla Roll Edge Tabla Flam Tabel Dom Tabel Tak ARABIC 3 Sagat 1 Sagat...

Page 80: ...ake can be stored to the Registration Memory panel buttons All Registrations in Registration Memory can also be saved to a SmartMedia card or other external media for future recall Create your origina...

Page 81: ...ternet Direct Connection settings page 198 The following settings common to all Registration Memory numbers 1 16 and cannot be stored individually for each number Transpose page 188 Attack mode in Org...

Page 82: ...niment patterns also change when you select different Registration Memory buttons Pressing the D Disable button allows you to keep the same rhythm accompaniment patterns tempo and so on throughout all...

Page 83: ...play Select the song to which you want to save the Registration data page 96 Press REGIST EDIT button in the display to call up the Registration Edit display Press the SAVE button in the display A mes...

Page 84: ...Electone will be restarted Press CANCEL to cancel the operation The Registration Shift function allows you to change Registrations without taking your hands from the keyboards By using the Right Foots...

Page 85: ...Right Footswitch selects the Registration Memory presets in their numerical order After the last Registration is reached the function wraps around to select the first preset again The numbered buttons...

Page 86: ...to the right 2 DATA These are data controls used to enter and delete Registration numbers in the Registration row SET For initially entering a Registration number to a blank space in the Registration...

Page 87: ...are saved in one Song This function is handy when you need to play a song with more than sixteen Registrations The Shift End mark will automatically be put at the end of the Registrations you entered...

Page 88: ...stration Shift in USER mode Indicates the current position of the Registration Shift You can change the Registration by moving the cursor in orange right left using the displayed buttons or the Data C...

Page 89: ...panel Press the 2 button at the top right of the display to select Page 2 Press the PARAMETER button indicates the currently selected parameter in the display to select the desired parameter for chang...

Page 90: ...with the SETTINGS buttons ALL ON ALL OFF ON OFF and SELECT ALL ON Selects all Registration memory numbers ALL OFF Cancels all Registration memory numbers ON Sets the currently selected Registration me...

Page 91: ...r position A message appears prompting you to confirm the operation To continue the operation select UNIFY Select CANCEL to abort the operation Offsetting the currently turned on parameter s value Pre...

Page 92: ...button again to recall the M D R display All the instructions in this chapter are related to the M D R display To call up the M D R functions and the M D R display press the MDR button Contents 1 Cal...

Page 93: ...oved because it is stuck do not try to force it but instead try re inserting the card completely into the slot and attempt to eject it again Accessing includes saving loading formatting deleting and m...

Page 94: ...Do not remove the floppy disk or turn off the instrument itself while the disk is being accessed Doing so may result not only in loss of data on the disk but also damage to the floppy disk drive Be s...

Page 95: ...slot or disk drive or connect the device to the USB TO DEVICE terminal Press the TOOLS button at the top right of the display to call up the TOOLS Page Press the FORMAT button in the display Select th...

Page 96: ...play then select the desired song Check the currently selected media at the top of the display For example if you want to select a song in the SmartMedia card confirm that SmartMedia is displayed at t...

Page 97: ...er buttons to change the displayed songs Song 1 Song 8 When the 1 button is selected When the 3 button is selected Song Part Information Pressing the PART SETUP button calls up the Part Setup display...

Page 98: ...er folder or media For example when SmartMedia Folder1 Folder1 in the SmartMedia is selected pressing the UP button selects SmartMedia 5 CREATE FOLDER Creates a new folder in the Media Folder List Up...

Page 99: ...media such as a SmartMedia card or floppy disk This icon is displayed in the Media Folder List Indicates a folder Indicates that write protect or copy protect is effective for the media Indicates a so...

Page 100: ...song consists of various files such as Registration files and performance files The following files are created with the M D R The extension will not appear in the Electone display They will however b...

Page 101: ...play The following display appears indicating that you can record your performance Press the F Play button An hourglass icon appears indicating that Registration data is currently being read After the...

Page 102: ...Voice 1 Voices can be recorded separately though the Lead Voice 2 Voices will be included in the performance data of the Upper Keyboard The following instruction is an example First record the chords...

Page 103: ...parts you want to record in this case the Upper part to REC Also set the part already recorded in this case Lower and Pedal parts to PLAY so you can hear the previously recorded parts as you record ne...

Page 104: ...ts to PLAY Press the F Play button to start punch in recording Play the new phrase as you want it to be changed Press the J Stop button to quit the punch in recording as soon as you reach the end of t...

Page 105: ...bol Select the desired character for entry A song name can contain up to 50 characters After finished select OK to actually enter the name The LCD will return to the TOOLS Page display 3 4 DATA CONTRO...

Page 106: ...rsed area can be changed by the E F buttons in the display or the Data Control dial The converted area can be cleared at once by pressing the cancel button To actually enter the change press the OK bu...

Page 107: ...ge disappears exit from the Regist Edit display by pressing the CLOSE button and return to the SONG SELECT Page The song to which the Registration is recorded is automatically named SONG XX xx indicat...

Page 108: ...song without changing the performance data In advance you need to create the original Registration that will replace the old one Select the song for which you wish to replace the Registrations For det...

Page 109: ...he Registration Sequence page 176 Save the desired Registrations to a song For instructions on saving two or more Registration banks to a song see page 107 Select the song containing the Registrations...

Page 110: ...red data you want to load For more information see page 111 4 LOAD Loads the selected Registration bank to the panel keyboards After loading you can check the Registration by playing the keyboards 5 S...

Page 111: ...ou want to load to the Electone Using the five DATA TO BE LOADED buttons select the desired data you want to load Press the LOAD button to load the selected data in the Registration Exit from the Regi...

Page 112: ...the elapsed time is shown In general all parts recorded to the song are played back however you can mute specific parts and playback only selected parts For more information see page 113 When the end...

Page 113: ...ant to playback to PLAY and the part you want to mute to OFF Fast Forward Rewind and Pause Fast Forward and Rewind During playback press the H Fast forward button or G Rewind button and hold it down u...

Page 114: ...po Use the TEMPO buttons in the display or Data Control dial to change the tempo The TEMPO dial on the panel cannot be used to change the tempo for the Music Data Recorder The range is 50 200 The orig...

Page 115: ...that will be played back For details on selecting a song see page 96 Press the TOOLS button at the top right of the display to call up the TOOLS Page Press the REPEAT SETTING button to call up the Re...

Page 116: ...rom Electone song format to XG format The fast forward rewind and pause controls are available just as with songs performances recorded on the Electone Insert the media containing XG song data into th...

Page 117: ...ME Adjusts the volume of the XG song within a range of 0 100 To set the volume touch the slider in the display directly or use the Data Control dial 3 PART SETUP Determines the volume balance of the p...

Page 118: ...G songs is done with a different method from Song Copy here Refer to XG Song Copy page 123 To copy within one media or between a SmartMedia card and floppy disk Select the song to be copied For detail...

Page 119: ...e one of the source song but is attached at the beginning If you want to change the song name see page 104 To copy a song from one SmartMedia card to another Follow the step 1 3 on page 118 Press the...

Page 120: ...E to abort the operation The song name of the destination is the same as the one of the source song but is attached at the beginning If you want to change the song name see page 104 Song Delete You ca...

Page 121: ...protect copyright This is Protected Song Protected songs can be saved to a SmartMedia card with ID or USB flash memory The protected song can be played back as same as the song you created but it can...

Page 122: ...to XG format Selects a song to be converted to XG For details on selecting a song see page 96 Press the TOOLS button at the top right of the display to call up the TOOLS Page Press the CONVERT TO XG...

Page 123: ...NG COPY button to call up the XG Song Copy display Confirm that the desired song to be copied is displayed in upper half of the display If you want to change the song press the COPY FROM CHANGE button...

Page 124: ...pting confirmation of the operation Select DELETE to delete the selected XG song or select CANCEL to abort the operation Converting ELS format to EL You can convert songs created on the ELS 01 01C 01X...

Page 125: ...he floppy disk created with an EL series Electone such as the EL 900 to the ELS 01 01C 01X format and save it to a SmartMedia card or USB flash memory If you are using the ELS 01 you ll need to instal...

Page 126: ...SmartMedia card or USB flash memory If a destination is not selected an empty song is automatically set as the destination Press the EXECUTE button in the display to start conversion A message appears...

Page 127: ...e level volume filter settings and so on A single Voice contains four boxes AWM1 AWM4 in which the Elements are put If a Voice consists of less than three Elements some boxes are empty For example Str...

Page 128: ...section of the ELS 01C 01X All Voices in the other Voice sections are AWM Voices Selecting a Voice for editing Select the Voice you want to edit from the Voice Menu For example if you want to edit Ac...

Page 129: ...M Voice If you have selected a VA Voice the VA Page will appear If you release the VOICE EDIT button before pressing a Voice button the Voice Edit function will not be called up and the normal Voice D...

Page 130: ...cy band over a range of 32 Hz 2 0 kHz The EQ LOW GAIN slider sets the level for the frequency band specified by the EQ LOW FREQ slider over a range of 12 dB 12 dB 3 EQ HIGH FREQ EQ HIGH GAIN Sets the...

Page 131: ...ingle Element for ease in editing Note that when some Elements are muted playing the keyboard in certain key areas or with certain velocities may result in no sound 3 Display switch buttons The LAYER...

Page 132: ...rmines the position of the Element in the stereo image Range L64 R63 1 NOTE SHIFT Determines the pitch settings in semitones Range 64 63 2 TUNE FINE Determines the fine tuning Range 64 63 3 ATTACK RAT...

Page 133: ...ut of a specific frequency portion of the sound This Electone is equipped with a low pass filter which passes only those signals below the cutoff frequency and cuts signals above the cutoff frequency...

Page 134: ...es the filter cutoff frequency Higher values result in a greater amount of frequency change For the minimum setting the frequency does not change Range 0 4800 cent 5 LFO AMD Amplitude Modulation Depth...

Page 135: ...ng the corresponding button Pressing the button again cancels the mute AWM buttons are grayed out when you are editing a VA Voice since VA Voices do not contain Elements However you can add AWM Elemen...

Page 136: ...4 63 6 EQ LOW Determines the level volume of the low range frequencies Positive values boost or increase the level while negative values decrease or cut it Range 64 63 7 EQ HIGH Determines the level v...

Page 137: ...the same as the one for the song name in the M D R section See page 104 for more information Up to sixteen characters can be entered Press the SAVE button to save the Voice or press CANCEL to abort th...

Page 138: ...er 2 Selecting Voices from the User buttons page 28 Once your original VA Voice has been saved it can be selected from the VA CUSTOM button in LEAD VOICE 2 Refer to chapter 2 Selecting Voices with the...

Page 139: ...165 Recalling User Rhythm Patterns 165 Selecting Rhythm from an External Media 166 Percussion Kit List 167 3 Rhythm Sequence Program 170 Selecting a Sequence 170 Programming a Sequence 171 Auditioning...

Page 140: ...existing rhythm saving you time if you want to program a rhythm that is similar to an existing preset pattern Select the rhythm you want to copy from the Rhythm Menu While holding down the PATTERN bu...

Page 141: ...3 Main A B C D Fill In A B C D Ending 1 2 3 Break Intro 1 2 3 Main A B C D Fill In A B C D Ending 1 2 3 Break Preset Rhythm User Rhythm Changing Intro 1 to Intro 1 Save as a User Rhythm All Rhythm se...

Page 142: ...nother rhythm to the currently selected rhythm Press the SETTING button in the display to call up the SETTING Page Determines the time signature used for the rhythm You can select the time signature w...

Page 143: ...re length of the rhythm pattern Pressing the MEASURE button on the display calls up the Measure Select pop up menu Select the desired measure in the pop up menu If you select Break or Fill In as the s...

Page 144: ...RT Clears a specific part or parts from the currently selected rhythm Pressing this button calls up the following display Select the part you want to delete from the displayed parts You cannot select...

Page 145: ...hmic value has been determined such as a bass drum that plays every beat in a measure Real Time Write on the other hand is similar to using a multi track tape recorder you can hear previously recorded...

Page 146: ...rds You can select only one kit for each part Main Drum or Add Drum When you want to create a rhythm pattern including two different drum kits select one kit for Main Drum and another for Add Drum Sel...

Page 147: ...ttern and one beat is made up of 480 clicks The rhythm clock advances up to the measures set in the SETTING Page and loops back to the beginning of the rhythm 01 01 000 2 ACCENT buttons Records the in...

Page 148: ...changing the accent level 1 NEXT INSTRUMENT Selects the entered instruments one by one from left key to right 2 NOTE E F controls Selects the previous next position s note of the currently selected in...

Page 149: ...evel over a range of 0 127 The minimum setting results in no sound 2 ACCENT buttons Determines the coarse accent level Eight accent levels from ppp to fff are available Press the desired Accent button...

Page 150: ...1 on page 148 Press the REST button in the ACCENT section of the display The selected note is deleted and replaced with a rest You can also erase all notes of a single instrument or all notes entered...

Page 151: ...to erase all instruments All instruments are instantly erased When you want to replace the instrument you have already entered with another instrument it s not necessary to delete and re enter You can...

Page 152: ...me Write It allows you to automatically correct the timing of the notes you play according to the specified Quantize resolution No correction occurs when you select FREE Generally you should set Quant...

Page 153: ...e operation For details refer to page 152 Press the rhythm START button in the panel The rhythm or Metronome starts playing enabling the Real Time Write operation While the rhythm is running play the...

Page 154: ...e Accompaniment pattern that best matches the rhythm that you have created Moreover Rhythm Pattern Program features a Rhythmic Chord function that lets you add your own backing patterns to the rhythms...

Page 155: ...pears prompting you to confirm whether you want to clear the existing data or not To create your own Rhythmic Chord pattern select CLEAR Select the desired Voice Pressing the button showing the Voice...

Page 156: ...For information on Step Write see page 147 for information on Real Time Write see page 153 You can also edit the entered Rhythmic Chord pattern using the same method as in Editing Entered Percussion N...

Page 157: ...iment Parts In Rhythm Pattern Program you can create your original drum patterns using Main Drum and Add Drum and original backing patterns using Chord 1 and Chord 2 Moreover you can change the Voices...

Page 158: ...o your personal preference by adjusting the volume and pan and setting the desired effects below Adjusting Volume and Panning Volume and Pan are set in VOICE EFFECT Page 1 ON OFF Determines the on off...

Page 159: ...rm ambience to the sound simulating the complex reflections of actual performance spaces such as a concert hall or a small club Chorus provides a wide variety of sound transformations and enhancements...

Page 160: ...he type of the chorus effect Pressing the CHORUS TYPE button calls up the chorus type list Select the desired chorus type and the list automatically closes 2 Chorus sliders Determines the amount of ch...

Page 161: ...oses After changing the category the variation type below automatically changes corresponding to the selected category 2 TYPE Variation Type Determines the type of the variation effect Pressing the TY...

Page 162: ...instrument Press the DRUM SETUP button at the top of the display to call up the DRUM SETUP Page Select the desired part Main Drum or Add Drum Press the appropriate key the key to which the instrument...

Page 163: ...etermines the pitch of the currently selected instrument adjustable in semitone 100 cent steps Range 64 63 6 PITCH FINE Determines the pitch of the currently selected instrument adjustable in 1 cent s...

Page 164: ...ttern again Confirming rhythm patterns before saving The rhythm pattern you have created will be saved with 15 sections collectively into one rhythm Before saving we recommend that you confirm the con...

Page 165: ...ram or CANCEL to abort the operation and return to the previous display Recalling User Rhythm Patterns The User rhythms you have created in the Rhythm Pattern Program can be selected and played from t...

Page 166: ...R section See page 96 for more information Press EXECUTE or press the highlighted selected button again to load the pattern To edit the loaded pattern go to the INPUT Page page 148 then save your crea...

Page 167: ...Electro 4 Mid Tom H Mid Tom H Hybrid Tom 5 Tom Room 5 Tom Rock 5 Tom Electro 5 Crash Cymbal 1 Crash Cymbal 1 Crash Cymbal 1 Crash Cymbal 1 Crash Cymbal 1 Crash Cymbal 1 High Tom High Tom Hybrid Tom 6...

Page 168: ...nalog 4 Tom Dance 4 Mid Tom L Tom Brush 4 Mid Tom L Synth Snare Drum Tom Analog 5 Tom Dance 5 Mid Tom H Tom Brush 5 Mid Tom H Analog SD Crash Analog Crash Analog Crash Cymbal 1 Crash Cymbal 1 Hand Cym...

Page 169: ...o L Tip Bongo L Tip Woodblock Low Hi Hat Open Hi Hat Open Bongo L Heel Bongo L Heel Timbale 4 Low Mid Tom L Mid Tom L Bongo L Slap Bongo L Slap Vibraslap Mid Tom H Mid Tom H Timbale L Open Timbale L O...

Page 170: ...ce a song in separate sections for example separately practicing the verse chorus and bridge divide the song into the relevant parts For example save the intro part to the SEQ 1 button the main chorus...

Page 171: ...next step Press the Sequence button SEQ 1 SEQ 4 of the copy source on the right half in the display A message appears prompting confirmation of the operation Press COPY to execute the operation or se...

Page 172: ...is entered the cursor colored orange will automatically move to one step right A maximum of 140 bars can be entered to a single sequence When you select an ending pattern and press the SET button an...

Page 173: ...OSITION buttons on the display Press the rhythm START button on the panel The Sequence plays back Pressing the START button again stops playback Editing an Existing Rhythm Sequence You can insert a ne...

Page 174: ...t of the cursor are moved to accommodate the new number This operation is not available between measures of an ending pattern Additional rhythms cannot be entered beyond the Rhythm sequence function s...

Page 175: ...ck Press the REGIST button at the top right in the display to call up the Registration Sequence display The Registration Sequence is programmed from this display The entered Registration number is sho...

Page 176: ...INSERT button in the display The Next Regist mark appears at the timing point you set in step 1 indicating that the Next Regist is entered Editing an Existing Registration Sequence You can move or de...

Page 177: ...Press the DELETE button to delete the data Quitting the Rhythm Sequence Program You can quit the Rhythm Sequence Program from any of its display pages When you quit the sequence you have made will be...

Page 178: ...e up to all four rhythm sequences automatically play in order one after another Press the desired Sequence buttons making sure that all their LEDs are lit Press the rhythm START button The rhythm sequ...

Page 179: ...ence playback cancels the Rhythm Sequence When you are playing a Rhythm Sequence that is made up of several sequences SEQ buttons pressing the Left footswitch turns off the currently playing Rhythm Se...

Page 180: ...unctions Rhythm Glide and Rotary speaker See page 84 for the details of the Registration Shift function or Right Footswitch The explanation on the Left Footswitch is given here Press the FOOT SWITCH b...

Page 181: ...n off whenever you press the Footswitch 2 BREAK When you press the Footswitch the Break section turns on This function corresponds to the BREAK button on the panel 3 MAIN A MAIN D These functions corr...

Page 182: ...he Footswitch the rhythm section is switched to Ending 1 After the ending pattern is played the rhythm stops Controlling Glide You can control the Glide effect by using the Left Footswitch Pressing th...

Page 183: ...ction or Organ Flute Voice For details see page 48 The Knee Lever located on the underside of the keyboard panel can be used to turn one of the following on and off Sustain effect Melody On Chord func...

Page 184: ...is on Controlling Melody On Chord Press the A B C M O C button on the front panel The Melody On Chord section appears in the right half of the display Set the KNEE control to ON and select one of the...

Page 185: ...g the Knee Lever cancels the Lead Slide effect Controlling the Solo Function You can turn the Solo function on off by using the Knee Lever See page 27 for more information The Expression pedal can be...

Page 186: ...Pedal Controlling Pitch Bend 1 MODE Determines the range of the Pitch Bend control Each step changes the pitch range by a semitone Range 1 12 The setting 2 NARROW results in a small amount of pitch va...

Page 187: ...e 1 12 The setting 2 NARROW results in a small amount of tempo change 70 140 the setting 12 WIDE results in a large amount of tempo change 50 200 2 TEMPO When you want to control the tempo with the 2n...

Page 188: ...Transpose and Pitch settings by using the buttons on the display or the Data Control Dial 1 TRANSPOSE Determines the coarse pitch setting of all the Voices and is adjustable in half steps semitones R...

Page 189: ...arks of Your Favorite Pages 194 Editing Bookmarks 196 Changing the Home Page 197 3 About the Internet Settings Display 198 Browser 198 LAN 199 Wireless LAN 199 Others 200 4 Exiting from the Internet D...

Page 190: ...ms require an optional hub network for simultaneously connecting to several devices such as computer musical instrument etc 2 Accessing the Website from the Electone USB wireless LAN adapter Here mode...

Page 191: ...ide or bottom of the display Touch and move the scroll bar to view those parts of the page that are not shown Following Links When there is a link in the page it is shown as a button or in colored tex...

Page 192: ...ication with the site is in progress The indicator lights continuously when loading is finished communication is established 3 SSL indicator This is shown when the opened website uses SSL and it indic...

Page 193: ...the Previous Web Page To return to a previously selected web page press the BACK button To return to the page selected before pressing the BACK button press the FORWARD button 5 Communication status...

Page 194: ...e can be instantly called up in the future With the desired page currently selected press the BOOKMARK button in the control menu The Bookmark display appears showing a list of the currently saved boo...

Page 195: ...the Data Control Dial To save the bookmark press the EXECUTE button or press the CANCEL button to cancel To return to the browser press the EXIT button Opening a Bookmarked Page Press the BOOKMARK bu...

Page 196: ...n calls up the display for entering characters For details on entering characters see page 104 5 DELETE Deletes the selected bookmark from the Bookmark list 6 MOVE Changes the order of the bookmarks 1...

Page 197: ...et as your new home page Press the SETTING button in the control menu to call up the Internet Setting display Press the Browser button to call up the Browser Page Press the Register button of the Set...

Page 198: ...his page as Home For details refer to Changing the Home Page on page 197 4 Restore default Home Restores the home page setting 5 Show images Image data and pictures in the web page are shown in the br...

Page 199: ...OFF 3 IP address Subnet mask Gateway These settings are available only when DHCP is not used The settings here are IP address subnet mask and gateway server address These settings must be made when Us...

Page 200: ...the type and length of the encryption key Others 1 Proxy server Proxy port Non proxy server Determines the proxy server name port number and the host name for a main non proxy server The settings here...

Page 201: ...gs must be initialized separately as explained here Initializing will reset to the default values not only the settings of the browser but also all settings you have made in the Internet Settings disp...

Page 202: ...em A device which connects and allows data transfer between a conventional telephone line and a computer It converts the digital signals from the computer to analog audio for sending over the phone li...

Page 203: ...ent to the MIC LINE IN jack make sure to set this level gain switch appropriately depending on the device you use Contents 1 Accessory Jacks and Controls 203 2 Connection Examples External Devices 206...

Page 204: ...1X only This set of stereo outputs is for connection to an external amplifier speaker The output level is fixed and cannot be controlled 7 AUX OUT RCA L R jacks LEVEL FIXED This set of stereo outputs...

Page 205: ...ng external MIDI devices such a synthesizer or sequencer You can also use these to connect with a computer that has a MIDI Interface OPTICAL OUT TO DEVICE TO HOST USB IN OUT MIDI 1 2 9 Reference Page...

Page 206: ...tem By using the AUX OUT jacks you can connect your Electone to external speakers If you re connecting the Electone to a mono device use only the AUX OUT L L R jack standard phone 2 Connection Example...

Page 207: ...components set all volume levels to minimum 0 then turn on the power in the following order 1 Electone and external keyboard s 2 Mixer 3 Powered Speaker To turn the power off first turn down the volum...

Page 208: ...Through the Built in Speakers of the Electone Connect the AUX IN jacks of the Electone with the LINE OUT of an external device such as a CD player The sound from the CD player is output from Electone...

Page 209: ...tandard 1 4 phone jack A dynamic microphone is recommended Set the MIC LINE switch to the MIC position when connecting a microphone or the LINE position when connecting a guitar or other high level ou...

Page 210: ...motely play the Voices of a MIDI keyboard or tone generator combining them with the Electone and letting you create even richer more multi layered sound textures The MIDI receive channels of the MIDI...

Page 211: ...ult your Yamaha dealer or an authorized Yamaha distributor for advice or see the Yamaha website http www global yamaha com NOTE When you are using the M D R MIDI data cannot be received MIDI IN MIDI O...

Page 212: ...I driver software from the Yamaha web site at http music yamaha com download NOTE When you are using the M D R MIDI data cannot be transferred to from the computer Precautions when using the USB TO HO...

Page 213: ...instrument In the world today these are the two main categories of instruments Let s consider a grand piano and a classical guitar as representative acoustic instruments They are easy to understand Wi...

Page 214: ...ed and when was it released Then each piece of information is changed into a number value and sent to the tone generator Using these numbers as a basis the tone generator plays the stored sampled note...

Page 215: ...erated when a key is released Velocity Indicates how strongly the key is played The range is 1 127 For more detailed information see MIDI Data Format on page 222 and MIDI Implementation Chart on page...

Page 216: ...el MIDI Transmit Channel via a single MIDI cable to the receiving instrument If the receiving instrument s MIDI channel MIDI Receive Channel matches the Transmit Channel the receiving instrument will...

Page 217: ...r keyboard the Lower keyboard and the Pedalboard The MIDI messages on each keyboard will be sent on the channels set here You must set the transmit channel here to match the receive channel of the con...

Page 218: ...the timing control for rhythm synchronization purposes INT Internal Pressing the Rhythm START or SYNCHRO START button on the panel controls connected devices such as a sequencer EXT External Starting...

Page 219: ...l the two legs for the back side Bench for the ELS 01C 01X Turn the bench board over and install the legs with the included eight screws Tighten the screws using the included hexagonal wrench as shown...

Page 220: ...he output cord to the left side of the pedalboard Also connect the pedalboard cord by fastening to the nut NOTE When disconnecting the output cord pull it while firmly holding the metal edge Attach th...

Page 221: ...ve a Phillips head screwdriver ready Remove the three backing papers from the adhesive tape in the case and fit the floppy disk drive into the case Fold the USB cable inside the case as shown Attach t...

Page 222: ...14ch XG Bn 0B 00 7F Expression 16ch 5 14ch 16ch Control XG Bn 10 00 7F VA After Touch 1ch 1ch UK ELS 01C 01X only Bn 40 00 7F Hold 5 14ch XG Bn 41 00 7F Portamento 5 14ch XG Bn 42 00 7F Sostenuto 5 14...

Page 223: ...K LK PEDAL An nn 00 7F Polyphonic After Touch 1 16ch Bn 00 00 7F Bn 20 00 7F Bank select 1 16ch Bn 01 00 7F Modulation 1 16ch Bn 04 00 7F 2nd Expression 16ch 4ch Control LEAD 1 ELS 01C 01X only Bn 05...

Page 224: ...16ch Bn 78 00 Bn 79 00 Bn 7B 00 Bn 7C 00 Bn 7D 00 Bn 7E 00 Bn 7F 00 All Sound Off Reset All Controllers All Note Off Omni Off Omni On Mono Poly 1 16ch Cn 00 7F Program Change 1 16ch 16ch Control Dn 0...

Page 225: ...4C BH BL AH AM AL data cc F7 XG Bulk Dump F0 43 1N 27 30 00 00 MM LL cc F7 XG Master Tuning Code Hexadecimal Message Receive Transmit F0 43 73 01 02 F7 03 Request for Internal Synch Mode Request for...

Page 226: ...Data 00 MAX 7F MIN 17 Pedal Voice 1 Volume 00 7F 00 7F Volume Data 00 MAX 7F MIN 18 Pedal Voice 2 Volume 00 7F 00 7F Volume Data 00 MAX 7F MIN 19 Lead Voice 2 Volume 00 7F 00 7F Volume Data 00 MAX 7F...

Page 227: ...cc Switch dd Remarks Code Receive Rx Range Transmit Tx Range 50 Upper Sustain UPPER KNEE 00 01 00 01 00 OFF 01 ON 51 Lower Sustain LOWER KNEE 00 01 00 01 00 OFF 01 ON 52 Pedal Sustain PEDAL 00 01 00 0...

Page 228: ...7F WIDE 00 7F 32 4E 10 00 07 19 1 00 7F User Vibrato 00 PRESET 01 USER 00 7F 00 01 10 00 07 1A 1 00 7F Vibrato Delay 00 SHORT 7F LONG 00 7F 02 1A 10 00 07 1B 1 00 7F Vibrato Depth 00 MIN 7F MAX 00 7F...

Page 229: ...00 7F7F 0000 7F7F 10 00 07 53 2 0000 7F7F Effect 2 Parameter 2 MSB LSB 0000 7F7F 0000 7F7F 0000 7F7F 10 00 07 54 2 0000 7F7F Effect 2 Parameter 3 MSB LSB 0000 7F7F 0000 7F7F 0000 7F7F 10 00 07 55 2 00...

Page 230: ...00 MIN 7F MAX 00 7F 00 7F 11 00 01 12 1 00 7F Reverb Send Level 00 MIN 7F MAX 00 7F 00 7F 11 00 01 13 1 00 7F Type Sine Vintage 00 Sine 01 Vintage 00 7F 00 01 11 00 01 40 3 00 00 7F 00 7F Effect Type...

Page 231: ...7F Main Drum On Off 00 OFF 01 ON 00 7F 00 01 13 00 17 1 00 7F Chord 1 On Off 00 OFF 01 ON 00 7F 00 01 13 00 18 1 00 7F Chord 2 On Off 00 OFF 01 ON 00 7F 00 01 13 00 19 1 00 7F Pad On Off 00 OFF 01 ON...

Page 232: ...F 01 ON 00 7F 00 01 13 05 18 1 00 7F Break On Off 00 OFF 01 ON 00 7F 00 01 13 05 20 1 00 7F Ending 1 On Off 00 OFF 01 ON 00 7F 00 01 13 05 21 1 00 7F Ending 2 On Off 00 OFF 01 ON 00 7F 00 01 13 05 22...

Page 233: ...0 7F 00 7F Reverb Type Panel 00 00 7F 00 7F 00 00 7F 00 7F 00 00 7F 00 7F Address Size Data Parameter Data Receive Rx Range Transmit Tx Range hh mm ll 14 02 01 1 00 7F Reverb Time Rhythm 00 FAST 7F SL...

Page 234: ...ode 3 OMNI OFF POLY 5 1 3 5 16 2 4 9nH v 1 127 9nH v 0 or 8nH 6 6 6 7 6 6 7 8 12 6 6 6 6 6 11 9 120 6 121 6 123 127 6 Mode 3 0 127 4 Bank Select 2nd Expression Data Entry Expression VA After Touch Dat...

Page 235: ...Date 19 Sep 2003 Version 1 00 YAMAHA Electone XG mode Model ELS 01 01C 01X Mode 1 OMNI ON POLY Mode 3 OMNI OFF POLY Yes No Mode 2 OMNI ON MONO Mode 4 OMNI OFF MONO 120 121 123 127 Transmitted 1 Funct...

Page 236: ...REAR SPEAKER switch may have been set to OFF Switch it to ON The Electone panel does not function normally or the content of the memorized data has changed This happens very rarely Occasionally power...

Page 237: ...iment volume in the Rhythm Condition display page 62 All Accompaniment parts may be set to off mute Set the desired part on page 61 The harmony notes of the Melody On Chord function cannot be heard Th...

Page 238: ...r to page 106 The path name is too long The capacity of the path name is 234 letters Reduce the layer or shorten the song folder name to shorten the path The rhythm does not start at the beginning of...

Page 239: ...1 Attack 4 2 2 3 2 Length Response Effect XG Rotary Sp Rotary Sp 1 5 2Way Rot Sp Dual Rotsp 1 2 Dist Rot Sp Odrv Rot Sp Amp Rot Sp Dist 2Rot Sp Odrv 2Rop Sp Amp 2Rot Sp OFF Rotary Speaker Control 2 6...

Page 240: ...NET VOICE EDIT RHYTHM PATTERN PROGRAM RHYTHM SEQUENCE PROGRAM ROTARY SP SPEED VOICE DISPLAY A B C M O C MDR FOOTSWITCH UTILITY INTERNET VOICE EDIT RHYTHM PATTERN PROGRAM RHYTHM SEQUENCE PROGRAM U ORGA...

Page 241: ...ntrol Change 215 Control Menu 191 CONVERT EL ELS 125 CONVERT ELS EL 124 CONVERT TO XG 122 CUSTOM A B C 63 CUTOFF FREQ 133 D D Disable 82 DATA CONTROL dial 10 DECAY RATE 136 DELAY Effect 50 DELAY Vibra...

Page 242: ...t 131 LCD BRIGHTNESS 16 LCD Display 10 Lead Slide 42 Lead Voice 22 LEAD VOICE Panel 9 LEVEL Voice Edit 132 135 LFO Low Frequency Oscillator 135 Lower Keyboard Voice 23 LOWER KEYBOARD VOICE Panel 8 M M...

Page 243: ...N MENU 19 Registration Sequence 175 Registration Shift 84 RELEASE RATE Voice Edit 132 136 Repeat 115 RESONANCE 133 RESP Response 36 Reverb 43 REVERB MIC 210 REVERB Panel 43 REVERB Rhythm Pattern Progr...

Page 244: ...SB TO HOST 205 212 USER Registration Shift 86 USER Vibrato 41 User button Rhythm 58 User button Voice 28 User Keyboard Percussion 70 User Rhythm 163 User Voice 137 UTILITY 15 V VA Voice Edit 135 VA Cu...

Page 245: ...Appendix 1 4 ELS 01 01C 01X Owner s Manual 245 MEMO...

Page 246: ...Co Ltd 11 F Silvercord Tower 1 30 Canton Road Tsimshatsui Kowloon Hong Kong Tel 2737 7688 INDONESIA PT Yamaha Music Indonesia Distributor PT Nusantik Gedung Yamaha Music Center Jalan Jend Gatot Subro...

Page 247: ......

Page 248: ...cal Instrument Division Yamaha Corporation 2004 2005 Yamaha Corporation WF37040 503MWCP1 2 02B0 Printed in Japan This document is printed on chlorine free ECF paper with soy ink Yamaha Manual Library...

Reviews: