background image

6

165

ELB-02 Owner’s Manual

Music Data R

eco

rder 

(MDR)

                                     

Creating folders

1

Connect a compatible USB flash drive to the [USB TO DEVICE] 
terminal.

2

Press the [MDR] button, then select the media/folder within which 
you want to create the new folder.

For details on selecting a Song/folder, see steps 2 and 3 on page 135.

3

Press the [B] button to open the media/folder.

4

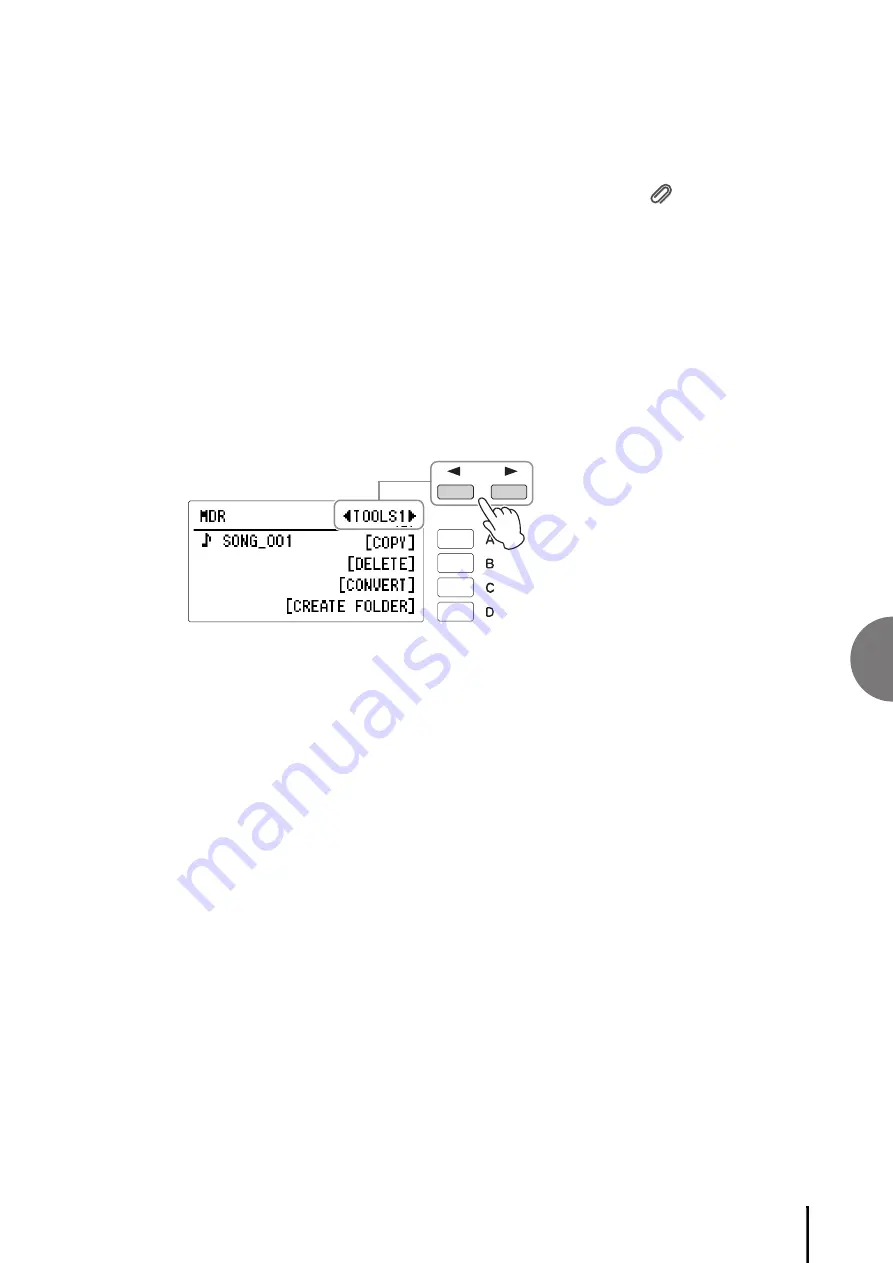
Call up the TOOLS1 Page with the Page buttons.

5

Press the [D] “CREATE FOLDER” button.

A message appears prompting confirmation of the operation.
You can cancel the operation at this point by pressing the [D] “CANCEL” 
button.

6

Press the [C] “OK” button.

The newly created folder is automatically named “FOLDER_001,” or similar. 
Up to 120 folders can be created.
For instructions on changing the folder name, see page 144.

Reference Page

Compatible USB flash drives 
(page 127)

Summary of Contents for Electone STAGEA ELB-02

Page 1: ...Owner s Manual ELB 02 EN Before using the instrument be sure to read PRECAUTIONS on pages 4 5 For information on assembling the instrument refer to the instructions at the end of this manual ...

Page 2: ...2 ELB 02 Owner s Manual ...

Page 3: ...3 ELB 02 Owner s Manual ...

Page 4: ... power cord or plug becomes frayed or damaged It emits unusual smells or smoke Some object has been dropped into the instrument There is a sudden loss of sound during use of the instrument CAUTION Always follow the basic precautions listed below to avoid the possibility of physical injury to you or others or damage to the instrument or other property These precautions include but are not limited t...

Page 5: ...lessly with or stand on the bench Using it as a tool or stepladder or for any other purpose might result in accident or injury Only one person should sit on the bench at a time in order to prevent the possibility of accident or injury If the bench screws become loose due to extensive long term use tighten them periodically using the specified tool in order to prevent the possibility of accident or...

Page 6: ...ertain operations such as Song playback etc Before using a USB flash drive make sure to refer to page 132 A mark appears at the top left of the display indicating that the Registration data is currently being saved Do not turn the power off while the Registration is being saved otherwise the data will be lost The Registration Shift settings and Keyboard Percussion settings will be automatically sa...

Page 7: ...maha Corporation The company names and product names in this manual are the trademarks or registered trademarks of their respective companies Compatible Format GM General MIDI is one of the most common Voice allocation formats GM System Level 2 is a standard specification that enhances the original GM and improves Song data compatibility It provides for increased polyphony greater Voice selection ...

Page 8: ...r Registration form Music Rest Dust Cover Power Cord Bench Congratulations Thank you for purchasing this Yamaha Electone We recommend that you read this manual carefully so that you can fully take advantage of the advanced and convenient functions of the instrument We also recommend that you keep this manual in a safe and handy place for future reference Insert the music rest into the slots as sho...

Page 9: ...lpful music scores which get you started playing the Electone using the preset Registration menu This book also includes information on how to record your performance to the USB flash drive and listen back to your recorded performances Online Materials PDF iPhone iPad Connection Manual Explains how to connect this instrument to the iPhone iPad MIDI Reference Contains MIDI related information such ...

Page 10: ...hythm buttons 68 To select and play a rhythm 68 Operating the rhythm from the panel 71 Adjusting the tempo 73 Changing the rhythm volume reverb 74 Selecting rhythms from the User buttons 75 Rhythm List 77 Accompaniment 79 Automatic Accompaniment Auto Bass Chord A B C 82 Melody On Chord M O C 85 Keyboard Percussion 88 Using the Preset Keyboard Percussion 88 Preset Keyboard Percussion List 90 Assign...

Page 11: ...ough an External Audio System 184 Outputting the sound of an external device through the built in speakers of the Electone 184 Controlling External MIDI Devices from the Electone 185 Controlling the Electone from an External Device 185 Connection with Computer 186 Using the USB TO HOST terminal 186 MIDI 187 What is MIDI 187 MIDI Messages of the Electone 188 MIDI Channels 189 MIDI Control 190 Conne...

Page 12: ...ach rhythm has its own matching accompaniment divided into five instrument parts providing basic backing as well as embellishments This powerful feature allows you to play drum and percussion sounds from the keyboard A wide range of sounds and drum percussion kits are available for performing rhythms in real time Each sound is assigned to its own key and the sounds include everything from conventi...

Page 13: ...e 182 PHONES jack page 182 Speaker Upper Keyboard page 29 USB TO DEVICE terminal page 183 Lower Keyboard page 29 MIDI terminals page 183 USB TO DEVICE terminal page 183 USB TO HOST terminal page 183 AC IN jack For connecting a power cord page 16 Right Footswitch page 121 Left Footswitch page 177 Expression Pedal page 17 Pedalboard page 29 ...

Page 14: ...r Upper Keyboard page 29 Also available on the Lower Keyboard while To Lower function is on REGISTRATION MENU Selects convenient Registrations which let you instantly reconfigure all relevant settings allowing you to start playing with all appropriate sounds pre selected page 20 LCD display Shows the current settings of the Electone page 25 SUSTAIN buttons page 63 REVERB buttons page 61 TEMPO butt...

Page 15: ...e display page 26 DATA CONTROL dial Selects the setting or value in the display page 25 Data Control A D buttons Selects items and changes the values settings in the display page 25 9 16 button page 112 MEMORY button page 111 REGISTRATION MEMORY buttons For registering and recalling panel setups page 111 DISABLE button page 114 MASTER VOLUME dial Adjusts the overall volume page 17 USB TO DEVICE te...

Page 16: ...n your locale WARNING Use only the supplied power cord CAUTION When setting up the product make sure that the AC outlet you are using is easily accessible If some trouble or malfunction occurs immediately turn off the power switch and disconnect the plug from the outlet NOTE When disconnecting the power cord first turn off the power then follow this procedure in reverse order 2 Turning On Off the ...

Page 17: ... Expression pedal down with your foot Once you have set the MASTER VOLUME control to a suitable level you can use the Expression pedal to change the volume with your foot as you play CAUTION Even when the P Standby On switch is in standby status electricity is still flowing to the instrument at the minimum level Remove the electric plug from the outlet when the instrument is not to be used for ext...

Page 18: ...ons if another page is shown 2 Press the C button corresponding to LCD CONTRAST LCD CONTRAST is selected and highlighted 3 Adjust the LCD contrast with the DATA CONTROL dial or by successively pressing the corresponding button You can set the value between 5 5 4 Adjusting the Contrast of the Display NOTICE The LCD contrast setting is automatically saved when another display is called up Make sure ...

Page 19: ...headphones connect them to the PHONES jack standard stereo phone jack 5 Using Headphones CAUTION Do not use the headphones for a long period of time at a high or uncomfortable volume level since this can cause permanent hearing loss Standard stereo phone plug ...

Page 20: ... or genre Selecting Registrations from the Registration Menu 1 Press one of the REGISTRATION MENU buttons Each button has different Registrations for different music genres For example if you want to play Jazz press the 4 button For details on the Registration Menu see page 22 2 From this main category select the specific Registration you want to use Each Registration Menu button actually contains...

Page 21: ...RATION MENU buttons 1 5 contain two display pages 01 and 02 each of which contain two different sets of Registrations Page 01 features the same Registration Menu as that of the ELB 01 while Page 02 features new Registration Menus for the ELB 02 From each of the 01 and 02 pages select the desired Registration Page buttons ...

Page 22: ...omping Classic1 93 Comping Classic2 94 Comping Classic3 95 Comping Classic4 1 KIDS SIMPLE Page 01 KIDS 01 Simple 8Beat 1 02 Simple 8Beat 2 03 Light Step 04 Sunny Pop 05 Kids March 1 06 Kids March 2 07 Kids March 3 08 Synth Rock 09 SymphonicMarch 1 10 SymphonicMarch 2 11 Bluegrass 12 Sea Carnival 13 Basic Waltz 14 Brass Ensemble 15 Pure Waltz 16 Rococo Ensemble 17 Pop Cha Cha 18 Comical Rumba 19 Co...

Page 23: ... Shaky Dance 58 J Pop Piano Band 59 J Pop Boys 60 J PopShuffleBeat 61 J Pop BandBallad 62 Breezy Ballad 63 HeroRanger Theme 64 Sunset Pop 65 Funky Punch A 66 Funky Punch B 67 GlxyBattleship A 68 GlxyBattleship B 69 J Pop Anime A 70 J Pop Anime B 71 70s Honey 72 70s Hero 73 DBZ A 74 DBZ B 75 DBZ C 76 DBZ D 3 DANCE BALLAD Page 01 01 Organ Ballad 02 Dramatic Ballad 03 Love Ballad 04 Smooth Lead 05 Po...

Page 24: ...rquesta Salsa 33 New Flamenco 34 Jummin Reggae 35 RumbaAndTheCity 36 French Caribbean 37 Caribbean Sea 5 SYMPHONY WORLD Page 01 01 Fanfare 02 String Orchestra 03 Romantic Violin 04 Baroque 05 Flute Harp 06 Serenade 07 Fast March 08 Wild West 09 Vienna Waltz 10 Polka 11 Chanson Club 12 Theatre Organ 13 Flamenco 14 Pop Flamenco 15 Mexican Dance 16 Mariachi 17 Celtic Dance 18 Folk Step 19 Italiano 20...

Page 25: ...l bar is shown in the display you can scroll through the display vertically by rotating the DATA CONTROL dial and select the desired menu When the marks U and D are shown at the right side of the scroll bar in the display you can scroll the display and select the desired one by using the A or D buttons Selecting an item and changing its value In many displays other than lists items or parameters s...

Page 26: ...lected page number appearing at the top right of the LCD Use the R button to select the next page and L to select the previous page Simultaneously pressing both buttons selects Page 1 Display name Page Page buttons Shows the number of pages and the current page The current page is shown with a long bar _ while other available pages are shown as dots Page 1 Page 2 Page 3 ...

Page 27: ...e All current settings including Registration Memory in all banks Display language and display contrast settings can be deleted at once by the following procedure Be careful when executing Factory Set since it erases all your existing data Always save your important data to a USB flash drive Note that the operation here does not affect the settings of the wireless LAN settings which can be initial...

Page 28: ...n 3 Release the ENDING 1 button after the Voice Display appears Confirming the Version of Your Electone You can confirm the version of your Electone by the following procedure 1 Press the UTILITY button The Utility display appears 2 Select Page 8 by using the Page buttons The Version appears in the display ...

Page 29: ...UPPER KEYBOARD VOICE 1 2 section while the Lead Voice 1 and Lead Voice 2 can be selected from the LEAD VOICE 1 2 section The Lead Voice sounds only the highest note or last note played if two or more keys are played together This makes the Lead Voices ideal for solo instruments such as Trumpet and Saxophone instruments that play the leading or most prominent part in an orchestra or band As the def...

Page 30: ...ection Voices for Pedalboard Up to two different Voice sections are available on the Pedalboard for playing together Pedal Voice 1 and Pedal Voice 2 Voices for each section can be selected from the panel s PEDAL VOICE 1 2 section The Pedal Voice sounds one note at a time when you simultaneously press two or more keys only the highest note will sound Voices for the Lower Keyboard 1 and Lower Keyboa...

Page 31: ...unds or not by setting the on off status in the Voice display Press the A D buttons corresponding to the Voice section you want to change to alternate between on and off Page 1 and page 2 Each of the keyboards and Pedalboard have two basic Voice sections Voice section 1 and Voice section 2 To select a Voice you need to first select the desired Voice section For this reason the Voice Display actual...

Page 32: ... up From this display you can check which Voices have been selected for Voice section 2 on each keyboard Upper Keyboard Voice 2 Lead Voice 2 Lower Keyboard Voice 2 and Pedal Voice 2 For selecting the desired Bank to which you can store the Registration or from which you can recall the Registration For details refer to page 116 Voice Display Page 3 Upper Keyboard Voice 1 Lead Voice 1 Lower Keyboard...

Page 33: ...n the lamp off and select Voice section 1 When the VOICE SECTION 2 lamp is off you can select a Voice for Voice section 1 in this case the Upper Keyboard Voice 1 from the panel s UPPER KEYBOARD VOICE 1 2 section 2 Press one of the Voice buttons in the UPPER KEYBOARD VOICE 1 2 section For example if you have pressed the ORGAN button the following display Voice Menu will appear The Voice menu contai...

Page 34: ... sound to a maximum of full volume Setting the Volume in the display fine Pressing the same Voice button on the panel again after selecting the Voice calls up the Voice Condition display The Volume is displayed in the top of the Voice Condition display Page 1 Press the A button to select the VOLUME item then adjust the volume by using the DATA CONTROL dial The range of the Fine volume control is 0...

Page 35: ...ng it a second time calls up the Voice Condition display Successive presses alternate between the two displays From the Voice Condition display you can control Voice related parameters such as Pan Effect Volume and so on For more information on the Voice Condition display see page 53 Voice Menu Display Voice Condition Display ...

Page 36: ...nd 2 by pressing the VOICE SECTION 2 button Each press of the VOICE SECTION 2 button alternates between the available Voice sections 1 and 2 When the button lamp is off Voice section 1 is available When the button lamp is lit Voice section 2 is available 4 Selecting a Voice for Voice section 2 NOTE Switching between Voice sections 1 and 2 has no effect on which Voice is sounded by the keyboard Sin...

Page 37: ...ECTION 2 button is lit If the VOICE SECTION 2 lamp is off press the VOICE SECTION 2 button to turn the lamp on and select Voice section 2 Now you can select a Voice for Upper Keyboard Voice 2 from the panel s UPPER KEYBOARD VOICE 1 2 section 2 Press one of the Voice buttons in the UPPER KEYBOARD VOICE 1 2 section 3 Select the Voice you want to play by using the DATA CONTROL dial Lamp is lit indica...

Page 38: ...or Upper keyboard Voice 2 above If you want to turn off the Voices of Voice section 2 set the volume level to minimum by using the Volume buttons of the selected Voice sections on the panel while the lamp of the VOICE SECTION 2 button is lit or set the status to Off in the Voice Display Page 2 Reference Page On Off status of the Voices page 31 About the To Lower function Voices selected for the Le...

Page 39: ...age available for selection in the same song For example you can assign one of the Voices to a User button in the Upper Keyboard Voice 1 2 section the second Voice to the other User button in the same section About the Solo function The ELS series Electone features an exclusive Solo function letting you instantly switch to a solo Lead Voice in the middle of your performance muting all other Upper ...

Page 40: ...ss the VOICE SECTION 2 button to turn the lamp off and select Voice section 1 2 Press one of the User buttons in any of the Voice sections in this case User button 1 in Upper Keyboard Voice 1 section The name of the selected category is displayed 3 Select one of the Pages categories with the Page buttons in this case CONTRABASS Lamp is off indicating that you can select a Voice for Voice section 1...

Page 41: ...n Upper Keyboard Voice 1 You can set voices to the User buttons in any other Voice sections just as you did for Upper keyboard Voice 1 above Directly selecting the category To directly select the desired category hold down one of the User buttons and simultaneously press the desired Voice button 1 While holding down the User button 2 Press the Voice button ...

Page 42: ...are for chamber music 14 Chamber Strs 2 15 Chamber Strs 3 16 Chamber Strs 4 17 Pizzicato Strs 1 These are sounds of stringed instruments being plucked by finger instead of being bowed 18 Pizzicato Strs 2 19 Pizzicato Strs 3 20 Pizzicato Strs 4 21 Tremolo Strings This is the sound of tremolo strings on a single note 22 Spiccato Strings This is the sound of lightly bouncing a bow on the strings of a...

Page 43: ...riations They feature rich variations from strong dynamic impact Voices with quick attack to soft warm Voices for enriching the overall sound 19 Octave Brass 2 20 Octave Brass 3 21 Octave Brass 4 22 Octave Brass 5 23 Octave Brass 6 24 Octave Brass 7 25 Octave Brass 8 26 Trumpet 1 These are bright multi purpose trumpet sounds 27 Trumpet 2 28 Trumpet 3 29 Trumpet 4 30 Trumpet 5 31 Trumpet 6 32 Trump...

Page 44: ...on 1 This instrument belongs to the double reed family and is used in the lower range It is known for its humorous expressive character as well as its wide range and agility and can also be used as a solo instrument 21 Bassoon 2 22 Bassoon 3 23 Alto Sax 1 Among the woodwind instruments this instrument is capable of the loudest sound and plays a highly prominent role Its wide expressive power makes...

Page 45: ...oices have more of unique character and distinctiveness than the other synth pads and feature sweeping filter effects and other dynamic sound variations when held 09 Resonance Pad 2 10 Resonance Pad 3 11 Resonance Pad 4 12 Resonance Pad 5 13 Resonance Pad 6 14 Resonance Pad 7 15 Resonance Pad 8 16 Bell Pad 1 These continuous pad Voices feature gentle bell sounds There are several types of Voices h...

Page 46: ...ead 1 These light and round synth sounds are appropriate for solos and leads 27 Pop Lead 2 28 Pop Lead 3 29 Pop Lead 4 30 Pop Lead 5 31 Pop Lead 6 32 Synth Cla 1 These bright round and fresh synth sounds are reminiscent of the clarinet 33 Synth Cla 2 34 Synth Cla 3 35 Synth Cla 4 36 Synth Cla 5 37 Synth Cla 6 38 Synth Cla 7 39 Synth Sax This is a wind synth sound 40 Synth Trumpet This is a bright ...

Page 47: ...nd features a solemn rich majestic sound The Voices here range from soft to powerful 02 Pipe Organ 2 03 Pipe Organ 3 04 Pipe Organ 4 05 Pipe Organ 5 06 Theatre Organ 1 This instrument evokes feelings of nostalgia having been used extensively in silent movie theaters skating rinks restaurants especially pizzerias and baseball stadiums 07 Theatre Organ 2 08 Theatre Organ 3 09 Theatre Organ 4 10 Thea...

Page 48: ... sounds are from the popular DX7 synthesizer 13 DX E Piano 2 14 DX E Piano 3 15 DX E Piano 4 16 DX E Piano 5 17 DX E Piano Pad 1 These sounds combine the popular DX7 synthesizer with pads 18 DX E Piano Pad 2 19 Galaxy E Piano This is a bright sound with a strong touch response 20 Stage E Piano 1 These electric piano Voices feature the characteristic hammer and tine sound with a bright yet warm fee...

Page 49: ...tion Gtr 6 38 Distortion Gtr 7 39 S Dist Solid 1 2 This is a distorted electric guitar sound that is suitable for solos It is a Super Articulation Voice that features hammering or slides only if you play an accented legato note that is between a minor 2nd and a perfect 4th above the current note When you release a key the noise caused by fingers touching and muting strings is reproduced Natural so...

Page 50: ...s 1 These synth bass sounds are suitable for dance music 09 Dance Bass 2 10 Dance Bass 3 11 Dance Bass 4 12 Dance Bass 5 13 Dance Bass 6 14 Dance Bass 7 15 Dance Bass 8 16 Dance Bass 9 17 Dance Bass 10 18 Smooth Bass 1 These are contemporary cool synth bass sounds 19 Smooth Bass 2 20 Smooth Bass 3 21 Smooth Bass 4 22 Fat Bass 1 These are fat synth bass sounds 23 Fat Bass 2 WORLD 01 Pan Flute 1 The...

Page 51: ...s suitable for beautiful and lyrical melodies 20 Gu Zheng 2 21 Yang Qin This percussive stringed instrument is a member of the zither family Sound is produced by striking the strings with beaters It is a relatively new Chinese instrument with origins influenced by the West 22 Pi Pa This Chinese lute has a pear shaped body and it is used often for solo parts as well as accompaniment and ensembles 2...

Page 52: ...ato are not applied to the Pedal Voices on the Pedalboard they will be applied to the Pedal Voices on the Lower Keyboard when you turn the To Lower function to on Priority is applicable only for Lead Voice 2 Controls and Effects Reference page for changing the settings Voice sections to which the controls effects are applied Upper Keyboard Lead Voice Lower Keyboard Pedalboard Upper Keyboard Voice ...

Page 53: ...oice Condition except for Lead Voice consists of five display pages Voice Condition of the Lead Voice consists of six pages 1 Selecting from the Voice Condition display Voice Condition Display Setting and adjusting the parameters Press the A D buttons at the right of the display corresponding to the items or parameters you want to change then use the DATA CONTROL dial to select the desired setting...

Page 54: ...he Reverb display is set to the minimum the setting here will have no effect See page 61 for details 3 Panning Determines the position of the Voice in the stereo image Seven pan positions are available Range L3 C R3 4 Feet Determines the octave setting of the Voice letting you use the Voice over a wide register There are three settings 4 8 and 16 4 is highest and 16 is lowest A 2 setting is added ...

Page 55: ... settings make the change wider Minimum setting produces no effect Range 0 14 4 Touch Vibrato Turns the Touch Vibrato function on or off Setting Touch Vibrato to on lets you apply vibrato to individual notes as you play them by after touch The harder you press down the key the greater the vibrato will be When Touch Vibrato is off vibrato depth cannot be controlled no matter how hard you press the ...

Page 56: ...e When PRESET is selected the Delay Depth and Speed parameters cannot be edited Selecting User lets you adjust the vibrato settings for yourself 2 Delay Determines the amount of time that elapses between the playing of a key and the start of the vibrato effect Higher settings increase the delay of the vibrato onset Range 0 14 3 Depth Determines the intensity of the vibrato effect Higher settings r...

Page 57: ...e sound image both front and back and left and right ROTARY SPEAKER This popular effect used mainly for electronic organ sounds recreates the rich animated pulsing sound of a rotating speaker horn The Rotary Speaker effect can be switched in real time as you play with the Left Footswitch when properly set for Footswitch operation Keep in mind that the Rotary Speaker effect CANNOT be turned on only...

Page 58: ...er type page 64 If you want to use the Rotary Speaker effect set the Speed and Mode settings in the Rotary Speaker display See Rotary Speaker on page 60 3 Parameters Effect parameters are displayed corresponding to the selected effect type 4 Value setting Press the Page buttons to select Page 5 1 Transpose Changes the pitch in semitones for each Voice section Range 6 6 2 Tune Determines the fine p...

Page 59: ...Voices produce effects such as pitch bend and glissando which are characteristic of the corresponding acoustic instrument making your keyboard performance more realistic Setting this to ON will apply various effects such as pitch bend and glissando to your keyboard performance 4 Priority only for Lead Voice 2 Determines the mode of Lead Voice 2 Last or Top LAST Only the last played key is sounded ...

Page 60: ...eaker mode When this is set to on rotating speed of the Rotary Speaker becomes fast and the speed can be set in 2 Speed When set to off the rotating speed of the Rotary Speaker becomes slow or stops a slow chorus effect is applied or the Rotary Speaker effect turns off stops completely Slow or Stop can be set in 3 Mode 2 Speed Determines the speed of the speaker rotation Press the B button to sele...

Page 61: ... if the Footswitch has been properly assigned See 4 Rotary Speaker on page 180 for details The Reverb and Sustain displays are called up by pressing the respective buttons on the panel Reverb Reverb adds an ambient echo like effect to the sound giving the impression of a performance in a large room or concert hall You can adjust the reverb volume for the entire system To adjust the reverb effect a...

Page 62: ... the Time parameter below is automatically changed corresponding to the selected reverb type 3 Time Determines the reverb length for the Voice sections Higher settings result in a longer reverb sound Range 0 3s 30 0s 1 Type Determines the reverb type for rhythm accompaniment and keyboard percussion 2 Time Determines the length of reverb applied to the rhythm accompaniment and keyboard percussion R...

Page 63: ...lamp of the button lights up to indicate that sustain is on Press the button again to turn sustain off and the lamp turns off When the lamp is off sustain does not affect the corresponding keyboard Remember to check whether the sustain button lamps are on or off before you start to play Sustain Length The display shows the current sustain length values for each keyboard Use the Page buttons and ap...

Page 64: ...s CROSS DELAY1 The feedback of the two delayed sounds is crossed CROSS DELAY2 TEMPO DELAY1 Tempo synchronized delay TEMPO DELAY2 TEMPO ECHO Tempo synchronized echo TEMPO CROSS1 Tempo synchronized cross delay TEMPO CROSS2 TEMPO CROSS3 TEMPO CROSS4 ER KARAOKE ER 1 Isolates only the early reflection components of the reverb ER 2 GATE REVERB1 Creates a unique powerful effect by cutting short the rever...

Page 65: ... of the independent rotation of the rotary speaker horn and rotor Bright Warm DUAL ROTSP 2 DUAL ROT BRT DUAL ROT WRM DIST ROT SP Distortion and rotary speaker connected in series ODRV ROT SP Overdrive and rotary speaker connected in series AMP ROT SP Amp simulator and rotary speaker connected in series DIST 2ROT SP Distortion and 2 way rotary speaker connected in series ODRV 2ROT SP Overdrive and ...

Page 66: ...vy sound 1 settings B LGND HVY 2 British stack amp simulator heavy sound 2 settings B LGND CLEAN British stack amp simulator with clean sound settings EFFECT TYPE Description B LGND D CLN British stack amp simulator with crunch sound settings US CMB TWIN Simulates an American combo amp USCMB RCH CL USCMB THN CL USCMB CRUNCH JZ CMB BASIC Simulates a jazz chorus combo amp JZ CMB WARM US HI GN DTY Si...

Page 67: ...on EQ DISCO Equalizer effect that boosts both high and low frequencies of the audio signal as is typical in most disco music EQ TELEPHONE Equalizer effect that cuts both high and low frequencies of the audio signal for simulating the sound heard through a telephone receiver HM ENHANCER Adds new harmonics to the input signal to make the sound stand out XG HM ENHNCE PITCH CHANGE PITCH CHANGE Changes...

Page 68: ...nce rhythms and they will be shown in the display Rhythm Keyboard Percussion This Electone features hundreds different real rhythms featuring actual drum and percussion sampled sounds Automatic Accompaniment functions are used with the rhythms providing appropriate and completely automatic accompaniment to match the style of the selected rhythm Moreover the Electone has a Keyboard Percussion featu...

Page 69: ...thm on off and switch the sections as desired by pressing the buttons on the panel and add the accompaniment to the rhythm 4 Set the volume using the panel rhythm volume buttons The buttons have five volume settings from a minimum of 0 or no rhythm sound to a maximum of full volume Fine adjustments in the volume of the rhythm can also be made from the Rhythm Condition display page 74 Reference Pag...

Page 70: ...esigned for use as a temporary and regular rhythmic pattern to spice up a repeating rhythm There are four Fill In sections that can be played by pressing the selected lit MAIN FILL IN A D buttons as desired When one measure pattern of Fill In finishes playing the rhythm is automatically shifts to the Main section BREAK This lets you add dynamic variations and breaks in the rhythm pattern The Break...

Page 71: ...buttons then press the START or SYNCHRO START button to actually start the rhythm While the introduction is playing the BAR BEAT display shows the countdown to the first measure of the pattern For example if there is a four measure lead in for a pattern in 4 4 time the display at right appears ENDING Pressing one of the ENDING 1 3 buttons automatically adds an ending phrase before stopping the rhy...

Page 72: ...s will be played automatically The Auto Fill In function is set in the Page 4 of the Rhythm Condition display To call up the Rhythm Condition display select the desired rhythm and press the same rhythm button again Select Page 4 by using the Page buttons When Auto Fill is set to ON the Fill In pattern is automatically played whenever you switch the Main sections Each press of the A button toggles ...

Page 73: ...thm has its original preset tempo Press the TEMPO buttons simultaneously to restore the tempo to the original setting 2 Tempo Indicator Bar Beat Indicator Tempo indicator shows the current tempo Displayed values are given in beats per minute The tempo range is 40 to 240 beats per minute When the rhythm begins playing the Tempo indicator changes function to a Bar Beat indicator 1 2 Tempo Bar Beat L...

Page 74: ...e adjustment of the rhythm percussion volume Same as the panel Rhythm Volume buttons Press the A button to select the item then use the DATA CONTROL dial to change the setting Range 0 24 2 Percussion Reverb Determines the amount of reverb applied to the rhythm percussion When the Reverb Depth for entire instrument is set to the minimum the setting here will have no effect Press the B button to sel...

Page 75: ...page This also allows you to assign two or three rhythms from the same category to be selected from different buttons one from the original Rhythm button and the others from the User buttons For example to call up 25 Modern Shuffle select the R B category 1 Press User button 1 at the right of the Rhythm buttons The rhythm category appears at the upper right of the display 2 Select one of the Pages...

Page 76: ...LS series can be selected and played from the User buttons in the panel Rhythm section To call up the User rhythm load back the registration containing the User rhythm to Electone in advance For details on loading back the Registration see Recalling Recorded Registrations on page 154 and Playing Back a Song on page 155 This procedure assigns the User rhythms to the User numbers 1 48 1 Press one of...

Page 77: ...ieland Jazz 2 2 36 Ragtime 37 Charleston 38 Orchestra Swing 39 Tap Dance Swing 40 Organ Groove POPS 01 Simple 8Beat Pop 1 02 Simple 3 4 Pop 1 03 SimpleShufflePop 1 04 8Beat Light 1 05 8Beat Light 2 06 16Beat 07 British 16Beat 08 Guitar Pop 09 Classic 16Beat 10 Fusion Shuffle 11 Folk Rock 12 Easy Pop 13 Chart Guitar Pop 1 14 Jazz Pop 15 British Pop 16 Pop Shuffle 17 Unplugged 1 1 18 Unplugged 2 19 ...

Page 78: ...ChartRockShuffle 16 Chart Piano Shfl 17 Beach Rock 18 Surf Rock 19 60s Rock 20 70s Rock 21 80s Power Rock 22 80s Pop Rock 23 80s Guitar Pop 24 00s Boy Band 25 Rock Shuffle 26 Rock Roll 27 6 8 Rock 28 60s Rock Roll 29 Jive 30 Swingin Boogie 31 Southern Rock 32 New Country 1 33 Country Strum 34 Disco Fox Rock 1 35 JPN Pop Rock 1 36 JPN Pop Rock 2 37 JPN Band Rock 1 38 JPN Band Rock 2 39 JPN Light Ro...

Page 79: ...tings for each part Pressing one of the A D buttons corresponding to the desired accompaniment parts successively alternates between ON and OFF Each rhythm consists of seven parts and you can visually confirm the On Off status for all parts in Page 2 and Page 3 of the Rhythm Condition display These parts with the exception of the Main Drum and Add Drum are Accompaniment parts The Accompaniment con...

Page 80: ...s brass section accents and chord arpeggios Not all parts contain accompaniment data Some parts may be empty depending on the selected rhythm and rhythm section 3 Press the START button to start the rhythm and then play the Lower Keyboard Main Drum and Add Drum contains the drum and percussion rhythm patterns When you turn both Main Drum and Add Drum off the drum and percussion do not sound Genera...

Page 81: ...animent Volume Determines the accompaniment volume Press the C button to select the item then use the DATA CONTROL dial to change the setting Range 0 24 2 Accompaniment Reverb Determines the amount of reverb applied to accompaniment When the Reverb Depth for entire instrument is set to the minimum the setting here will have no effect Press the D button to select the item then use the DATA CONTROL ...

Page 82: ... C button The A B C M O C display appears 2 Press the A button to select the ABC MODE then select the desired mode by turning the DATA CONTROL dial A B C Mode You can select modes in sequence OFF SINGLE FINGER FINGERED CHORD CUSTOM ABC by turning the DATA CONTROL dial clockwise Turning the DATA CONTROL dial counter clockwise selects in the reverse order When you start the rhythm with the SYNCHRO S...

Page 83: ...ord mode automatically produces bass accompaniment for chords played in the Lower keyboard It allows you to use a wider range of chord types than in the Single Finger mode In the Fingered Chord mode you play full chords while the Auto Bass Chord function automatically selects the appropriate bass pattern If you play only one or two notes in the Lower keyboard the appropriate chord will sound on th...

Page 84: ... to hold a chord down to keep the accompaniment going When A B C is turned off but Memory is on the auto accompaniment of the rhythmic chords and bass pattern do not sound but the sound of the Lower keyboard and or Pedalboard continues until you play the next chord bass note 1 Lower Memory When this is set to on the Lower keyboard Voices and chord accompaniment keep playing even after you release ...

Page 85: ...paniment To set the M O C function 1 Press the A B C M O C button The A B C M O C display appears 2 Turn the M O C on Successive pressing of the D button alternates between ON and OFF ON Produces harmonies of up to two notes in a range close to the melody played OFF Cancels the Melody On Chord function Melody On Chord can be heard only when the Upper Keyboard Voice section s volume is set to the a...

Page 86: ...ce data in the Registration data cannot be loaded 1 Insert the USB flash drive that contains the desired rhythm sequence data into the USB TO DEVICE terminal 2 Press the MDR button and select the desired Song which contains the Registration data you want to load back to Electone For details on selecting a Song see steps 2 and 3 on page 135 This is necessary because the rhythm sequence data is stor...

Page 87: ... 5 Press the START button in the Rhythm section to play back the rhythm sequence Only those sequences set to on can be played Two or more rhythm sequences can be played back in succession in numeric order The SEQ lamp goes out when the sequence assigned to it is finished playing NOTE Sequence numbers SEQ 1 SEQ 4 buttons can be turned on at the same time ...

Page 88: ...me to MIN 2 Turn on the Keyboard Percussion function by pressing the Keyboard Percussion 1 or 2 button Press the 1 button to play Percussion sounds on the Upper Lower keyboards and press the 2 button for the Pedalboard The Keyboard Percussion KBP display appears Pressing the Keyboard Percussion 1 button calls up the Preset 1 kit on the Upper Lower keyboards and pressing 2 button calls up the Prese...

Page 89: ... DATA CONTROL dial to change the setting Range 0 24 2 Reverb Determines the amount of reverb applied to the Keyboard Percussion When the Reverb depth for entire instrument is set to the minimum the setting here will have no effect Press the D button to select REVERB then use the DATA CONTROL dial to change the setting Range 0 24 Reference Page Recalling the User Keyboard Percussion page 104 NOTE T...

Page 90: ...ymbal Snare Roll Snare Roll Car Crash Snare Drum Light Hi Hat Closed Hi Hat Closed Footstep Tom 3 Synth Tom 1 Cymbal Cymbal Puddle Snare Drum Rim 1 Hi Hat Open Hi Hat Open Tom 2 Tambourine Tambourine Hi Hat Closed Finger Snap Finger Snap Tom 1 Castanet Castanet Hi Hat Open Triangle Mute Triangle Mute Ride Cymbal 1 Wood Block L Wood Block L Orch Snare Drum Triangle Open Triangle Open Crash Cymbal 1...

Page 91: ...oft 2 Splash Cymbal Sticks Sticks Kick Soft Kick Soft Open Rim Shot Open Rim Shot H Kick Tight Kick Tight Bongo H Kick Bongo H Kick Short Bongo L Side Stick Bongo L Side Stick Light Conga H Mute Snare Conga H Mute Snare Short Conga H Open Hand Clap Conga H Open Hand Clap Conga L Snare Tight Conga L Snare Tight H Timbale H Floor Tom L Timbale H Floor Tom L Timbale L Hi Hat Closed Timbale L Hi Hat C...

Page 92: ...Splash Cymbal Sticks Sticks Kick Tight L Kick Soft Snare Pitched Open Rim Shot Kick Wet Kick Tight Bongo H Kick Tight H Bongo H Kick Bongo L Stick Ambient Bongo L Side Stick Conga H Mute Snare Ambient Conga H Mute Snare Snappy Conga H Open Hand Clap Conga H Open Hand Clap Conga L Snare Tight 2 Conga L Snare Tight Snap Timbale H Hybrid Tom 1 Timbale H Tom Room 1 Timbale L Hi Hat Closed 2 Timbale L ...

Page 93: ... Elec Splash Cymbal Sticks Sticks Kick Soft Kick 3 Open Rim Shot Open Rim Shot Kick 2 Kick Gate Bongo H Kick Gate Bongo H Kick Gate Heavy Bongo L Side Stick Bongo L Side Stick Conga H Mute Snare Rock Conga H Mute Snare Noisy 2 Conga H Open Hand Clap Conga H Open Hand Clap Conga L Snare Rock Tight Conga L Snare Noisy 3 Timbale H Tom Rock 1 Timbale H Tom Electro 1 Timbale L Hi Hat Closed Timbale L H...

Page 94: ... Dance 1 Kick 3 Kick Techno Q Open Rim Shot Rim Gate Kick Anlg Short Kick Techno L Bongo H Kick Analog Bongo Analog H Kick Techno Bongo L Side Stick Anlg Bongo Analog L Side Stick Anlg Conga Analog H Snare Analog Conga Analog H Snare Clap Conga Analog M Hand Clap Conga Analog M Dance Clap Conga Analog L Snare Analog 2 Conga Analog L Snare Dry Timbale H Tom Analog 1 Timbale H Tom Dance 1 Timbale L ...

Page 95: ...2 Splash Cymbal Sticks Sticks Kick Soft Kick Soft Open Rim Shot Open Rim Shot Kick Tight Kick Tight Bongo H Kick Jazz Bongo H Kick Jazz Bongo L Side Stick Light Bongo L Side Stick Light Conga H Mute Snare Jazz L Conga H Mute Brush Slap 3 Conga H Open Hand Clap Conga H Open Hand Clap Conga L Snare Jazz M Conga L Brush Tap 2 Timbale H Floor Tom L Timbale H Tom Brush 1 Timbale L Hi Hat Closed Timbale...

Page 96: ...Splash Cymbal Sticks Sticks Kick Soft 2 Kick Ambience H Open Rim Shot Open Rim Shot Gran Cassa Kick Ambience L Bongo H Gran Cassa Mute Bongo H Kick Studio Bongo L Side Stick Bongo L Side Stick Conga H Mute Band Snare Conga H Mute Snare Studio M Conga H Open Hand Clap Conga H Open Hand Clap Conga L Band Snare 2 Conga L Snare Studio L Timbale H Floor Tom L Timbale H Floor Tom L Timbale L Hi Hat Clos...

Page 97: ...lash Cymbal 2 Snare T9 5 Kick T9 1 Snare T9 Gate Kick T9 2 Bongo H Open 1 F Kick T9 5 Cutting Noise 1 Bongo L Open 3 F Snare T9 Rim Cutting Noise 2 Conga H Tip Snare T9 1 Conga H SlapOpen Clap T9 String Slap Conga H Open 2 Snare T9 2 Timbale H Tom T9 1 Timbale L Hi Hat Closed T8 Agogo H Tom T9 2 Agogo L Hi Hat Pedal T9 Shower Cabasa Tom T9 3 Thunder Maracas Slur 2 Hi Hat Open T9 Wind Vox Drum L To...

Page 98: ...NoiseUp LFO PinkNoise Up LFO CarEngn Ignition Car Tires Squeal Car Passing Car Crash Burst Phone Call White Noise Roller Coaster Door Squeak Pink Noise Submarine Door Slam WhiteNoiseDown 1 Scratch Cut PinkNoise Down 1 Scratch Split WhiteNoiseDown 2 Wind Chime PinkNoise Down 2 Telephone Ring White Noise Up 2 White Noise Up 1 Laugh Pink Noise Up Scream WhiteNoiseUp Rel Punch PinkNoise Up Rel Heart B...

Page 99: ...SlapOpen Conga L Conga L Slap Zagrouda H Conga L Slide Zagrouda L Cowbell Top Bongo H Open 1 f Katem Dom Kick Soft Cowbell 1 Bongo H Open 3 f Katem Tak Side Stick Cowbell 2 Bongo H Rim Katem Sak Snare Soft Cowbell 3 Bongo H Tip Katem Tak Arabic Hand Clap Guiro Short Bongo H Heel Doff Tak Snare Drum Guiro Long Bongo H Slap Tabla Dom Floor Tom L MetalGuiro Short Bongo L Open 1 f Tabla Tak 1 Hi Hat C...

Page 100: ...i Gu 1 Snare Drum Light Ban Luo High 1 Bongo H Stick Snare Ensemble Bangu Roll Gong Batter Bongo L Stick Sus Cym 1 Roll S ChineseOperaVo 1 Jin Luo Conga H Stick Sus Cymbal 1 ChineseOperaVo 2 Luo High 2 Conga L Stick Sus Cym 2 Roll L ChineseOperaVo 3 Luo Mid Low Whip Sus Cymbal 2 Yunluo F Luo Rotating Tom 5 Concert Tom 5 Yunluo F Jin Luo Low Tubular Bell L OrchCymbal 1 ckd Yunluo G Da Cha 1 Rotatin...

Page 101: ...board Percussion 1 button 1 Turn on the Keyboard Percussion function by pressing the Keyboard Percussion 1 button The KBP display appears 2 Select User 1 here Press the A button to select User 1 If another name is shown select User 1 with the DATA CONTROL dial This step assigns User 1 to the Keyboard Percussion 1 button You can call up User 1 the next time you press the 1 button 3 Select the desir...

Page 102: ...r to the Kit Assign List on page 105 3 Assign Assigns the selected instrument to the desired key See the following explanation in step 7 4 Clear This function is used to erase the User assignment for User 1 Clear works in two ways either to erase a single instrument or to erase all instruments See the following explanation on page 103 5 Select the desired percussion group Press the A button to sel...

Page 103: ...g to the instrument you wish to erase A short beep sound indicates that the instrument has been erased NOTE Though 40 User Keyboard Percussion setups can be created they cannot be memorized to Registration Memory Only on off data and the Keyboard Percussion Menu are memorized to Registration Memory If you want to save the User Keyboard Percussion setups with the Registration Memory save the data t...

Page 104: ...ration at this point by pressing the D button corresponding to CANCEL 2 Press the C CLR Clear button to erase all data When the C button is pressed an Assignments of User xx have been cleared message momentarily appears on the display Recalling the User Keyboard Percussion 1 Press the Keyboard Percussion button 2 Select the desired User Keyboard percussion kit Press the A button to select MENU the...

Page 105: ...ind Chime Up Tambourine Pandeiro Bells Hand Claps Finger Snap Scratch Noise Percussion PERCUSSION 3 Kotsuzumi 1 Kotsuzumi 2 Kotsuzumi 3 Kotsuzumi 4 Ohtsuzumi 1 Ohtsuzumi 2 Taiko 1 Taiko 2 Ohdaiko 1 Ohdaiko 2 Kakegoe 1 Kakegoe 2 Kakegoe 3 Standard Kit 1 CYMBAL Crash Cymbal 1 Crash Cymbal 2 Splash Cymbal Chinese Cymbal Ride Cymbal 1 Ride Cymbal 2 Ride Cymbal Cup Hi Hat Open Hi Hat Closed Hi Hat Peda...

Page 106: ...at Open Hi Hat Closed Hi Hat Pedal SNARE DRUM Snare Snappy Snare Tight Snap Snare Soft Snare Roll Side Stick Open Rim Shot Brush Tap Brush Slap Brush Swirl Brush Tap Swirl TOM Tom Room 1 Tom Room 2 Tom Room 3 Tom Room 4 Tom Room 5 Tom Room 6 BASS DRUM Kick Kick Tight Kick Soft PERCUSSION 1 Conga H Open Conga L Conga H Mute Bongo H Bongo L Timbale H Timbale L Cowbell Claves Guiro Long Guiro Short M...

Page 107: ...PERCUSSION 2 Surdo Mute Surdo Open Scratch H 2 Scratch L 2 Cabasa Shaker Agogo H Agogo L Samba Whistle H Samba Whistle L PERCUSSION 3 Tambourine Hi Q 2 Jingle Bells Bell Tree Triangle Open Triangle Mute Wood Block H Wood Block L Sticks Whip Slap Finger Snap Hand Clap PERCUSSION 4 Hi Q Click Noise Scratch H Scratch L Seq Click L Seq Click H Metronome Click Metronome Bell Dance Kit CYMBAL Crash Anal...

Page 108: ...Hand Cymbal Hand Cymbal 2 Splash Cymbal Chinese Cymbal Hand Cymbal S Hand Cymbal 2 S Ride Cymbal Cup Hi Hat Open Hi Hat Closed Hi Hat Pedal SNARE DRUM Band Snare Band Snare 2 Snare Soft Snare Roll Side Stick Open Rim Shot Brush Tap Brush Slap Brush Swirl Brush Tap Swirl TOM Floor Tom L Floor Tom H Low Tom Mid Tom L Mid Tom H High Tom BASS DRUM Gran Cassa Mute Gran Cassa Kick Soft 2 PERCUSSION 1 Co...

Page 109: ...all Telephone Ring Wind Chime Door Squeak Door Slam Scratch Cut Scratch Split Laugh Scream Punch Heart Beat Foot Steps SFX 2 CarEngn Ignition Car Tires Squeal Car Passing Car Crash Siren Train Jet Plane Starship Burst Roller Coaster Submarine Machine Gun Laser Gun Explosion Firework Noise Kit NOISE White Noise WhiteNoiseDown 1 WhiteNoiseDown 2 White Noise Up 1 White Noise Up 2 WhiteNoiseUp Rel Whi...

Page 110: ...a Gu Rim Da Gu Roll Da Gu Hand Pai Gu 1 Pai Gu 2 High Pai Gu 2 Pai Gu 3 High Pai Gu 3 Pai Gu 4 High Pai Gu 4 GONG 1 Yunluo F Yunluo F Yunluo G Yunluo G Yunluo A Yunluo A Yunluo B Yunluo C Yunluo C Yunluo D Yunluo D Yunluo E Yunluo High F Yunluo High F Yunluo High G Yunluo High G GONG 2 Yunluo High A Yunluo High A Yunluo High B Yunluo High C PERCUSSION Muyu Low Muyu Mid Low Muyu Mid Muyu High Ban B...

Page 111: ...nel buttons All Registrations in Registration Memory can also be saved to USB flash drive 1 Create your original Registration by making all desired panel settings 2 While holding down the MEMORY button in the Registration Memory section press the numbered button to which you wish to save your Registration When the Registration is stored the LED of the numbered button flashes momentarily 1 Storing ...

Page 112: ...p 2 Reference Page Saving the Registration Data to USB Flash Drive page 147 Functions and settings that cannot be memorized The following settings cannot be stored to a Registration Memory number The following settings are common to all Registration Memory numbers 1 16 and cannot be stored individually for each number Pitch page 181 LCD contrast MIDI Control settings page 190 Wireless LAN settings...

Page 113: ...ons stored to another Bank If you ve selected another Bank and stored Registrations to it you will need to select the same Bank to recall the Registrations Select the Bank in Page 3 of the VOICE display then press the panel numbered button to recall the Registration For details on how to select the Bank refer to page 116 You can also recall Registrations in a pre programmed order by using the righ...

Page 114: ...unctions will not change even when you change the Registration Memory number Rhythm menu Rhythm section Rhythm tempo Rhythm volume Rhythm reverb Rhythm reverb time Accompaniment volume Accompaniment reverb On Off status of Accompaniment parts A B C mode A B C memory M O C mode The particular settings that do not change when the DISABLE button is on depend on the Disable mode setting For details on...

Page 115: ... functions will not change even when you change the Registration Memory number Rhythm menu Rhythm section Rhythm tempo Rhythm volume Rhythm reverb Rhythm reverb time Accompaniment volume Accompaniment reverb On Off status of Accompaniment parts A B C mode A B C memory M O C mode TEMPO When the Disable Mode is set to Tempo and the DISABLE button is on the rhythm tempo will not change even when you ...

Page 116: ... your original Registrations to Banks A and B Bank C is available only after Registrations have been stored to Bank B Likewise other Banks up to Bank E will not be available until the Bank preceding it contains data To select the Bank 1 Call up the VOICE Display then select the Page 3 The currently selected Registration bank will be shown 2 Select the desired Bank by using the DATA CONTROL dial Yo...

Page 117: ... to delete the Bank or D CANCEL button to cancel the operation Bank A can only be deleted if data is stored to another bank other than A Data of Banks that follow the deleted Bank will be moved up to the previous Bank respectively For example deleting the Bank A will move the data of Bank B to Bank A Bank C to Bank B Bank D to Bank C and Bank E to Bank D NOTE When you try to store Registrations af...

Page 118: ...re using a USB flash drive be sure to read Connecting a USB Device on page 132 1 Connect the compatible USB flash drive to the USB TO DEVICE terminal 2 Press the MDR button The MDR display appears 3 Confirm the SONG Page is shown Confirm SONG is shown at the top right of the display If another page is shown select the SONG Page by simultaneously pressing both Page buttons 4 Select the Song to whic...

Page 119: ...lash drive 7 Press the D EXIT button The display returns to MDR display Song name Unit number Reference Page Recalling Recorded Registrations page 154 Reference Page Changing the Song Folder Name page 144 About Banks and Units The Registration Memory data 16 x up to 5 Banks stored to internal memory of the instrument will be handled as a Unit If you want to create more than 80 16 x 5 Banks Registr...

Page 120: ...cific Bank see Deleting Banks on page 117 1 Press the UTILITY button to call up the Page 1 of the UTILITY display If another page is shown select Page 1 by using the Page buttons 2 Press the D INITIALIZE button The message Are you sure you want to initialize Registration data appears You can cancel the operation at this point by pressing the D CANCEL button Press C INITIALIZE button to actually in...

Page 121: ...trations in sequence either in numeric order or in any order you specify Registration Shift has four modes Off Shift Jump and User These are set in the REGIST SHIFT RIGHT display You can also view and check the Registration Shift mode in the VOICE Display 1 Select the Bank containing the Registration you want to use 2 Press the FOOT SWITCH button 3 Use the Page buttons to select Page 1 The REGIST ...

Page 122: ...ch press of the Right Footswitch selects the Registration Memory presets in their numerical order After the last Registration is reached the function wraps around to select the first preset again The LEDs of numbered buttons 1 16 light up as they are selected Keep in mind that the 9 16 button lights up in addition to the selected numbered button if Registrations 9 16 are selected 1 2 3 4 OFF SHIFT...

Page 123: ...nt for the Registration Shift function User Shift can be set in Page 2 and Shift End can be set in Page 1 of the REGIST SHIFT RIGHT display To set the User Registration order Before proceeding set the mode to 4 User 1 Select the Bank containing the Registration you want to use For details about how to select Banks refer to page 116 NOTE In the Jump mode the Right Footswitch cannot call up another ...

Page 124: ... The Bank indication and Registration number appears in the display indicating that the Registration is entered Enter the Registration Number Page 2 REGIST SHIFT RIGHT Display NOTE To select the Registration from another Bank select desired Bank in the Page 3 of the VOICE display page 116 To go back to the REGIST SHIFT RIGHT display press the FOOT SWITCH button Highlighted cursor indicates the dat...

Page 125: ...used to insert a Registration number just before the current cursor position To perform the operation first move the data entry position to a numbered position Then press the desired Registration Memory button and press the A INS button The new Registration number is inserted at the cursor position and all other numbers to the right of the cursor are moved to accommodate the new numbers Registrati...

Page 126: ...s function is available only when two or more Units are saved in one Song This function is handy when you need to play a Song with more than 80 Registrations The Shift End mark Top Next will automatically be put at the end of the Registrations you entered when Top or Next Unit is selected as the Shift End 1 2 3 STOP TOP NEXT UNIT Reference Page Next Unit Settings using more than 80 Registrations i...

Page 127: ...download yamaha com Use of unsupported devices may result in data saving recalling operations to abort etc Before using a USB flash drive be sure to read Connecting a USB Device on page 132 Press the MDR button in the panel to call up the MDR display All operations related to the MDR such as recording and playing your performances can be done from the MDR display Pressing any button other than the...

Page 128: ... below will be shown when you press the C SET Setting button in the SONG Page while the Song is selected 2 Using the MDR Display SONG Page TOOLS1 Page TOOLS2 Page TEMPO Page PART 1 Page PART 2 Page PART 3 Page Select target Song Copy Delete Convert Song You can copy folder or USB flash drive Create Folder Format USB flash drive Change Song Folder name Confirm information of Song USB flash drive So...

Page 129: ... dial 4 UP Selects the higher layer folder or USB flash drive by pressing the A button 5 IN Selects the next lower or deeper layer folder or USB flash drive by pressing the B button 6 Page Selects the Page of the display if the display contains two or more Pages 7 Unit Show the Unit name last used shown as blank unless the UNIT is used If USB flash drive cannot be found Press the A button several ...

Page 130: ...er use the DATA CONTROL dial and the A and B buttons to select the folder in which the desired Song is stored Song icons These icons are shown when you select a USB flash drive folder and Song Indicates a USB flash drive This icon is displayed in the USB flash drive folder list Indicates a folder Indicates that performance data is contained in the Song Indicates a Protected Original Song See page ...

Page 131: ... single Song consists of various files such as Registration files and performance files The file types listed below are created with the MDR The extension will not appear in the Electone display They will however be displayed on a computer Files in the Song In addition one file extension nam is automatically created in each folder for organization maintenance of the folder contents It does not app...

Page 132: ...the USB device during playback recording and file management operations such as Save Copy Delete and Format or when accessing the USB device Failure to observe this may result in freezing of the operation of the instrument or corruption of the USB device and the data When connecting then disconnecting the USB device and vice versa make sure to wait a few seconds between the two operations NOTE If ...

Page 133: ...s 2 Press the MDR button on the panel to call up the MDR display 3 Select the desired USB flash drive you want to format If a single USB flash drive is connected only USB 01 will be displayed After that if you connect another USB flash drive the latter one will be displayed as USB 02 If the desired USB flash drive is not selected use the DATA CONTROL dial to select the desired one 4 Press the Page...

Page 134: ...n select a blank Song for recording your performance or saving the Registration settings or you can select a desired Song for playback NOTICE Never attempt to disconnect the USB flash drive or turn the power off during formatting Doing so may corrupt the USB flash drive data 4 Selecting a Song Reference Page USB flash drive Media Contents Folders Songs and Files page 131 NOTICE While the instrumen...

Page 135: ... make a new recording or save data To simply play an existing Song select the desired Song containing data referring to the Song name and icons The selected Song is highlighted For details about how to select songs in a folder see Selecting a Song in a Folder on page 136 Reference Page If USB flash drive cannot be found page 129 NOTE If two or more USB flash drives are connected which of them is l...

Page 136: ...ge or parts that are played when playing the Song PART Pages These Pages can be switched by pressing the Page buttons in the order TEMPO PART 1 PART 2 PART 3 When playing back the Song by pressing the PLAY PAUSE button on the panel only those parts that are set to PLAY in the display actually play at the indicated tempo over a range of 50 to 200 of the original tempo when recording If the Song con...

Page 137: ...l up the folder Songs list in the selected USB flash drive FOLDER_001 FOLDER_002 and SONG_001 are displayed 2 Select FOLDER_002 by turning the DATA CONTROL dial 3 Press the B button to call up the song in the FOLDER_002 4 Select the desired Song Twinkle Twinkle Little Star by turning the DATA CONTROL dial In this case already Twinkle Twinkle Little Star is selected ...

Page 138: ...comprised of your keyboard performance information and is not a recording of the actual sound itself The performance information refers to which keys are played at what timing and at what strength just as in a musical score Based on the recorded performance information the tone generator of the Electone outputs the corresponding sound MDR also records Registrations such as Voice selection effect s...

Page 139: ...lash drive from the instrument during recording Outline of MDR Operation Basically the MDR independently records the following three types of data Registration data including Bulk data All registrations stored to the Registration Memory numbered buttons as well as the registration currently set to the panel are recorded at the beginning of a Song before the actual recording of your performance Bul...

Page 140: ... expression pedal operation separately from the other parts of the Song Even Keyboard Percussion and Lead Voice 1 can be recorded separately The following instruction is an example First record the chords and bass to the Song using the Lower and Pedalboard and then record the melody using the Upper Keyboard 1 Follow steps 1 through 3 on page 138 to call up the Rec Standby display 2 Select the Page...

Page 141: ... Keyboard Percussion parts be recorded at the same time 4 Press the PLAY PAUSE button After 00 00 appears at the bottom left of the LCD display begin playing 5 Press the STOP button when you are finished with your performance to stop recording Now you ve recorded the first parts of your performance Setting up recording of the next part Upper part in this case 6 Press the RECORD button A message ap...

Page 142: ... the C button repeatedly if necessary to set CUSTOM PLAY to ON to start recording of the new part or parts 11 Press the PLAY PAUSE button on the panel to start recording then begin playing Playback of the previously recorded parts starts immediately The CUSTOM PLAY function is used here to record only the parts that have been selected for recording and plays back only those parts that have been se...

Page 143: ...tarily 5 Press the RECORD button The lamp of the RECORD button lights indicating that the MDR is ready to record 6 Set the parts which you want to change to RECORD status and other parts to PLAY Part settings can be set in Pages PART 1 and PART 2 You can cancel the record standby mode at this point by pressing the STOP button 7 Press the PLAY PAUSE button to start punch in recording Play the new p...

Page 144: ...nal 2 Press the MDR button then select the Song folder whose name you want to change For details on selecting a Song or a folder see steps 2 and 3 on page 135 3 Use the Page buttons to select the TOOLS2 Page 4 Press the D CHANGE NAME button The CHANGE NAME display appears 6 Changing the Song Folder Name NOTE However Song names of EL series Electones such as the EL 900 cannot be changed Reference P...

Page 145: ...n it clockwise to select the characters in order and counter clockwise for reverse order To delete a character Move the cursor to the character you want to delete and press the C button When the character is deleted all other numbers to the right of the cursor are moved one step to the left To insert a character Move the cursor one step right to the position at which you want to enter the characte...

Page 146: ... the change press the C CHANGE button The renamed Song folder is displayed NOTE An XG Song name can contain up to 46 characters An error message This name is not available may appear when pressing the C CHANGE button to finish entering the name If this message appears the name is invalid and you ll need to enter a different name The following names cannot be used The letters xx indicate numbers MD...

Page 147: ...minal 2 First make all the desired Electone settings to create your original Registration 3 Press the MDR button and select the destination blank Song Select new song For details on selecting a Song see steps 2 and 3 on page 135 7 Saving Registrations NOTE Even if you ve only created a couple of Registrations yourself 16 separate Registration Memory settings are always stored when saving to a Song...

Page 148: ...it to which the Registration is recorded is automatically named UNIT 1 and SONG XXX XXX number is assigned as Song name to the destination Song 6 Press the D EXIT button to exit from the UNIT EDIT Display Method 2 1 First make all the desired settings you want to save then select the destination blank Song as you did in steps 1 and 3 above 2 Press the RECORD button on the panel to enable recording...

Page 149: ...Registrations exceeding five Registration Banks one Unit you should save additional Registration Units to a Song 1 First make all the desired settings you want to save 2 Connect the compatible USB flash drive to the USB TO DEVICE terminal 3 Press the MDR button and select the destination Song which includes Registration data For details on selecting a Song see steps 2 and 3 on page 135 NOTE Althou...

Page 150: ...tration Unit will be added and follows previously contained Units 7 Press the D EXIT button to exit from the UNIT EDIT Display To play this Song first press the D EXIT button to returns to the SONG Page then press the PLAY PAUSE button Keep in mind that when you play back this Song the UNIT 1 will be loaded to the Electone but the next Unit will not be loaded unless you make the Next Unit settings...

Page 151: ...ains performance data a note icon will appear at the left of the Song name For details on selecting a song see steps 2 and 3 on page 135 4 Press the D UNIT button to call up the UNIT EDIT display In the display the Registration Unit list of the current Song is shown such as UNIT 1 and UNIT 2 5 Select the Registration Unit number you wish to overwrite by using the DATA CONTROL dial 6 Press the B SA...

Page 152: ...e 135 3 Press the D UNIT button to call up the UNIT EDIT display In the display the Registration Unit list of the current Song is shown such as UNIT 1 and UNIT 2 4 Select the Registration Unit number you want to delete by using the DATA CONTROL dial 5 Press the C DEL button A message appears prompting confirmation of operation You can cancel the operation at this point by pressing the D CANCEL but...

Page 153: ...tion Shift mode to USER and select Next UNIT as the Shift End in Page 1 of the REGIST SHIFT RIGHT display then set the Use Registration order in Page 2 For details see To set the User Registration order on page 123 3 Press the MDR button and select the destination Song For details on selecting a Song see steps 2 and 3 on page 135 4 Call up the UNIT EDIT display then save the User Registration to N...

Page 154: ...ains more than two Registration Units Loading Registrations 1 Connect the compatible USB flash drive to the USB TO DEVICE terminal 2 Press the MDR button and select the Song containing the Registrations you want to load back to the Electone For details on selecting a Song see steps 2 and 3 on page 135 NOTICE When you record a Song using the Next Unit function make sure to load the top Registration...

Page 155: ... This operation lets you automatically load the Registration data saved to a Song when playing back your recorded performances Thus you can use the loaded Registrations for your performance 1 Connect the compatible USB flash drive containing the Song to be played back to the USB TO DEVICE terminal 2 Press the MDR button then select the desired Song for playback For details on selecting a Song see ...

Page 156: ...ong are played back however you can mute specific parts and play back only selected parts page 157 When the end of the recorded performance is reached playback automatically stops You can however stop playback in the middle of the Song by pressing the STOP button Although this Electone can play Songs created on other Electones such as the ELS series the sound or tempo of the Song may differ from t...

Page 157: ...g button toggles the part setting between PLAY and OFF The XG part setting can be set in the PART 3 Page Rewind Fast Forward and Pause Rewind and Fast Forward During audio playback or when paused press the REW Rewind button or FF Fast forward button and hold it down until the time reaches the desired position When the button is released playback is paused at the desired position To resume playback...

Page 158: ...ting Recall the desired Registration for editing by pressing the Registration numbered button and change the tempo with the TEMPO button on the panel then record the changed tempo to the Registration numbered button Repeat these steps for all numbered buttons you want to change the tempo After finishing the settings save overwrite the Registration data to the edit Song 1 Press the MDR button then ...

Page 159: ...etails on selecting a Song or folder see steps 2 and 3 on page 135 2 Press the C SET button then press the Page buttons to select the TEMPO Page 3 Select the repeat mode Press the B button to select REPEAT then press the same button successively or use the DATA CONTROL dial to change the setting 1 Off Cancels repeat playback 2 Single Repeats the currently selected Song indefinitely 3 All Repeats a...

Page 160: ... You can set the volume or mute settings for each part 1 Part Select the desired channel CH1 through CH16 or ALL to specify the part to mute play or to change the volume Press the A button to select XG PART CH then use the DATA CONTROL dial to select the setting 2 Playback Off Sets the selected part for playback or mute off Select PLAY for the part you want to play back and select OFF for the part...

Page 161: ... destination drive in advance If memory space is insufficient or if the folder already contains 100 Songs Copy is not available 1 Connect the compatible USB flash drive to the USB TO DEVICE terminal If you want to copy a Song between two different drives you will need to insert the destination USB flash drive 2 Press the MDR button then select the folder Song USB flash drive to be copied For detai...

Page 162: ... keep in mind that the actual time necessary may differ Proceed by following the message in the display Press the D button to cancel or C button to execute the operation If you want to cancel the copy operation while the copy operation is in progress press the D INTERRUPT button Keep in mind however that cancelling the operation may take a long time since the operation is stopped only after all fi...

Page 163: ...inal Song called Protected Original Song exists in the same folder Be careful not to delete the Protected Original song NOTICE If you move or copy the protected Song data on the computer without the Musicsoft Downloader application the Song cannot be played back Always use Musicsoft Downloader when moving or copying protected Songs on the computer Musicsoft Downloader can be obtained at the follow...

Page 164: ...the Page buttons to select the TOOLS1 Page 4 Press the B DELETE button A message appears prompting confirmation of operation You can cancel the operation at this point by pressing the D CANCEL button 5 Press the appropriate A D button corresponding to the specific data you want to delete DELETE or PERF ONLY Selecting DELETE deletes the entire Song and selecting PERF ONLY deletes only performance d...

Page 165: ... 135 3 Press the B button to open the media folder 4 Call up the TOOLS1 Page with the Page buttons 5 Press the D CREATE FOLDER button A message appears prompting confirmation of the operation You can cancel the operation at this point by pressing the D CANCEL button 6 Press the C OK button The newly created folder is automatically named FOLDER_001 or similar Up to 120 folders can be created For in...

Page 166: ...gs cannot be converted to XG format 1 Connect the USB flash drive containing the Song you want to convert to XG format to the USB TO DEVICE terminal 2 Press the MDR button then select the Song to be converted to XG format Select the desired Song having the icon at left of its name For details on selecting a Song see steps 2 and 3 on page 135 3 Call up the TOOLS1 Page with the Page buttons 4 Press ...

Page 167: ... the C EXE button to start conversion 8 A message will appear prompting confirmation of the converted data and the converted Song is played back The song converted to XG format is automatically named such as XGSONG001 For instructions on changing the Song name see page 144 For details on XG Songs refer to Playing Back XG Songs on page 160 NOTE Do not play the keyboard or press any of the panel con...

Page 168: ...o the USB TO DEVICE terminal 2 Press the MDR button then select a Song or USB flash drive For details on selecting a Song or USB flash drive see steps 2 and 3 on page 135 3 Call up the TOOLS2 Page with the Page buttons 4 Press the C INFORMATION button to call up the information When a USB flash drive is selected REMAIN Remaining memory in the USB flash drive ID Displays Found or Missing to indicat...

Page 169: ... USB flash drive firmly and take care that the USB flash drive does not loosen from the connection from sudden shaking while performing etc during audio recording playback If the USB flash drive is disconnected while recording it may result in data corruption in the USB flash drive USB flash drive External audio device Audio file Audio file Audio file Computer 1 Recording Your Performance as Audio...

Page 170: ... audio press the B button in the display of step 2 to open the USB flash drive then select new audio by using the DATA CONTROL dial Since the operation for selecting audio files is the same as that for Songs refer to steps 2 and 3 on page 135 4 Press the C REC button to engage the Record Standby status NOTE The file extension does not appear in the Electone display However it can be viewed on a co...

Page 171: ...TICE Never attempt to disconnect the USB flash drive or turn the power off during recording Doing so may corrupt the USB flash drive data or the recording data Elapsed recording time Reference Page Deleting files Renaming files page 176 AUDIO PLAY Display PLAY Page Recording the Song playback as audio file Once you ve recorded your performance as a Song using MDR function you can record the playba...

Page 172: ...ect the desired audio file containing data referring to the audio file name and icon Since the operation for selecting audio files is the same as that for Songs refer to steps 2 and 3 on page 135 2 Playing Back Audio Files NOTE This instrument cannot play back DRM protected files Reference Page Compatible USB flash drives page 169 NOTE Songs you ve recorded using the MDR function on this Electone ...

Page 173: ...t forward button and hold it down until the time reaches the desired position When the button is released playback is paused at the desired position To resume playback from the point you ve reversed or advanced to press the C PLAY button Pause If you want to temporarily stop playback of the audio file press the C PAUSE button To resume playback from the point at which the audio file was paused pre...

Page 174: ...ired audio file for playback Since the operation for selecting audio files is the same as that for Songs refer to steps 2 and 3 on page 135 4 Press the C PLAY button to call up the AUDIO PLAY display Select the PLAY Page with the page buttons if another page is shown 5 Press the Page buttons to select the SET Setting Page In this Page you can make other audio playback settings Reference Page Compa...

Page 175: ...adjust the value by using the DATA CONTROL dial or by successively pressing the C button This let you shift the pitch of an audio file in semitone steps from 12 to 12 If you select another audio file this setting will be restored to the default value 0 6 After setting go back to the PLAY Page with the Page buttons and then play the audio file to hear and check the changes you ve made in the SET Pa...

Page 176: ...int by pressing the D CANCEL button If you want to delete the file press the C DELETE button The audio file will be deleted and the display returns to the AUDIO display 2 To rename the file Press the C CHANGE NAME button to call up the rename display For details on how to enter characters refer to the Changing the Song Folder Name on page 144 After entering the characters press the D FINISH button...

Page 177: ...gistration Shift function and Right Footswitch see Registration Shift on page 121 The Left Footswitch can be set to control one of three functions Rhythm Glide or Rotary Speaker Instructions for setting the Left Footswitch in the FOOT SWITCH LEFT Page are given here 1 Press the FOOT SWITCH button Left Footswitch Right Footswitch Expression Pedal 1 Right Footswitch 2 Left Footswitch NOTE Pressing t...

Page 178: ...ontrol with the Left Footswitch is disabled 2 Rhythm When this is selected one of the control settings appears below Press the B button as necessary to select the desired control setting 2 1 Stop Switches the rhythm on off whenever you press the Left Footswitch 2 2 Break This function corresponds to the BREAK button on the panel When you press the Left Footswitch the Break section is played 1 2 3 ...

Page 179: ...2 6 Off Control with the Left Footswitch is disabled 3 Glide This lets you control the Glide effect by using the Left Footswitch Pressing the Left Footswitch immediately lowers the pitch of the selected Voice or Voices by a half step and releasing it slowly returns the pitch to the original When the Glide setting is chosen two separate Glide pages are available with the current page number shown a...

Page 180: ...PEAKER is selected in this display and you press the Footswitch the Rotary Speaker effect is switched on or off This function corresponds to the Speed Control in the Rotary Speaker display To use this function you ll need to make the appropriate Rotary Speaker settings for each Voice section For details see page 60 Reference Page Rotary Speaker page 60 ...

Page 181: ...d is adjustable in half steps semitones Range 6 6 2 Pitch Determines the fine pitch setting of all the Voices Each step changes the pitch by 0 2 Hz The default Pitch setting is 440 0 Hz corresponding to key A3 Range 427 2 Hz 452 6 Hz You can also change the Transpose and Pitch for each Voice section in the Voice Condition display See page 58 for details 1 2 NOTE These are overall pitch controls th...

Page 182: ...uilt in speakers 2 AUX OUT L L R R standard phone jacks This pair of stereo outputs is for connection to an external amplifier speaker system The output level can be controlled with the MASTER VOLUME dial 3 PHONES jack For connection of a stereo headphone set When headphones are connected to this jack sound to the Electone s built in speaker system is automatically cut off allowing you to play wit...

Page 183: ... You can also use these to connect with a computer that has a MIDI Interface 6 USB TO HOST terminal For connecting to a computer with a USB cable To connect to a computer make sure that an appropriate USB MIDI driver is installed to the computer 7 USB TO DEVICE terminal Same as 4 USB TO DEVICE terminal 4 Reference Page Connecting a USB Device page 132 Connecting to an iPhone iPad page 192 6 7 5 Fr...

Page 184: ...et all volume levels to minimum 0 Otherwise electrical shock or damage to the components may occur NOTICE To avoid damage to the devices first turn on the power to the instrument then to the external device When turning off the power first turn off the power to the external device then to the instrument NOTICE Do not route the output from the AUX OUT jacks to the AUX IN jack If you make this conne...

Page 185: ...re automatically disabled when the USB TO HOST terminal is used MIDI and USB TO HOST terminals are automatically disabled when the USB wireless LAN adaptor is connected Controlling the Electone from an External Device You can use an external MIDI keyboard or sequencer to remotely play the sounds of your Electone and change its Registrations You will need to set the MIDI transmit channels of the MI...

Page 186: ...ed 3 Connection with Computer NOTE When you are using the MDR MIDI data cannot be transferred to from the computer Precautions when using the USB TO HOST terminal When connecting the computer to the USB TO HOST terminal make sure to observe the following points Failing to do so risks freezing the computer and corrupting or losing the data If the computer or the instrument freezes restart the appli...

Page 187: ...mple let s say you play a C quarter note using the grand piano sound on the Electone keyboard Unlike an acoustic instrument that puts out a resonated note the electronic instrument puts out information from the keyboard such as with what Voice with which key about how strong when was it pressed and when was it released Then each piece of information is changed into a number value and sent to the t...

Page 188: ...through 127 The reception note range is C 2 0 G8 127 C3 60 Note Off Generated when a key is released Velocity Indicates how strongly the key is played The range is 1 127 For more detailed information refer to the MIDI Reference document downloadable from the Yamaha website page 9 Program Change Program Change messages allow you to change Voices in the middle of a song With these messages you can c...

Page 189: ...MIDI Transmit Channel via a single MIDI cable to the receiving instrument If the receiving instrument s MIDI channel MIDI Receive Channel matches the Transmit Channel the receiving instrument will sound according to the data sent by the transmitting instrument The receive channel of the Electone is fixed at channel 1 for the Upper Keyboard channel 2 for the Lower Keyboard and channel 3 for the Ped...

Page 190: ...ad Voice 1 Successive presses of the A button alternates between Internal and External Internal Lead Voice 1 is played from the Upper Keyboard of the Electone If the To Lower function is on it is played from Lower Keyboard External Lead Voice 1 is played from the connected instrument via MIDI channel 4 2 Synchro Determines the source of the timing control for rhythm synchronization purposes Succes...

Page 191: ...ard The MIDI messages on each keyboard will be sent over the channels set here You must set the transmit channel here to match the receive channel of the connected device 1 Upper Keyboard You can select the channel for the Upper Keyboard Press the A button to select the item then use the DATA CONTROL dial to select the setting 2 Lower Keyboard You can select the channel for the Lower Keyboard Pres...

Page 192: ... LAN settings Start wireless connection according to the instructions in the iPhone iPad Connection Manual on the website then make sure to make appropriate setups from the following instructions Display the Networks and connecting to the access point Automatic Setup by WPS Manual Setup or Connecting by the Adhoc Mode Refer to pages 192 196 in this Owner s Manual then set up as required If there i...

Page 193: ...u can cancel the operation at this point by pressing the D CANCEL button 4 Press the C OK button to start WPS setup then press the WPS button on your access point within two minutes 5 After connection between the instrument and the access point is done successfully connect the iPhone iPad to the access point by referring to the iPhone iPad Connection Manual WIRELESS LAN Display Appears when connec...

Page 194: ...work 4 1 Select the desired network by using the DATA CONTROL dial then press the C CNCT Connect button The name of the selected network will be fully shown in the display letting you confirm this is the network you want to use 4 2 Press the C CNCT Connect button For a network without a lock icon Connecting starts For a network with a lock icon You need to enter the proper password For details on ...

Page 195: ...TURE Refer to Wireless LAN Mode on page 197 2 Connect the USB wireless LAN adaptor then call up the Wireless LAN display Press the UTILITY button then use the Page buttons to select Page 6 3 Select OTHER at the bottom of the network list by using the DATA CONTROL dial then press the C CNCT Connect button The OTHER display will be shown The OTHER display consists of two different pages that can be ...

Page 196: ...Password input then set the password in the same way as SSID Press the D EXIT button to finalize the setting 5 Press the C CNCT button to start connection 6 After connection between the instrument and the access point is done successfully connect the iPhone iPad to the access point by referring to the iPhone iPad Connection Manual Connecting by the Adhoc Mode 1 Set the Wireless LAN mode to ADHOC R...

Page 197: ...y Press the UTILITY button then use the Page buttons to select Page 7 The currently selected Mode name is shown 2 Set the Wireless LAN mode You can set between two modes INFRASTRUCTURE and ADHOC Press the B MODE CHANGE button to call up a message prompting confirmation of the operation then press the C OK button to execute the operation Mode ...

Page 198: ...s LAN mode then call up the display for detailed settings by pressing the D button in the Wireless LAN settings display Page 6 or the Wireless LAN option display Page 7 Reference Page Wireless LAN Mode page 197 Wireless LAN settings display Page 6 Wireless LAN option display Page 7 INFRASTRUCTURE mode ADHOC mode INFRASTRUCTURE mode ADHOC mode DETAIL display Page 1 ADHOC display Page 1 DETAIL displ...

Page 199: ...NS Server 1 0 0 0 0 DNS Server 2 0 0 0 0 ADHOC mode ADHOC display Page 1 SSID ap ELB 02 last 6 characters of MAC address in lowercase or simply ap ELB 02 if MAC address cannot be used To find the specific MAC address see MAC address below SSID Security and Password can be set in the same way as those described in the section Manual Setup on page 195 The last 6 characters of the MAC address must be...

Page 200: ... careful when executing initialize since it erases all the wireless LAN settings and replaces them with the factory defaults 1 Press the UTILITY button to call up the UTILITY display then select Page 7 by using the Page buttons 2 Initialize the wireless LAN setting Press the C button A message appears prompting confirmation of operation Press the C OK button to execute the operation or the D butto...

Page 201: ...e such as an access point of the wireless LAN IP ADDRESS A string of numbers assigned to each computer connected to a network that indicate the device s location on the network LAN Short for Local Area Network this is a data transfer network that connects a group of computers at a single location such as an office or home by means of a special cable router A device that allows multiple devices e g...

Page 202: ...accordance with the sequence described here Assembly should be carried out by at least two persons Be sure to use only the included screws of the specified sizes Do not use any other screws Use of incorrect screws can cause damage or malfunction of the product Be sure to tighten all screws upon completing assembly of each unit To disassemble the unit reverse the assembly sequence given below Have ...

Page 203: ...deboard 4 3 While holding the Sideboard s to the Speaker unit fasten the four screws B from the rear to secure the Speaker unit to the Sideboards Cover the four screw holes on the rear side with the corresponding screw caps 5 Affix the two cord holders to the top surface of the Speaker unit then insert the Power cord in the holders as shown in the illustration Make sure to place the connector of t...

Page 204: ...e latches on each connector of the cords face toward you and connect them to each socket securely until the latch is set Once connected securely the connector cannot be accidentally disconnected even if you pull the connector gently downward If disconnected the pedals will not function properly 10 Affix the two cord holders to the inside of the side board then insert the Pedalboard cord in the hol...

Page 205: ...to produce sounds is described in Quick Introductory Guide Confirm that the Speaker cord connector and the Pedalboard cord connector are securely connected to each socket on the Main unit When moving the instrument CAUTION When moving the instrument always hold the bottom of the main unit Do not hold the top portion Improper handling can result in damage to the instrument or personal injury Transp...

Page 206: ... is not connected Securely insert the speaker cord to the Main Unit page 204 The Pedal Voices do not sound and the expression pedal does not work The pedal cord plug is not connected Securely insert the pedal cord plug to the Main Unit page 204 The Connection interrupted problem occurred in USB device message is shown and the USB device does not respond Communication with the USB device has been s...

Page 207: ...n Display page 54 The Rotary Speaker effect cannot be heard even when the Speed Control in the Rotary Speaker display is on Rotary Speaker must be selected first in Voice Condition display page 57 ACCOMPANIMENT The pitch in the Single Finger mode does not change even when pressing different keys of the keyboard Single Finger mode will only produce notes when played within a fixed octave interval o...

Page 208: ...R is designed so that the rhythm cannot be started at the very beginning of a recording If you wish to use the rhythm start it after the time indicator appears in the display page 138 The USB flash drive cannot be formatted when you want to format an unformatted drive Recognizing an unformatted drive takes a few seconds after it is inserted Wait about 30 seconds then try to format again An error m...

Page 209: ... Slow Stop EFFECT CONDITION Sustain Upper 1 Upper 2 Lower 1 Lower 2 Pedal 1 Pedal 2 Reverb Types Hall 1 3 M L XG Hall 1 2 Room 1 4 S M L XG Room 1 3 Stage 1 2 XG Stage 1 2 Plate 1 2 XG Plate GM Plate White Room Atmosphere Hall Acoustic Room Drums Room Percussion Room Tunnel Canyon Basement Depth Upper 1 2 Lower 1 2 Lead 1 2 Pedal 1 2 Percussion Accompaniment Keyboard Percussion Voice Section Effec...

Page 210: ...IDI Control Yes MASTER VOLUME Yes MDR Song Select Stop Play Pause Rewind Fast Forward Record Custom Play Setting Tempo Part Unit Edit Tools Create Folder Change Song Name Copy Delete Conversion XG format Format Information Audio Recording Playback Play Stop Play Pause Rewind Fast Forward Volume Tempo Pitch Record Stop Record Tools Change Name Delete File Format wav 44 1kHz 16bit stereo Utility Lan...

Page 211: ...ANCER 57 67 ER KARAOKE 57 64 Expression pedal 17 177 External 190 F Fast Forward audio 173 Fast Forward Song 157 Feet 54 Files 131 FILL IN 70 Fingered Chord 83 FLANGER 57 64 Folders 131 165 Footswitches 177 Format 7 Formatting a USB Flash Drive 133 Functions and settings that cannot be memorized 112 G Glide 179 GM 7 GS 7 H Headphones 19 I ID 168 INFRASTRUCTURE 197 Initial Touch 55 Initialize the w...

Page 212: ...0 S Save Registration Memory 118 Scroll bar 25 Selecting a Song 134 Shift 122 Shift End 126 Single Finger 83 Slide 59 Solo function 39 Song 155 Song selection 134 Song data size 168 Song icons 130 SONG Page 129 Speed Rotary Speaker 60 Speed Vibrato 56 Speed Control 60 START Rhythm 71 Stop Shift End 126 Super Articulation 42 Sustain 63 Synchro MIDI 190 SYNCHRO START 71 System Messages 188 T Tempo a...

Page 213: ...HE COPYRIGHT OWNER OR CONTRIBUTORS BE LIABLE FOR ANY DIRECT INDIRECT INCIDENTAL SPECIAL EXEMPLARY OR CONSEQUENTIAL DAMAGES INCLUDING BUT NOT LIMITED TO PROCUREMENT OF SUBSTITUTE GOODS OR SERVICES LOSS OF USE DATA OR PROFITS OR BUSINESS INTERRUPTION HOWEVER CAUSED AND ON ANY THEORY OF LIABILITY WHETHER IN CONTRACT STRICT LIABILITY OR TORT INCLUDING NEGLIGENCE OR OTHERWISE ARISING IN ANY WAY OUT OF ...

Page 214: ...ST TH 2860 Søborg Denmark Tel 45 44 92 49 00 FINLAND F Musiikki Oy Antaksentie 4 FI 01510 Vantaa Finland Tel 358 0 96185111 NORWAY Yamaha Music Europe GmbH Germany Norwegian Branch Grini Næringspark 1 1332 Østerås Norway Tel 47 6716 7800 ICELAND Hljodfaerahusid Ehf Sidumula 20 IS 108 Reykjavik Iceland Tel 354 525 5050 CROATIA Euro Unit D O O Slakovec 73 40305 Nedelisce Tel 38540829400 RUSSIA Yamah...

Page 215: ...Manual Development Department 2016 Yamaha Corporation Published 04 2016 MWZC C0 Printed in Indonesia Yamaha Downloads http download yamaha com ZS53040 ZS53040 ...

Reviews: