background image

58

Creating the Best Listening Space

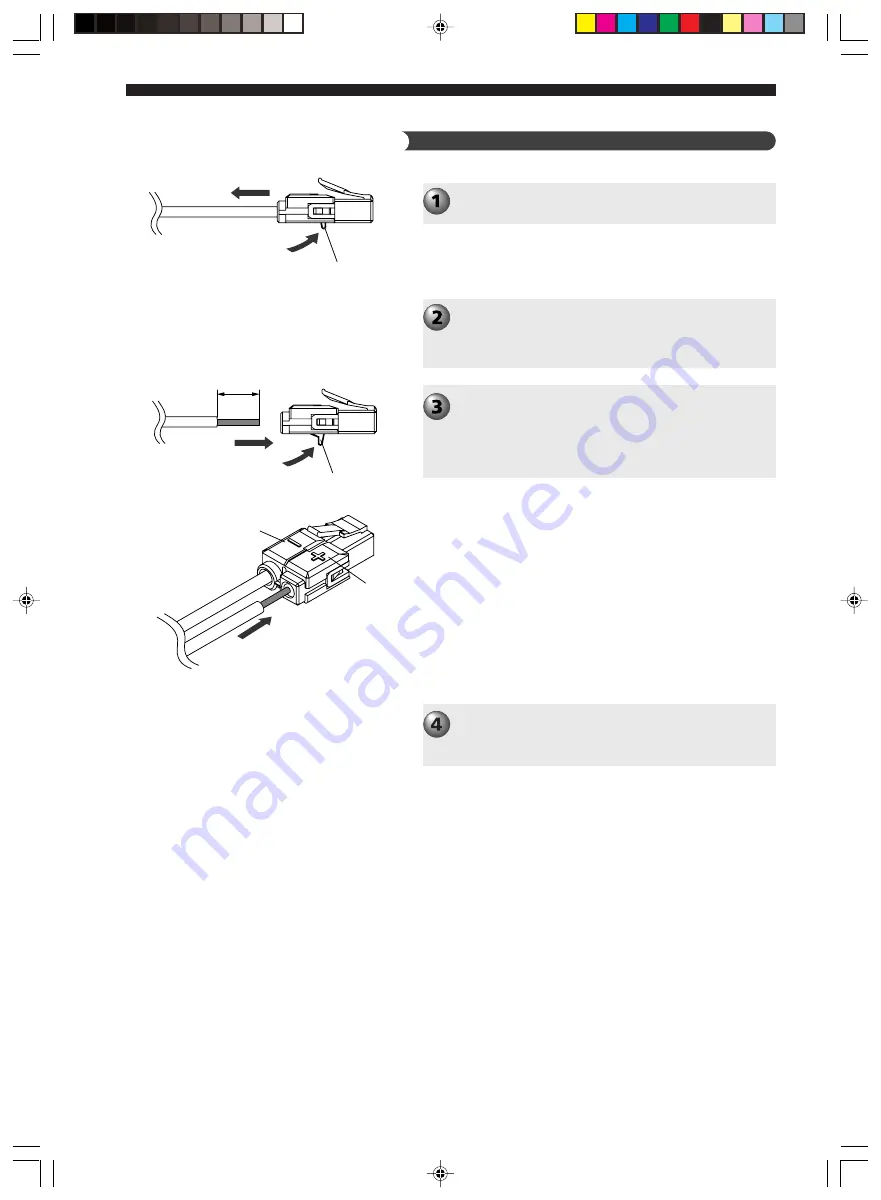
Push up the release button and pull out the
supplied speaker cable from the connector.

Peel away about 10 mm of covering from the tip
of the commercially available cable and firmly
twist the cable cores.

Not twisting firmly can cause a short.

Keep pushing up the release button and insert
the cable cores of the commercially available
cable.

Match the speaker cable polarity (+/-) with the polarity
indicator (+/-) of the connector.

Release your finger from the release button to
fasten the cable.

Release button

10 mm

Polarity indicator 

Polarity indicator 

Changing the speaker cables

Release button

012DVX-S200-en

04.3.1, 11:18 AM

58

Summary of Contents for DVX-S200

Page 1: ...BOURG 77312 MARNE LA VALLEE CEDEX02 FRANCE YAMAHA ELECTRONICS UK LTD YAMAHA HOUSE 200 RICKMANSWORTH ROAD WATFORD HERTS WD18 7GQ ENGLAND YAMAHA SCANDINAVIA A B J A WETTERGRENS GATA 1 BOX 30053 400 43 V...

Page 2: ...lugs convenience receptacles and the point where they exit from the apparatus 11 Only use attachments accessories specified by the manufacturer 12 Use only with the cart stand tripod bracket or table...

Page 3: ...nts provides a reasonable level of assurance that your use of this product in a residential environment will not result in harmful interference with other electronic devices This equipment generates u...

Page 4: ...wn on the table Please check to make sure that all of the components listed in the table are included Model name Category No of pcs DVR S200 DVD Super Audio CD 1 RECEIVER NX S200 Satellite Speaker 4 f...

Page 5: ...a room with a humidifier to prevent condensation inside this unit which may cause an electrical shock fire damage to this unit and or personal injury 5 Avoid installing this unit where foreign object...

Page 6: ...let s watch a DVD Page 10 Basic Operations Transform your room into a home theater in 3 steps Double and triple your enjoyment by CONNECTING OTHER EQUIPMENT Page 46 Using Other Equipment Enhance the...

Page 7: ...provides an incredible listening presence with headphones Let s listen to an FM AM BROADCAST Page 38 Listening to the Radio In 2 quick steps you can enjoy live radio broadcasts Enjoy playing all types...

Page 8: ...Page 37 Preparation Introduction Page 6 About this Manual Page 6 Supplied Accessories Page 6 Preparing the Remote Control Page 7 Preparing the Speakers Page 7 Placing the Speakers Page 7 Connecting th...

Page 9: ...s Page 65 Using Matrix 6 1 Page 65 Using All Speakers for CD or Video Playback Page 67 Using Front Speakers Only for DSP Program Virtual Cinema DSP Page 69 Using a DSP Program with Headphones SILENT C...

Page 10: ...DVR S200 1 unit Speaker Set NX P200 Satellite Speakers Front Surround NX S200 4 units Center Speaker NX C200 1 unit Subwoofer NX SW200 1 unit This Owner s Manual was printed before final product devel...

Page 11: ...levision Front Speakers L R Place the Front Left and Right Speakers an equal distance from the ideal listening position The distance of each speaker from each side of the video monitor should be the s...

Page 12: ...3 Release the lever and the lever will snap back into place 1 Speaker Cable Red Connect the plug to the jack of the same color Insert it firmly Red green white Face the tab upwards and insert Gray bl...

Page 13: ...efore connecting Video Pin Cable DVD Super Audio CD Receiver Speaker Cable Blue System Control Cable Subwoofer Cable Connect to the S video or Y PB PR jack on the TV Connect the power cord after makin...

Page 14: ...a disc and begin from step 1 Turn on the TV Use the TV remote control or power switch Switch TV Input Use the TV remote control or the input switch button on the television For example switch to vide...

Page 15: ...ic Operations Place a disc in the tray Place the disc with the label side facing up Hold the disc by its edge and hole in the center to avoid touching the surface of the disc Please Press f on the Cin...

Page 16: ...W TV CH TV INPUT A B C D E CENTER SURR SHIFT STEREO MATRIX 6 1 A B REPEAT ANGLE SUBTITLE DVR S200 WB56620 Press p The DVD starts playing Press s to stop playback To change discs Press f on CinemaStati...

Page 17: ...es Selecting the Audio Language 1 While holding down SHIFT press AUDIO 2 While viewing the TV screen press h or g to select the audio language you want The audio language changes each time you press A...

Page 18: ...LUME SET MENU ENTER Useful Features Switching the Viewing Angle While holding down SHIFT press ANGLE The video angle changes each time you press ANGLE while holding down SHIFT Restarting Playback from...

Page 19: ...ental Control level and lock discs See page 81 Protecting Your Children from Undesirable Material Enhancing Video Quality CinemaStation uses progressive image playback available only for NTSC Signal O...

Page 20: ...perience the sound of a movie theater or concert hall Follow the chart below to select the DSP Program that offers the acoustic qualities you want Advice What do you want to do Next selection Watch a...

Page 21: ...Munich Philharmonic Hall Puts you in a front row seat at the Munich Philharmonic Hall surrounded in calm voluptuous sound Jazz Club The Bottom Line Reproduces the acoustics of sitting right in front o...

Page 22: ...want To select another DSP Program group hold down this button See the diagram shown on the left t e r y Selects the previous next track or chapter Continue pressing to fast forward or fast reverse f...

Page 23: ...page 79 Preset radio stations See page 41 DSP Program settings Delay Time See page 72 Dolby Pro Logic II Music settings See page 68 A dvanced Advanced Features 19 A B C D E Selects preset groups A B C...

Page 24: ...P A B Lights up during A B Repeat ST Lights up when receiving a strong FM radio signal in Auto Tuning or Auto Preset mode Disc indicator DVD Lights up while a DVD disc is set in the disc tray VCD Ligh...

Page 25: ...replace them When the batteries grow old the effective operation distance decreases considerably When that happens replace the batteries with two new ones Once you take the old batteries out replace t...

Page 26: ...of the Surround Speakers STEREO Switches between normal stereo sound and audio with a sound field effect See page 75 Select STEREO to listen to audio with no sound field effect from the Front L R Spea...

Page 27: ...e While holding down SHIFT press one of the following buttons to enable the corresponding operation 7 REPEAT Enables Repeat Play 8 A B Enables settings for A B Repeat 2 AUDIO Switches the audio langua...

Page 28: ...Screen Menu appears CH CINEMA CH ON SCREEN MENU TEST RETURN STATUS TV VOL VOLUME MUTE AMP DVD CD VCR VIDEO 1 VIDEO 2 TUNER MD CD R MOVIE MUSIC SPORTS GAME SET MENU ENTER g g h g ON SCREEN Setting def...

Page 29: ...tion Contrast Color settings Colour settings Brightness Sharpness Status window Clear All Tracks Program Play list Playlist Zoom Angle Chapter Preview Audio Disc Navigation Sub title Subtitle Frame by...

Page 30: ...entertainment possibilities For connecting the equipment you want follow the chart below What would you like to play Equipment you use Video discs Music CDs MP3 discs or Super Audio CDs FM AM radio Vi...

Page 31: ...necting the Speakers and TV Then connect the indoor FM Antenna and AM Loop Antenna to CinemaStation See page 38 Connecting the Antennas Complete the steps on pages 8 and 9 Connecting the Speakers and...

Page 32: ...n Selecting a Scene or Tune Number buttons TV CH CINEMA CH POWER POWER AUDIO DTS SELECT NIGHT SW TV CH TV INPUT SLEEP PRESET PRESET A B C D E CENTER SURR SHIFT STEREO MATRIX 6 1 A B REPEAT ANGLE SUBTI...

Page 33: ...button the speed changes 1 8 1 4 or 1 2 To Slow Advance press r Each time you press the button the speed changes 1 8 1 4 or 1 2 TV CH CINEMA CH POWER POWER AUDIO DTS SELECT NIGHT SW TV CH TV INPUT SLE...

Page 34: ...ure that Toolbar is selected Press w to select Play Option Press g to select Search Press w to select Time Press w or q to select 0 00 00 hour minute or second with the cursor Then enter time with the...

Page 35: ...ENTER g g Customizing Playback Order Program Play Playback your favorite chapters and tracks in the order you want Perform operations using the TV On Screen Menu Program View Play Option Search Toolba...

Page 36: ...rn off the On Screen Menu Program Play starts Press w to start Program Play when Program Play does not start Advice Note Once Program Play is set the PROG indicator lights up in the CinemaStation Disp...

Page 37: ...select Clear All Then press w Clear changes to Cleared and all Program Play content is deleted English CH CH ON SCREEN MENU TEST RETURN STATUS SET MENU ENTER g h ON SCREEN g g Turn on off Program Pla...

Page 38: ...rk properly with some DVD video discs Repeat Play will not work during Menu Play of a video CD that is using Playback Control Repeating a Disc orTrack Repeat Play DVD V VCD CD Play back a disc To repe...

Page 39: ...points A B Repeat DVD V VCD CD Specify the start and end of a favorite segment points A and B then playback between those two points as much as you like You can specify a part within one title or trac...

Page 40: ...s not available during Program Play Using a Disc Menu Navigate a DVD Disc Menu Use Video CD Playback Control PBC Menu Play Press MENU A menu appears on the TV screen Depending on the disc a menu may a...

Page 41: ...recorded on a computer each folder on the disc is designated an Album and each file in each folder a Track CinemaStation is compatible with a bit rate range of 32 64 96 128 192 or 256 kbps CinemaStat...

Page 42: ...Loop Antenna s cord cores into the AM ANT and GND jacks Close the lever to fasten the cord Pull the cord lightly to make sure it is properly fastened Adjust the Antenna left and right and find the bes...

Page 43: ...source to Tuner Advice Display Selecting Radio Stations You have two ways to select radio stations Auto Tuning and Manual Tuning Auto Tuning is quick and handy to use when radio signal reception is st...

Page 44: ...ill automatically change the reception mode to monaural to increase the signal quality Select your favorite stations by hand Manual Tuning Perform step 1 in Select stations automatically Auto Tuning o...

Page 45: ...n Auto Preset finishes the frequency of the last radio station memorized appears Customizing Auto Preset method You can specify the Preset Group or number to start tuning You can also start Auto Tunin...

Page 46: ...ly Manually preset stations in advance Manual Preset Select radio stations you want to preset See page 39 Selecting Radio Stations The frequency and broadcast band FM or AM of the tuned in station app...

Page 47: ...anges each time you press A B C D E Press PRESET u d to select the Preset Number The Preset Group and Number broadcast band FM or AM and frequency appear in the CinemaStation Display with the TUNED in...

Page 48: ...PTY SEEK MODE Press this button to set the program type to search for PTY SEEK START Once the program type has been selected in PTY SEEK mode press this button to begin the search PTY Program Type RDS...

Page 49: ...is changes reception to monaural and may help RDS information reappear when you switch to RDS display mode If outside interference disrupts an RDS station broadcast RDS information may suddenly disapp...

Page 50: ...CAL OUTPUT OUTPUT L R L R AUDIO VIDEO L R L R AUDIO VIDEO AUDIO VIDEO L R AUDIO VIDEO INPUT OUTPUT1 OUTPUT2 INPUT1 INPUT2 Please TV Connection Cables VCR Game console or video camera Or CinemaStation...

Page 51: ...nected VCR power playback sound may become distorted and the volume reduced In this case turn on the VCR power Even if you adjust the audio volume audio quality or change the DSP Program during a vide...

Page 52: ...Storing Manufacturer Codes in the Remote Control Operate your VCR Turn on the TV Turn on the VCR Switch the TV input For example switch to video 1 if CinemaStation is connected to video input 1 on th...

Page 53: ...1 or VIDEO 2 according to the jacks connected to the video camera CinemaStation can now input video signal video camera Press POWER to turn on CinemaStation Switch the TV input For example switch to v...

Page 54: ...nection read the owner s manual of the equipment you want to connect Anti dust cap When connecting an optical cable first remove the dust cap attached to the OPTICAL jack Store the cap in a safe place...

Page 55: ...ks have priority over the MD CD R jacks See page 78 Switching Input Modes Use Input Assign in the SET MENU to assign the OPTICAL IN jack to VIDEO 1 VIDEO 2 VIDEO on U K and Europe models VCR or MD CD...

Page 56: ...cording may cut off if any of the operations below are performed Do not perform any of the below during recording Output a test tone Change a DSP Program Connect disconnect the headphones CinemaStatio...

Page 57: ...en if you use DTS software to digitally record a DTS signal only noise will be recorded CinemaStation cannot output a Super Audio CD signal to the digital jack If you want to perform Timer Recording w...

Page 58: ...the fastener seal do not touch the bonding surface If you do the bonding surface weakens which later may cause the speaker to fall over Before attaching the fastener to the television wipe the TV top...

Page 59: ...y installation methods Placing the Front and Surround Speakers Attach to the wall using the two holes on the back of the Front and Surround Speakers Attach 2 screws 3 5 to 4 mm dia commercially availa...

Page 60: ...n the mounting bracket to the speaker stand Use the screws 4 mm dia spring washers and washers Mounting bracket supplied Screw supplied 60 mm When attaching to a speaker stand and bracket When attachi...

Page 61: ...ly available speakers instead of the supplied Center Speaker Front Speakers Surround Speakers or Subwoofer You can also use commercially available speaker cables instead of the supplied cables Use a s...

Page 62: ...cable cores Not twisting firmly can cause a short Keep pushing up the release button and insert the cable cores of the commercially available cable Match the speaker cable polarity with the polarity...

Page 63: ...ition you may need to adjust the Speaker volume level especially when changing speaker or furniture position This adjustment is important because it brings out the maximum effect of the DSP Program an...

Page 64: ...or w and tune it to the same volume level as the Front Speakers Only the speaker currently being adjusted produces a test tone While in test tone mode you cannot adjust the volume level of the Front...

Page 65: ...T SW TV CH TV INPUT SLEEP PRESET PRESET A B C D E CENTER SURR SHIFT STEREO MATRIX 6 1 A B REPEAT ANGLE SUBTITLE DVR S200 WB56620 ON SCREEN MENU TEST RETURN STATUS TV VOL VOLUME MUTE AMP DVD CD VCR VID...

Page 66: ...n setting to 0 you hear no sound from the Speaker The volume levels adjusted with the test tone or the CENTER or SURR buttons in 5ch Stereo mode are replaced with the setting with CT LEV RL LEV or RR...

Page 67: ...sound field effects you need to use all 6 of the supplied speakers Front Center Surround and Subwoofer But depending on your listening objectives you can turn off specified speakers When using any spe...

Page 68: ...g small Surround L R Speakers A surround L R channel signal with a low tone of 90 Hz or below is output from the speaker set to BASS NON Select this setting when not using Surround L R Speakers The su...

Page 69: ...page 75 Reproducing Stereo Sound Using Matrix 6 1 TV CH CINEMA CH POWER POWER AUDIO DTS SELECT NIGHT SW TV CH TV INPUT SLEEP PRESET PRESET A B C D E CENTER SURR SHIFT STEREO MATRIX 6 1 A B REPEAT ANG...

Page 70: ...ayback If headphones are connected If a Dolby Digital KARAOKE source is playing If you select 5ch Stereo DSP Program If you turn on the power once more after CinemaStation goes into standby Matrix 6 1...

Page 71: ...e DSP button on CinemaStation to select PRO LOGIC II Movie or PRO LOGIC II Music Even if you play back a monaural source with Dolby Pro Logic II CinemaStation cannot reproduce multi channel sound Sele...

Page 72: ...ound sound field and surround volume Variable range 3 stronger toward the surround direction to 3 stronger toward the front direction Default setting STD Standard CT WIDTH Distributes the center chann...

Page 73: ...CinemaStation Display In the cases below even if SUR is set to NON in the SET MENU Virtual Cinema DSP does not function When you select the following DSP Programs 5ch Stereo PL Normal Dolby Digital N...

Page 74: ...r regardless of whether sound field effect is on or off When you do not select any DSP Program the headphone produces normal stereo sound If CinemaStation inputs a digital audio sampling frequency ove...

Page 75: ...DSP Programs are available in Night Listening mode Night Listening mode does not work when listening through headphones You can control the big sound effects and focus on listening clearly to speech E...

Page 76: ...und reverberant sound and Delay Time Among these parameters you can change the Delay Time to match to your Speaker positions Delay Time is the time gap in playback between front speaker audio and surr...

Page 77: ...le 6 1 15 5 Theater 20 Theater 6 1 5 MUSIC 1 Music Video 21 2 Classic Hall 30 3 Jazz Club 30 4 Rock Concert 15 SPORTS 1 Live Sports 10 GAME 1 Game 36 Program Name Default Setting ms PL Normal Dolby Pr...

Page 78: ...D R MOVIE MUSIC SPORTS GAME SET MENU ENTER AMP SELECT q DTS You can play back and enjoy movie sound processed with Dolby Digital Dolby Pro Logic or DTS Enjoy smooth precise and flowing audio of the or...

Page 79: ...aker or Surround L R Speakers The volume may become very low if you turn off sound field effects and set D Range to MIN in the SET MENU In this case turn on sound field effects If sound field effects...

Page 80: ...AT ANGLE SUBTITLE DVR S200 WB56620 ON SCREEN MENU TEST RETURN STATUS TV VOL VOLUME MUTE AMP DVD CD VCR VIDEO 1 VIDEO 2 TUNER MD CD R MOVIE MUSIC SPORTS GAME SET MENU ENTER AMP STEREO g Checking Sound...

Page 81: ...Input Signal Format Display Analog Audio Analog PCM Audio PCM Dolby Digital Audio Dolby DGTL DTS Audio DTS Other Digital Signals Unknwn DGTL Audio Channels Shows the number of audio channels an input...

Page 82: ...you select with the Input Selection button can only accept an analog input signal To play back DTS set the Input mode to AUTO or DTS Do not set it to ANLG If you do audio may not output or you may he...

Page 83: ...leep timer of each device separately The Sleep Timer cancels if you press POWER on the Remote Control press STANDBY ON on CinemaStation or pull out the power cord Memory backup remembers the previous...

Page 84: ...n Menu to change to the screen display that matches your television See pages 95 and 96 On Screen Menu Guide If you cannot adjust the size turn off Progressive Scan Changes to interlace output When Pr...

Page 85: ...AT ANGLE SUBTITLE DVR S200 WB56620 ON SCREEN MENU TEST RETURN STATUS TV VOL VOLUME MUTE AMP DVD CD VCR VIDEO 1 VIDEO 2 TUNER MD CD R MOVIE MUSIC SPORTS GAME SET MENU ENTER g h g g ON SCREEN The defaul...

Page 86: ...on page 81 Enter the new password 4 digits again for confirmation Enter the new password 4 digits with the Number buttons Enter the current password 4 digits with the Number buttons Press g to select...

Page 87: ...MOVIE MUSIC SPORTS GAME SET MENU ENTER g h g g ON SCREEN When you are finished with the setting press the ON SCREEN key and the On Screen Menu will close As long as a password is not entered playback...

Page 88: ...rect manufacturer code With a manufacturer code set for the TV button press the button to turn the TV power on off standby and check that the setting is working correctly With a manufacturer code set...

Page 89: ...serting batteries try the steps again within 2 minutes of reinserting When reinserting batteries be careful not to press the Remote Control buttons If a manufacturer code has been set for the TV VCR o...

Page 90: ...MATRIX 6 1 A B REPEAT ANGLE SUBTITLE DVR S200 WB56620 ON SCREEN MENU TEST RETURN STATUS TV VOL VOLUME MUTE AMP DVD CD VCR VIDEO 1 VIDEO 2 TUNER MD CD R MOVIE MUSIC SPORTS GAME SET MENU ENTER TV opera...

Page 91: ...alter 297 LG Goldstar 297 298 239 237 Goodmans 296 298 223 Grundig 229 238 249 Harvard 285 Hitachi 297 239 242 243 ICE 296 Irradio 296 Itt Nokia 244 245 JC Penny 293 297 234 237 286 JVC Victor 296 246...

Page 92: ...h 397 348 354 NEC 392 394 344 383 Nikko 396 Noblex 363 Nokia 393 395 Nokia Oceanic 395 Okano 323 Olympic 325 328 Optimus 396 Orion 327 Panasonic 325 328 355 378 384 385 Pentax 333 349 342 Philco 325 3...

Page 93: ...r listening environment SET MENU List The SET MENU contains the items below Advice Item Default Setting value Speaker Set CENTER SML FRONT SML SUR SML BASS SWFR F Level Nrm LFE Level SP LFE 0 dB HP LF...

Page 94: ...TUNER MD CD R MOVIE MUSIC SPORTS GAME SET MENU ENTER AMP SET MENU g h g g Press AMP Press SET MENU Press h or g repeatedly to select the Menu you want Press q or w Once in the setting mode of the sel...

Page 95: ...way Press q to set it closer Every 1 ms increase in Delay Time increases the distance away from the listening position by 30 cm 1 foot Advice Set the Delay Time of the Center and Surround Speakers dur...

Page 96: ...aStation after you change the setting The new setting becomes effective after you turn on CinemaStation again Refer to the list below for the frequency spacing North Central and South America AM10 FM1...

Page 97: ...ATRIX 6 1 A B REPEAT ANGLE SUBTITLE DVR S200 WB56620 ON SCREEN MENU TEST RETURN STATUS TV VOL VOLUME MUTE AMP DVD CD VCR VIDEO 1 VIDEO 2 TUNER MD CD R MOVIE MUSIC SPORTS GAME SET MENU ENTER ON SCREEN...

Page 98: ...IC SPORTS GAME SET MENU ENTER g h ON SCREEN ENTER g g Press ENTER then press ON SCREEN to turn off the On Screen Menu In some cases you can also use h or g for setting content Press q or w to set Pres...

Page 99: ...ndow Clear All Tracks Program Play list Playlist Zoom Angle Chapter Preview Play Option Setting Content Setting Item Submenu Main Menu Selects a track Page 31 Selects Program Play On Off Page 33 Shows...

Page 100: ...selected language you selected it will play in another language Select the output signal for the OPTICAL OUT jack The speaker sound changes depending on the setting for this menu item All Outputs all...

Page 101: ...before reinserting the cord and turning on the power again 4 The system cable is not connected properly Connect the system cable securely No sound 1 You did not connect the cable properly Check your...

Page 102: ...rs 1 You turned off the Surround Speaker volume level Turn up the Surround Speaker volume See page 61 2 CinemaStation plays a monaural source in the Theater DSP Program Select another DSP Program See...

Page 103: ...do not share an analog connection Connect them with an analog connection 5 Some recording devices are not able to record a digital source such as Dolby Digital or DTS CinemaStation is not working nor...

Page 104: ...cs are copy protected so you cannot copy them Picture looks poor while fast forwarding or reversing To some degree the picture does not look normal but this is not a defect The television monitor has...

Page 105: ...e 40 2 Change your outdoor FM antenna for a multi channel one Auto Tuning does not work The radio waves are weak or your antenna is not completely connected 1 Change the AM Loop antenna s direction Se...

Page 106: ...You did not select the mode to operate CinemaStation Press DVD CD AMP or TUNER on the Remote Control before starting operation Remote Control A peripheral device does not work with the Remote Control...

Page 107: ...CinemaStation can play the discs with the region codes shown below on the right For more details read the information on the disc jacket Advice DVD region codes U S A Canada 2 ALL 2 U K Europe 4 ALL...

Page 108: ...ch as PC environment and application software Failure can also result from disc characteristics and condition like material quality scratches or curvature Notes Caution Handling a disc Do not touch th...

Page 109: ...opyright protection technology must be authorized by Macrovision Corporation and is intended for home and other limited viewing uses only unless otherwise authorized by Macrovision Corporation Reverse...

Page 110: ...ge audio channels With an additional channel especially for bass effects called LFE low frequency effect the system has a total of 5 1 channels By using 2 channel stereo for the surround speakers more...

Page 111: ...the picture to reproduce an aspect ratio of 16 9 PAL PAL is a video signal system 625 lines 25 frames per second used in the United Kingdom much of the rest of western Europe several South American c...

Page 112: ...17 DTS ES disc 65 DVD region codes 103 F Fastener 54 Finding the Best DSP Effect 16 Frame Advance 29 G H Game 17 HP Tone CTRL 91 I J Input Assign 92 Input Mode 92 Input Modes 77 Jazz Club 17 L L R Bal...

Page 113: ...Manual Preset 42 Setting the Manufacturer Code 84 SILENT CINEMA 70 Sleep Timer 79 Slow Advance Reverse 29 SP Delay 91 Speaker Mode 63 Speaker Size 63 Speaker Volume Level 59 61 5ch Stereo DSP Program...

Page 114: ...etic shielding type Impedance 6 Center Speaker Model Name NX C200 Type 2 way acoustic suspension magnetic shielding type Driver Tweeter 2 5 cm 1 inch balanced dome magnetic shielding type Woofer 5 cm...

Page 115: ...URG 77312 MARNE LA VALLEE CEDEX02 FRANCE YAMAHA ELECTRONICS UK LTD YAMAHA HOUSE 200 RICKMANSWORTH ROAD WATFORD HERTS WD18 7GQ ENGLAND YAMAHA SCANDINAVIA A B J A WETTERGRENS GATA 1 BOX 30053 400 43 V S...

Reviews: