background image

18

18

General information about On-
Screen Menu Icons

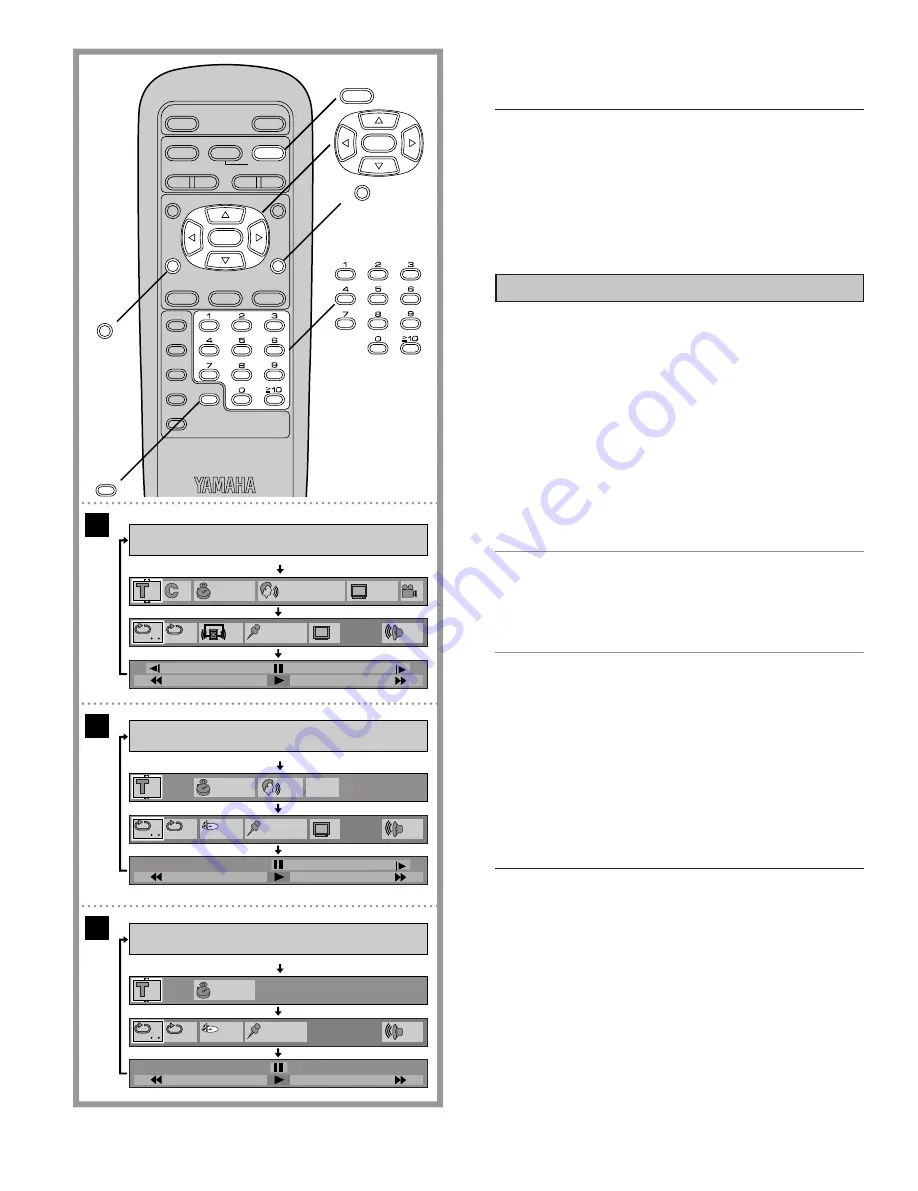
This player features On-Screen Menu Icons providing various
functions. A “banner” will be displayed on the TV monitor by
pressing the ON SCREEN button on the remote control.
Operating the cursor buttons/SELECT button on the remote
control will show disc information (title/chapter/track number,
elapsed playing time, audio/subtitle language, and angle) and
player information (repeat play, play mode, marker, etc.).
Some icons allow the settings to be changed.

Common procedures

1

Press ON SCREEN during play or in the
stop mode.

Each time this button is pressed, the TV monitor changes
as shown below.

[>

On-Screen Menu Icons are not displayed

l

v

l

>

On-Screen Menu Icons for selecting disc information

l

v

l

On-Screen Menu Icons for selecting player information

l

v

{=

Shuttle screen

Á

Some functions cannot be accessed from the stop
mode.

2

Press the cursor buttons (

C

D

) to select

the preferred item.

Á

The currently selected item is indicated by the yellow
frame on the On-Screen Menu Icons.

3

Press the cursor buttons (

A

B

) to select

the preferred setting.

Á

For some functions, the setting will be registered imme-
diately; for others, SELECT or PLAY must be pressed.

Á

When numbers are displayed (e.g. title No.), the numeric
buttons are also effective for setting instead of the cursor
buttons (

A

B

). When numbers are entered by the nu-

meric buttons, press SELECT to register the setting.

Press RETURN or CLEAR to clear the On-Screen Menu
Icons.

Examples of On-Screen Menu Icons
(See 

A

B

 and 

C

 for detailed illustration.)

(The screens may differ depending on the disc contents.)

Á

DVD (

A

)

Á

Video CD (

B

)

Á

CD (

C

)

For your reference:

Á

Depending on the type of DVD software and a TV with auto-
matic picture zoom function enabled, the On-Screen Menu
Icons may not be displayed or only partially displayed on the
TV screen.
In this case, change the position of the On-Screen Menu
Icons in “4 On-Screen Messages” of the initial settings.
(See page 34.)

Á

The color (blue, violet or green) of the On-Screen Menu
Icons can be changed. (See page 34.)

A

B

C

1

1:56:37

1

LPCM

ENG

1

48k 16b

OFF

ENG

ON

1

1

  3:37

L  R

OFF

PBC

PRG

1

  3:37

0

N

dB

F

dB

*****

PRG

0

dB

µ

100

p

100

µ

40

p

40

µ

50

p

50

N

0

*****

*****

OFF

OFF

POWER

@

STOP

TITLE

SUBTITLE

MARKER

ANGLE

AUDIO

ON SCREEN

RETURN

MENU

SELECT

H   

SKIP   

I

F   


G

D

PLAY

g

STILL/PAUSE

OPEN/CLOSE

*

/ I

PLAY MODE

REPEAT

A-B

CLEAR

DVD

SET UP

SLOW/

SEARCH

D

PLAY

CLEAR

SELECT

RETURN

ON SCREEN

OFF

Summary of Contents for DVD-S795

Page 1: ...CD Player DVD S795 Operating Instructions Before attempting to connect operate or adjust this product please read this Operating Instructions manual completely and save this manual for future reference UC VQT8007 1 ...

Page 2: ... constitute a risk of electric shock to persons The exclamation point within an equilateral trian gle is intended to alert the user to the presence of important operating and maintenance servicing instructions in the literature accompanying the ap pliance CAUTION TO REDUCE THE RISK OF ELECTRIC SHOCK DO NOT REMOVE COVER OR BACK NO USER SERVICEABLE PARTS INSIDE REFER SERVICING TO QUALIFIED SERVICE P...

Page 3: ...aring damage from loud sounds is often undetectable until it is too late YAMAHA and the Electronic Industries Association s Consumer Electronics Group recommend you to avoid prolonged exposure from excessive volume levels Precautions Please read these precautions before operating this player È AC cord To avoid any malfunctions of the player and to protect against electric shock fire or personal in...

Page 4: ... of the player Please note them in the space provided below and re tain this booklet as a permanent record of your purchase to aid identification in the event of theft MODEL NUMBER __________________________ SERIAL NUMBER __________________________ This product incorporates copyright protection technolo gy that is protected by method claims of certain U S pat ents and other intellectual property r...

Page 5: ...of each On Screen Menu Icon 19 ÁScreen for disc information For DVD 019 ÁScreen for disc information For Video CD CD 020 ÁScreen for player information 021 ÁShuttle screen 022 Advanced Operation Repeat play 23 ÁRepeat viewing listening 023 ÁRepeating sections between two specific points A B repeat 024 Program play Video CD CD 25 Random play Video CD CD 26 Storing markers in memory to be viewed lis...

Page 6: ...ion to make it easier to hear movie dialogues and other features Ádts digital theater systems digital output See page 10 By connecting an amplifier incorporating a dts decoder you can enjoy high quality digital surround from dts discs È On Screen Menu Icons See page 18 By simply pressing the ON SCREEN button on the remote control information on the DVD Video CD CD player and disc can be displayed ...

Page 7: ...h the information can be recorded a DVD disc has a greater capacity than a single 1 2 mm thick disc Since the two thin discs are adhered to each other there is the potential to achieve double sided play sometime in the future for even longer duration of play Field Half of the video information video signal in a frame is called a field With conventional TV systems a signal frame a single screen con...

Page 8: ...ntrol reference guide Main unit Page e STANDBY ON button 14 Press to switch the player from standby mode to ON or vice versa In standby mode the player is still consuming a small amount of power f Disc tray 14 g OPEN CLOSE button E 14 h PLAY button D 14 i PAUSE button g 16 Page j STOP button 15 k Headphones jack PHONES 13 l Phones level control LEVEL 13 m Remote control signal sensor 13 n FL Displ...

Page 9: ... Linear PCM of 96 kHz sampling is be ing played p Illuminates when Linear PCM of 24 bit is being played q Illuminates when the disc tray is open r Illuminates when the disc tray is being closed re tracted s Illuminates during play of a DVD t Illuminates during play of an interactive DVD u Illuminates during play of a Karaoke DVD v Illuminates during play of an interactive Karaoke DVD w Illuminates...

Page 10: ...hot Connecting to an AV amplifier containing Dolby Digital or dts digital theater systems decoder When DVDs recorded in Dolby Digital or dts are played Dolby Digital bitstream or dts bitstream is output from the player s OPTICAL digital audio output connector or COAXIAL digital audio output connector When the player is connected to a Dolby Digital decoder or dts decoder you can enjoy theater quali...

Page 11: ...ly or no output 1 dts bitstream 1 5 1ch or no output 1 PCM 44 1 kHz sampling 2 Linear PCM 44 1 kHz sampling Caution for the optical coaxial digital audio output connector È When connecting an amplifier with an optical coaxial digital input connector which contains the Dolby Digital decoder or dts decorder ÁBe sure to select Bitstream both at 2 Dolby Digi tal and 3 dts of the initial setting 7 Digi...

Page 12: ...etting see page 40 the discs recorded in Linear PCM will be played back only in 2 channels even when the center speaker is connected as well as the front speakers ÁDVDs recorded in Linear PCM 96 kHz sampling in which Center Speaker is contained will also be played back only in 2 channels ÁIf the player is connected to the AV amplifier as shown above audio recorded in dts will not be output To enjo...

Page 13: ... Connecting headphones C 1 Connect the headphones optional ÁHeadphones with a 1 4w 6 3 mm stereo plug can be con nected 2 Adjust the volume Caution Avoid listening to sound at levels which may be harmful to your ears Notes ÁDo not use rechargeable Ni Cd batteries ÁDo not attempt to recharge short circuit disassemble heat or throw the batteries into a fire ÁDo not drop step on or otherwise impact t...

Page 14: ...ted as the menu language Basic play O p e n C l o s e R e a d i n g Preparations ÁConfirm that the TV set or the audio equipment if connected is properly connected to the player ÁConfirm that the power for the TV set or the audio equipment if connected is turned on ÁConfirm that the input setting for the TV set or the audio equipment if connected is properly selected Example Select VCR 2 on the TV...

Page 15: ...reen Example Example of DVD B Notes ÁThe disc continues to rotate while the menu is displayed even after the player has finished playing a particular item When no further selections are to be played be sure to press STOP to clear the menu display ÁIf the disc is placed in upside down and it is a single sided disc the FL display will indicate NO PLAY For your reference ÁWhen appears on the TV monit...

Page 16: ...nu screen may some times be recalled Still picture Pause By the remote control unit Press STILL PAUSE during play By the main unit Press PAUSE during play ÁDVD Video CD The player will be placed in the still picture mode ÁCD The player will be placed in the pause mode ÁNormal play is resumed when PLAY is pressed POWER STOP TITLE SUBTITLE MARKER ANGLE AUDIO ON SCREEN RETURN MENU H SKIP I F G DPLAY ...

Page 17: ... PAUSE also activates frame ad vance ÁWhether the pictures are advanced by a Frame or Field is automatic See page 42 Reverse direction Forward direction Example Forward direction Reverse direction Slow motion play DVD Video CD By the remote control unit Press SLOW SEARCH F G in the still pic ture mode See page 16 On the main unit Press SEARCH F G in the still picture mode See page 16 ÁThe speed of...

Page 18: ...or some functions the setting will be registered imme diately for others SELECT or PLAY must be pressed ÁWhen numbers are displayed e g title No the numeric buttons are also effective for setting instead of the cursor buttons A B When numbers are entered by the nu meric buttons press SELECT to register the setting Press RETURN or CLEAR to clear the On Screen Menu Icons Examples of On Screen Menu I...

Page 19: ... OFF V1oV2 V1 V2 Change the No by using the cursor buttons A B or the numeric buttons ENG English POR Portuguese FRA French RUS Russian DEU German JPN Japanese ITA Italian CHI Chinese ESP Spanish KOR Korean NLD Dutch MAL Malay SVE Swedish VIE Vietnamese NOR Norwegian THA Thai DAN Danish U Others Select ON or OFF by using the cursor buttons A B OFF Subtitle is cleared ON Subtitle is displayed Subti...

Page 20: ...ng time Remaining time of the track Remaining time of the disc Audio mode Video CD only See page 27 Change the mode by using the cursor buttons A B LR L R Left channel sound is output from the speaker L and right channel sound from the speaker R Left channel sound only is output Right channel sound only is output Note ÁTrack No and the elapsed playing time are not displayed during menu play of Vid...

Page 21: ...utton A ÁTo clear a marker select the preferred marker no using the cursor buttons C D and press CLEAR Adjust the master volume by using the cursor buttons A B 0 to p127 dB or p Master volume Contrast o7 to p7 Equalizer o1 0 p1 Brightness 0 to 15 Repeat play See page 23 Select the preferred mode during play by using the cursor buttons A B OFF C T OFF T A Normal play Chapter repeat play Title repea...

Page 22: ...aximum speeds of rapid reverse and rapid advance DVD o100 p100 Video CD o40 p40 CD o50 p50 Detailed descriptions of each On Screen Menu Icon Shuttle screen Still Pause Press the cursor button A Slow motion play Backward Press the cursor button C DVD only Slow motion play Forward Press the cursor button D DVD Video CD only Rapid advance Press the cursor button D Rapid reverse Press the cursor butto...

Page 23: ... Normal play ÁVideo CD CD Normal play Repeat of track being played Repeat of entire disc contents Cancel repeat mode Normal play To return to normal play Press REPEAT several times until OFF is displayed Notes ÁRepeat play may not work correctly with some DVDs ÁRepeat play does not work with an interactive DVD or during menu play of a Video CD with playback control POWER STOP TITLE SUBTITLE MARKER...

Page 24: ...at play of the selection between points A and B starts To return to normal play Press A B several times until Á Á is displayed Notes ÁA B repeat play does not work with an interactive DVD ÁSome subtitles recorded around point A or B may fail to ap pear DVD ÁA B repeat play works only within a title DVD or a track Video CD CD For your reference ÁIf the title track is completed before end location B...

Page 25: ...g CLEAR of the remote control unit also clears the last program ÁTo clear all the programs Move to Clear all and press SELECT The programs are also cleared when the player is set to the standby mode or turned off or OPEN CLOSE is pressed Programming track numbers while monitoring the player s FL display This function works with the following discs ÁCDs ÁVideo CDs with playback control when menu pl...

Page 26: ...to again Storing a marker in the memory 1 Press MARKER during play The marker screen appears on the TV monitor 2 Press SELECT during play at the starting point to be viewed listened to again Indicates MARKER 1 is stored in the memory If SELECT is pressed where any number is already displayed the previous starting point will be replaced by the new one ÁUp to 5 markers can be stored in the memory ÁP...

Page 27: ...es are recorded 1 Press AUDIO during play ÁWhen no audio soundtrack is recorded will be dis played instead of the language number 2 Press the cursor buttons A B until the preferred language is selected Pressing the numeric buttons also changes the audio soundtrack language ÁPress AUDIO or SELECT to clear the display For your reference ÁWhen the preferred language is not selected even after pressin...

Page 28: ... not changed to the selected one immediately ÁWhen a disc supported the closed caption is played the sub title and the closed caption may overlap each other on the TV monitor In this case turn the subtitle off For your reference ÁWhen the preferred language is not selected even after pressing the cursor buttons A B several times it means that the language is not available on the disc ÁWhen the pow...

Page 29: ...disc used 1 Press TITLE during play A list of the titles on the disc is now displayed ÁPressing TITLE again resumes play from the scene when TITLE was first pressed 2 Press the cursor buttons A B C D and press SELECT or PLAY or press the numer ic buttons to select the preferred title The selected title now starts playing Using a DVD menu DVD Some DVDs have unique menu structures called DVD menus F...

Page 30: ... respec tive page To cancel during setup operation Press RETURN or select 0 The previous screen is dis played To clear the initial settings screen Press the cursor buttons A B to select 0 and press SELECT Pressing SET UP or RETURN also clears the initial settings screen Note ÁAfter the player is set to the Lock All setting in 2 Ratings none of the initial settings including 2 Ratings can be change...

Page 31: ... 2 Subtitle is selected 1 Automatic The same language selected for the 1 Audio will be selected Factory preset ÁIf the language selected for the 1 Audio is actually used during play back the subtitles will not appear ÁIf another language is used during playback the subtitles will appear in the language selected at the setup 1 Audio 2 English 3 French 4 Spanish Each language is selected 5 Other UUU...

Page 32: ...vel 1 DVDs for children can be played back DVDs for adults general audiences are prohibited Level 0 Playback of all DVDs is prohibited e g to prohibit playback of DVDs for adults which are not encoded with rating level information 3 When level 7 or lower is selected Input a 4 digit password by pressing the numeric buttons and press SELECT The lock symbol appears closed to show the rating is locked...

Page 33: ...nd the initial settings screen is displayed Also refer to Common procedures of initial settings on page 30 Note ÁSome discs may not be encoded with specific rating level information though its disc jacket says that it is for adults For those discs the age restriction will not work Selecting language of On Screen Display menu This is to select the language to be used in the On Screen Dis play menus...

Page 34: ...d position above slightly below of Play Still and other dis plays as well as On Screen Menu Icons 3 Press the cursor buttons A B to select the preferred setting and press SELECT When 1 On Screen Messages is selected 1 On Play Still and other displays will always ap pear on the TV screen Factory preset 2 Off Play Still and other displays will not appear on the TV screen When 2 Color and Position is...

Page 35: ...display 1 At the initial settings screen on page 30 Press the cursor buttons A B to select 5 FL Display and press SELECT 2 Press the cursor buttons A B to select the preferred item and press SELECT 1 Bright The FL display will always be bright Factory preset 2 Dim The FL display will always be dimmed 3 Dim During DVD VCD Play Auto The FL display will be dimmed during playback of DVDs and Video CDs...

Page 36: ...V types can be selected in both cases 1 Standard Direct View TV Select when a standard TV Direct view is connected Factory preset 2 CRT Projector Select when a CRT projector is connected 3 LCD Projector Select when a LCD projector is connected 4 Projection TV Select when a projection TV is connected Setting is finished and the initial settings screen is displayed Also refer to Common procedures of...

Page 37: ...ppear on the TV screen differ depending on the type of software and the TV set connected 4 3 Screen whose right and left edges are cut off Letterbox with black bands at top and bottom Full screen Letterbox with black bands at top and bottom TV set connected Screen mode Type of software Software for wide screen formatted in the Pan Scan style Software for wide screen not formatted in the Pan Scan s...

Page 38: ...ar PCM of 96 kHz In case of the DVD recorded in Linear PCM of 48 kHz digital audio converted to 48 kHz 16 bit is output irre spective of the setting 2 Dolby Digital To select the signal format Bitstream or PCM to be output from the optical coaxial digital audio output con nector during playback of the DVD recorded in Dolby Digital 3 dts To select whether dts bitstream is output from the opti cal c...

Page 39: ...al settings on page 30 Recommended setting of Digital Audio Out put Make settings as shown in table below depending on the kind of equipment that is connected to the optical coaxial digital au dio output connector ÁUnderlined item is a factory preset 1 When connecting an AV amplifier with an optical coaxial digital audio input connector without Dolby Digital or dts decoder be sure to select PCM of...

Page 40: ...uency under 100 Hz reproduction select the smaller icon When the subwoofer is not con nected be sure to select Large for the front speakers L R Center Large Small No Center Delay time 0 ms Front L Large Small Test signal Surround L Large Small No Surround L Channel balance 0 dB Surround R Large Small No Surround L R Delay time 0 ms Subwoofer Channel balance 0 dB Subwoofer Yes No Front R Large Smal...

Page 41: ...ept the subwoofer consecutively 2 While listening to the test signal adjust the volume of each speaker so that all the test signals are heard at the equal level 3 Press SELECT The test signals are stopped Note ÁTest signal is not output from the subwoofer Adjust the channel balance for each disc to be played back 4 Press the cursor buttons A B C D to select Exit and press SELECT Setting is finishe...

Page 42: ...lay To select whether the picture type I P B is displayed on the TV screen in the still picture mode or not 6 Black Level Control To select the black level of the picture Lighter or Darker 3 Press the cursor buttons A B to select the preferred value and press SELECT When 1 Still Mode is selected 1 Automatic Field still and Frame still are automati cally selected in the still picture mode Factory p...

Page 43: ...Control is selected 1 Lighter The black level of the picture is selected to the lighter one Select this setting normally when the player is connected to a TV set through the VIDEO OUT connector or S VIDEO OUT connector Factory preset 2 Darker The black level of the picture is selected to the darker one Select this setting normally when the player is connected to a TV set through the COM PONENT VID...

Page 44: ...Armenian Interlingua Indonesian Icelandic Italian Hebrew Japanese Yiddish Javanese Georgian Kazakh Greenlandic Cambodian Kannada Korean Kashmiri Kurdish Kirghiz Latin Code 7678 7679 7684 7686 7771 7773 7775 7776 7778 7779 7782 7783 7784 7789 7865 7869 7876 7879 7982 8065 8076 8083 8084 8185 8277 8279 8285 8365 8368 8372 8373 Language Lingala Laothian Lithuanian Latvian Lettish Malagasy Maori Maced...

Page 45: ...oft dry lint free cloth before us ing the disc Improper disc storage You can damage discs if you store them in the following places ÁAreas exposed to direct sunlight ÁHumid or dusty areas ÁAreas directly exposed to a heat outlet or heating appliance Discs which cannot be played with this player ÁDVD with Region No other than 1 or ALL ÁDisc of PAL system ÁCD G ÁDVD ROM ÁCD RW ÁDVD R DVD RAM ÁDVDGRW...

Page 46: ...ng upwards ÁEnsure that the equipment is connected properly ÁEnsure that the input setting for the TV is Video ÁEnsure that the equipment is connected properly ÁEnsure that the input settings for the TV and stereo system are correct ÁAdjust the master volume using the On Screen Menu Icon for player information The picture will be somewhat distorted at times this is normal ÁSome operations may be p...

Page 47: ...d The password for rating level has been forgotten ÁSubtitles appear only with discs which contain them ÁSubtitles are cleared from the TV monitor Perform the steps on page 28 to display the subtitles ÁAn alternative language is not selected with discs which do not contain more than one language ÁIn the case of some discs the alternative language cannot be selected by operating the AUDIO or SUBTIT...

Page 48: ... 8 cm double sided single layer 2 Compact disc CD DA VIDEO CD 5w 12 cm disc 3w 8 cm disc Component video output Y output level 1 Vp p 75 CB output level 0 7 Vp p 75 CR output level 0 7 Vp p 75 Output connector Pin jack Y green CB blue CR red S video output Y output level 1 Vp p 75 C output level 0 286 Vp p 75 Output connector S terminal Number of connectors 1 system Video output Output level 1 Vp ...

Reviews: