background image

5

English

Preparation

General Notes

Depending on the equipment you wish to connect, there
are various ways you could connect the player. Possible
connections are shown in the following drawings.

Please refer to the manuals of other equipment as
necessary to make the best connections.

Do not connect the player via your VCR. The video quality
could be distorted by the copy protection system.

Do not connect  the player’s audio out jack to the phono in
jack of your audio system.

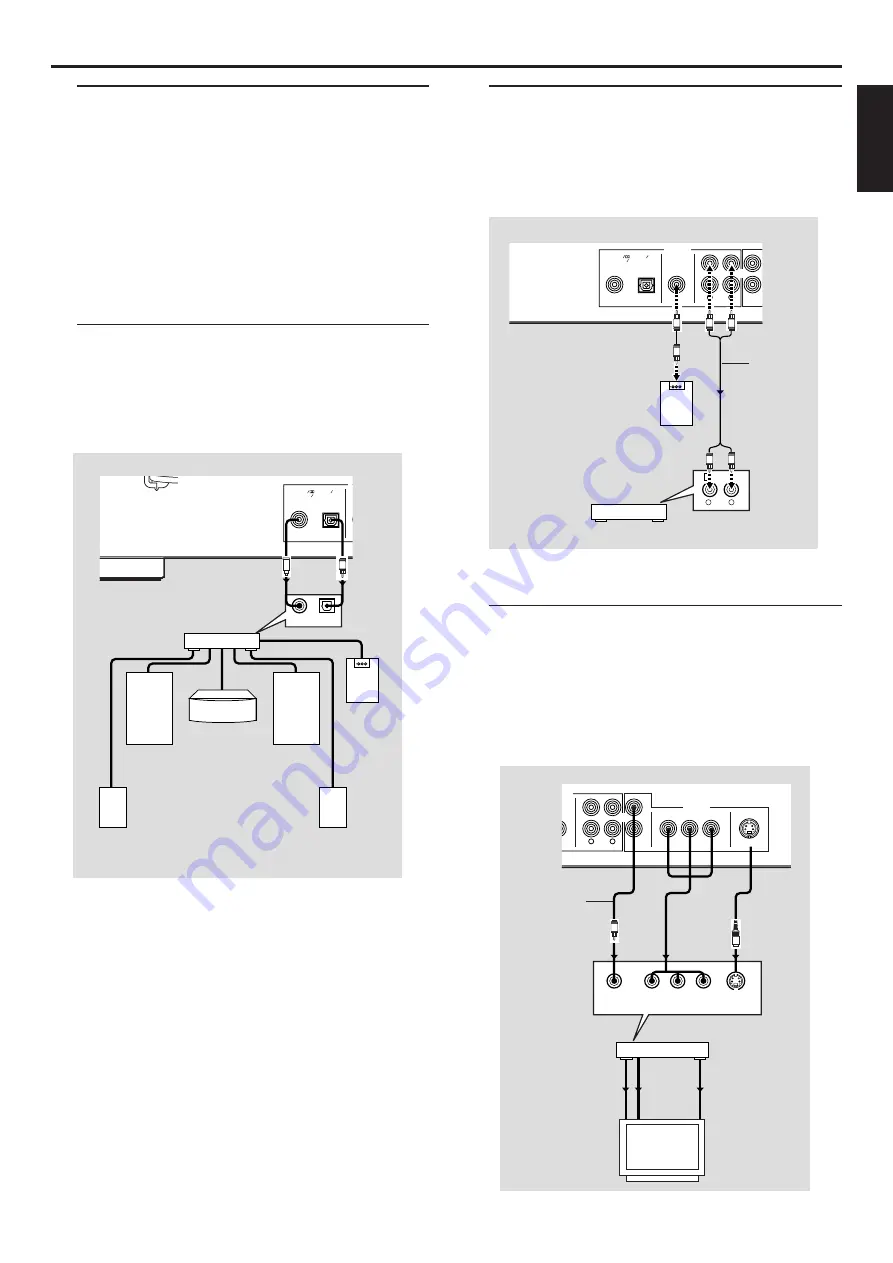
Digital Connections

The player has COAXIAL and OPTICAL digital out jacks.
Connect one or both of them to your AV receiver
equipped with Dolby digital, DTS, or MPEG decoder using
each specific cable (separate purchase).

COAXIAL

SU

PCM      DIGITAL 

DTS  MPEG

OPTICAL

A

AV receiver

Left main

speaker

Left rear

speaker

Center speaker

Right main

speaker

Subwoofer

Right rear

speaker

COAXIAL

IN

OPTICAL

IN

C

O

You will need to activate the player’s digital
output (see ‘Personal Preferences’).

Note:
– If the audio format of the digital output does not match the
capabilities of your receiver, the receiver will produce a strong,
distorted sound or no sound at all. Make sure to select the
appropriate audio format at menu screen included on the disc.
Pressing AUDIO once or more may change not only audio
languages but also audio formats, and the selected format
appears for several seconds on the status window.

Analog  Connections

Use RCA audio cable supplied with the player to connect
AUDIO OUT L (left) and R (right) jacks of the player to
corresponding input jacks of your audio equipment such as
Stereo amplifier. You can connect a subwoofer to the
player’s SUBWOOFER (AUDIO OUT) jack.

COAXIAL

SUBWOOFER

VIDEO

2

1

PCM      DIGITAL 

DTS  MPEG

OPTICAL

AUDIO OUT

R

L

1   CD/DVD

R

L

L

R

R

L

Stereo

amprifier

Subwoofer

(supplied)

Video Connections

If your AV receiver has video output jacks, connect your
receiver (and then to your TV) so that you can use one TV
for several different video sources (LD, VCR etc.) by simply
switching the input source selector of your receiver.
The player has three types of video output jacks. Use one
of them in accordance with the input jacks of the
equipment to be connected.

OFER

VIDEO

COMPONENT VIDEO

2

1

2

1

P

R

P

B

Y

OUT

VIDEO OUT

R

L

S VIDEO

VIDEO

OUT

VIDEO

IN

COMPONENT 
VIDEO OUT

COMPONENT 
VIDEO IN

S VIDEO
OUT

S VIDEO
IN

COMPONENT

VIDEO IN

S VIDEO

INPUT

VIDEO

Y

P

B

C

B

P

R

C

R

V

S

<A>

<B>

<C>

AV receiver

(supplied)

P

REPARATION

Summary of Contents for DVD-S520

Page 1: ...UCA POWER NATURAL SOUND DVD PLAYER STANDBY PLAY STOP PAUSE DVD VIDEO CD CD CLOSE OPEN T ruSurround bySRS DVD VIDEO CD CD PLAYER LECTEUR DE DVD DVD S520 OWNER S MANUAL MODE D EMPLOI ...

Page 2: ...arized or grounding type plug A polarized plug has two blades with one wider than the other A grounding type plug has two blades and a third grounding prong The wide blade or the third prong are provided for your safety When the provided plug does not fit into your outlet consult an electrician for replacement of the obsolete outlet 10 Protect the power cord from being walked on or pinched particu...

Page 3: ... corrective measures do not produce satisfactory results please contact the local retailer authorized to distribute this type of product If you can not locate the appropriate retailer please contact Yamaha Electronics Corp 6600 Orangethorpe Ave Buena Park CA90622 The above statements apply ONLY to those products distributed by Yamaha Corporation of America or its subsidiaries We Want You Listening...

Page 4: ...ace where foreign objects and liquid might fall It might cause a fire damage to this unit and or personal injury Do not place the following objects on this unit Other components as they may cause damage and or discoloration on the surface of this unit Burning objects i e candles as they may cause fire damage to this unit and or personal injury Containers with liquid in them as they may cause an el...

Page 5: ...uthorized by Macrovision Corporation Reverse engineering or disassembly is prohibited Introduction 2 DVDVideo Introduction 2 Unpacking 2 Remote Control Battery Installation 2 Environmental Information 2 Cleaning Discs 2 Functional Overview 3 Front and Rear Panels 3 Remote Control 4 Preparation 5 General Notes 5 Digital Connections 5 Analog Connections 5 Video Connections 5 NTSC PAL Settings 6 NTSC...

Page 6: ...dustry of the People s Republic of China Audio CD Audio CDs contain music tracks only You will recognize Audio CDs by the logo shown MP3 MPEG Audio Layer 3 The player supports the MP3 format which contains compressed music tracks Notes CD R and CD RW cannot be played unless finalized Some discs cannot be played depending on the disc characteristics or recording conditions Unpacking First check and...

Page 7: ...Do not touch the inner pins of the jacks on the rear panel Electrostatic discharge may cause permanent damage to the unit COAXIAL SUBWOOFER VIDEO COMPONENT VIDEO 2 1 2 1 PR PB Y PCM DIGITAL DTS MPEG OPTICAL AUDIO OUT VIDEO OUT R L S VIDEO AC Power cord connect to power source COAXIAL AUDIO OUT connect to digital coaxial audio equipment OPTICAL AUDIO OUT connect to digital optical audio equipment S...

Page 8: ...ayback PAUSE pause playback temporarily frame by frame playback REPEAT repeat chapter track title disc A B repeat a specific segment SHUFFLE play tracks in random order SCAN play the first 10 seconds of each track chapter within a disc POWER B switches DVD ON or to standby on mode numeric buttons 0 9 select numbered items in a menu BIT RATE display bit rate indicator during playback ON SCREEN acce...
Page 9: ... sound or no sound at all Make sure to select the appropriate audio format at menu screen included on the disc Pressing AUDIO once or more may change not only audio languages but also audio formats and the selected format appears for several seconds on the status window Analog Connections Use RCA audio cable supplied with the player to connect AUDIO OUT L left and R right jacks of the player to co...

Page 10: ...PAL Settings You can switch the NTSC PAL setting of the player to match the video signal of yourTV This setting only affects the television s on screen display that shows the stop and setup modes You may select either NTSC or PAL To change the player setting to PAL or NTSC follow the steps below 1 Press the POWER button on the front panel of the player to turn off the player 2 Press and hold 9 and...

Page 11: ...he menu bar is displayed will clear the menu bar from the screen The selected item will be highlighted and the appropriate cursor buttons to operate it will be displayed below the icon The symbols or indicate more items are available at the left right of the menu bar Press 1 or 2 to select these items Menu Bar Status Window As there are multiple menu bars the items on the menu bar are arranged acc...

Page 12: ...Colour settings OK to exit 1en 1en 1 2 Color settings You can select one of five predefined sets of color settings and one set Personal which you can define yourself 1en 1en 1 2 TV shape Black Level Shift Video Shift Colour settings 4 Soft 3 Natural 2 Rich 1 Personal Personal color Allows you to fine tune the selected color settings saturation brightness and contrast TV System Usually you don t ha...

Page 13: ...l contains the following features Child Lock When Child Lock is set to ON a 4 digit code must be entered in order to play discs Parental control Allows the conditional viewing of DVDs containing Parental Control information Status Window Displays the current status of the player and appears with the menu bar When disc playback is stopped it is displayed with the Temporary Feedback Field in the def...

Page 14: ... the screen then press B again Note DVDs may have a region code The player will not play discs that have a region code different from the region code of the player General Features Note Unless stated all operations described are based on remote control use Some operations can be carried out using the menu bar on the screen Moving to another title chapter When a disc has more than one title or chap...

Page 15: ... during playback SHUFFLE appears on the screen and the player display for about two seconds To return to normal playback press SHUFFLE again Video CDs Press SHUFFLE during playback SHUFFLE appears on the screen for about two seconds To return to normal playback press SHUFFLE again Time search TheTime Search function allows you to start playing at any chosen time on the disc Select TIME SEARCH in t...

Page 16: ...ct VIDEO FTS c in the menu bar Use 4 to select CLEAR ALL Press ENTER OK All selections will be erased Press ON SCREEN to exit Switching FTS ON OFF 1 Use 3 to move to FTS 2 Use 2 or 1 to select either On or Off Special DVD Features Checking the contents of DVDVideo discs Menus DVDs may contain menus to navigate the disc and access special features To use the menu press the appropriate numeric butto...

Page 17: ...sume playback or press to pause or press 9 to stop playback Moving to another track Press S or T briefly during playback to go to the next track or to return to the beginning of the current track Press S twice briefly to step back to the previous track To go directly to any track enter the track number using the numeric buttons 0 9 Random sequence play Press SHUFFLE during playback The playing ord...

Page 18: ...e process Sound Quality Bit Rate Approximate Reduction Ratio Approximate total MP3 CD time Comment AM radio FM radio Near CD CD like CD CD 32 kbps 64 kbps 96 kbps 128 kbps 256 kbps 320 kbps 40 1 20 1 15 1 10 1 5 1 3 1 40 hrs 20 hrs 15 hrs 10 hrs 5 hrs 3 hrs Sound quality significantly affected not recommended Balanced sound quality compression rate Compression rate low suggest to play CDs instead ...

Page 19: ...ays be played even if the Child Lock is set to ON Notes The player memory maintains a list of 80 authorized Child safe disc titles A disc will be placed in the list when Playback Always is selected in the child protect dialog Each time a child safe disc is played it will be placed on top of the list When the list is full and a new disc is added the last disc in the list will be removed from the li...

Page 20: ...o confirm then press 1 again to exit the menu Changing the 4 digit code 1 Select ACCESS CONTROL in the features menu using the 3 4 and then press 2 2 Enter the old code 3 Move to CHANGE CODE using the 4 4 Press the 2 5 Enter the new 4 digit code 6 Enter the code a second time and reconfirm by pressing ENTER OK 7 Press 1 to exit the menu If you forget your 4 digit code 1 Press 9 to exit the Child P...

Page 21: ... signal PAL NTSC with DVD orVideo CD No sound Check audio connections If you are using a HiFi amplifier try another sound source Distorted sound from HiFi Check to make sure that no audio connections are made to the amplifier s amplifier phono input No audio at digital output Check the digital connections Check the settings menu to make sure the digital output is set to ALL or PCM only Check if th...

Page 22: ...Cinch yellow Audio L R output Cinch white red Subwoofer output Cinch black Digital Output 1 coaxial 1 optical IEC958 for CDDA LPCM IEC1937 for MPEG1 2 Dolby Digital and DTS GENERAL Dimensions w x h x d 435 x 91 x 314 mm 17 12 x 3 64 x 12 56 inch Weight Approximately 3 3 Kg 7 3 pounds Power Supply U S A and Canada model 120V 60Hz Australia model 240V 50Hz Power Consumption U S A and Canada model 20...

Page 23: ...G F R OF GERMANY YAMAHA ELECTRONIQUE FRANCE S A RUE AMBROISE CROIZAT BP70 CROISSY BEAUBOURG 77312 MARNE LA VALLEE CEDEX02 FRANCE YAMAHA ELECTRONICS UK LTD YAMAHA HOUSE 200 RICKMANSWORTH ROAD WATFORD HERTS WD1 7JS ENGLAND YAMAHA SCANDINAVIAA B J A WETTERGRENS GATA 1 BOX 30053 400 43 VÄSTRA FRÖLUNDA SWEDEN YAMAHA MUSIC AUSTRALIA PTY LTD 17 33 MARKET ST SOUTH MELBOURNE 3205 VIC AUSTRALIA YAMAHA CORPO...

Reviews: