


DVD-S2500
9
■
DISASSEMBLY PROCEDURES
●
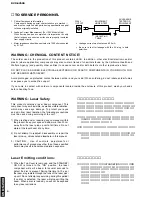
HOW TO MANUALLY EJECT THE TRAY
a. Turn the player bottom up.
b. Move the slider in the direction indicated
with a screw driver until the tray is ejected.
c. Gently pull the tray out.
a
c
Top Cover [240]
➔
➔
Remove 7 screws [281]
(4 on side and 3 on rear side)
Lift cover from rearside to remove.
IEEE1394 board [1007]
➔
➔
➔
➔
Remove 3 cable connections. [1100] [1300] [1401]
Remove 2 screws [283] (Board to rear panel).
Remove 1 screw [283] (DVD Mechanism).
Dismount board.
PSCAN board [1005]
➔
➔
➔
➔
Remove 2 cable connections. [1000] [1402]
Remove 1 screw [282] and 1 screw [283]
(Board to rear panel).
Remove 1 screw [283] (Board to frame).
Dismount board.
MONO board
➔
➔
➔
Remove 5 cable connections.
[1400] [1500] [1700] [1702] [1900]
Remove 4 screws [283] (Board to frame).
Dismount board.
AV board [1002]
➔
➔
➔
➔
Remove 4 cable connections.
[1400] [1500] [1601] [1404]
Remove 7 (U) or 9 (G) screws [282]
(Board to rear panel).
Release 2 spacers locking (Board to frame).
Dismount board.
Power Supply Unit [1004]
➔
➔
➔
➔
Remove 2 cable connections. [CON1] [CN1]
Remove 2 screws [283] (Board to frame).
Release 2 spacers locking. (Board to frame).
Dismount board.
Front (1) Display board [1001(1)]
➔
➔
Remove 4 screws [282] (Board to
Front panel).
Dismount board.
Front (2) Key Matrix board [1001(2)]
➔
➔
Remove 4 screws [282] (Board to Front
panel).
Dismount board.
Front Panel [101]
➔
➔
➔
➔
Open Tray (see
HOW TO MANUALLY
EJECT THE TRAY
).
Unlock Tray lid and close tray.
Remove 7 screws [283] (Front Panel to Frame. 4 on Frame and 3
on bottom).
Unlock Front panel by releasing successively 4 snaps (2 on the
top and 2 on the bottom).
Sub Panel Ass'y [103]
➔
➔
Remove cable connections. [1404]
Unlock Sub panel ass'y by releasing successively 4 snaps (2 on
the side and 2 on the bottom).
Mounting
Dismounting
See EXPLODED VIEW for item numbers.
2.7 mm
When disassembling, use the special screw driver with tip shape in figure.
T10
Frame
Rear
Front
Tray
Screw Driver
Slider
Slider
DVD Mechanism
➔
➔
➔
➔
➔
Remove 2 cable connections.
[1700] [1702]
Open tray.
(see
HOW TO MANUALLY EJECT
THE TRAY
)
Unlock Tray lid and close tray.
Remove 4 screws [283]
(DVD Mechanism to frame).
Lift DVD Mechanism up slightly and
move it backward to remove.
RS232C board [1008] (U model only)
➔
➔
➔
Remove cable connections. [1402]
Remove 1 screw [282] and 2 jack screws
(Board to rear panel).
Dismount board.
b
Summary of Contents for DVD-S2500
Page 52: ...DVD S2500 DVD S2500 ...