


DVD-S2300MK2
29
DVD-S2300MK2
■
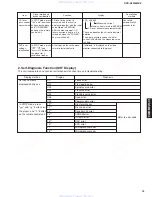
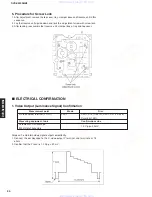
OPTICAL PICKUP TILT ADJUSTMENT
Adjustment point
Tangential adjustment screw,
Tilt adjustment screw
Mode
T01 (inner periphery) play, T43
(outer periphery) play
Disc
DVDT-S15 (AAX07320) or
DVDT-S01
Measuring equipment None (Use main unit servicing
display.)
Adjustment value
Adjust to the minimum jitter
value.
Tool
Hex wrench
1.2mm JZS0100 (TX946380)
Screw Lock
RZZOL01 (TX946400)
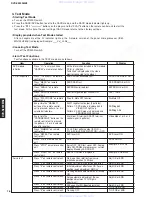
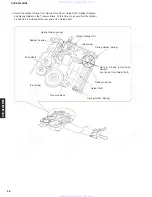
1. Important Points in Optical Pickup Tilt
Adjustment
• Before starting optical pickup tilt adjustment, be sure to
take anti-static measures.
• Optical pickup tilt adjustment is necessory after
replacement of the following components.
1. Optical pickup unit
2. Spindle motor unit
3. Optical pickup peripheral parts (such as the rail)
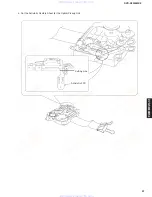
Notes
Adjustment is generally unnecessary after replacing the
other parts of the traverse unit. However, make
adjustment if there is a noticeable degradation in picture
quality. Optical adjustments cannot be made inside the
Optical pickup. Adjustment is generally unnecessary after
replacing the traverse unit.
1. Press the "SACD/DVD" button to set the DVD mode.
2. While pressing the " " and " " buttons on the player,
press the "5" button on the remote control unit.
3. Confirm that "J_xxx_yyy_zz" is shown on the front
"yyy" and "zz" shown to the right have nothing to do with
the jitter value. "yyy" is the error counter, while "zz" is the
focus drive value.
Note:
Jitter value appears on the front display.
4. Play test disc track01 (inner periphery).
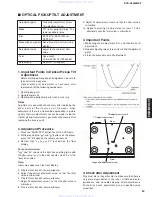
5. Adjust tangential adjustment screw so that the jitter
value is minimized.
6. Play test disc track43 (outer periphery).
7. Adjust tilt adjustment screw 1 so that the jitter value is
minimized.
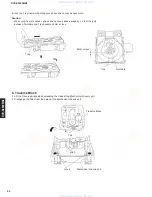
8. Play test disc track43 (outer periphery).
Tangential adjustment screw
Tilt adjustment screw 1
Rear
Front
Tilt adjustment screw 2
9. Adjust tilt adjustment screw 2 so that the jitter value is
minimized.
10. Repeat adjusting tilt adjustment screws 1 and 2
alternately until the jitter value is minimized.
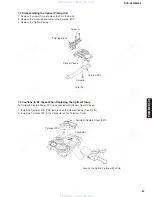
3. Important Points
1. Make tangential adjustment first, and then make tilt
adjustment.
2. Repeat adjusting two or three times to find the optimum
point.
3. Finish the procedure with tilt adjustment.
4. Check after Adjustment
Play a test disc or any other disc to make sure that there is
no picture degradation in the inner, middle and outer
peripheries, and no audio skipping. After adjustment is
finished, lock each adjustment screw in position using
screw lock.
www. xiaoyu163. com
QQ 376315150
9
9
2
8
9
4
2
9
8
TEL 13942296513
9
9
2
8
9
4
2
9
8
0
5
1
5
1
3
6
7
3
Q
Q
TEL 13942296513 QQ 376315150 892498299
TEL 13942296513 QQ 376315150 892498299