background image

9

English

Preparation

We recommend to setup some of the basic menu items 
before the initial playback.

1

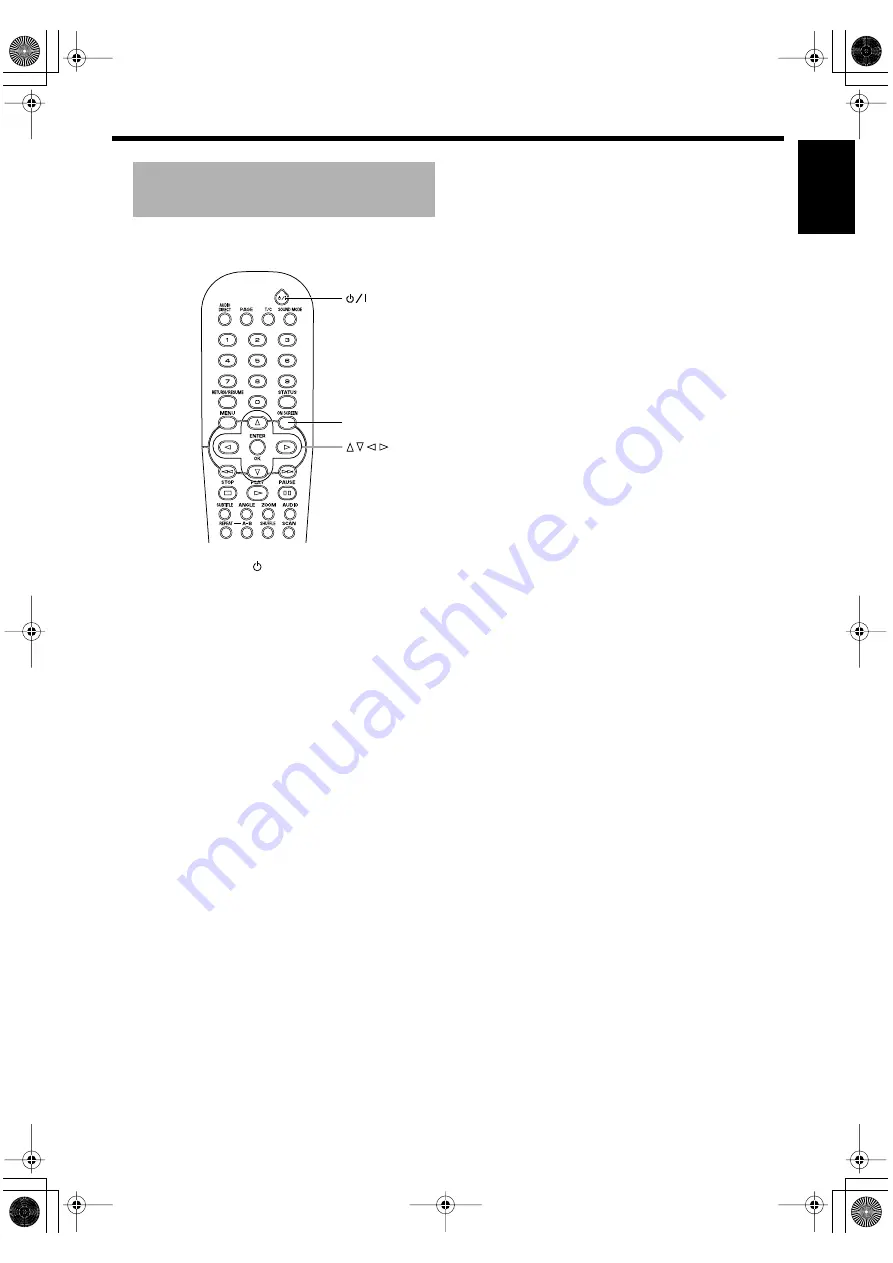
Press STANDBY/ON  /I to turn on the unit.

2

Press ON SCREEN.

On-screen menu is displayed on the screen.

3

Follow the procedure described below to set the 
following menu items.

1

Menu Language (see page 14)

You can select the language displayed in the On-screen 
menu.

1

Go to [Menu Language] (Setup 

 Language 

 Menu 

Language) by using 

v


w


t


u

 buttons on the remote 

control, then press 

u

.

Choices are displayed on the right column.

2

Select a language to be displayed in the On-screen menu 
by using 

v


buttons.

3

Press 

t

 to return to the previous menu.

2

Default Audio (see page 14)

You can select the audio language spoken in video discs. 
Available choices are determined by the disc.

1

Go to [Default Audio] (Setup 

 Language 

 Default 

Audio) by using 

v


w


t


u

 buttons on the remote control, 

then press 

u

Choices are displayed on the right column.

2

Select a language by using 

v


w

 buttons.

3

Press 

t

 to return to the previous menu.

3

Default Sub-title (see page 14)

You can select the subtitle language set as default. 
Available choices are determined by the disc.

1

Go to [Default Sub-title] (Setup 

 Language 

 Default 

Sub-title) by using 

v


w


t


u

 buttons on the remote 

control, then press 

u

.

Choices are displayed on the right column.

2

Select a default subtitle language by using 

v


w

 buttons.

3

Press 

t

 to return to the previous menu.

4

TV shape (see page 12)

You can select the aspect ratio of the video displayed on 
the TV monitor.
Select [Wide-screen] if you connect to a wide-screen 
monitor. If you connect to a conventional monitor, select 
[4:3 Pan Scan] (the left and right sides are trimmed when 
you play 16:9 video) or [4:3 Letterbox] (black areas 
appear at the top and bottom when you play 16:9 video). 

1

Go to [TV Shape] (Setup 

 TV 

 TV shape) by using 

v


w


t


u

 buttons on the remote control, then press 

u

Choices are displayed on the right column.

2

Make a choice by using 

v


w

 buttons.

3

Press 

t

 to return to the previous menu.

5

Analog output (see page 13)

Enables you to specify the type of analog output suitable 
for your AV receiver. Select [Multichannel] if you are 
using a multi-channel AV receiver with 6-ch discrete 
inputs. If your AV receiver does not have 6-ch discrete 
inputs, select one of [Stereo], [Dolby Surr-compat], or 
[3D Sound]. 

1

Go to [Analog output] (Setup 

 Audio Menu 

 Analog 

output) by using 

v


w


t


u

 buttons on the remote 

control, then press 

u

.

Choices are displayed on the right column.

2

Select an item for the analog output signal by using 

v


buttons.

3

Press 

t

 to return to the previous menu.

6

Digital output (see page 13)

Enables you to specify the type of digital output suitable 
for your AV receiver. Select [PCM only] if your AV 
receiver is not capable of decoding multi-channel audio.
Select [All] if you connected this unit’s digital out jacks to 
a multi-channel AV receiver.

1

Go to [Digital output] (Setup 

 Audio Menu 

 Digital 

output) by using 

v


w


t


u

 buttons on the remote 

control, then press 

u

.

Choices are displayed on the right column.

2

Select an item for the digital output signal by using 

v


buttons.

3

Press 

t

 to return to the previous menu.

Note:
– Press ON SCREEN again to exit from the On-screen 

menu.

– You can find the selection of the helpful menu items in 

[Preference] and [Setup]. 
Go to [Preference] if you want to customize this unit for 
your personal requirement such as the Wake-up timer. 
Go to [Setup] if you want to set the operational status of 
this unit.

Setups before the initial 
playback

ON SCREEN

DVS1500_A_En.fm  Page 9  Tuesday, October 19, 2004  6:28 PM

Summary of Contents for DVD-S1500

Page 1: ...U DVD AUDIO VIDEO SA CD PLAYER LECTEUR DE DVD AUDIO VIDEO SA CD DVD S1500 OWNER S MANUAL MODE D EMPLOI ...

Page 2: ... replace your obsolete outlet Do not defeat the safety purpose of the polarized plug 13 Power Cord Protection Power supply cords should be routed so that they are not likely to be walked on or pinched by items placed upon or against them paying particular attention to cords at plugs convenience receptacles and the point where they exit from the product 14 Lightning For added protection for this pr...

Page 3: ...ur in all installations If this product is found to be the source of interference which can be determined by turning the product OFF and ON please try to eliminate the problem by using one of the following measures Relocate either this product or the device that is being affected by the interference Utilize power outlets that are on different branch circuit breaker or fuse circuits or install AC l...

Page 4: ...ge other than as specified 13 To prevent damage by lightning disconnect the power cord from the wall outlet during an electrical storm 14 Do not attempt to modify or fix this unit Contact quali fiedYAMAHA service personnel when any service is needed The cabinet should never be opened for any reason 15 When not planning to use this unit for long periods of time i e vacation disconnect the AC power plu...

Page 5: ... 17 Playing bonus groups 17 DVD Video Mode 17 SA CD Super Audio CD 18 Playing a disc 18 Sound mode SA CD playback 18 Audio CD 19 Playing a disc 19 Video CD and Super Video CD 19 Playing a disc 19 Playback Control PBC 19 MP3 20 MP3 disc features 20 Playing a disc 20 Choosing an Album Track to playback 20 MP3 text 20 JPEG 21 JPEG disc features 21 Playing a disc 21 Slide show setting 21 Rotating the ...

Page 6: ...een finalized DVD R and DVD RW discs must be recorded in Video format and must be finalized Some discs cannot be played depending on disc characteristics or recording conditions Be sure to use only CD R and CD RW discs from reliable manufacturers Dolby Digital DTS digital surround and MPEG digital audio are supported PAL and NTSC are supported This unit features the PAL and NTSC video system conve...

Page 7: ...ontact with clothing etc Clean the battery compartment thoroughly before installing new batteries Handling the remote control Do not spill water or other liquids on the remote control Do not drop the remote control Do not leave or store the remote control in the following types of conditions high humidity such as near a bath high temperature such as near a heater or stove extremely low temperature...

Page 8: ...y pressing the AUDIO DIRECT button on the remote control during audio disc playback ML CH lights up when you play multi channel audio source D MIX lights up when you play the discs that allow down mixing of the multi channel audio sources PAUSE pauses playback 9 STOP stops playback DVD AUDIO indicator lights up when the unit detects DVD Audio signals SA CD indicator lights up when the unit detects...

Page 9: ...t SCAN MODE switches the component video output signals between progressive and interlace OPTICAL digital audio output connects to an audio input on digital optical audio equipment AC IN Mains connects to a standard AC outlet MIXED 2CH audio outputs connect to audio inputs on your AV receiver or stereo system 6CH DISCRETE audio outputs connect to an AV receiver with 6 ch discrete audio inputs S VI...

Page 10: ...r in random order SCAN plays the first 10 seconds of each track chapter within a disc AUDIO DIRECT switches video output on and off during audio disc playback PAGE turns pages of the DVD Audio still pictures T C selects title or chapter SOUND MODE selects the required sound mode for SA CD CD Stereo or Multi channel if available for DVD VCD Stereo Dolby Surround compatible 3D sound or Multi channel...

Page 11: ...distorted sound or no sound at all Make sure to select the appropriate audio format on the disc menu screen Pressing AUDIO once or more may change not only the audio language but also the audio format The selected format name will be displayed for several seconds in the status window SA CD audio signal is not output from DIGITAL OUT jacks If you wish to enjoy Dolby Digital DTS and MPEG you must co...

Page 12: ...If you notice picture distortion when outputting the progressive signals switch the SCAN MODE selector to INTERLACE 1 Connect the AC power cord to the power outlet 2 Switch on the TV and this unit 3 Set the TV to the correct Video IN channel e g EXT1 EXT2 AV1 AV2 AUDIO VIDEO etc refer to your TV owner s manual for detail The front panel display lights up and the default screen appears on the TV 4 ...

Page 13: ... you play 16 9 video or 4 3 Letterbox black areas appear at the top and bottom when you play 16 9 video 1 Go to TV Shape Setup TV TV shape by using v w t u buttons on the remote control then press u Choices are displayed on the right column 2 Make a choice by using v w buttons 3 Press t to return to the previous menu 5Analog output see page 13 Enables you to specify the type of analog output suita...

Page 14: ... made when AUTO is selected We recommend setting the aspect ratio on your TV if the function is available Choices 4 3 Pillar Box NL Stretch Auto Initial setting Auto TrueLife Produces more dynamic picture by increasing the picture contrast and the color intensity This function is available for progressive scan output only Choices 0 to 7 Initial setting 0 DCDi DCDi Directional Correction Deinterlac...

Page 15: ...l discs Choices On Off Initial setting Off Night Mode When set to On the dynamics of the sound output is optimized High volume output is softened enabling you to watch your favorite action movie without disturbing others Choices On Off Initial setting Off CD Up sampling Allows you to upgrade a CD from 44 1 kHz 16 bit to a higher sampling rate for superior sound quality Choices On Off Initial setti...

Page 16: ...ration for each image Choices Slow Medium Fast Initial setting Medium Access Disc lock This function enables you to restrict others from accessing certain discs If this setting is on you need to enter the four digit PIN to modify the Access menu settings before you can play the disc Choices On Off Initial setting Off Change PIN Enables you to change the four digit PIN To change the four digit PIN ...

Page 17: ...setting when using equipment with a Dolby Surround Pro Logic decoder In this setting the multi channel audio Dolby Digital MPEG 2 DTS is downmixed to a Dolby Surround compatible 2 ch output SA CD and PCM signals with a sampling frequency of over 88 2 kHz are downmixed to normal stereo 3D sound In a setup without rear speakers analogue stereo output 3D Sound remixes the six channels of digital surr...

Page 18: ...your speakers Notes These settings are effective only on analog output signals When playing DVD Audio all speaker size is set to Large and the subwoofer is set to On regardless of the setting you adjusted Front Distance Sets the distance from your listening place to the front speakers We recommend to place the front left speaker and right speaker at the same distance from the listening point Choic...

Page 19: ...Initial setting 0 Surround L Vol Choices 6 to 6 Initial setting 0 Subwoofer Vol Choices 6 to 6 Initial setting 0 SA CD mode You can adjust the volume level output from each channel for SA CD playback You must choose Multi channel for Analog output to make this function available See Analog output on page 13 If you adjust the volume level for any speaker the volume level for the other speakers is a...

Page 20: ...bered press the numerical buttons or use the v w button to select the desired title in the menu bar 3 To stop playback press the STOP button Smart Resume This unit memorizes the last five discs and their next starting points where they are stopped at the last time operation Using this function you can quickly return to the scene you were watching last time To interrupt playback Press STOP to inter...

Page 21: ...ge in the On screen menu Toolbar Play Option Sub title The DVD Audio is developed for the sole purpose of creating high quality pure sound with Linear PCM and Packed PCM Loss less coding in up to six audio channels The sampling frequency of 192 kHz 24 bits are supported Moreover many DVD Audio discs offer slide show and page turn capabilities Changing pages Some DVD Audio discs contain information...

Page 22: ...track list in the area 2 Playback will stop at the end of the disc 3 To stop playback press STOP Analog output setting in the On screen menu Setup Audio Menu Analog output allows you to specify which area of SA CD to play automatically when you insert the disc When you select Stereo stereo area is selected When you select the other choices multi channel area is selected If you set the playback are...

Page 23: ...u can change the vocal by pressing AUDIO on the remote control Playback Control PBC Playback Control is a feature on some Video CDs and Super Video CDs that enables users to access selected tracks directly from the disc menu 1 Insert a Video CD or Super Video CD that features PBC then press PLAY 2 Navigate the menu using the buttons indicated on the TV screen until your chosen passage starts to pl...

Page 24: ...exceed 10 seconds due to the large number of songs compiled onto one disc Multi session discs are supported The digital output signals of MP3 files are copy protected Downloading MP3 files from the internet or copying songs from your own legal discs is a delicate process Playing a disc 1 Insert the disc and close the tray Playback starts and the playlist appears automatically If the disc includes ...

Page 25: ...s ENTER OK Press MENU to return to the thumbnail screen 2 Press PLAY during a full screen mode The slide show starts 3 To stop playback press STOP The slide show stops Press MENU to return to the thumbnail screen When you press PAUSE the slide show pauses To return to the normal slide show press PLAY Repeat function is also available for JPEG discs Slide show setting You can set the duration of ea...

Page 26: ...red speed 1 1 2 1 4 or 1 8 reverse or 1 8 1 4 1 2 or 1 forward 3 Select 1 to resume playback at normal speed 4 If you press the button the speed will be set to zero PAUSE 5 To exit slow motion mode press PLAY Notes You can use this function for DVD Audio while the disc is playing its video content Slow motion in reverse is not available for VCDs and SVCDs Still picture and frame by frame playback ...

Page 27: ...ng playback SHUFFLE appears on the screen for about two seconds 2 To return to normal playback press SHUFFLE again Note For SA CD this function works in the currently selected area only Scan Plays the first 10 seconds of each segment on the disc 1 Press SCAN 2 To continue playback at your chosen segment press SCAN again or press PLAY Note You can also access this function by selecting Chapter Prev...

Page 28: ...list 4 Press the t button then press ON SCREEN to exit from the On screen menu Erasing all tracks chapters indexes from the FTS list You can erase everything at once in the FTS list 1 Press ON SCREEN on the remote control The On screen menu appears 2 Go to Clear all Toolbar Program Clear all by using thev w t u buttons then press the u button Cleared appears momentarily then all items in the list ...

Page 29: ...ings 1 to 8 If you set a rating for the player all scenes with the same rating or lower will be played Higher rated scenes will not be played unless an alternative that has the same rating or lower is available on the disc If no suitable alternative is available playback will stop and the four digit code will be required to proceed 6 Press the ENTER OK button then press the ON SCREEN button to exi...

Page 30: ...is set to ALL or PCM Check to ensure that the audio format of the selected audio language matches your receiver capabilities Disc does not play Check that the disc label is facing up Determine if the disc is defective by trying another disc Picture freezes momentarily during playback Check the disc for fingerprints or scratches Clean with a soft cloth wiping from center to outside edge Fails to re...

Page 31: ...5 1 ch decoding from the stereo source SA CD AUDIO PERFORMANCE D A Converter DSD SA CD fs 2 8224MHz Max output voltage 0dB 2V rms Signal Noise Ratio 115 dB Dynamic Range 107 dB Total Harmonic Distortion 1kHz 0 0017 AUDIO PERFORMANCE Without upsampling DA Converter 24 bits DVD fs 96 kHz 2 Hz 44 kHz CD Video CD fs 44 1 kHz 2 Hz 20 kHz Signal Noise Ratio 115 dB Dynamic Range 103 dB DVD 48 kHz 24 bit ...

Page 32: ...GERMANY YAMAHA ELECTRONIQUE FRANCE S A RUE AMBROISE CROIZAT BP70 CROISSY BEAUBOURG 77312 MARNE LA VALLEE CEDEX02 FRANCE YAMAHA ELECTRONICS UK LTD YAMAHA HOUSE 200 RICKMANSWORTH ROAD WATFORD HERTS WD18 7GQ ENGLAND YAMAHA SCANDINAVIA A B J A WETTERGRENS GATA 1 BOX 30053 400 43 VÄSTRA FRÖLUNDA SWEDEN YAMAHA MUSIC AUSTRALIA PTY LTD 17 33 MARKET ST SOUTH MELBOURNE 3205 VIC AUSTRALIA Printed in China IP...

Reviews: