background image

Play the Pads/Pedals

13

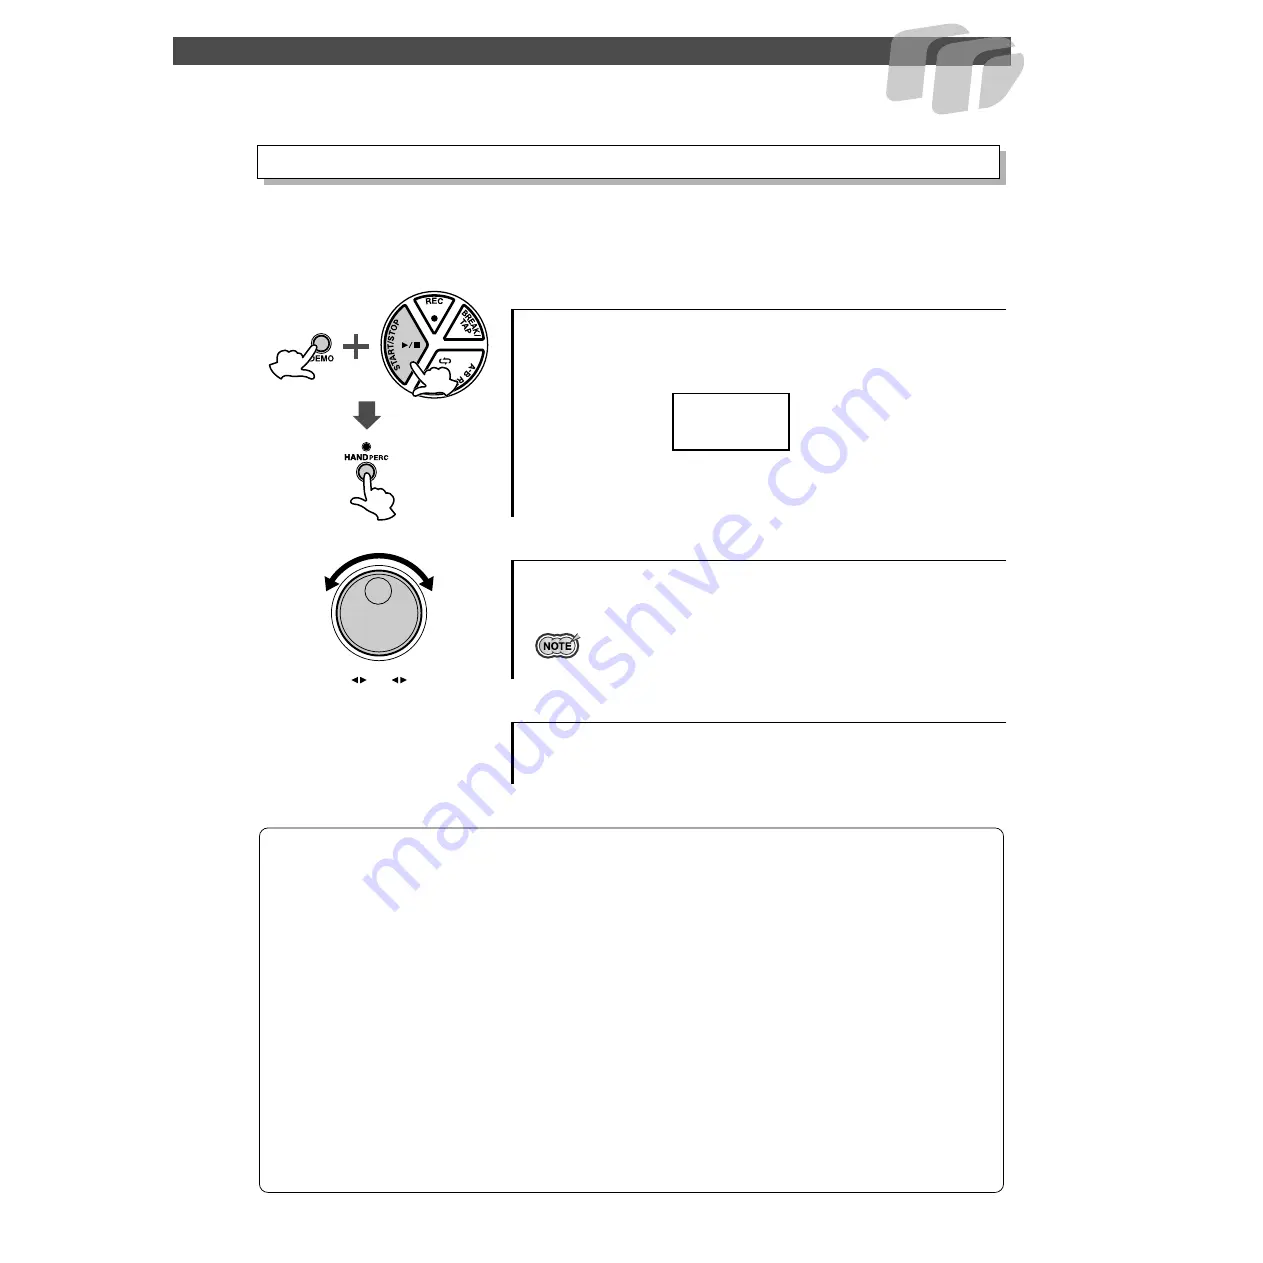
The DD-55 allows you to custom-set the sensitivity of the pads (range 0 - 2).
When set to a value of 2, the pad sensitivity is the highest, providing the most dynamic range for 
your playing (softest to loudest volume).

1

Display the current pad sensitivity setting.

2

Set the sensitivity value.

3

Exit the sensitivity setting.

Setting the Pad Sensitivity

Simultaneously press the 

[DEMO]

 and 

[START/STOP]

 button to 

enter the MIDI/Utility mode, then press the 

[HAND PERC]

 button.  

The current pad sensitivity setting appears in the display.

To raise the value, turn the 

DIAL

 to the right (clockwise), and to lower 

it, turn the 

DIAL

 to the left (counter-clockwise).

• Default setting is “

1

.”

After setting the sensitivity, simultaneously press the 

[DEMO]

 and 

[START/STOP]

 button to exit the MIDI/Utility mode.

0

2

1

1

DD-55 Sound Triggering

The DD-55 is fitted with sensors underneath each pad.  When struck, each pad/sensor produces velocity data.  However, 
striking one pad very strongly may inadvertently trigger the sounds of other pads, because the sensors of those pads 
pick up the vibrations of the struck pad. To prevent this from happening, the DD-55 is set to ignore hits of low velocity.  
(It assumes the low velocity is “noise.”) However, some noise may get through and trigger the sensors.
Here is another related problem: When you strike two pads simultaneously and hit one with less force than the other, the 
pad struck weakly may not sound because the DD-55 assumes the hit to be noise.

These problems may be solved by changing the DD-55 settings or altering your playing technique (as described below).

 Striking two pads simultaneously results in one of the pads not sounding.

Set the pad sensitivity level to 2.  This may solve the problem if you strike one of the pads weakly.
Better yet, try striking both pads with the same force.

 Striking one pad results in other pads also sounding, even though they were not 

struck.

Set the pad sensitivity level to 0.  With this setting, any pads that are not struck may not respond to 
the vibrations of your playing.

Summary of Contents for Druid Pro DD-55

Page 1: ...Owner s Manual Owner s Manual ...

Page 2: ...TION The name plate is located on the bottom of the product The model number serial number power requirements etc are located on this plate You should record the model number serial number and the date of purchase in the spaces provided below and retain this manual as a permanent record of your purchase Model Serial No Purchase Date SPECIAL MESSAGE SECTION 92 BP bottom 1 IMPORTANT NOTICE DO NOT MO...

Page 3: ...ut or if the instrument is not to be used for a long time remove the batteries from the instrument to prevent possible leakage of the battery fluid Keep batteries away from children If the batteries do leak avoid contact with the leaked fluid If the battery fluid should come in contact with your eyes mouth or skin wash immedi ately with water and consult a doctor Battery fluid is corrosive and may...

Page 4: ...25 Setting the Clock 25 Local ON OFF 26 Setting the MIDI Transmit Channel 27 Setting the MIDI Note Number 28 Saving and Loading Song Data 29 Appendix 31 Initialize 31 Troubleshooting 32 Drum Voice List 33 Song List 35 Drum Kit List 36 Drum Map 38 GM Voice List 40 MIDI Implementation Chart 41 Specifications 44 Trademarks Apple and Macintosh are trademarks of Apple Computer Inc registered in the U S...

Page 5: ...plug the AC Power Adaptor when not using the DD 55 or during electrical storms For battery operation the DD 55 requires six 1 5V C size R14P LR14 or equivalent batteries Alkaline batteries are recommended When the batteries need to be replaced the volume may be reduced the sound may be distorted and other problems may occur When this happens turn the power off and replace the batteries as describe...

Page 6: ... buttons 18 u BACKING button 18 i PAD button 11 14 27 o KIT button 10 28 0 SONG button 8 15 16 17 1 TEMPO button 17 2 START STOP button 8 15 25 3 A B REPEAT button 19 4 BREAK TAP button 16 18 5 REC button 20 6 STANDBY ON Switch 8 31 7 DIAL 10 8 Drum Pads x7 9 888 888 q w y u t 6 7 8 2 3 4 5 o i 0 1 r e Front Panel Pedal 2 Pedal 1 ...

Page 7: ...video tapes cassette tapes floppy disks or any kind of magnetic storage media on the panel doing so may result in data loss or dam age to the items Also avoid using the DD 55 near a televi sion or computer monitor since interference may result Use the sticks with caution Do not use them for anything other than playing the instrument Also to avoid damage or injury refrain from waving them reck less...

Page 8: ...olding down either of the buttons increases or decreases the volume level rapidly To stop playback press the DEMO button again or press the START STOP button Large Small L0 L5 L9 Small Volume Level Large When the VOLUME is set to L0 no sound is produced SONG VOLUME To control the volume level of the song press the SONG button and the song starts playing simultaneously hold down the SONG button and...

Page 9: ...ass drum voice is controlled by pressing Foot Pedal 1 Pedal 1 features touch response the volume responds to how hard you press the pedal Use Foot Pedal 2 to control the Hi hat This is in the case of Drum Kit 00 A hi hat sound is assigned to Small Pad 3 Drum Kit 00 Striking Small Pad 3 while pressing Pedal 2 pro duces a closed hi hat sound Striking the pad without pressing the pedal produces an op...

Page 10: ...laying by hand When HAND PERCUSSION is on the DD 55 automatically selects an appropriate song 94 and kit 29 ideal for playing by hand and using with the Hand Percussion feature When Hand Percussion is on do not strike the pads with drumsticks or anything other than your hands Assigning a Drum Kit to the Pads and Pedals When you press the KIT button the currently selected Drum Kit number appears on...

Page 11: ... Strike any pad one time or press a pedal and the currently assigned voice number for that pad pedal is shown in the display You can select the voice by repeatedly striking the pad or repeatedly pressing the pedal while listening to the voice or by turning the DIAL Striking the pad or pressing the pedal to select a voice Every time the pad is struck or a pedal is pressed voice numbers will increas...

Page 12: ...multaneously press the DEMO and START STOP button to enter the MIDI Utility mode then press the DRUM3 button The current Reverb setting appears in the display To set to on Reverb ON turn the DIAL to the right clockwise to set to oFF Reverb OFF turn the DIAL to the left counter clock wise After setting the Reverb ON OFF simultaneously press the DEMO and START STOP button to exit the MIDI Utility mo...

Page 13: ...s velocity data However striking one pad very strongly may inadvertently trigger the sounds of other pads because the sensors of those pads pick up the vibrations of the struck pad To prevent this from happening the DD 55 is set to ignore hits of low velocity It assumes the low velocity is noise However some noise may get through and trigger the sensors Here is another related problem When you str...

Page 14: ...to adjust 2 Press and hold down the PAD button and simul taneously press VOLUME or to adjust the designated pad s volume Adjusting the Pad Volume The corresponding pad is selected for changing volume The default Pad volume is L9 Click ON OFF Press the CLICK button The click sounds in rhythm at the current tempo See Adjusting the Tempo on page 17 To turn the click off press the button once again L5...

Page 15: ... number 00 is automatically selected whenever the power is turned ON With the Auto Kit Select feature turned on selecting a song will also auto matically select the best suited Drum Kit for that song See Auto Kit Select ON OFF Setting on page 16 Song numbers are arranged in each category according to their complex ity Smaller numbers are easier to play than larger numbers When you press the START ...

Page 16: ...standby To cancel the Tap Start mode simply press the BREAK TAP button once again the beat lamps will turn off In the case of a song in 4 4 strike any pad or press any pedal four times and the accompaniment will start at the desired tempo The number of times needed to strike the pad will change according to the following time signatures 5 4 5 times 4 4 4 times 3 4 3 times 6 8 2 times Press the STA...

Page 17: ...urrent tempo value 32 280 appears in the display Use the DIAL to select the TEMPO Turn the DIAL to the right clockwise to increase the Tempo value and turn it to the left counter clockwise to decrease the value The Tempo range is 32 280 Press the SONG button to exit from the Tempo setting mode When both the SONG and TEMPO buttons are pressed simultaneously the preset tempo of the currently selecte...

Page 18: ...iking a pad while in the Break mode the song s accompaniment will be muted until the end of the measure you have finished your fill or solo in 1 During song playback press the BREAK TAP button 2 Play the Break 3 Exit the Break mode Track ON OFF Break During song playback press the BREAK TAP button The three beat lamps in the display flash indicating the DD 55 is in Break standby mode To cancel the...

Page 19: ...once again to set the B point b appears in the display A one measure count in plays A b appears in the display then the specified section plays back repeatedly The current measure number will appear in the display during repeat playback The A B Repeat start and end points can only be set in measure steps Press the START STOP button and the song accompaniment will stop A b will appear in the displa...

Page 20: ...po and track on off setting Any song from 00 99 can be selected After recording the data is auto matically saved to the CU song Recording cannot be done if the CU song is selected Press the REC button to start recording A count in sound plays guiding you into the start of the recording The following indication appears for a time signature of 4 4 Press the CLICK button to turn the click sound on or...

Page 21: ...the information from the pads and pedals that becomes the basis for note production For example let s say you play a C quarter note using the grand piano sound on the keyboard Unlike an acoustic instrument that puts out a resonated note the electronic instrument puts out infor mation from the keyboard such as with what voice with which key about how strong when was it pressed and when was it relea...

Page 22: ...ata unique to each instrument manufacturer and Realtime Messages that control the MIDI device The messages transmitted received by the DD 55 are shown in the MIDI Implementation Chart on page 41 Message Name DD 55 Operation Panel Setting Note ON OFF Messages which are generated when the pad or pedal is played Each message includes a specific note number which corresponds to the pad which is struck...

Page 23: ...nect the MIDI OUT terminal on the DD 55 to the MIDI IN terminal on the other instrument You can record your performance on the DD 55 to a connected sequencer or computer Here you can record all your playing along with the DD 55 s auto accompaniment to a connected computer or sequencer Naturally you can use the sophisticated functions of the computer or sequencer to edit your data and play it back ...

Page 24: ...or printer terminal to the MIDI interface as shown in the diagram below When connecting to a computer with a USB interface use the Yamaha UX16 USB MIDI Interface Connect the UX16 and the computer with a standard USB cable then make the proper MIDI connections between the DD 55 and the UX16 If you use the Yamaha UX16 be sure to install the supplied driver on your com puter Connecting to a Computer ...

Page 25: ... 55 s clock is used as the timing clock E External The external clock is used as the timing clock If the clock is set to external without being connected to another MIDI device the DD 55 s Song Play or Demo functions will not operate 1 Display the clock setting 2 Set the Clock to External Internal 3 Exit the MIDI Utility mode Enter Exit the MIDI Utility Mode Pads and pedals do not sound while in t...

Page 26: ... 55 as you play it However for external sequencer applications you may need to set this to oFF to avoid getting double notes in which the sounds of the DD 55 are played twice once from the pads and once again by the pad data routed through the sequencer 1 Display the Local On Off Setting 2 Set the Local On Off 3 Exit the MIDI Utility mode Local ON OFF After entering the MIDI Utility mode press the...

Page 27: ...it channel strike the appropriate pad That pad s currently selected MIDI transmit chan nel will appear in the display Turn the DIAL to the right clockwise to increase the MIDI transmit channel value or turn it to the left counter clockwise to decrease the value You can also select the MIDI transmit channel by striking the pad repeat edly Every time the pad is struck the MIDI transmit channel numbe...

Page 28: ...r turn the DIAL to the right clockwise and the MIDI note numbers will increase Turn the DIAL to the left counter clockwise and MIDI note numbers will decrease You can also select the MIDI note number by striking the pad repeatedly Every time the pad is struck the value will increase by semitone steps After you ve assigned each pad to a MIDI note number as desired exit the MIDI Utility mode For inf...

Page 29: ...ong Filer software from the following Yamaha PK CLUB website Make sure that your computer has an Internet connection System requirements for Song Filer Windows OS Windows 95 98 Me 2000 XP CPU Pentium 100MHz or faster Available Memory 8MB or more Free space in Hard Disk 2MB or more Display 800 x 600 256 colors or more Macintosh OS Mac OS 7 5 9 2 2 OS X is not supported CPU Power PC or higher Availa...

Page 30: ...nformation on using Song Filer refer to the PDF manual included with the Song Filer application download Managing Data on DD 55 The DD 55 s custom song data can be deleted by using your computer You should delete this cus tom song data before sending data from the computer to the DD 55 Transmitting and Receiving Files You can transfer a song file between the DD 55 and your computer DD 55 MIDI OUT ...

Page 31: ...ta you saved to the instrument q Turn the power off Move the STANDBY ON switch to the STANDBY position w While holding down the DEMO button turn the power on again Move the STANDBY ON switch to the ON position The DD 55 will be initialized to its factory settings C r will appear in the display when the initialization process is complete C r The following data will remain in memory as long as batte...

Page 32: ... defaulted No sound comes from the speakers The volume is set too low Adjust the volume see page 8 A plug is inserted into the PHONES OUTPUT jack and should be taken out see page 7 The LOCAL ON OFF is set to OFF Set the LOCAL ON OFF to ON see page 26 You are in the MIDI Utility mode Exit the MIDI Utility mode see page 25 Striking two pads simultaneously results in one of the pads not sounding Refe...

Page 33: ...loor Tom H 065 Floor Tom L 066 High Tom 067 Mid Tom H 068 Mid Tom L 069 Low Tom 070 Floor Tom H 071 Floor Tom L 072 Room High Tom 073 Room Mid Tom H 074 Room Mid Tom L 075 Room Low Tom Voice No Voice Name 076 Room Floor Tom H 077 Room Floor Tom L 078 Rock High Tom 079 Rock Mid Tom H 080 Rock Mid Tom L 081 Rock Low Tom 082 Rock Floor Tom H 083 Rock Floor Tom L 084 Elec High Tom 085 Elec Mid Tom H 0...

Page 34: ...5 Castanet 166 Jazz Castanet 167 Vibraslap 168 Wood Block H 169 Wood Block L 170 Jingle Bell 171 Bell Tree 172 Pandiero Keto 173 Pandiero Solto 174 Pandiero Ponta 175 Pandiero Calcanhar 176 Tamborim Solto 177 Tamborim Ponta 178 Tamborim Nylon Volta 179 Conga Muff 180 Surdo Mute 181 Surdo Open 182 Hi Q 183 Hi Q Low 184 Whip Slap 185 Scratch Push 186 Scratch Pull 187 Click Noise 188 Metronome Click ...

Page 35: ...ult 59 R B 2 Nomal 60 Motor Town 1 61 Motor Town 2 62 Urban Funk 1 Difficult 63 Urban Funk 2 64 Fusion 1 65 Fusion 2 66 Fusion Samba 1 67 Fusion Samba 2 68 Swing Jazz 1 Nomal Song No Song Name Diffi culty 69 Swing Jazz 2 Nomal Song 70 Simple Rock Easy 71 Pop Rock 72 R R 73 Groove Rock Nomal 74 Hard Rock 75 Contemporary R B Difficult 76 Hard Shuffle Nomal 77 Blues Shuffle 78 A O R Difficult 79 Soul...

Page 36: ...072 Room High Tom 074 Room Mid Tom L 076 Room Floor Tom H 19 R B Kit 2 023 Snare M 068 Mid Tom L 069 Low Tom 070 Floor Tom H 20 R B Kit 3 024 Snare H Hard 067 Mid Tom H 069 Low Tom 071 Floor Tom L 21 Funk Kit 054 Open Rim Shot 081 Rock Low Tom 120 Splash Cymbal 083 Rock Floor Tom L 22 Fusion Kit 1 053 Open Rim Shot 061 Mid Tom H 063 Low Tom 064 Floor Tom H 23 Fusion Kit 2 024 Snare H Hard 066 High...

Page 37: ...007 Room Bass Drum 104 Hi Hat Closed Open 013 Dance Bass Drum Soft 109 Crash Cymbal 2 121 Hand Clap 015 Dance Bass Drum 104 Hi Hat Closed Open 108 Crash Cymbal 1 116 Ride Cymbal Cup 104 Hi Hat Closed Open 005 Bass Drum 104 Hi Hat Closed Open 108 Crash Cymbal 1 113 Ride Cymbal 1 104 Hi Hat Closed Open 003 Bass Drum Soft 104 Hi Hat Closed Open 108 Crash Cymbal 1 114 Ride Cymbal 2 104 Hi Hat Closed O...

Page 38: ...L Dance Floor Tom L Jazz Floor Tom L Floor Tom L 54 F 2 42 F 1 Hi Hat Closed Hi Hat Closed 55 G 2 43 G 1 Floor Tom H Room Floor Tom H Rock Floor Tom H Elec Floor Tom H Dance Floor Tom H Jazz Floor Tom H Floor Tom H 56 G 2 44 G 1 Hi Hat Pedal Hi Hat Pedal 57 A 2 45 A 1 Low Tom Room Low Tom Rock Low Tom Elec Low Tom Dance Low Tom Jazz Low Tom Low Tom 58 A 2 46 A 1 Hi Hat Open Hi Hat Open 59 B 2 47 B...

Page 39: ...Floor Tom H Room Floor Tom H Rock Floor Tom H Elec Floor Tom H Dance Floor Tom H Jazz Floor Tom H Floor Tom H 56 G 2 44 G 1 Hi Hat Pedal Dance Hi Hat Pedal Hi Hat Pedal Hi Hat Pedal 57 A 2 45 A 1 Low Tom Room Low Tom Rock Low Tom Elec Low Tom Dance Low Tom Jazz Low Tom Low Tom 58 A 2 46 A 1 Hi Hat Open Dance Hi Hat Open Hi Hat Open Hi Hat Open 59 B 2 47 B 1 Mid Tom L Room Mid Tom L Rock Mid Tom L ...

Page 40: ...4 Synth Voice 055 OrchestraHit 056 Trumpet 057 Trombone 058 Tuba 059 MutedTrumpet 060 French Horn 061 BrassSection 062 SynthBrass1 063 SynthBrass2 064 Soprano Sax 065 Alto Sax 066 Tenor Sax 067 Baritone Sax 068 Oboe 069 English Horn 070 Bassoon 071 Clarinet 072 Piccolo 073 Flute 074 Recorder 075 Pan Flute 076 Blown Bottle 077 Shakuhachi 078 Whistle 079 Ocarina 080 Square Lead 081 SawtoothLead 082 ...

Page 41: ...x Common Song Sel x x Tune x x System Clock o o Real Time Commands o o 2 Aux All Sound OFF x o 120 Reset All Cntrls x o 121 Local ON OFF x x All Notes OFF x x Mes Active Sense o o sages Reset x x Mode 1 OMNI ON POLY Mode 2 OMNI ON MONO o Yes Mode 3 OMNI OFF POLY Mode 4 OMNI OFF MONO x No 0 32 o o Bank Select 1 o 3 o Modulation 6 38 o 3 o Data Entry 7 o o Volume 10 o 1 o Pan 11 o o Expression Contr...

Page 42: ... Values for ll are ignored Reverb Type F0H 43H 1nH 4CH 02H 01H 00H mmH llH F7H mm Reverb Type MSB ll Reverb Type LSB Refer to the Effect Map page 43 for details Chorus Type F0H 43H 1nH 4CH 02H 01H 20H mmH llH F7H mm Chorus Type MSB ll Chorus Type LSB Refer to the Effect Map page 43 for details DSP Type F0H 43H 1nH 4CH 02H 01H 40H mmH llH F7H mm DSP Type MSB ll DSP Type LSB Refer to the Effect Map ...

Page 43: ...00 064 No Effect 065 Chorus Chorus2 066 Celeste Chorus1 067 Flanger Flanger1 Flanger2 068 127 No Effect TYPE MSB TYPE LSB 00 01 02 08 16 17 18 19 20 000 No Effect 001 1 Hall1 2 Hall2 002 Room 3 Room1 4 Room2 003 Stage 5 Stage1 6 Stage2 004 Plate 7 Plate1 8 Plate2 005 Delay L C R 26 Delay L C R 006 27 Delay L R 007 28 Echo 008 29 Cross Delay 009 9 Early Reflection1 10 Early Reflection2 010 11 Gate ...

Page 44: ... Kit Tempo etc Auxiliary jacks DC IN12 V PHONES OUTPUT MIDI IN OUT PEDAL 1 2 Main Amplifier 5W 5W Speaker 8 cm x 2 Power Consumption 16 W Power Supply Adaptor DC12V Yamaha PA 5D or PA 5C sold sepa rately Batteries Six C size R14P LR14 or equivalent bat teries sold separately Dimensions WxDxH 558 x 355 x 174 mm 22 x 14 x 6 7 8 Weight 3 9 kg 8 Ibs 10 oz Supplied Accessories Drum Stick x 2 Foot Pedal...

Page 45: ...ay also contact Yamaha directly at the address provided below 2 Deliver the unit to be serviced under warranty to the retailer selling the product an authorized service center or toYamaha with an explanation of the problem Please be prepared to provide proof purchase date sales receipt credit card copy etc when requesting service and or parts under warranty 3 Shipping and or insurance costs are th...

Page 46: ... 8888 GREECE Philippos Nakas S A The Music House 147 Skiathou Street 112 55 Athens Greece Tel 01 228 2160 SWEDEN Yamaha Scandinavia AB J A Wettergrens Gata 1 Box 30053 S 400 43 Göteborg Sweden Tel 031 89 34 00 DENMARK YS Copenhagen Liaison Office Generatorvej 8B DK 2730 Herlev Denmark Tel 44 92 49 00 FINLAND F Musiikki Oy Kluuvikatu 6 P O Box 260 SF 00101 Helsinki Finland Tel 09 618511 NORWAY Nors...

Page 47: ...trument Division Yamaha Corporation 2004 Yamaha Corporation WD47990 PO 01A0 Printed in Malaysia Yamaha PK CLUB Portable Keyboard Home Page English only http www yamahaPKclub com Yamaha Manual Library http www2 yamaha co jp manual english ...

Reviews: