background image

22

Setting the Type of
Time Display

Song time is indicated in one of two formats:

minutes and seconds

 or 

measures and beats

.

The format used depends on whether or not you
use the metronome for recording.

Songs recorded without the metronome will be in
minutes and seconds.
Songs recorded with the metronome will be in
measures and beats.

Songs recorded in measures and beats can be

converted to minutes and seconds. See “Changing

the Counter Display” on page 7.

Song Titling and Title
Editing

Songs can be titled before or after recording, and
the title can be edited at any time.

1

Specify a disk.

2

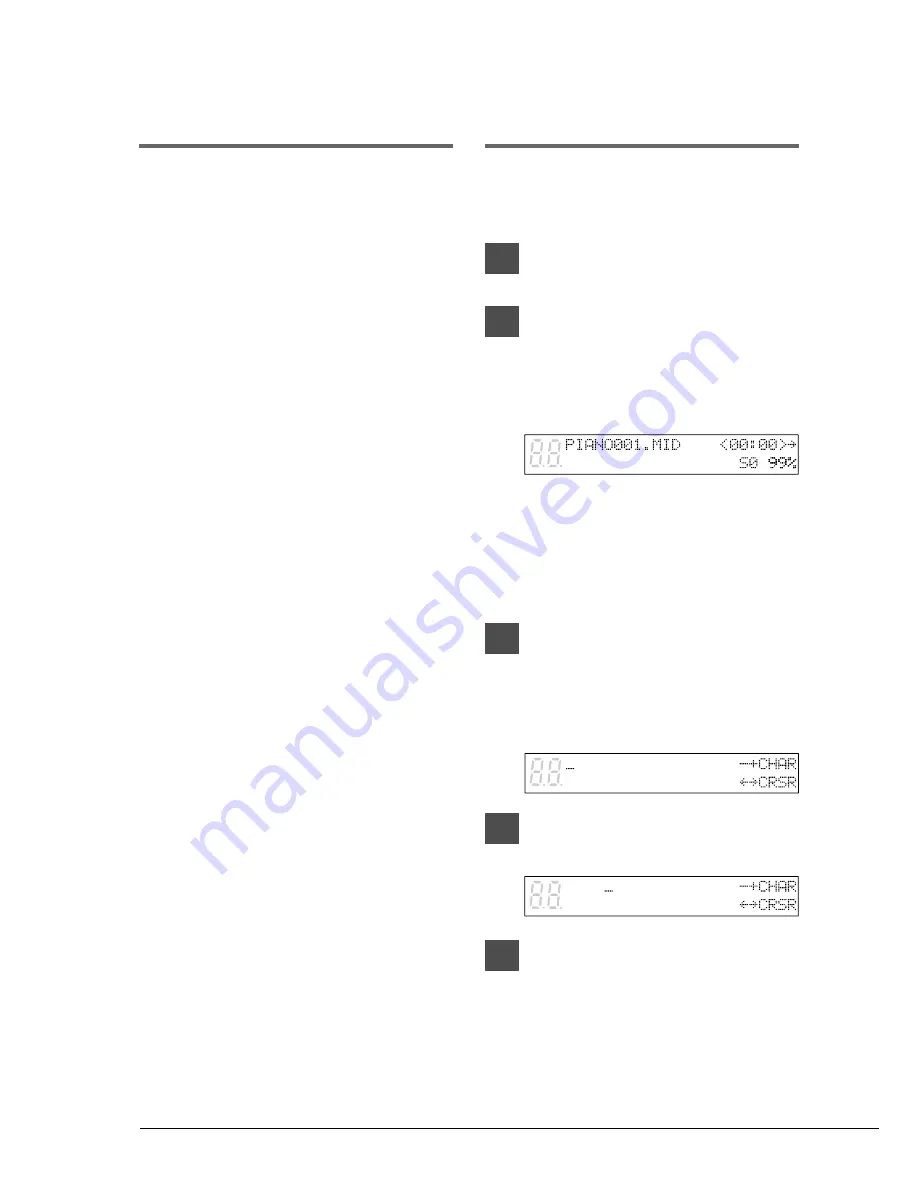
Press [REC].

The REC indicator lights and the
PLAY/PAUSE indicator flashes. The
following display appears.

If you are titling or editing the title of an
existing song, use the [SONG SELECT]
buttons to select the song before
proceeding. Make sure that the correct song
number is selected.

3

Press [REC] again.

The display cursor appears at the position
of the first character in the title, as shown
below.

4

Use [

<

] and [

>

] to position the

cursor within the title.

5

Use the keyboard or [–/NO] and
[+/YES] buttons to select
characters.

To enter characters using the keyboard, see
“Keyboard Character Map” on the next
page.

Summary of Contents for Disklavier Mark III Series

Page 1: ...B...

Page 2: ...Mark III Series DGC1B B Advanced Operation Manual English...

Page 3: ...ecording a Song 21 Setting the Type of Time Display 22 Song Titling and Title Editing 22 Recording with the Metronome 24 Changing the Default Song Tempo 26 MDR MIDI Data Recording Mode 27 Chapter 6 Re...

Page 4: ...ting 81 Chapter 14 Display Error Messages 84 Chapter 15 Glossary 86 Chapter 16 Specifications 90 Chapter 9 Song and Disk Formats and Compatibility Song Format 50 Disk Types 51 Converting Song Format 5...

Page 5: ...1 44MB Since Memory Disks have a total of 64 megabytes of memory you can copy to the Memory Disks PianoSoft songs or your favorite recordings or record your own songs to create your own library of Dis...

Page 6: ...d or contain no songs Copying Songs You can copy songs stored on a disk to another one song at a time or all songs at once Songs stored on a floppy disk can be copied to the same floppy disk to anothe...

Page 7: ...en the song number indicator reaches 00 and the squares on the bar graph are completely filled the copy process is complete If the destination disk is Other Disk the following display appears Insert a...

Page 8: ...ct the source disk if the source disk is a floppy disk then insert a formatted destination disk Note1 Make sure that the destination disk is formatted and its erasure protection tab is set to unprotec...

Page 9: ...sk one song at a time or all songs at once If you want to delete all songs on a disk it may be quicker to re format the disk See Formatting Disks on page 17 1 Specify a disk Note If you are deleting s...

Page 10: ...ong No 4 is deleted song No 5 becomes song No 4 and song No 6 becomes song No 5 and so on Rearranging the Song Order Song Sort You can rearrange the order of songs on a disk 1 Specify a disk 2 Press F...

Page 11: ...ected songs such as PianoSoft songs on a pre recorded disk 9 When sorting is complete the following display appears Press any button to return to the normal display Changing the Counter Display The co...

Page 12: ...ttons to select the time display TIME minutes and seconds display METRONOME measures and beats display 7 Press ENTER Note You cannot change the time display of copy protected songs 8 When the followin...

Page 13: ...playback to Grp1 You do not need to make settings for the next disk after each disk has finished You can have up to 9 groups 1 to 9 Each group can contain a maximum of 16 Memory Disks freely combined...

Page 14: ...group consecutively without the need to make settings after each Memory Disk has finished playing This is called Memory Disk Chain Play Chain Play can also be set to start from any disk within the gro...

Page 15: ...of the last song on the selected disk finishes the next disk in the group that contains songs is automatically played back Canceling Group Functions You can choose to manage your disks in disk units...

Page 16: ...option press ENTER to restart the Control Unit This is the same as turning off the Control Unit and then turning it back on The standard disk title display appears The disk title display shows to ind...

Page 17: ...pears 2 Press until the c cursor is next to the Timer Play option and press ENTER The following display appears The five parameters on the lower row constitute a program You can create up to 99 progra...

Page 18: ...group 9 Repeat steps 4 to 8 to set as many programs as necessary Pressing and scrolls the display vertically through the programs 10 Press ENTER after you set all parameters for the programs you need...

Page 19: ...back The Disklavier will stop playing at 9 00 p m even if Grp3 is still playing Example 2 Location Cocktail bar Repeat RND 16 50 Turn on Control Unit manually 17 00 01 17 00 PLAY Grp1 19 00 02 19 00...

Page 20: ...sk 2 1 song to be played on the hour Grp2 Memory Disk 3 several songs for continuous play during lunch Grp3 Memory Disk 4 continuation of disk 3 Grp3 Memory Disk 5 3 songs for closing of store Grp4 Th...

Page 21: ...k to format Note If you are formatting a floppy disk make sure that the floppy disk s erasure protection tab is set to unprotected If the disk has not been formatted the following display appears If t...

Page 22: ...LAY PAUSE indicator flashes 3 Select song No 1 then press the SONG SELECT again to display the disk title The song number disappears and the display cursor appears at the position of the first charact...

Page 23: ...Unit See the character table above Cursor back Space Numbers Letters Upper case Lower case Cursor forward 1 2 3 4 5 6 7 8 9 10 11 1213 14 15 16 17 18 19 20 21 22 23 24 25 26 27 28 29 30 31 32 33 34 3...

Page 24: ...s as a toggle switch so that all recording functions including quantizing and overdubbing are available for the recording of all tracks This allows the recording procedures of L R tracks rhythm tracks...

Page 25: ...22 If you want to record a song using the metronome see Recording with the Metronome on page 24 3 Press PLAY PAUSE The PLAY PAUSE indicator stops flashing and the following display appears The Diskla...

Page 26: ...gs can be titled before or after recording and the title can be edited at any time 1 Specify a disk 2 Press REC The REC indicator lights and the PLAY PAUSE indicator flashes The following display appe...

Page 27: ...8 29 30 31 32 33 34 35 36 37 38 39 40 41 42 43 44 45 11 45 46 47 48 49 50 51 52 53 54 55 61 62 63 64 65 66 67 68 69 70 71 72 73 74 75 76 77 78 79 80 81 82 83 84 85 86 87 88 56 57 58 59 60 f g h i j k...

Page 28: ...select an option then press ENTER Recording with the Metronome You can use the metronome to record songs Songs recorded with the metronome will be in the measures and beats format All metronome parame...

Page 29: ...measure all the indicators flash and on the remaining beats the left half and right half of the indicators flash alternately 5 Press PLAY PAUSE The metronome starts and recording begins immediately Th...

Page 30: ...d in beats per minute 1 Specify a disk 2 Press REC 3 Select the song that you want to change using the SONG SELECT buttons 4 Press METRONOME For measures and beats the current song tempo bpm is shown...

Page 31: ...can be connected to either the MIDI IN connector or the TO HOST connector on the Disklavier However for proper results it is recommended that you set the HOST SELECT switch to MIDI when connecting yo...

Page 32: ...to the following appears 6 Press NO and YES buttons to set the piano parts For E SEQ songs L 01 fixed and R can be set to or 02 For SMF songs L can be set to tracks 01 to 16 and R can be set to tracks...

Page 33: ...songs to a CD Recording the Left and Right Parts Separately When recording an L R song the left and right hand parts can be recorded separately Either part can be recorded first and the pedals can be...

Page 34: ...hen you start playing As soon as you play the keyboard or press a pedal recording starts 6 When you finish playing the first part press STOP The first L R part is saved to disk Recording the Second Pa...

Page 35: ...rd split point is set and the notes played on the left hand side of the split point are saved as the left hand part and notes played on the right hand side of the split point are saved as the right ha...

Page 36: ...oon as you play the keyboard or press a pedal recording will start 7 When you finish playing your song press STOP Your new L R song is saved to disk Re Recording Both Parts Simultaneously To re record...

Page 37: ...n option then press ENTER The re recording is saved as indicated or canceled Re Recording One Part 1 Specify a disk 2 Press REC The REC indicator lights and the PLAY PAUSE indicator flashes 3 Use the...

Page 38: ...rd a count in preceding the song to indicate the tempo and the initial downbeat of the song as a band leader would do This is useful when for example you want to play a four hand duet by yourself or e...

Page 39: ...pecifically the metronome beeps and the LED volume indicators flash to indicate the count in beats As the default setting is OFF you need to set it to ON when you want the count in to be played back 1...

Reviews: