background image

94

 CVP-601 Reference Manual

Utilit

y – Making Global Set

tings –

11

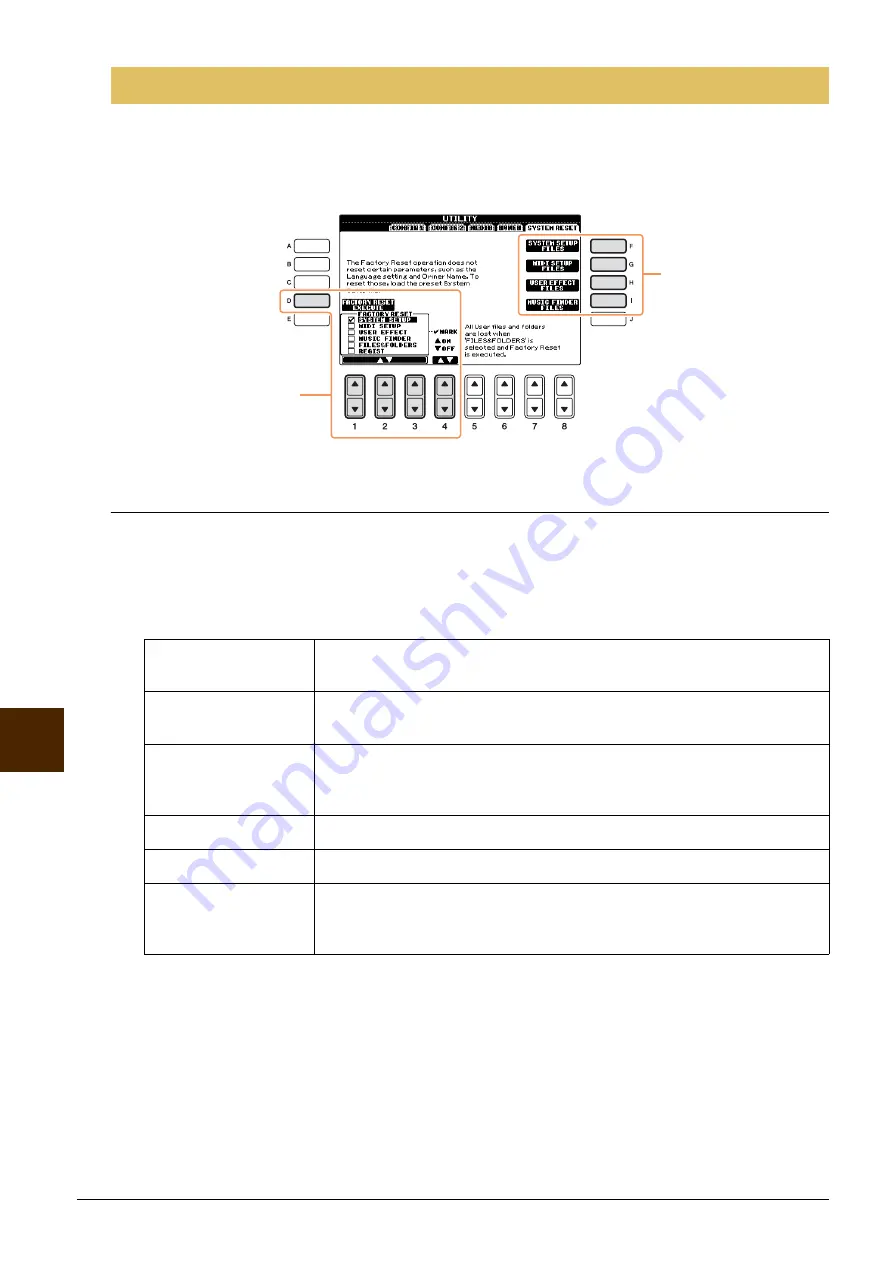
There are two reset methods in the SYSTEM RESET display: Factory Reset and Custom Reset.

Call up the operation display.

[FUNCTION] – [UTILITY] 



TAB [

L

][

R

] SYSTEM RESET

Factory Reset — Restoring the Factory Programmed Settings

This function lets you restore the status of the instrument to the original factory settings. 

1

Select the desired item to be restored by using [1



] – [3



] buttons and add a 

checkmark to it by pressing the [4

] (MARK ON) button.

To remove the checkmark, press the [4

] (MARK OFF) button.

2

Press the [D] (FACTORY RESET) button to execute the Factory Reset operation for all 
checkmarked items.

SYSTEM RESET

SYSTEM SETUP

Restores the System Setup parameters to the original factory settings. Refer to 
the Data List for details about which parameters belong to the System Setup.

MIDI SETUP

Restores the MIDI settings including the MIDI templates on the USER tab dis-
play to the original factory status.

USER EFFECT

Restores the User Effect settings, including the user effect types and user mas-
ter EQ types created via the Mixing Console display, to the original factory set-
tings.

MUSIC FINDER

Restores the Music Finder data (all records) to the original factory settings.

FILES & FOLDERS

Deletes all files and folders stored in the USER tab display.

REGIST

Temporarily deletes the current Registration Memory settings of the selected 
Bank. The same can be done also by turning the power button ON while hold-
ing the B6 key (right-most B key on the keyboard).

Factory Reset 
(see below)

Custom Reset 
(see 

page 95

)

Summary of Contents for Clavinova CVP-601

Page 1: ...Reference Manual This Reference Manual explains advanced features of this instrument that are not explained in the Owner s Manual Please read the Owner s Manual first before reading this Reference Ma...

Page 2: ...ming the Registration 65 Confirming the Registration Memory Information 66 Disabling Recall of Specific Items Freeze 67 Calling Up Registration Memory Numbers in Order Registration Sequence 68 9 Mixin...

Page 3: ...istics are indicated above the Voice name in the Voice Selection display Voice Characteristics S Articulation See the Owner s Manual chapter 2 Natural These rich and luscious Voices are comprised most...

Page 4: ...authentic and natural With MegaVoices however each velocity range the measure of your playing strength has a completely different sound For example a guitar MegaVoice includes the sounds of various pe...

Page 5: ...to which the desired Voice is to be assigned 2 Press one of the VOICE category selection buttons to call up the Voice Selection display 3 Press the 8 UP button to call up the Voice categories 4 Press...

Page 6: ...d according to the type selected above and the chord specified in the chord section of the keyboard shown below Selecting the Harmony Echo type Harmony Types These types apply the harmony effect to no...

Page 7: ...o type 4 VOLUME This parameter is available for all types with the exception of Multi Assign It determines the level of the harmony echo notes generated by the Harmony Echo effect 5 SPEED This paramet...

Page 8: ...he A B buttons to select the desired scale Preset Scale types Pitch Related Settings EQUAL The pitch range of each octave is divided equally into twelve parts with each half step evenly spaced in pitc...

Page 9: ...ch key has its own unique charac ter The scale was used extensively during the time of Bach and Beethoven and even now it is often used when performing period music on the harpsichord ARABIC1 ARABIC2...

Page 10: ...6 VOICE SET button to call up the VOICE SET display 3 Use the TAB L R buttons to call up the relevant setting display For information on the available parameters in each display see the Editable Param...

Page 11: ...s the depth of sustain sampling for the damper pedal 7 8 STRING RESONANCE Adjusts the depth of string resonance 1 VOLUME Adjusts the volume of the current edited Voice 2 3 TOUCH SENSE Adjusts the touc...

Page 12: ...ited Voice is set to MONO above NOTE The Portamento Time determines the pitch transition time Portamento is a function that creates a smooth transition in pitch from the first note played on the keybo...

Page 13: ...t in a brighter sound 2 HARMO Harmonic content Determines the emphasis given to the cutoff frequency resonance set in BRIGHT above see dia gram Higher values result in a more pronounced effect 3 ATTAC...

Page 14: ...IBRATE is selected for the DSP Type parameter explained below Determines whether VIBE VIBRATE should be set to on or off when selecting the Voice 1 4 DSP TYPE Selects the DSP effect category and type...

Page 15: ...s feature by the operation in the relevant display as explained below For example if you want to change the Voice yet keep the same Harmony effect set the HARMONY ECHO parameter to OFF in the display...

Page 16: ...increasing or decreasing the response time of the initial swell and release based on the FOOTAGE controls The higher the value the slower the swell and release 3 VIB SPEED Determines the speed of the...

Page 17: ...2 Making Style File Format Settings 33 There are seven different Fingering Types which let you specify the chord root and type for Style playback 1 Call up the operation display FUNCTION C STYLE SETTI...

Page 18: ...rds in the entire key range Chords are detected in a way similar to Fingered even if you split the notes between your left and right hands for example playing a bass note with your left hand and a cho...

Page 19: ...ound STYLE The chord played in the chord section will sound via the Voices for the Pad part and the Bass channel of the selected Style FIXED The chord played in the chord section will sound via the sp...

Page 20: ...ncluded in the Style data the nearest section is automatically selected For example when MAIN D is not contained in the selected Style MAIN C will be called up 7 TEMPO This determines whether the temp...

Page 21: ...Set the Split Point Split Point Settings F Split Point S L Sets the Split Point S and Split Point L to the same note Press the F button and rotate the DATA ENTRY dial G Split Point S Sets each Split...

Page 22: ...the desired Style from the Style Selection display 2 Press the 5 REPERTOIRE button Various appropriate panel settings matching the selected Style will be shown in the display 3 Use the 2 3 buttons to...

Page 23: ...4 buttons A message appears in the display prompting you to save the panel settings 5 Press F YES button to call up the Style Selection display and save the panel settings as a Style file NOTICE The p...

Page 24: ...Styles or from Styles you have already created See page 28 Call up the operation display FUNCTION F DIGITAL REC MENU B STYLE CREATOR NOTE The Style files created on this instrument can only be played...

Page 25: ...ctions directly via panel operations Realtime Recording Characteristics Loop Recording and Overdub Recording Loop Recording Style playback repeats the rhythm patterns of several measures in a loop and...

Page 26: ...T button to close the Voice Selection display 8 If necessary delete a channel by simultaneously holding down the J DELETE button and pressing the appropriate numbered button 1 8 You can cancel the del...

Page 27: ...hm channel When you are recording the rhythm channel RHY1 or RHY2 you can delete a specific instrument sound by simultaneously holding down the E RHY CLEAR button and pressing the appropriate key on t...

Page 28: ...e Creator the channel data can be entered and System Exclusive data can be edited delete copy or move You can switch between the two by pressing the F button However Chord Lyrics and System Exclusive...

Page 29: ...nnels 7 Press the J SAVE button to execute the Save operation NOTICE The edited Style will be lost if you change to another Style or turn the power to the instrument off without executing the Save ope...

Page 30: ...te triplet timing The 16A and 16B Beat Converter which appear when ORIGINAL BEAT is set to 12 Beat are variations on a basic 16th note setting 5 6 SWING Produces a swing feel by shifting the timing of...

Page 31: ...operation NOTICE The edited Style will be lost if you change to another Style or turn the power to the instrument off without executing the Save operation 1 2 CHANNEL Selects the desired channel part...

Page 32: ...d channel 2 Use the 1 2 CHANNEL buttons to select the channel to be edited The selected channel is shown at the upper left of the display 3 Use the 4 8 buttons to edit the data 4 Press the D EXECUTE b...

Page 33: ...ts which are compatible with SFF GE Source Pattern settings SOURCE PLAY ROOT CHORD page 34 The Style data is appropriately converted depending on chord changes you make during your performance You can...

Page 34: ...preset data When you change Source Root Chord from the default CM7 to another chord the chord notes and recommended notes will also change depending on the newly selected chord type NOTE When NTR is s...

Page 35: ...d A3 when they are transposed to F Use this setting for channels that contain chord parts GUITAR This is exclusively for transposing guitar accompaniment Notes are trans posed to approximate the chord...

Page 36: ...are not changed Use this for chord channels of Sections which respond only to a Major minor chord such as Intros and Endings NATURAL MINOR 5th In addition to the Natural Minor transposition above aug...

Page 37: ...und as realistic as possible in other words that no notes outside the natural range are sounded e g high bass sounds or low pic colo sounds 7 NOTE LIMIT HIGH STOP The notes stop sounding PITCH SHIFT T...

Page 38: ...ting Music Notation Settings 1 LEFT ON OFF Enables disables display of the left hand key range Depending on other settings this parameter may be unavailable and may appear grayed out If this is the ca...

Page 39: ...respective left or right hand parts OFF LEFT CH only No channel assignment This disables display of the left hand key range 2 RIGHT CH 3 4 KEY SIGNATURE This lets you enter key signature changes in t...

Page 40: ...Auto Accompaniment function 4 Press the STYLE SYNC START button to enable standby letting you simultaneously start the accompaniment as soon as you start playing 5 While holding down the SONG STOP but...

Page 41: ...repeatedly ALL Continues playback through all the Songs in the specified folder repeat edly RANDOM Continues playback at random through all the Songs in the specified folder repeatedly NOTE The prese...

Page 42: ...lyrics AUTO When the language is specified in the Song data the lyrics are displayed accordingly When the language is not specified in the Song data the lyr ics language is regarded as INTERNATIONAL b...

Page 43: ...AUSE button to start playback Practice playing the keyboard or singing along with the Guide type selected in step 3 NOTE The guide lamps light according to Song channels recorded to Track 1 and 2 and...

Page 44: ...display shows the current chord type After stopping playback go to the next step 2 Call up the operation display FUNCTION B SONG SETTING 3 Press the 8 button to turn the P A T performance assistant t...

Page 45: ...rding and re recording or editing existing Song data Call up the operation display FUNCTION F DIGITAL REC MENU A SONG CREATOR There are six Pages tabs in the Song Creator display REC MODE For re recor...

Page 46: ...ctions A B C Moves the cursor in the list G Determines the velocity loudness of the note to be entered The velocity value can be specified within a range from 1 to 127 The higher the velocity value th...

Page 47: ...e 1 4 Select the dotted quarter note by using the 6 buttons 1 5 Play the C3 key The first note is entered 1 6 Press the I button to select the normal note type 1 7 Press the 7 button to select the eig...

Page 48: ...key yet Keep holding it while executing the following steps 4 4 While holding the G3 key press the C4 key Do not release the G3 and C4 keys yet Keep holding the notes while executing the following ste...

Page 49: ...using the Step Record function 1 Press the SONG REC and SONG STOP buttons simultaneously A blank Song New Song is called up for recording NOTE Selecting a blank Song initializes the panel settings 2 S...

Page 50: ...chord section of the keyboard 2 Enter the chords for the Break section 2 1 Press the STYLE BREAK button 2 2 Press the 6 button to select the quarter note length 2 3 Play the chords F and G7 in the cho...

Page 51: ...P button or press the C button to return to the top of the Song then hear the newly entered Song by pressing the PLAY PAUSE button 5 Press the EXIT button to exit from the Step Recording display 6 Pre...

Page 52: ...button or when you play the keyboard in the Synchro Standby mode FIRST KEY ON The Song plays back normally then starts overwrite recording as soon as you play the keyboard PUNCH IN AT The Song plays...

Page 53: ...NOTE Pedal Punch In Out operation may be reversed depending on the particular pedal you ve con nected to the instrument If necessary change the pedal polarity to reverse the control page 79 1 2 3 4 5...

Page 54: ...cute the operation for the current display After the operation with the exception of the SETUP menu is completed this button changes to UNDO letting you restore the original data if you are not satisf...

Page 55: ...settings marked with asterisks are exceptionally convenient since they allow you to quantize two different note values at the same time For example when the straight eighth notes and eighth notes tri...

Page 56: ...el specified here are copied to the destination channel Besides the values 1 16 there is a COPY setting that allows you to copy the data from Source 1 to the destination channel 6 7 DESTINATION Determ...

Page 57: ...f the Song D E Moves the cursor left right and select the desired parameter of the high lighted event H FILTER Calls up the Filter display page 59 letting you select only the events you wish to be sho...

Page 58: ...ch of a Voice continuously A T Aftertouch This event is generated when pressure is applied to a key after the note is played ScBar Score Start Bar Determines the top measure of a Song Tempo Determines...

Page 59: ...ress the EXIT button to execute the settings C MAIN Displays all main types of events D CTRL CHG Displays all specific Control Change message events E STYLE Displays all types of Style playback relate...

Page 60: ...ER or USB 64 By registering a Song Audio or Style file in various locations Preset User and USB into Music Finder you can conveniently and easily call up the file from the Song title NOTE If you want...

Page 61: ...the Desired Song from among the Panel Settings and Searching the Panel Settings in the Owner s Manual chapter 7 NOTE If you want to play back files in the USB flash memory connect the USB flash memor...

Page 62: ...ay by pressing the MUSIC FINDER button and select the desired record 2 Press the H ADD TO FAVORITE button to add the selected record to the FAVORITE display then press the G YES button to actually add...

Page 63: ...er selecting the desired Style press the EXIT button to return back to the Edit display For SONG or AUDIO records this field cannot be edited D BEAT Changes the beat time signature of the record for s...

Page 64: ...separate files 1 Call up the Save display MUSIC FINDER 7 FILES 2 Press the TAB L R buttons to select the location for saving USER or USB 3 Press the 6 SAVE button to save the file All records are sav...

Page 65: ...ory Numbers in Order Registration Sequence 68 Confirming the Registration Sequence Setting in the Main Display 70 Saving the Registration Sequence Settings 70 1 Press the REGIST BANK and buttons simul...

Page 66: ...GIST BANK and buttons to call up the Registration Bank Selection display then use the A J buttons to select the desired Bank NOTE You can instantly call up the information display of the currently sel...

Page 67: ...e This is where the Freeze function comes in handy It lets you maintain the settings of certain items and leave them unchanged even when selecting other Registration Memory buttons 1 Call up the opera...

Page 68: ...d to use a pedal to switch Registration Memory settings specify here how the pedal will be used to advance or to reverse through the sequence Use the C REGIST PEDAL button to select the pedal for adva...

Page 69: ...e function on 7 Press the EXIT button to exit from the operation display 1 4 CURSOR Moves the cursor 5 REPLACE Replaces the number at the cursor position with the currently selected Regis tration Memo...

Page 70: ...by pressing one of the TAB L R buttons or by pressing the pedal NOTE The pedal can be used for Registration Sequence no matter which display is called up except for the display in step 3 on page 68 Sa...

Page 71: ...five pages of parameters Use the TAB L R buttons to call up the desired page and set various parameters for each part to adjust the balance between parts and create your desired sound Note that the Sa...

Page 72: ...selection buttons on the panel then select a Voice by using the A J buttons NOTE When the display for SONG CH 1 8 or SONG CH 9 16 is selected you can switch between the two by pressing the A PART butt...

Page 73: ...ansition in pitch from the first note played on the keyboard to the next The Portamento Time deter mines the pitch transition time Higher values result in a longer pitch change time Setting this to 0...

Page 74: ...splay is called up 2 Use the 1 2 buttons to select the effect BLOCK Editing EFFECT Parameters Effect Block Applicable parts Effect characteristics REVERB All parts Reproduces the warm ambience of play...

Page 75: ...fect blocks You can edit both the conventional parameters and the convenient Variation parameter Press the E button to move the cursor to the Variation parameter then edit the value via the 6 7 button...

Page 76: ...cy response Usually an equalizer is used to correct the sound from speakers to match the special character of the room For example you can cut some of the low range frequencies when playing in large s...

Page 77: ...Q EDIT display is called up 2 Use the B C buttons to select a preset EQ type The set parameters of the selected EQ type are automatically shown at the bottom of the display 3 Use the 3 7 buttons to bo...

Page 78: ...us functions here The following explanations cover the related operations and assignable functions parameters NOTE For information on how to connect a Footswitch or Foot Controller refer to the Owner...

Page 79: ...er to control the volume This function is available only for the pedal connected to the instrument s AUX PEDAL jack SUSTAIN Allows you to use a pedal to control the sustain When you press and hold the...

Page 80: ...of the Super Articulation Voices even if this has been assigned to the Foot Pedals PITCHBEND Allows you to bend the pitch of notes up or down by using the pedal This function can be assigned to the ri...

Page 81: ...de In Fade Out function on and off FINGERD FING ON BASS The pedal alternately switches between the Fingered and On Bass modes page 18 BASS HOLD While the pedal is pressed the Accompaniment Style bass...

Page 82: ...ogrammed template from the PRESET Page page 83 If you have already created your original template and saved it to the USER Page you can also select the template from the USER Page 3 Press the 8 EDIT b...

Page 83: ...chronizes with an external MIDI clock instead of the instrument s internal clock This template should be used when you wish to set the tempo on the MIDI device connected to the instru ment MIDI Accord...

Page 84: ...l sequencer MIDI computer or other MIDI device and you want to synchronize it to that device set this parameter to the appropriate setting MIDI USB 1 or USB 2 In this case make sure that the external...

Page 85: ...d from the Split Point for the Voices This is not affected by the on off status of the ACMP ON OFF button 2 Use the 3 buttons to select a channel via which the selected part will be transmitted NOTE I...

Page 86: ...ges control the instrument s keyboard performance EXTRA PART 1 5 There are five parts specially reserved for receiving and playing MIDI data Normally these parts are not used by the instrument itself...

Page 87: ...select the channel 2 Use the 1 8 buttons to set the desired channel to ON or OFF You can also set all channels to OFF by pressing the I ALL OFF button Setting the Chord Type for Style Playback via MID...

Page 88: ...e In Out These parameters determine the behavior when the Style or Song playback is faded in out CONFIG1 3 FADE IN TIME Determines the time it takes for the volume to fade in or go from mini mum to ma...

Page 89: ...to set the drum sound and the velocity which will sound when the Tap function is used 5 AUTO POWER OFF Refer to the Owner s Manual 2 VOLUME Determines the level of the metronome sound 3 5 SOUND Determ...

Page 90: ...coustic Control is a function which automati cally adjusts and controls the sound quality according to the overall vol ume of the instrument Even when the volume is low it permits both low sounds and...

Page 91: ...ank and number are shown in the Voice Selection display This is useful when you want to check which bank select MSB LSB values and program change number you need to specify when selecting the Voice fr...

Page 92: ...ormatting see the Owner s Manual F PROPERTY Opens the Property display of the USB flash memory selected by A B buttons from which you can check the amount of remaining memory NOTE The displayed remain...

Page 93: ...ual E RESTORE Loads the backup file from the USB flash memory I OWNER NAME Allows you to enter your name as the owner The Owner name is indi cated on the opening display when you turn the power on Ref...

Page 94: ...ores the System Setup parameters to the original factory settings Refer to the Data List for details about which parameters belong to the System Setup MIDI SETUP Restores the MIDI settings including t...

Page 95: ...6 SAVE button to save your file 6 To recall your file press the desired F I buttons in the SYSTEM RESET display then select the desired file F SYSTEM SETUP FILES Parameters set on the various displays...

Page 96: ...E ONLY 7 CHORD SYS EX 84 Chord Tutor 17 CHORUS 74 CHORUS DEPTH Voice Set 14 CLOCK 84 Clock setting 84 COMMON 11 CONFIG1 88 CONFIG2 90 Connections 78 CONTROLLER 78 CONTROLLER Voice Set 12 Cool 3 D DECA...

Page 97: ...7 NOTE NAME 39 Note Transposition 33 35 NTR 35 NTT 35 O OCTAVE 73 One Touch Setting 23 Organ Flutes 16 Organ Flutes 4 ORIGINAL BEAT 30 OTS INFO 23 OTS LINK TIMING 19 Overdub Recording 25 OWNER 93 OWNE...

Page 98: ...19 STYLE TOUCH 20 SUSTAIN 79 SUSTAIN SAMPLE 11 Sweet 3 SWING 30 SYNCHRO STOP WINDOW 20 SYS EX MIDI 84 SYS EX Song Creator 58 System Exclusive Events 57 58 SYSTEM RESET 94 T Tap 89 TEMPO Style Setting...

Reviews: