Yamaha Clavinova CLP-311 Owner'S Manual Download Page 21

16

○ ○ ○ ○ ○ ○ ○ ○ ○ ○ ○ ○ ○ ○ ○ ○ ○ ○ ○ ○ ○ ○ ○ ○ ○ ○ ○ ○ ○ ○ ○ ○ ○ ○ ○ ○ ○ ○ ○ ○ ○ ○ ○ ○ ○ ○ ○ ○ ○ ○ ○ ○ ○ ○ ○ ○ ○ ○ ○ ○

MIDI Functions

The Multi-Timbre Mode

...........................................................................................................................................................

The Multi-Timbre mode is a special mode in which the Clavinova

voices can be independently controlled on different MIDI channel
numbers by an external MIDI device. The Multi-Timbre mode can be
activated as follows:

NO

HARPSI-

CHORD

P

OR

MIDI/TRANSPOSE

HARPSI-

CHORD

HARPSI-

CHORD

= Multi-Timbre Mode ON

= Multi-Timbre Mode OFF

Z

Hold down the [MIDI/TRANSPOSE] button.

X

Press the [HARPSICHORD] voice selector. If the HARPSI-
CHORD  LED is lit when the [HARPSICHORD] voice selector
is pressed, you have turned the Multi-Timbre mode ON. If the
HARPSICHORD  LED is not lit when the [HARPSICHORD]
voice selector is pressed, you have turned the Multi-Timbre mode
OFF.

C

Release the [MIDI/TRANSPOSE] button.

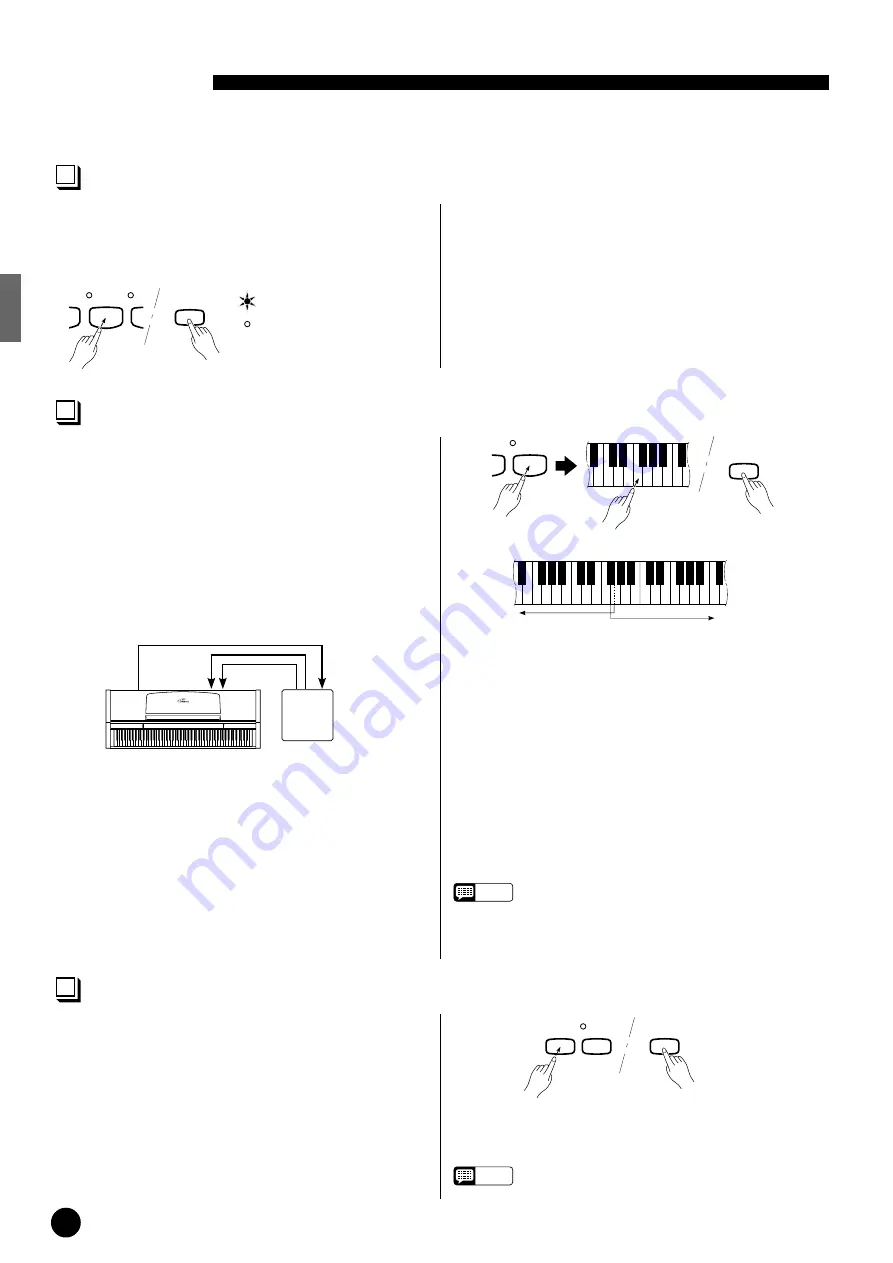
The MIDI Split & Left Local OFF Mode

...................................................................................................................

In the MIDI split mode one section of the Clavinova keyboard is

used to play a Clavinova voice in the normal way, while the remain-
ing section is used to play a second MIDI keyboard or tone generator
such as the Yamaha DOU-10 Disk Orchestra Unit. In this mode the
right-hand section of the keyboard is used to play an internal
Clavinova voice, while the left-hand section of the keyboard plays the
external keyboard or tone generator. Playing the left-hand section of
the keyboard produces no sound from the Clavinova. The “split
point,” or the key that divides the left- and right-hand sections of the
keyboard can be set at any desired key.

SPLIT POINT

Left-hand section plays
a DOU-10 bass voice.

Right-hand section plays a
Clavinova piano voice.

MIDI/TRANSPOSE

PSI-

RD

PIPE

ORGAN

Z

Press the [PIPE ORGAN] voice selector while holding down the
[MIDI/TRANSPOSE] button. The PIPE ORGAN LED will
flash.

X

While still holding the [MIDI/TRANSPOSE] button, press the
key on the keyboard at which you want to set the split point. The
PIPE ORGAN LED will light continuously. The split-point
becomes the first key of the left-hand section.

C

Release the [MIDI/TRANSPOSE] button.

V

To return to the normal full-keyboard mode, hold the [MIDI/
TRANSPOSE]
 button and press the [PIPE ORGAN] voice
selector, then release both buttons.

NOTE

• When the power is turned ON the default split point key

— F

#

2 — will be automatically selected. If a new split

point is selected it remains active until the power is
turned OFF or a different split point is selected.

Bulk Data Dump

.............................................................................................................................................................................

This function is used to transmit all data stored in the Recorder

memory to a MIDI data storage device such as the Yamaha DOU-10
Disk Orchestra Unit, other sequence recorders, or MIDI compatible
computers.

MIDI/TRANSPOSE

REC

START/

STOP

RECORDER

Z

Hold [MIDI/TRANSPOSE] and press the [START/STOP]
button. Transmission will begin.

X

Release the buttons.

NOTE

• Bulk dump will not function when the metronome is on

or when the recorder is in operation.

DOU-10

OUT PUT

R

L

AUX IN

L

R

MIDI OUT

MIDI
IN

Clavinova

(Set to receive on MIDI
channel 2)

The MIDI split mode is useful if, for example, you want to play a

piano (Clavinova) voice with the right hand while playing a synthe-
sizer bass line or string section with the left hand.

When the MIDI split mode is activated,  notes played on the left-

hand section are transmitted via the Clavinova MIDI OUT connector
on MIDI channel 2. Notes played on the right-hand section are
transmitted on the “basic channel” (i.e. the channel set using the
MIDI channel selection function described previously).

Summary of Contents for Clavinova CLP-311

Page 1: ...mit einem Schlitzschraubendreher bis der Zeiger auf den korrekten Spannungswert weist IMPORTANT Contr ler la source d alimentation V rifiez que la tension sp cifi e sur le panneau arri re correspond l...

Page 2: ...cord of your purchase CAUTION RISK OF ELECTRIC SHOCK DO NOT OPEN CAUTION TO REDUCE THE RISK OF ELECTRIC SHOCK DO NOT REMOVE COVER OR BACK NO USER SERVICEABLE PARTS INSIDE REFER SERVICING TO QUALIFIED...

Page 3: ...isters and other devices that produce heat should be avoided 8 This product was NOT designed for use in wet damp loca tions and should not be used near water or exposed to rain Exam ples of wet damp l...

Page 4: ...er provided 3 Clean the cabinet and keys of your Clavinova only with a clean slightly damp cloth A neutral cleanser may be used if desired Never use abrasive cleansers waxes solvents or chemical dust...

Page 5: ...C L P 3 1 1 English Owner s Manual Deutsch Bedienungsanleitung Fran ais Mode d emploi Espa ol Manual de instrucciones...

Page 6: ...ture 10 Tempo Control 10 Using the Recorder 11 Recording 11 Changing the Initial Settings 12 Erasing the recorded data 12 Playback 12 Fast Forward Playback 12 MIDI Functions 13 A Brief Introduction to...

Page 7: ...oice is currently selected The CLP 311 also has a DUAL mode in which two voices can be played simultaneously across the full range of the keyboard see page 7 for details NOTE The PIANO voice is automa...

Page 8: ...ART STOP and REC Buttons These buttons control the CLP 311 recorder letting you record and play back just about anything you play on the keyboard up to a maximum of about 1 300 notes See page 11 for d...

Page 9: ...al Amplifier Speaker System The CLP 311 features a high performance stereo amplifier delivering 20 watts per channel to a pair of 16 cm speaker units NOTE The AUX OUT jack signal must never be returne...

Page 10: ...ANO voice is automatically selected whenever the power is turned ON Set the Volume Initially set the MASTER VOLUME control about half way between the MIN and MAX settings Then when you start playing r...

Page 11: ...ton Prelude No 1 C Major from 8 Short Prelude and Fugues BWV553 560 by J S Bach The demonstration pieces listed above are short excerpts from the original composi tions The other demo tune is original...

Page 12: ...The volume levels of the two voices combined in the DUAL mode are normally set automatically to produce a pleasing balance see Default Settings below The balance can be adjusted manually by using the...

Page 13: ...and F 3 according to the desired amount of transposition CRelease the MIDI TRANSPOSE button Pressing the C3 key produces normal keyboard pitch Pressing the key to the left of C3 B2 transposes the pitc...

Page 14: ...6 cents up to a maximum of 50 cents above standard pitch CRelease the A 1 and B 1 keys Tuning Down ZTo tune down lower pitch hold the A 1 and A 1 keys simulta neously XPress any key between C3 and B3...

Page 15: ...t METRONOME CLAVI TONE 2 time METRONOME E PIANO 3 time METRONOME HARPSICHORD 4 time METRONOME PIPE ORGAN 6 time METRONOME METRONOME PIANO E PIANO CLAVI TONE HARPSI CHORD PIPE ORGAN METRONOME TEMPO 280...

Page 16: ...n indica tor will light Make All Necessary Initial Settings Before actually beginning to record select the voice you want to record with or voices if you will be using the dual mode You might also wan...

Page 17: ...the RECORDER START STOP button Playback starts from the beginning of the recorded data and will stop automatically at the end of the recorded data You can also stop playback at any time by pressing th...

Page 18: ...ponds to the appropriate control change data See Control Change ON OFF on page 15 for information on turning control change number reception and transmission ON or OFF MIDI the Musical Instrument Digi...

Page 19: ...ansmitted by the sequence recorder while the second instrument or tone generator will respond only to channel 2 information This allows the sequence recorder to play two completely different parts on...

Page 20: ...perated This function makes it possible to cancel control change data reception and transmission if you do not want the Clavinova voices to be affected by control change data received from an external...

Page 21: ...N voice selector while holding down the MIDI TRANSPOSE button The PIPE ORGAN LED will flash XWhile still holding the MIDI TRANSPOSE button press the key on the keyboard at which you want to set the sp...

Page 22: ...nce or other electronic equipment which is fed by the same AC mains line as your Clavinova 5 Interference Appears On Radio or TV Sets Located Near the Clavinova The Clavinova contains digital circuitr...

Page 23: ...igung des Instruments zur Folge haben Z ffnen Sie den Karton und nehmen Sie alle Teile heraus Im Karton sollten die oben abgebildeten Teile enthalten sein Pr fen Sie zun chst bitte ob alle Teile volls...

Page 24: ...montar la Clavinova usted solo El trabajo puede ser realizado f cilmente entre dos personas Utilice s lo los tornillos suministrados o reemplazos del exacto tama o especificado El empleo de tornillos...

Page 25: ...pielen wackelig anf hlt pr fen Sie gem den unter Zusammenbau und Aufstellung gegebenen Anweisungen ob der St nder richtig zusammengebaut wurde und ziehen dabei die einzelnen Schrauben noch einmal nach...

Page 26: ...eclado hacia adelante hasta que se pare TENGA CUIDA DO CON SUS DEDOS MIENTRAS LO HACE Alinee los orificios del panel inferior de la unidad principal con los orificios de las m nsulas de los paneles la...

Page 27: ...3H 0nH 7CH 00H 1BH n channel number 53H 4BH 20H 20H SK 43H 4CH 50H 27H 39H 34H CLP 3xH 3yH x y version number PANEL DATA CHECK SUM 1byte 0 53H 4BH 20H Data end F7H Panel Data Contents 1 VOICE 2 DUAL V...

Page 28: ...ch circuit breaker or fuse circuits or install AC line filter s In the case of radio or TV interference relocate reorient the an tenna If the antenna lead in is 300 ohm ribbon lead change the lead in...

Reviews: