


Graphic EQ, Effects, and Premium Rack
V1.7 Supplementary Manual
11
Graphic EQ, Effects, and Premium Rack
Improvements in popup window operation
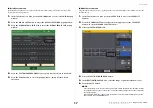
In the EFFECT popup window, GEQ popup window, and PREMIUM RACK popup window, you can
now use the [SEL] keys to switch channels.
In the EFFECT popup window, pressing a top panel [SEL] key while editing an effect parameter will
switch the screen to the effect that is inserted in that channel. The same will occur in the GEQ popup
window and the PREMIUM RACK popup window. You can also switch from the EFFECT popup
window to the GEQ popup window or the PREMIUM RACK popup window.
The following items will change in conjunction with the channel being operated.
• Selected channel indication in the Function Access Area
• Channel being operated in the synchronized CL Editor
If no insert settings have been made in the channel to which you switched, a dialog box informing you
of this will appear.
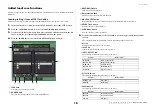
Improved display for tap tempo function
If TAP TEMPO is assigned to a user defined key, and you are specifying the BPM (tempo value) by
pressing that key, a popup window like the following will now appear.
■
Tap tempo popup window
NOTE
This popup window will not appear if the EFFECT EDIT popup window in which you’re specifying
tap tempo is open.
ATT
Keyin
Self PRE EQ
Self POST EQ
MIX21-24 OUT
CH[1-8,9-16,17-24,25-32,33-40,41-48, 49-56, 57-64, 65-72]POST EQ(CL5)
CH[1-8,9-16,17-24,25-32,33-40,41-48, 49-56, 57-64]POST EQ(CL3)
CH[1-8,9-16,17-24,25-32,33-40,41-48]POST EQ(CL1)
ON
4BAND
EQ
GATE
DUCK
EXPAND
COMP
GR METER
COMP
COMPAND
DE-ESSER
KEYIN CUE
HPF
PRE HPF
POST EQ
INSERT
METER
LEVEL/
DCA1-16
PRE FADER
PRE FADER
POST ON
PRE FADER
INSERT OUT
PRE EQ
INSERT OUT
To OUTPUT PATCH
PRE EQ
INSERT POINT
POST ON INSERT OUT
PRE FADER INSERT OUT
PRE EQ INSERT OUT
GR METER
METER
POST ON
METER
DYNA2OUT
METER
DYNA1OUT
METER
EQ OUT
METER
PRE EQ
PRE HPF / PRE EQ / PRE FADER/POST ON
ON
LEVEL
DIRECT OUT 1-72{64,48}
To OUTPUT PATCH
PAN LINK
MATRIX1,3...7
MATRIX2,4...8
CUE R
MIX1,3...23
MIX2,4...24
CUE L
Keyin Filter
CH INSERT IN
1-72{64,48}
To RACKIN PATCH
INSERT
CH 1-72{64,48}
(PRE FADER)PFL / (POST ON)AFL / POST PAN L
ON
ON
ST L
MONO(C)
ST R
MIX
1 2
2324
ST
L R
M
O
N
O
(C)
MATRIX
1 2
7 8
CUE
L R
METER
PRE D.GAIN
CH INSERT OUT
1-72{64,48}
PRE EQ / PRE FADER / POST ON
ON
LEVEL
ON
LEVEL
LEVEL
PAN
ON
PRE EQ / PRE FADER / POST ON
To MATRIX
VARI
To MATRIX
VARI
STEREO
PRE EQ / PRE FADER / POST ON
ON
LEVEL
ON
LEVEL
LEVEL
PAN
ON
PRE EQ / PRE FADER / POST ON
To MIX
VARI
To MIX
VARI
STEREO
To MIX
FIXED
POST ON
ON
ON
To MIX
FIXED
STEREO
POST PAN L
POST PAN R
ON
ON
PAN
TO ST
LR MONO
TO MONO
LCR
TO LCR
CSR
POST PAN L
POST PAN R
(PRE FADER)PFL / (POST ON)AFL / POST PAN R
PAN MODE
DELAY
Max
1000ms
INSERT
POST ON
INSERT OUT
Digital
GAIN
OSCILLATOR
ON
ON
ON
ON
ON
ON
ON
ON
ON
ON
METER
POST DG
72
{64,
48}
INPUT P
A
TCH


