17
A-S500/A-S300
A
-S50
0/A
-S30
0
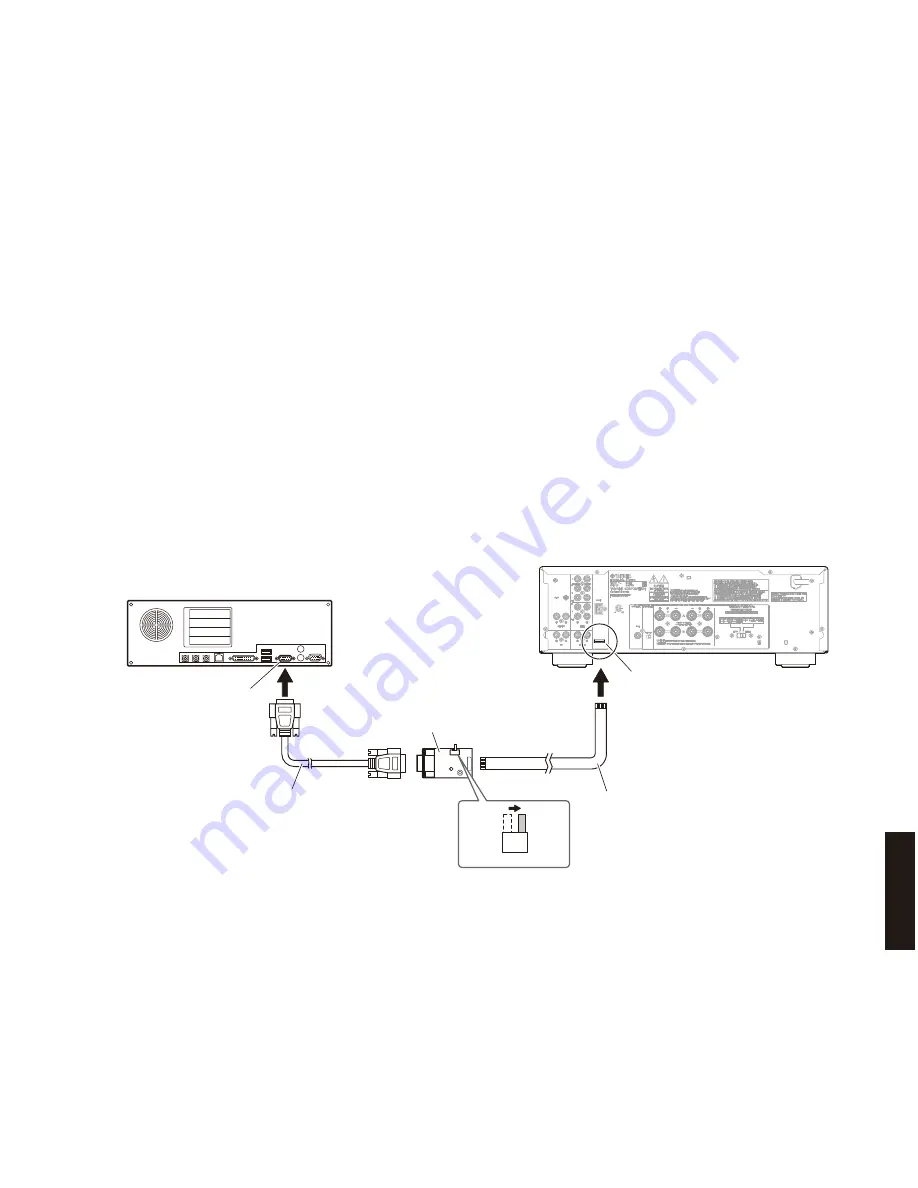
Serial port (RS-232C)
シリアルポート
(RS-232C)
RS-232C cross cable
RS-232Cクロスケーブル
PC
This
u
nit
/ 本機
RS-232C conversion adaptor
RS-232C変換アダプター
SW7
FLASH
UCOM
OTHER
Flexible flat cable (9P)
カード電線(9P)
Writing port
(FUNCTION P.C.B. CB509)
● 準備と注意
・ 指定のダウンロード先から、ファームウェア書き
込み用プログラムと最新のファームウェアを、PC
の同じフォルダにダウンロードしてください。
・ RS-232C クロスケーブルは必ず上記仕様のものを
用意してください。
・ 書き込み時は、PC 上の他のアプリケーションソ
フトは閉じてください。
さらに、タスクトレイ上にあるソフトも閉じてお
くことを推奨します。
● 接続
※ 本機の電源コードを AC コンセントから抜いてく
ださい。
・ RS-232C 変換アダプターのスイッチ(SW7)“FLASH
UCOM” 側に設定します。(Fig. 1)
・ 本機の書き込み用ポート(FUNCTION P.C.B. の
CB509)と PC のシリアルポート(RS-232C)を下
記のように接続します。(Fig. 1)
●
Preparation and precautions
• Download the firmware downloader program and
the latest firmware from the specified download
source to the same folder of the PC.
• Prepare the above specified RS-232C cross
cable.
• While writing the firmware, keep the other application
software on the PC closed.
It is also recommended to keep the software on the
task tray closed as well.
●
Connection
*
Disconnect the power cable of this unit from the
AC outlet
• Set the switch (SW7) of RS-232C conversion
adaptor to the “FLASH UCOM” position. (Fig. 1)
• Connect the writing port (CB509 of the FUNCTION
P.C.B.) located on the rear panel of this unit to
the serial port (RS-232C) of the PC with RS-232C
cross cable, RS-232C conversion adaptor and
flexible flat cable as shown below. (Fig. 1)
Fig. 1
Summary of Contents for A-S300
Page 5: ...5 A S500 A S300 A S500 A S300 A S500 A model A S500 B model A S500 G model A S500 ...
Page 6: ...6 A S500 A S300 A S500 A S300 A S500 L model A S300 R model A S300 T model A S500 A S300 ...
Page 7: ...7 A S500 A S300 A S500 A S300 A S300 A model A S300 B model A S300 G model A S300 ...
Page 8: ...8 A S500 A S300 A S500 A S300 A S300 J model A S300 L model A S300 ...
Page 80: ...81 A S500 A S300 A S500 A S300 MEMO ...
Page 81: ...A S500 A S300 ...


