3
En
GETTING STARTED
■
Front panel
1
Remote control sensor
Receives signals from the remote control.
2
STANDBY/ON indicator
Green
: Lights up when this unit is on.
Red
: Lights up when this unit is in the standby mode.
Orange
: Lights up when the sleep timer is on.
3
PHASE indicator
Green
: Lights up when the phase is set in the reverse mode.
Red
: Lights up when the phase is set in the regular mode.
4
STANDBY/ON switch
Turns on or sets this unit to the standby mode.
In the standby mode, this unit consumes a small amount of
power.
5
H-CUT control
Adjusts the high frequency cut off point depending on the
connected front speakers or your preference (see page 13).
6
VOLUME control
Adjusts the volume level. Turn the control clockwise to
increase the volume, counterclockwise to decrease the
volume.
7
B.A.S.S. indicators
Light up to indicate the currently selected
B.A.S.S.
number (
1
,
2
or
3
) (see page 13).
8
PRESET indicators
Light up to indicate the currently selected
PRESET
number (
1
,
2
or
3
) (see page 14).
• If you set this unit to the standby mode when one of the
PRESET indicators is lit, no PRESET indicator lights up
when you turn on this unit next time.
• The PRESET indicator turns off when you press any
button other than PRESET 1, 2, or 3, or when you
operate any other function of this unit.
Controls and functions
H-CUT
SUBWOOFER SYSTEM Soavo-900SW
STANDBY
/ON
STANDBY
/ON
PHASE
1
2
3
1
2
3
B.A.S.S.
PRESET
140Hz
40Hz
VOLUME
10
0
1
2
3
4
5
6
7
8
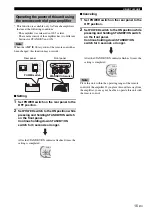
Note
H-CUT
140Hz
40Hz
One graduation
of this control
represents 10 Hz.
Notes


