background image

Connection

Internet Connection Guide  

15

Some cases may require detailed knowledge of the network settings.

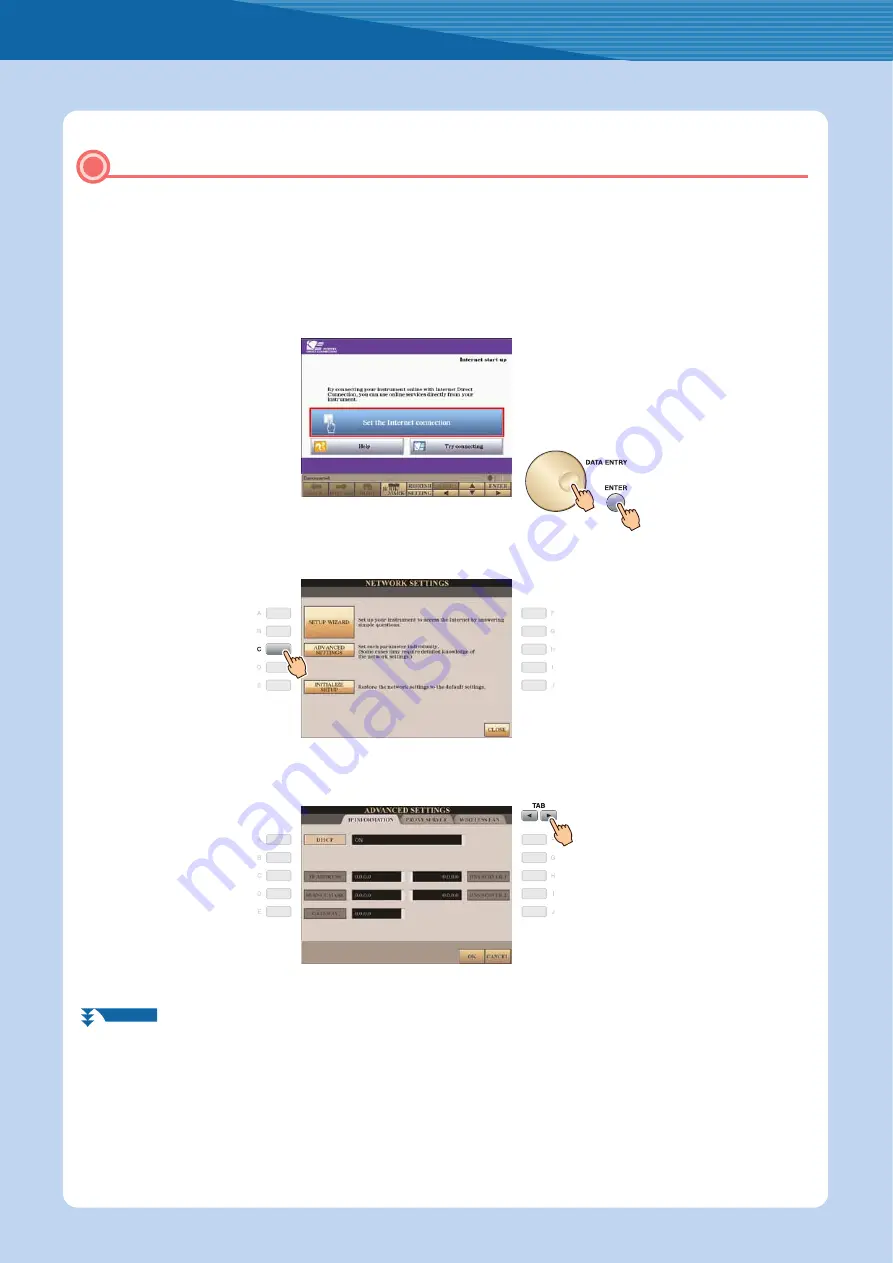
1

Turn the power of the instrument on, then press the [INTERNET] button.

2

Use the [DATA ENTRY] dial to select “Set the Internet connection,” then press the [ENTER] 
button to execute.

3

Press the [C] button to select “ADVANCED SETTINGS.”

4

Use the TAB [

<

][

>

] buttons to call up the desired page.

Using Static IP Address or Proxy Server

NEXT PAGE

Summary of Contents for 501

Page 1: ...http services music yamaha com Only the special website can be opened when the instrument is directly connected to the Internet v1 10 v1 10 NOTE The illustrations and screens as shown in this guide ar...

Page 2: ...For details on connection operations refer to page 6 USB wireless LAN adaptor Wireless game adaptor Enables setting of a strong security format such as WPA2 format etc Wireless connection of several I...

Page 3: ...the operations in the special website refer to the Owner s Manual The special website screen above is taken from the CVP 509 The contents of the service as appearing here are current as of March 2010...

Page 4: ...en press the ENTER button to execute 4 Use the A B buttons to select SETUP WIZARD 5 Press the B button to select LAN cable then press the G button to proceed to NEXT 6 Make sure that the devices are c...

Page 5: ...you turn off the power of the instrument be sure to save the settings and changes you made 8 Press the G DONE button to connect to the special website When the special website appears the network set...

Page 6: ...he website http music yamaha com download A USB wireless LAN adaptor which is not on the list cannot be used Access point with router The router capability here is unnecessary if your modem has router...

Page 7: ...ect SETUP WIZARD 5 Press the C button to select Wireless LAN using USB LAN adaptor then press the G but ton to proceed to NEXT 6 Make sure that the devices are connected as shown in the illustration o...

Page 8: ...S Check whether your USB wireless LAN adaptor supports WPS by accessing the URL of Required Devices on page 6 Press the B button to select Setup by WPS push button then press the G button to proceed t...

Page 9: ...key Make sure that the settings are the same as those for the access point on the router side For details on confirmation and changes in the setting of the access point on the router side refer to th...

Page 10: ...s Manual for character entry details To cancel the key input press the 8t CANCEL button 12 Press the G NEXT button to set the key input When you set the key input the characters are hidden and display...

Page 11: ...when you turn off the power of the instrument be sure to save the settings and changes you made 14 Press the G DONE button to connect to the special website When the special website appears the netwo...

Page 12: ...router capability Modem ADSL modem optical network unit or cable modem The wireless game adaptor requires connection to the AC outlet For details on changes in the settings of the wireless game adapto...

Page 13: ...te refer to the Owner s Manual The special website screen above is taken from the CVP 509 The contents of the service as appearing here are current as of March 2010 The available contents of the servi...

Page 14: ...heck the connection to the special website The settings are saved by checking the connection Because the settings are lost when you turn off the power of the instrument be sure to save the settings an...

Page 15: ...the power of the instrument on then press the INTERNET button 2 Use the DATA ENTRY dial to select Set the Internet connection then press the ENTER button to execute 3 Press the C button to select ADVA...

Page 16: ...rameter refer to page 18 6 Select the setting or change the value Selecting the setting Use the 2 st 3 st buttons to select the setting then use the 4 st OK button to execute Changing the value Enter...

Page 17: ...you made 9 Connect the devices First turn the power of the instrument off then connect the devices and finally turn the power on again 10 Press the INTERNET button to connect to the special website Wh...

Page 18: ...is set to OFF DNS SERVER 1 2 These settings must be made when DHCP above is set to ON SET DNS MANUALLY or OFF PROXY SERVER PROXY PORT Determines the proxy server name and port number SSID Determines...

Page 19: ...e the DATA ENTRY dial to select a solution Details then press the ENTER button to view the details 3 Solve the problem with the displayed solutions Connection Help Error code For details about each co...

Page 20: ...default settings 1 Press the INTERNET button 2 Use the DATA ENTRY dial to select Set the Internet connection then press the ENTER but ton to execute 3 Press the E button to select INITIALIZE SETUP 4...

Page 21: ...er It converts the digital signals from the computer to analog audio for sending over the phone line and vice versa Provider A communications business that offers Internet connection services In order...

Page 22: ...E COPYRIGHT OWNER OR CONTRIBUTORS BE LIABLE FOR ANY DIRECT INDIRECT INCIDENTAL SPECIAL EXEMPLARY OR CONSEQUENTIAL DAMAGES INCLUDING BUT NOT LIMITED TO PROCUREMENT OF SUBSTITUTE GOODS OR SERVICES LOSS...

Reviews: