background image

EAU00000

INTRODUCTION

Congratulations on your purchase of the Yamaha XVS1100/XVS1100A. This model
is the result of Yamaha’s vast experience in the production of fine sporting, touring,
and pacesetting racing machines. It represents the high degree of craftsmanship
and reliability that have made Yamaha a leader in these fields.

This manual will give you an understanding of the operation, inspection, and basic
maintenance of this motorcycle. If you have any questions about the operation or
maintenance of your motorcycle, please consult a Yamaha dealer.

E_5ks.book  Page 1  Wednesday, August 23, 2000  6:35 PM

Summary of Contents for 2001 V Star XVS1100AM

Page 1: ...PRINTED IN JAPAN 2000 4 0 3 1 CR E PRINTED ON RECYCLED PAPER YAMAHA MOTOR CO LTD 5KS 28199 21 XVS1100M XVS1100AM OWNER S MANUAL ...

Page 2: ...F_5eb_Toc0 fm Page 2 Wednesday February 2 2000 2 02 PM ...

Page 3: ...racing machines It represents the high degree of craftsmanship and reliability that have made Yamaha a leader in these fields This manual will give you an understanding of the operation inspection and basic maintenance of this motorcycle If you have any questions about the operation or maintenance of your motorcycle please consult a Yamaha dealer E_5ks book Page 1 Wednesday August 23 2000 6 35 PM ...

Page 4: ... be taken to avoid damage to the motorcycle NOTE A NOTE provides key information to make procedures easier or clearer NOTE This manual should be considered a permanent part of this motorcycle and should remain with it even if the motorcycle is subsequently sold Yamaha continually seeks advancements in product design and quality Therefore while this manual contains the most current product informat...

Page 5: ...IMPORTANT MANUAL INFORMATION EW000002 WARNING PLEASE READ THIS MANUAL CAREFULLY AND COMPLETELY BEFORE OPERATING THIS MOTORCYCLE E_5ks book Page 2 Wednesday August 23 2000 6 35 PM ...

Page 6: ...R S MANUAL 2000 by Yamaha Motor Co Ltd 1st Edition April 2000 All rights reserved Any reprinting or unauthorized use without the written permission of Yamaha Motor Co Ltd is expressly prohibited Printed in Japan E_5ks book Page 3 Wednesday August 23 2000 6 35 PM ...

Page 7: ...ND CONTROL FUNCTIONS 3 4 PRE OPERATION CHECKS 4 5 OPERATION AND IMPORTANT RIDING POINTS 5 6 PERIODIC MAINTENANCE AND MINOR REPAIR 6 7 MOTORCYCLE CARE AND STORAGE 7 8 SPECIFICATIONS 8 9 CONSUMER INFORMATION 9 INDEX EAU00009 E_5ks book Page 1 Wednesday August 23 2000 6 35 PM ...

Page 8: ...E_5ks book Page 2 Wednesday August 23 2000 6 35 PM ...

Page 9: ...ORMATION 1 Safe riding 1 1 Protective apparel 1 3 Modification 1 3 Loading and accessories 1 3 Gasoline and exhaust gas 1 5 Location of the important labels 1 7 E_5ks book Page 1 Wednesday August 23 2000 6 35 PM ...

Page 10: ...BY MECHANICAL CONDITIONS Safe riding 1 Always make pre operation checks Careful checks may help prevent an accident 2 This motorcycle is designed to carry the operator and a passenger 3 The failure of motorists to detect and recognize motorcycles in traffic is the predominating cause of automobile motorcycle accidents Many accidents have been caused by an automobile driver who did not see the moto...

Page 11: ...ficient lean angle for the speed a Always obey the speed limits and never travel faster than warranted by road and traffic condi tions b Always signal before turning or changing lanes Make sure other motorists see you 6 The operator s and passenger s posture are important for proper control a The operator should keep both hands on the handlebars and both feet on the operator footrests during opera...

Page 12: ...become very hot and can cause burns Always wear protective clothing that covers your legs ankles and feet 6 A passenger should also observe the above precautions Modification Modifications made to the motorcycle not approved by Yamaha or the removal of original equipment may render your motorcycle unsafe for use and may cause severe personal injury Modifications may also make your motorcycle illeg...

Page 13: ...ems in cluding such cargo as sleeping bags duffle bags or tents can create unstable handling or slow steering response Accessories Genuine Yamaha accessories have been specifically designed for use on this motorcycle Since Yamaha cannot test all other accessories which may be available you must personally be responsible for the proper selection installation and use of non Yamaha accessories You sh...

Page 14: ...bility Therefore such accessories are not recommended 2 Caution must be used if adding electrical accessories If these accessories exceed the capacity of the motorcycle s electrical system an electric failure could result which could cause a dangerous loss of lights or engine power Gasoline and exhaust gas 1 GASOLINE IS HIGHLY FLAMMABLE a Always turn off the engine when refueling b Take care not t...

Page 15: ...ycle could catch fire 4 When transporting the motorcycle in another vehicle be sure it is kept upright and that the fuel cock is turned to ON or RES for vacuum type OFF for manual type If it should lean over gasoline may leak out of the carburetor or fuel tank 5 If you should swallow any gasoline inhale a lot of gasoline vapor or allow gasoline to get in your eyes see your doctor immediately If an...

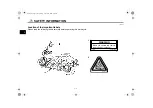
Page 16: ...he important labels Please read the following labels carefully before operating this motorcycle WARNING Before you operate this vehicle read the owner s manual English 3HP 21568 00 4AA 22259 40 1 2 E_5ks book Page 7 Wednesday August 23 2000 6 35 PM ...

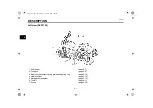
Page 17: ...DESCRIPTION 2 Left view XVS1100 2 1 Right view XVS1100 2 2 Left view XVS1100A 2 3 Right view XVS1100A 2 4 Controls Instruments XVS1100 XVS1100A 2 5 E_5ks book Page 1 Wednesday August 23 2000 6 35 PM ...

Page 18: ...Shift pedal page 3 5 2 Fuel cock page 3 8 3 Rear shock absorber spring preload adjusting ring page 3 14 4 Helmet holder page 3 12 5 Storage compartment page 3 13 6 Tool kit page 6 1 7 Fuses page 6 25 E_5ks book Page 1 Wednesday August 23 2000 6 35 PM ...

Page 19: ...ht view XVS1100 8 Oil filter page 6 9 9 Battery page 6 23 10 Main fuse page 6 25 11 Main switch steering lock page 3 1 12 Air filter page 6 10 13 Rear brake pedal page 3 6 E_5ks book Page 2 Wednesday August 23 2000 6 35 PM ...

Page 20: ... pedal page 3 5 2 Fuel cock page 3 8 3 Rear shock absorber spring preload adjusting ring page 3 14 4 Helmet holder page 3 12 5 Storage compartment page 3 13 6 Tool kit page 6 1 7 Fuses page 6 25 E_5ks book Page 3 Wednesday August 23 2000 6 35 PM ...

Page 21: ...ht view XVS1100A 8 Oil filter page 6 9 9 Battery page 6 23 10 Main fuse page 6 25 11 Main switch steering lock page 3 1 12 Air filter page 6 10 13 Rear brake pedal page 3 6 E_5ks book Page 4 Wednesday August 23 2000 6 35 PM ...

Page 22: ... lever page 3 5 2 Left handlebar switches page 3 3 3 Starter choke page 3 9 4 Speedometer page 3 3 5 Fuel tank cap page 3 7 6 Right handlebar switches page 3 4 7 Throttle grip page 6 12 8 Front brake lever page 3 6 E_5ks book Page 5 Wednesday August 23 2000 6 35 PM ...

Page 23: ... Front brake lever 3 6 Rear brake pedal 3 6 Fuel tank cap 3 7 Fuel 3 7 Fuel cock 3 8 Starter choke 3 9 Seats XVS1100 3 10 Seats XVS1100A 3 11 Helmet holder 3 12 Storage compartment 3 13 Rear shock absorber adjustment 3 14 Luggage strap holders 3 17 Sidestand 3 17 Sidestand clutch switch operation check 3 17 E_5ks book Page 1 Wednesday August 23 2000 6 35 PM ...

Page 24: ...0 LOCK The steering is locked in this position and all electrical circuits are switched off The key can be removed in this po sition To lock the steering turn the handle bars all the way to the left While push ing the key into the main switch turn it from OFF to LOCK and remove it To release the lock turn the key to OFF while pushing EW000016 WARNING Never turn the key to OFF or LOCK when the moto...

Page 25: ...when the transmission is in neutral EAU00057 Turn indicator light This indicator flashes when the turn switch is moved to the left or right EAU01672 Engine trouble indicator light This indicator light will come on or flash if trouble occurs in a monitoring circuit In such a case take the motorcycle to a Yamaha dealer to have the self diag nostic systems checked To check that the engine trouble ind...

Page 26: ...ush it once again and hold it down for at least one second NOTE This motorcycle does not have a ta chometer However it is equipped with an engine speed limiter which pre vents the engine speed from exceed ing approximately 6 800 r min and the vehicle from exceeding a top riding speed of approximately 175 km h EAU00118 Handlebar switches EAU00127 Turn signal switch To signal a right hand turn push ...

Page 27: ...or cranks the engine when pushing the start switch EC000005 CAUTION See starting instructions prior to starting the engine EAU00138 Engine stop switch The engine stop switch is a safety de vice for use in an emergency such as when the motorcycle overturns or if trouble occurs in the throttle system Turn the switch to to start the en gine In case of emergency turn the switch to to stop the engine 1...

Page 28: ... clutch The lever should be pulled rapidly and released slowly for smooth clutch oper ation Refer to the engine starting pro cedures for a description of the ignition circuit cut off system EAU00157 Shift pedal This motorcycle is equipped with a con stant mesh 5 speed transmission The shift pedal is located on the left side of the engine and is used in com bination with the clutch when shifting 1 ...

Page 29: ...t handlebar Pull it toward the han dlebar to apply the front brake EAU00162 Rear brake pedal The rear brake pedal is on the right side of the motorcycle Press down on the brake pedal to apply the rear brake 1 Rear brake pedal XVS1100 1 Rear brake pedal XVS1100A E_5ks book Page 6 Wednesday August 23 2000 6 35 PM ...

Page 30: ...osed unless the key is in the lock The key cannot be removed if the cap is not locked properly EW000023 WARNING Be sure the cap is properly installed and locked in place before riding the motorcycle EAU01183 Fuel Make sure there is sufficient fuel in the tank Fill the fuel tank to the bottom of the filler tube as shown in the illustra tion EW000130 WARNING Do not overfill the fuel tank Avoid spill...

Page 31: ...n in the il lustrations OFF With the fuel cock in this position fuel will not flow Always set the fuel cock to this position when the engine is not running ON With the fuel cock in this position fuel flows to the carburetors Set the fuel cock to this position when starting the engine and while riding Recommended fuel Regular gasoline For Australia Unleaded fuel only Fuel tank capacity Total 17 L R...

Page 32: ...ixture A separate starter cir cuit supplies this mixture Move in direction a to turn on the starter choke Move in direction b to turn off the starter choke ECA00038 CAUTION Do not use the starter choke for more than 3 minutes as the exhaust pipe may discolor from excessive heat Also longer use of the starter choke will cause afterburning If af terburning occurs turn off the starter choke 1 Pointed...

Page 33: ...o install Insert the projection on the front of the seat into the seat holder and install the nut Rider seat To remove Remove the passenger seat Then re move the bolts and bracket and pull the seat upward 1 Nut XVS1100 1 Projection 2 Seat holder XVS1100 1 Bolt 2 2 Bracket XVS1100 E_5ks book Page 10 Wednesday August 23 2000 6 35 PM ...

Page 34: ...ts 3 Install the passenger seat NOTE Make sure that the seats are securely fitted EAU01888 Seats XVS1100A Passenger seat To remove Remove the bolt and pull the seat up ward To install Insert the projection on the front of the seat into the holder and install the bolt 1 Projection 2 2 Seat holder 2 XVS1100 1 Bolt XVS1100A 1 Projection 2 Seat holder XVS1100A E_5ks book Page 11 Wednesday August 23 20...

Page 35: ... sure that the seats are securely fitted EAU00260 Helmet holder To open the helmet holder insert the key in the lock and turn it as shown To lock the helmet holder replace the holder in its original position EW000030 WARNING Never ride with a helmet in the hel met holder The helmet may hit ob jects causing loss of control and possibly an accident 1 Bolt XVS1100A 1 Projection 2 2 Seat holder 2 XVS1...

Page 36: ...tment is located on the left side of the motorcycle To open Slide the lock cover open insert the key in the lock and turn it clockwise Then pull the storage compartment cover out as shown 1 Compartment cover 2 Lock 1 Storage compartment E_5ks book Page 13 Wednesday August 23 2000 6 35 PM ...

Page 37: ...bsorber is located under the rider seat This shock absorber is equipped with a spring preload adjust ing ring Adjust spring preload as fol lows 1 Remove the rider seat See page 3 10 XVS1100 or 3 12 XVS1100A for removal and in stallation procedures 2 Remove each quick fastener by pushing the center in with a screw driver then pulling the fastener out 1 Storage compartment 1 Quick fastener 3 E_5ks b...

Page 38: ...he ignitor unit panel outward to the right 4 Remove the mud guard by remov ing each quick fastener 1 Ignitor unit panel 1 Quick fastener 3 2 Mud guard XVS1100 1 Quick fastener 2 2 Mud guard XVS1100A E_5ks book Page 15 Wednesday August 23 2000 6 35 PM ...

Page 39: ...eat EAU00315 WARNING This shock absorber contains high ly pressurized nitrogen gas Read and understand the following infor mation before handling the shock absorber The manufacturer cannot be held responsible for property damage or personal injury that may result from improper handling Do not tamper with or attempt to open the cylinder assembly Do not subject the shock ab sorber to an open flame o...

Page 40: ...tor re sulting in a possible loss of control Yamaha has designed into this mo torcycle a lockout system to assist the operator in fulfilling the respon sibility of retracting the sidestand Please check carefully the operating instructions listed below and if there is any indication of a malfunction return the motorcycle to a Yamaha dealer immediately for repair EAU00331 Sidestand clutch switch ope...

Page 41: ...OL FUNCTIONS 3 18 3 CD 11E EW000045 WARNING If improper operation is noted con sult a Yamaha dealer immediately SIDESTAND IS DOWN ENGINE WILL STALL SIDESTAND SWITCH IS OK E_5ks book Page 18 Wednesday August 23 2000 6 35 PM ...

Page 42: ...E_5ks book Page 19 Wednesday August 23 2000 6 35 PM ...

Page 43: ...PRE OPERATION CHECKS 4 Pre operation check list 4 1 E_5ks book Page 1 Wednesday August 23 2000 6 35 PM ...

Page 44: ...rake Check operation free play fluid level and vehicle for fluid leakage Fill with DOT 4 brake fluid if necessary 6 17 6 20 Clutch Check operation condition and free play Adjust if necessary 6 15 Throttle grip and housing Check for smooth operation Lubricate if necessary 6 12 Engine oil Check oil level Fill with oil if necessary 6 7 6 9 Final gear oil Check vehicle for leakage 6 9 6 10 Wheels and ...

Page 45: ...t inspected and repaired before op erating the motorcycle The engine and exhaust system will be very hot after the engine has been run Be careful not to touch them or to allow any clothing item to contact them during inspection or repair Chassis fasteners Make sure that all nuts bolts and screws are properly tightened Tighten if necessary Fuel Check fuel level Fill with fuel if necessary 3 7 3 8 L...

Page 46: ...E_5ks book Page 3 Wednesday August 23 2000 6 35 PM ...

Page 47: ...NT RIDING POINTS 5 Starting and warming up a cold engine 5 1 Starting a warm engine 5 4 Shifting 5 5 Tips for reducing fuel consumption 5 6 Engine break in 5 6 Parking 5 7 E_5ks book Page 1 Wednesday August 23 2000 6 35 PM ...

Page 48: ...ion Before starting out always be sure the sidestand is up Failure to retract the sidestand com pletely can result in a serious accident when you try to turn a corner EAU01715 Starting and warming up a cold engine NOTE This motorcycle is equipped with an ig nition circuit cut off system The engine can be started only under one of the following conditions The transmission is in neutral The sidestan...

Page 49: ...EUTRAL AND SIDESTAND IS DOWN PUSH THE START SWITCH ENGINE WILL START RETRACT SIDESTAND AND PUT TRANSMISSION IN GEAR IF TRANSMISSION IS IN GEAR AND SIDESTAND IS UP PULL IN THE CLUTCH LEVER AND PUSH THE START SWITCH ENGINE WILL START MOTORCYCLE CAN BE RIDDEN MOTORCYCLE CAN BE RIDDEN E_5ks book Page 2 Wednesday August 23 2000 6 35 PM ...

Page 50: ...gain Each attempt should be as short as possible to preserve the bat tery Do not crank the engine more than 10 seconds on any one attempt ECA00023 CAUTION The oil level indicator light should come on for 2 to 3 seconds when the main switch is turned to ON and then should go off If the indicator light flickers or remains on immedi ately stop the engine and check the engine oil level and for oil lea...

Page 51: ...d with a cold engine 7 After warming up the engine turn off the starter choke completely NOTE The engine is warm when it responds normally to the throttle with the starter choke turned off EAU01258 Starting a warm engine The starter choke is not required when the engine is warm EC000046 CAUTION See the Engine break in section prior to operating the motorcycle for the first time E_5ks book Page 4 W...

Page 52: ...n raise the pedal slightly EC000048 CAUTION Do not coast for long periods with the engine off and do not tow the motorcycle a long dis tance Even with gears in neu tral the transmission is only properly lubricated when the engine is running Inadequate lubrication may damage the transmission Always use the clutch when changing gears The engine transmission and driveline are not designed to withstan...

Page 53: ...f your motorcycle than the period between zero and 1 600 km For this reason we ask that you carefully read the following material Because the engine is brand new you must not put an excessive load on it for the first 1 600 km The various parts in the en gine wear and polish themselves to the correct operating clearances During this period prolonged full throttle oper ation or any condition which m...

Page 54: ...y Turn the fuel cock to OFF whenever stopping the engine EW000058 WARNING The exhaust system is hot Park the motorcycle in a place where pedes trians or children are not likely to touch the motorcycle Do not park the motorcycle on a slope or soft ground the motorcycle may over turn E_5ks book Page 7 Wednesday August 23 2000 6 35 PM ...

Page 55: ...ake pedal height adjustment 6 17 Brake light switch adjustment 6 17 Checking the front and rear brake pads 6 18 Inspecting the brake fluid level 6 19 Brake fluid replacement 6 20 Cable inspection and lubrication 6 20 Throttle cable and grip lubrication 6 20 Brake and shift pedal lubrication 6 21 Brake and clutch lever lubrication 6 21 Sidestand lubrication 6 21 Front fork inspection 6 22 Steering ...

Page 56: ...cle service this work should be done by a Yamaha dealer EAU01129 Tool kit The tool kit is located inside the storage compartment See page 3 13 for com partment opening procedures The tools provided in the owner s tool kit are to assist you in the performance of pe riodic maintenance However some other tools such as a torque wrench are also necessary to perform the mainte nance correctly The servic...

Page 57: ...ter element Clean or replace if necessary 6 Clutch Check operation Adjust or replace cable 7 Front brake Check operation fluid level and vehicle for fluid leakage See NOTE on page 6 4 Correct accordingly Replace brake pads if necessary 8 Rear brake Check operation fluid level and vehicle for fluid leakage See NOTE on page 6 4 Correct accordingly Replace brake pads if necessary 9 Wheels Check balan...

Page 58: ... are properly tightened Tighten if necessary 15 Sidestand Check operation Lubricate and repair if necessary 16 Sidestand switch Check operation Replace if necessary 17 Front fork Check operation and for oil leakage Correct accordingly 18 Rear shock absorber assembly Check operation and shock absorber for oil leakage Replace shock absorber assembly if necessary 19 Carburetors Check engine idling sp...

Page 59: ...vice Regularly check and if necessary correct the brake fluid level Every two years replace the internal components of the brake master cylinder and caliper and change the brake fluid Replace the brake hoses every four years and if cracked or damaged 21 Engine oil filter element Replace 22 Final gear oil Check oil level and vehicle for oil leakage Change oil at initial 1 000 km and thereafter ever...

Page 60: ...me of the mainte nance described in this chapter Refer to this section each time the panel has to be removed or installed EAU00491 Panel A To remove Remove the bolt and pull outward on the areas shown To install Place the panel in its original position and install the bolt 1 Panel A 1 Bolt E_5ks book Page 5 Wednesday August 23 2000 6 35 PM ...

Page 61: ...lectrode The ideal color at this point is a medium to light tan color for a motorcycle that is being ridden normal ly If one spark plug shows a distinctly different color there could be some thing wrong with the engine Do not attempt to diagnose such prob lems yourself Instead take the motor cycle to a Yamaha dealer You should periodically remove and inspect the spark plugs because heat and deposi...

Page 62: ... tight Have the spark plug tightened to the specified torque as soon as possible 4 Install the spark plug caps and the cylinder head covers EAU01712 Engine oil Oil level inspection 1 Place the motorcycle on a level place and hold it in an upright posi tion Warm up the engine for sev eral minutes NOTE Be sure the motorcycle is positioned straight up when checking the oil level A slight tilt toward ...

Page 63: ...r the engine and remove the oil filler cap 3 Remove the drain bolt and drain the oil 4 Reinstall the drain bolt and tighten it to the specified torque 5 Fill the engine with sufficient rec ommended oil Install the oil filler cap and tighten it EC000066 CAUTION Do not put in any chemical addi tives Engine oil also lubricates the clutch and additives could cause clutch slippage Be sure no foreign ma...

Page 64: ...02943 Final gear oil EW000066 WARNING Do not let foreign material enter the final gear case Be sure oil does not get on the tire or wheel Oil level inspection 1 Place the motorcycle on a level place and hold it in an upright posi tion The engine should be cool at ambient temperature 2 Remove the oil filler bolt and check the oil level The oil level should be at the brim of the filler hole Add the ...

Page 65: ...requently if you are riding in un usually wet or dusty areas 1 Remove the air filter case cover by removing the screws 2 Remove the air filter 3 Tap the air filter lightly to remove most of the dust and dirt Blow out the remaining dirt with com pressed air as shown If the air fil ter is damaged replace it Final gear case capacity 0 2 L Recommended oil SAE 80 API GL 4 Hypoid gear oil If desired an ...

Page 66: ...aha dealer who has the professional knowledge and experience to do so However the idle speed may be adjusted by the owner as part of routine maintenance EC000095 CAUTION The carburetors were set at the Yamaha factory after many tests If they are changed poor engine per formance and damage may result EAU00633 Idle speed adjustment NOTE A diagnostic tachometer must be used for this procedure 1 Attac...

Page 67: ...able free play inspection There should be a free play of 4 6 mm at the throttle grip If the free play is incorrect ask a Yamaha dealer to make this adjustment EAU00637 Valve clearance adjustment The correct valve clearance changes with use resulting in improper fuel air supply or engine noise To prevent this the valve clearance must be adjusted regularly This adjustment however should be left to a...

Page 68: ... and dis tribute the weight evenly from side to side Properly adjust the suspen sion for your load and check the condition and pressure of your tires NEVER OVERLOAD YOUR MOTOR CYCLE Make sure the total weight of the cargo rider passenger and accessories fairing saddlebags etc if approved for this model does not exceed the maximum load of the motorcycle Operation of an over loaded motorcycle could ...

Page 69: ...heel parts replacement should also be left to a Yamaha dealer Patching a punctured tube is not recommended If it is abso lutely necessary to do so use great care and replace the tube as soon as possible with a good quality replacement 1 Side wall 2 Wear indicator a Tread depth FRONT XVS1100 Manufacturer Size Type Bridgestone 110 90 18 61S EXEDRA L309 Dunlop 110 90 18 61S K555F REAR XVS1100 Manufac...

Page 70: ...n poor performance adverse han dling characteristics and short ened tire life Ride at moderate speeds after changing a tire since the tire sur face must first be broken in for it to develop its optimal characteristics EAU00692 Clutch lever free play adjustment The clutch lever free play should be ad justed to 5 10 mm If the free play is incorrect adjust as follows 1 Loosen the locknut 2 Turn the a...

Page 71: ... Check the brake lever free play Be sure the brake is working properly A soft or spongy feeling in the brake lever can indicate the presence of air in the brake sys tem This air must be removed by bleeding the brake system before the motorcycle is operat ed Air in the system will cause greatly diminished braking ca pability and can result in loss of control and an accident Have a Yamaha dealer ins...

Page 72: ...ability and can result in loss of control and an accident Have a Yamaha dealer inspect and bleed the system if necessary EAU00713 Brake light switch adjustment The rear brake light switch is activated by the brake pedal and is properly ad justed when the brake light comes on just before braking takes effect To ad just the rear brake light switch hold the switch body so it does not rotate while tur...

Page 73: ...indicator groove which allows check ing the brake pad for wear without dis assembling the brake Inspect each wear indicator groove and as soon as one of them has almost worn away ask a Yamaha dealer to replace the brake pads as a set 1 Wear indicator groove 1 Wear indicator groove E_5ks book Page 18 Wednesday August 23 2000 6 35 PM ...

Page 74: ...ise the rubber seals may deteriorate causing leakage and poor brake perfor mance Refill with the same type of brake fluid Mixing fluids may result in a harmful chemical reaction and lead to poor brake performance Be careful that water does not en ter the master cylinder when refill ing Water will significantly lower the boiling point of the fluid and may result in vapor lock Brake fluid may deteri...

Page 75: ...t Replace damaged cables as soon as possible to prevent unsafe condi tions Lubricate the cables and cable ends If a cable does not operate smoothly ask a Yamaha dealer to replace it EAU00773 Throttle cable and grip lubrication The throttle twist grip assembly should be greased at the time that the cable is lubricated since the grip must be re moved to get at the end of the throttle cable After rem...

Page 76: ... EAU02986 Sidestand lubrication Lubricate the sidestand pivoting point and metal to metal contact surfaces Check that the sidestand moves up and down smoothly EW000113 WARNING If the sidestand does not move smoothly consult a Yamaha dealer Recommended lubricant Engine oil Recommended lubricant Engine oil Recommended lubricant Engine oil E_5ks book Page 21 Wednesday August 23 2000 6 35 PM ...

Page 77: ...ds smoothly EC000098 CAUTION If any damage or unsmooth move ment is found with the front fork consult a Yamaha dealer EAU00794 Steering inspection Periodically inspect the condition of the steering Worn out or loose steering bearings may be dangerous Place a stand under the engine to raise the front wheel off the ground Hold the lower end of the front forks and try to move them forward and backwar...

Page 78: ...t periodically EC000101 CAUTION Never try to remove the sealing caps of the battery cells The battery will be damaged EW000116 WARNING Battery electrolyte is poisonous and dangerous causing severe burns etc It contains sulfuric acid Avoid contact with skin eyes or clothing ANTIDOTE EXTERNAL Flush with water INTERNAL Drink large quanti ties of water or milk Follow with milk of magnesia beaten egg o...

Page 79: ... storing Storing a discharged battery can cause permanent battery damage Use a battery charger designed for a sealed type MF battery Using a conventional battery charger will cause battery dam age If you do not have a sealed type battery charger contact your Yamaha dealer Always make sure the connec tions are correct when reinstall ing the battery 1 Positive terminal 2 Negative terminal E_5ks book...

Page 80: ...age 3 10 XVS1100 or 3 12 XVS1100A for removal and in stallation procedures 2 Remove each quick fastener by pushing the center in with a screw driver then pulling the fastener out 1 Odometer fuse 2 Ignition fuse 3 Headlight fuse 4 Carburetor heater fuse 5 Spare fuse 3 6 Signaling system fuse Specified fuses Odometer fuse 5 A Ignition fuse 10 A Headlight fuse 15 A Carburetor heater fuse 15 A Signali...

Page 81: ...ing than those recommend ed Substitution of a fuse of improper rating can cause extensive electrical system damage and pos sibly a fire 4 Place the ignitor unit panel in the original position and install the quick fasteners NOTE When installing a quick fastener push its pin back so that it will protrude from the fastener head then insert the fas tener and push the protruding pin in un til it is fl...

Page 82: ...ands away from a bulb while it is on as it is hot Do not touch a bulb until it cools down 4 Put a new bulb into position and secure it in place with the bulb holder EC000105 CAUTION Avoid touching the glass part of a bulb Keep it free from oil other wise the transparency of the glass life of the bulb and luminous flux will be adversely affected If oil gets on a bulb thoroughly clean it with a clot...

Page 83: ...rd and turn it counterclockwise 3 Place a new bulb in the socket Push the bulb inward and turn it clockwise until it engages into the socket 4 Install the lens and the screws EC000108 CAUTION Do not over tighten the screws as the lens may break 1 Screw 2 1 Screw 2 XVS1100 1 Screw 3 XVS1100A XVS1100A E_5ks book Page 28 Wednesday August 23 2000 6 35 PM ...

Page 84: ...ing chart describes a quick easy procedure for making checks If your motorcycle requires any repair bring it to a Yamaha dealer The skilled technicians at a Yamaha dealership have the tools experience and know how to properly service your motorcy cle Use only genuine Yamaha parts on your motorcycle Imitation parts may look like Yamaha parts but they are of ten inferior Consequently they have a sho...

Page 85: ...on check Ask a Yamaha dealer to inspect Remove spark plugs and check electrodes 3 Ignition Wet Dry Wipe clean with dry cloth and correct spark gap or replace spark plugs Ask a Yamaha dealer to inspect Engine doesn t start go to battery check Open throttle half way and start the engine Use the electric starter 4 Battery Engine turns over quickly Engine turns over slowly Battery good Check connectio...

Page 86: ...E_5ks book Page 31 Wednesday August 23 2000 6 35 PM ...

Page 87: ...MOTORCYCLE CARE AND STORAGE 7 Care 7 1 Storage 7 4 E_5ks book Page 1 Wednesday August 23 2000 6 35 PM ...

Page 88: ...autions Before cleaning 1 Cover up the muffler outlets with plastic bags 2 Make sure that all caps and covers as well as all electrical couplers and connectors including the spark plug caps are tightly in stalled 3 Remove extremely stubborn dirt like oil burnt onto the crankcase with a degreasing agent and a brush but never apply such prod ucts onto seals gaskets and wheel axles Always rinse the d...

Page 89: ...ers since they cause water seepage and deterioration in the following ar eas seals of wheel bearings swingarm bearings forks and brakes electric components couplers connectors instru ments switches and lights breather hoses and vents For motorcycles equipped with a windshield Do not use strong cleaners or hard sponges as they will cause dulling or scratching Some cleaning compounds for plastic may...

Page 90: ... and nickel plated metal surfaces 4 Use spray oil as a universal clean er to remove any remaining dirt 5 Touch up minor paint damage caused by stones etc 6 Wax all painted surfaces 7 Let the motorcycle dry completely before storing it or covering it EWA00001 WARNING Make sure that there is no oil or wax on the brakes and tires If neces sary clean the brake discs and lin ings with a regular brake d...

Page 91: ... the fuel cock to OFF 4 Fill up the fuel tank and add fuel stabilizer if available to prevent the fuel tank from rusting and the fuel from deteriorating 5 Perform the following steps to pro tect the cylinders piston rings etc from corrosion a Remove the spark plug caps and spark plugs b Pour a teaspoonful of engine oil into each spark plug bore c Install the spark plug caps onto the spark plugs an...

Page 92: ...Cover up the muffler outlets with plastic bags to prevent moisture from entering 9 Remove the battery and fully charge it Store it in a cool dry place and recharge it once a month Do not store the battery in an excessively cold or warm place less than 0 C or more than 30 C For more information see Battery storage in the chapter PERIODIC MAINTENANCE AND MINOR REPAIRS NOTE Make any necessary repairs...

Page 93: ...SPECIFICATIONS 8 Specifications 8 1 HOW TO USE THE CONVERSION TABLE 8 6 E_5ks book Page 1 Wednesday August 23 2000 6 35 PM ...

Page 94: ...45 mm Ground clearance 145 mm Minimum turning radius 3 300 mm Basic weight with oil and full fuel tank XVS1100 274 kg XVS1100A 288 kg Engine Engine type Air cooled 4 stroke SOHC Cylinder arrangement V type 2 cylinder Displacement 1 063 cm3 Bore stroke 95 0 75 0 mm Compression ratio 8 3 1 Starting system Electric starter Lubrication system Wet sump Engine oil Type Recommended engine oil classificat...

Page 95: ...ed Energy Conserving contain anti friction additives which will cause clutch and or starter clutch slippage resulting in reduced component life and poor engine performance Spark plug Type manufacturer BPR7ES NGK or W22EPR U DENSO Gap 0 7 0 8 mm Clutch type Wet multiple disc Transmission Primary reduction system Spur gear Primary reduction ratio 1 660 Secondary reduction system Shaft drive Secondar...

Page 96: ...f cm2 2 25 bar Rear 250 kPa 2 50 kgf cm2 2 50 bar Load is total weight of cargo rider passenger and accessories XVS1100A Front Type Tube Size 130 90 16 67S Manufacturer model Dunlop D404F Rear Type Tube Size 170 80 15 M C 77S Manufacturer model Dunlop D404G Maximum load 201 kg Air pressure cold tire Up to 90 kg load Front 225 kPa 2 25 kgf cm2 2 25 bar Rear 225 kPa 2 25 kgf cm2 2 25 bar 90 kg load ...

Page 97: ...ght foot operation Fluid DOT 4 Suspension Front Type Telescopic fork Rear Type Swingarm link suspension Shock absorber Front Coil spring oil damper Rear Coil spring gas oil damper spring preload adjustable Wheel travel Front 140 mm Rear 113 mm Electrical Ignition system T C I digital Charging system Type A C magneto Standard output 14 V 350 W 5 000 r min Battery Type GT14B 4 Voltage capacity 12 V ...

Page 98: ...vel indicator light 12 V 1 7 W 1 Neutral indicator light 12 V 1 7 W 1 Turn indicator light 12 V 1 7 W 1 Engine trouble indicator light 12 V 1 7 W 1 High beam indicator light 12 V 1 7 W 1 Fuses Main fuse 30 A Signaling system fuse 10 A Odometer fuse 5 A Ignition fuse 10 A Headlight fuse 15 A Carburetor heater fuse 15 A E_5ks book Page 5 Wednesday August 23 2000 6 35 PM ...

Page 99: ...PERIAL Metric unit Multiplier Imperial unit Torque m kg m kg cm kg cm kg 7 233 86 794 0 0723 0 8679 ft lb in lb ft lb in lb Weight kg g 2 205 0 03527 lb oz Speed km hr 0 6214 mph Distance km m m cm mm 0 6214 3 281 1 094 0 3937 0 03937 mi ft yd in in Volume Capacity cc cm3 cc cm3 lt liter lt liter 0 03527 0 06102 0 8799 0 2199 oz IMP liq cu in qt IMP liq gal IMP liq Misc kg mm kg cm2 Centigrade C 5...

Page 100: ...E_5ks book Page 7 Wednesday August 23 2000 6 35 PM ...

Page 101: ...NFORMATION 9 Identification number records 9 1 Key identification number 9 1 Vehicle identification number 9 1 Model label 9 2 Noise regulation For Australia 9 2 E_5ks book Page 1 Wednesday August 23 2000 6 35 PM ...

Page 102: ...1E EAU01041 Key identification number The key identification number is stamped on the key tag Record this number in the space provided and use it for reference when obtaining a new key EAU01043 Vehicle identification number The vehicle identification number is stamped into the steering head pipe Record this number in the space pro vided NOTE The vehicle identification number is used to identify yo...

Page 103: ... NOISE CON TROL SYSTEM PROHIBITED Owners are warned that the law may prohibit a The removal or rendering inopera tive by any person other than for purposes of maintenance repair or replacement of any device or element of design incorporated into any new vehicle for the pur pose of noise control prior to its sale or delivery to the ultimate pur chaser or while it is in use and b The use of the vehi...

Page 104: ...ght bulb replacement 6 27 Helmet holder 3 12 High beam indicator light 3 2 Horn switch 3 4 How to use the conversion table 8 6 I Identification number records 9 1 Idle speed adjustment 6 11 Indicator lights 3 2 Engine trouble indicator light 3 2 High beam indicator light 3 2 Neutral indicator light 3 2 Oil level indicator light 3 2 Turn indicator light 3 2 Inspecting the brake fluid level 6 19 K K...

Page 105: ...ngine 5 4 Start switch 3 4 Steering inspection 6 22 Storage 7 4 Storage compartment 3 13 T Throttle cable and grip lubrication 6 20 Throttle cable free play inspection 6 12 Tips for reducing fuel consumption 5 6 Tires 6 13 Tool kit 6 1 Troubleshooting 6 29 Troubleshooting chart 6 30 Turn indicator light 3 2 Turn signal and taillight bulb replacement 6 28 Turn signal switch 3 3 V Valve clearance ad...

Page 106: ...F_5eb_Toc0 fm Page 2 Wednesday February 2 2000 2 02 PM ...

Page 107: ...F_5eb_Toc0 fm Page 2 Wednesday February 2 2000 2 02 PM ...

Page 108: ...PRINTED IN JAPAN 2000 4 0 3 1 CR E PRINTED ON RECYCLED PAPER YAMAHA MOTOR CO LTD 5KS 28199 21 XVS1100M XVS1100AM OWNER S MANUAL ...

Reviews: