7
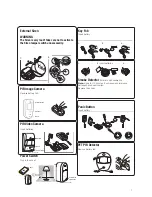
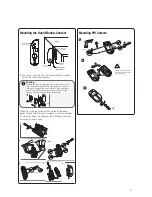
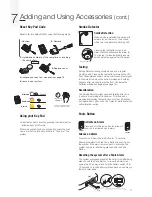
External Siren
WARNING
The Siren is very loud! Take care not to activate
the Siren tamper switch unnecessarily.
Remove battery tab.
Insert batteries
Plug in to socket.
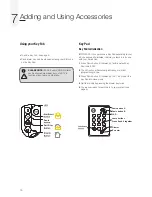
Key Fob
Insert battery
Smoke Detector
Enter into self-calibration
Note:
mode for 10 minutes. It will resume normal once
batteries have been inserted.
Replace the cover.
Panic Button
Insert battery
Learn/Test button
Camera
Flash light
Learn: Hold for 10 seconds
Test: Hold for 1 second
On/Off, Test &
Learn button
Learn: Hold for 10 seconds
Power On/Off: Press & release
Test: Press & release
Power Switch
ale
Y
Status
LED
Learn/Test button
Cover
screw
(21)
7
1
3
4
5
2
6
a
a
a
b
b
b
c
d
(GB) Installation - (IT) Installazione - (DE) Installation - (NO) Installasjon - (SE) Installation -
(DK) Installation.
Ø 5mm
(21)
7
1
3
4
5
2
6
a
a
a
b
b
b
c
d
(GB) Installation - (IT) Installazione - (DE) Installation - (NO) Installasjon - (SE) Installation -
(DK) Installation.
Ø 5mm
(GB) Installation - (IT) Installazione - (DE) Installation - (NO) Installasjon - (SE) Installation -
(DK) Installation.
Remove battery strips
(1
Test your planned location of components
(2
Test location for radio signal strength
(4
Press button to test connection
(3
(11)
(1 (IT) Rimuovi la linguetta della batteria - (DE) Entfernen der Batteriefolie - (NO) Fjern plastbeskyttelsen på batteriet
(SE) Ta bort batterifliken - (DK) Fjern batteri-strimmel
(2 (IT) Verifica la posizione scelta per i dispositivi - (DE) Testen Sie den geplanten Standort -
(NO) Test plasseringen av komponenten - (SE) Testa tilltänkta placeringen av sensorerna -
(DK) Test komponent placering
(3 (IT) Premere il pulsante per verificare la connessione - (DE) Drücken Sie den Knopf um die Verbindung zu testen
(NO) Trykk på knappen for å teste forbindelse - (SE) Tryck på knappen för att testa kopplingen -
(DK) Tryk knap for test af forbindelse.
(4 (IT) Verifica la connessione nella posizione prescelta - (DE) Testen Sie den Ort für die Stärke des Signals -
(NO) Test plassering i forhold til stabilitet av de trådløse signalene - (SE) Testa radiosignalens styrka -
(DK) Test placering for god trådløs forbindelse
8 9
5
6
Camera
Flash light
Learn/Test button
Learn: Hold for 10 seconds
Test: Hold for 1 second
SR-SD
SR-PB
(GB) Changing batteries - (IT) Sostituzione batterie - (DE) Batteriewechsel - (NO) Batteribytte -
(SE) Batteribyte - (DK) Batteriskift.
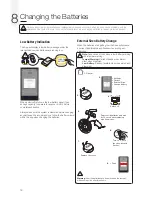
(23)
3 x 1.5v AA
CR 2032
SR-KF
CR 2032
3 x 1.5v AA
SR-PVC
(Lithium)
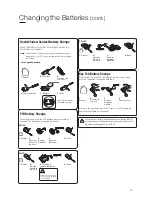
1.
2.
SR-SD
SR-PB
(GB) Changing batteries - (IT) Sostituzione batterie - (DE) Batteriewechsel - (NO) Batteribytte -
(SE) Batteribyte - (DK) Batteriskift.
(23)
3 x 1.5v AA
CR 2032
SR-KF
CR 2032
3 x 1.5v AA
SR-PVC
(Lithium)
1.
2.
3.
SR-SD
SR-PB
(GB) Changing batteries - (IT) Sostituzione batterie - (DE) Batteriewechsel - (NO) Batteribytte -
(SE) Batteribyte - (DK) Batteriskift.
(23)
3 x 1.5v AA
CR 2032
SR-KF
CR 2032
3 x 1.5v AA
SR-PVC
(Lithium)
1.
3.
PIR Image Camera
ON / OFF
On/Off, Test &
Learn button
Learn: Hold for 10 seconds
Power On/Off: Press & release
Test: Press & release
(GB) Installation - (IT) Installazione - (DE) Installation - (NO) Installasjon - (SE) Installation -
(DK) Installation.
Remove battery strips
(1
Test your planned location of components
(2
Test location for radio signal strength
(4
Press button to test connection
(3
(11)
(1 (IT) Rimuovi la linguetta della batteria - (DE) Entfernen der Batteriefolie - (NO) Fjern plastbeskyttelsen på batteriet
(SE) Ta bort batterifliken - (DK) Fjern batteri-strimmel
(2 (IT) Verifica la posizione scelta per i dispositivi - (DE) Testen Sie den geplanten Standort -
(NO) Test plasseringen av komponenten - (SE) Testa tilltänkta placeringen av sensorerna -
(DK) Test komponent placering
(3 (IT) Premere il pulsante per verificare la connessione - (DE) Drücken Sie den Knopf um die Verbindung zu testen
(NO) Trykk på knappen for å teste forbindelse - (SE) Tryck på knappen för att testa kopplingen -
(DK) Tryk knap for test af forbindelse.
(4 (IT) Verifica la connessione nella posizione prescelta - (DE) Testen Sie den Ort für die Stärke des Signals -
(NO) Test plassering i forhold til stabilitet av de trådløse signalene - (SE) Testa radiosignalens styrka -
(DK) Test placering for god trådløs forbindelse
8 9
5
6
PET PIR Detector
Remove battery tab.
2.
Insert batteries
PIR Video Camera


