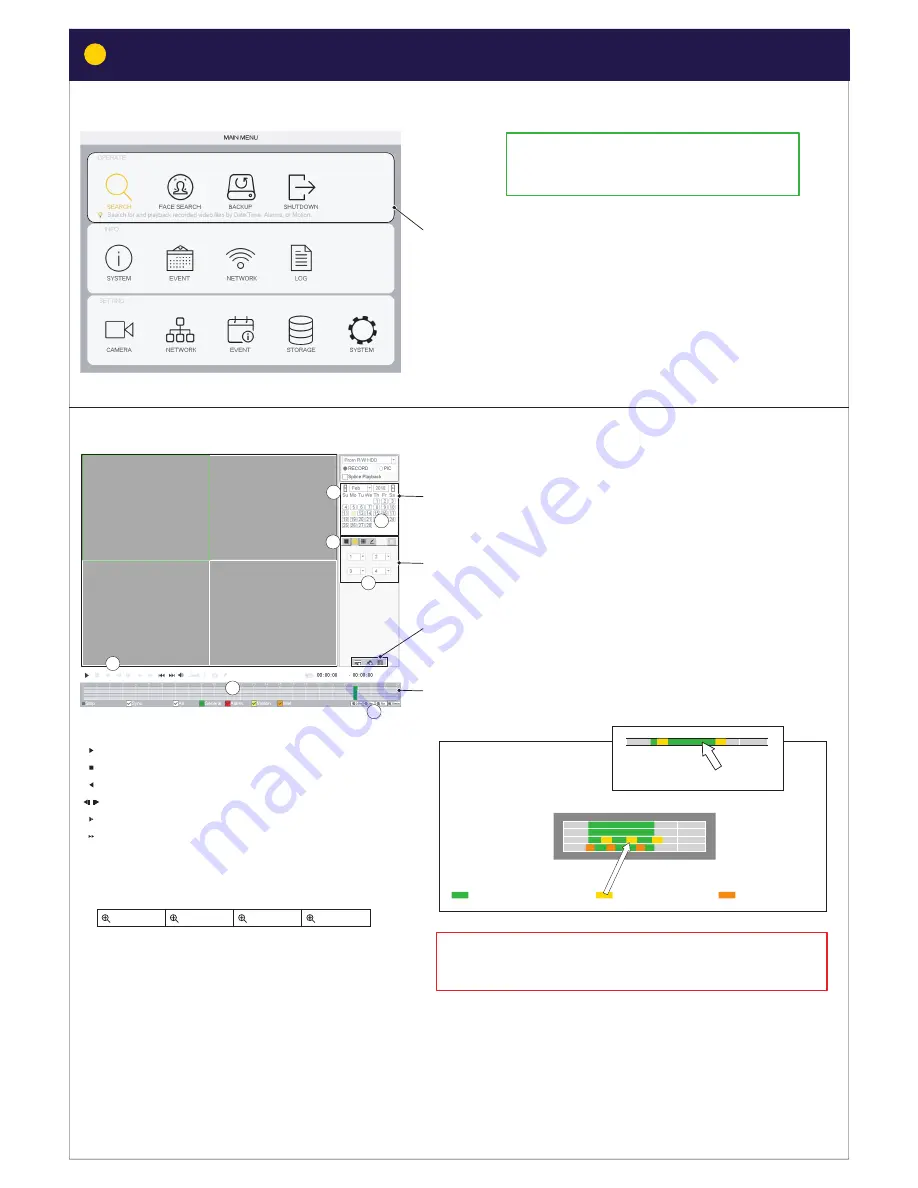
Yale Smart Living SV-4C-2ABFX Operation Manual Download Page 16

OPERATE: 

How to find a recording:
1) 

Select

 YEAR and Month.


2) 

Select

 Day.


Set up display:
3) 

Select

 1/4/9 

channel view. 

4) 

Select


which 

channels to watch.


(A) SEARCH

: Search for and playback recorded video by 

Date and Time. 

(B) FACE SEARCH

: Search and playback recorded video by 

face detection. (If feature is applied)

BACKUP

: Plan backup of recorded video, to external 

media (Extenal HDD og USB memory).

SHUTDOWN

:  Shutdown / Logout / Reboot

24 hour timeline:
5) 

Click timeline to view recording. 


List of recordings by type, 

R

egular / 

M

D / 

I

VS(INTEL):

Select Channel at top. Doubelt click to start listed recording. 

(A) SEARCH

Channel 1

Channel 2

Channel 3

Channel 4

6) 

Controls for play back:

        Play 
        Stop
        Play (backwards)
        One frame steps (Only when paused)
        Slow Playback (x1/2 / x1/4 / x1/8 x / x1/16)
        Fast Playback (x2 / x4 / x8 / x16)

10

9

11

12

13

14

7) 

Zoom timeline:

Channel 1 

/ 5

Channel 2 

/ 6

Channel 3 

/ 7

Channel 4 

/ 8

Timeline:

General

 = Regular

Motion

 = MD

Intel

 = IVS

Click to start video

24hr

2hr

1hr

30min

1

2

3

4

5

6

7

When you have setup your system, this menu 

is where you can find video recordings to 

investigate or document events.

No changes can be made in the Search window while video 
is playing. Stop video to change parameters.

16

Searching in recorded video by Time/Date, Motion detection, Face detection

Searching in recorded video

7

Summary of Contents for Smart Living SV-4C-2ABFX

Page 1: ...al will guide you through the standard settings and operations for normal Residential CCTV usage The system is based on a professional system and may contain advanced features and settings that are ty...

Page 2: ...tration in the App It is better to have the App ready before starting the setup of the system Initial setup Wired Kit WiFi Kit Menu overwiev Setting up recording and motion detection Searching in reco...

Page 3: ...with your Kit Plan the camera location HDMI Router Not included Nicht enthalten Non inclusa Non inclus No incluido HDMI Router Not included Nicht enthalten Non inclusa Non inclus No incluido HDMI VGA...

Page 4: ...App App Log in page Initial setup 1 Click Registr r After registration initial setup you open from this page E mail Register page Initial setup 2 Enter username 3 Enter password 4 Enter email 5 Click...

Page 5: ...e mail address and complete security Questions These are optional and can be switched OFF by un ticking boxes 7 Security Questions 9 As default leave Auto check for update ticked This will automatical...

Page 6: ...ick NEXT 15 Click NEXT 16 Click OK 12 Click NEXT Initial setup for system with wired cameras The App needs to be installed and registered before scanning The DVR system is now turned ON and cameras ar...

Page 7: ...gain to confirm Draw unlock pattern 6 write e mail address and complete security Questions These are optional and can be switched OFF by un ticking boxes 7 Security Questions 9 As default leave Auto c...

Page 8: ...the Yale Quick guide included in the box with the DVR unit 13 If you have WiFi cameras in your Kit wiereless camera click YES 11 Click Refresh to update Network connection 12 Click Next 08 Initial set...

Page 9: ...are all connected to power and camera Ethernet cables are connected to the same router as the DVR system 17 Click Next 19 Click Next 18 Leave box ticked and all cameras will have the same password as...

Page 10: ...uter network 24 Click Connect 25 Click OK You can now unplug the ethernet network cable from your WiFi camera It is now wirelessly connected to your router Camera power can be unplugged and then plugg...

Page 11: ...Initial setup for system with WiFi cameras The DVR system is now turned ON and cameras are recording System is as default running in Regular Mode which means that cameras are recording 24 hours a day...

Page 12: ...sts of events motion detection Network List of Network activities LOG List of operations changes to the system CAMERA General camera setting Network General network setting EVENT Personal settings for...

Page 13: ...ng as planned Buzzer can be activate to test motion detection 6 When all Channels have been planned and applied click Save Click Default will take you back to factory setting A Click STORAGE Setting u...

Page 14: ...be activate to test motion detection 4 Go to CAMERA menu CHANNEL TYPE Click Cancel IP CAM The WiFi cameras already installed if any will not be affected System will now reboot 1 2 3 4 5 6 7 9 8 C IVS...

Page 15: ...Channels have been set and applied click Save Buzzer can be activate to test motion detection Click Default will take you back to factory setting 1 2 3 4 5 D FACE DETECT Face detection is usefull at...

Page 16: ...oubelt click to start listed recording A SEARCH Channel 1 Channel 2 Channel 3 Channel 4 6 Controls for play back Play Stop Play backwards One frame steps Only when paused Slow Playback x1 2 x1 4 x1 8...

Page 17: ...SEARCH will show a picture taken of the face shape captured by the camera SEARCH by Year Month Date 17 Searching in recorded video by Time Date Motion detection Face detection Searching in recorded vi...

Page 18: ...4 Click start time Click end time Click to go to backup media Backup sequence 17 00 00 20 50 00 1 2 3 Channel 1 Extenal storage media HDD or a USB memorystick need to be plugged in to USB back of unit...

Page 19: ...other consumer locking solution THE ASSA ABLOY GROUP is the world s leading manufacturer and supplier of locking solutions dedicated to satisfying end user needs for security safety and convenience An...

Reviews: