background image

5

Confirm the location of a Group Member station in real time

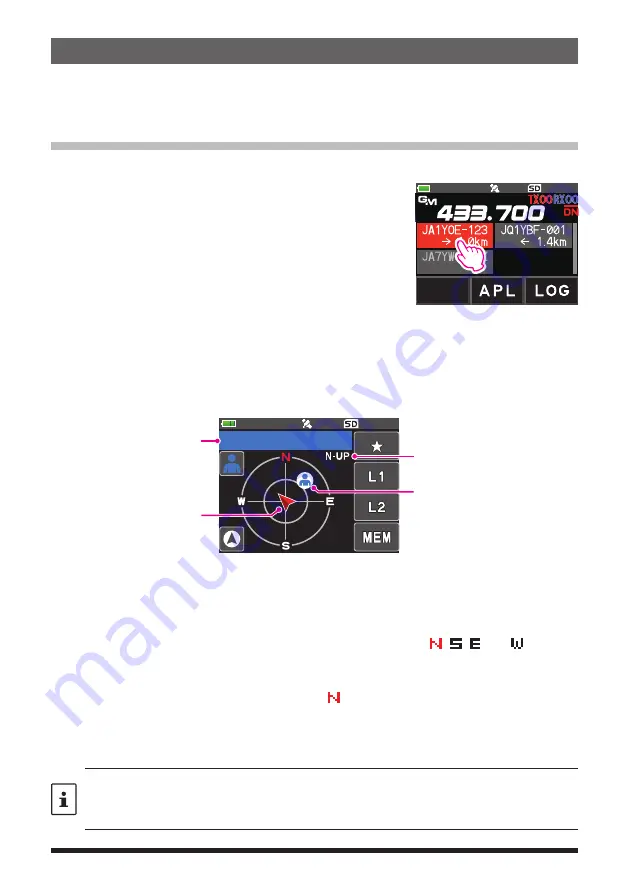
The position of the selected member can be confirmed in real time on the compass 
screen.
The member's current position may be registered as the navigation destination.

Display the position of the member station on the compass screen

1.  Press the [

GM

] key.

2.  Touch the station for which you want to display location 

information.

3.  Press the [

DISP

] key.

If the GPS information screen is displayed, touch the compass display to switch to 
the navigation display screen.
The call sign and direction, distance, and heading of the selected partner station are 
displayed.

JA1YOE-123

1.0km

Callsign and distance to

partner station

Progress direction of

own station

Direction of remote station

H-UP: Heading Up

N-UP: North Up


z

Switch the compass screen display method

Press and hold the [

DISP

] key 

 touch [

DISPLAY

 [

2 COMPASS

], select the 

screen display method (direction toward the top of the screen) from “HEADING UP” 
or “NORTH UP”. The default setting is “HEADING UP”.

HEADING UP:

 The compass circle indicates the direction ( ,  ,   and  ) you are 

heading. The arrow indicates the direction toward your partner sta-
tion.

NORTH UP:

  Always displays the north ( ) on the top. The arrow indicates the di-

rection you are heading. 


z

Disable the Compass screen display

1.  Press the [

DISP

] key.

•  You cannot update the location information of the partner stations outside of 

communication range.

•  If your station or your partner stations do not set the location information manually or 

capture it from the GPS satellite signals, the compass display is not available.

Summary of Contents for FT3DR

Page 1: ...C4FM FM 144 430MHz DUAL BAND DIGITAL TRANSCEIVER FT3DR FT3DE Instruction Manual GM Edition...

Page 2: ...reen 5 Registering the Location Information of a Partner Station 6 Checking Received Messages and Images 7 Sending massages or images 9 Creating and sending a new message 9 Using Standard Messages 10...

Page 3: ...displayed and you can check each other s position distance and moving direction You can also use GM functions to send data such as messages and images with your friends When the GM function is activat...

Page 4: ...GM key The callsign distance and direction of all stations up to 24 within the communi cation range operating with the GM function on the designated frequency in DN V D mode are displayed The call sig...

Page 5: ...on are displayed on the APL screen The displayed sta tions are listed on the right side of the screen with the first six characters of the callsign and the dis tance from your own station Display addi...

Page 6: ...s direction of own station Direction of remote station H UP Heading Up N UP North Up z z Switch the compass screen display method Press and hold the DISP key touch DISPLAY 2 COMPASS select the screen...

Page 7: ...u can register the current position of the selected member and then navigate toward that station 1 Touch MEM in step 3 of Display the position of the partner station on the compass screen page 5 L1 an...

Page 8: ...G list indicate the following Message received unread Message received read Message sent Message failed to send Image received unread Image received read Image sent Image failed to send Image taken wi...

Page 9: ...ender of the downloaded message or image data Refer to Replying to the Sender of the Checked Message or Image Data page 12 Touch DEL to display DELETE Touch OK then touch OK to delete the information...

Page 10: ...the checked message or image data 4 Sending your snapshot images Creating and sending a new message Create and send a new message 1 Press the GM key 2 Touch LOG 3 Touch MESSAGE Displays the LOG list...

Page 11: ...ge The address designation to is merely for displaying ALL or the call sign of a specific station In other words even if you specify a call sign for to to send a message other stations operating GM on...

Page 12: ...messages Registered texts can be selected and used like the 19 standard messages that have been saved as default 1 Follow steps 1 to 6 in Creating and sending a new message on page 9 to dis play the...

Page 13: ...e MESSAGE PICT data Forwarding the Checked Message or Image Data After reviewing the message or image data you may forward the data to other members 1 Select the information MESSSAGE or PICT to check...

Page 14: ...ch PICT Displays the list of images saved on the micro SD memory card JA1YOE 123 06 02 JA1YOE 123 05 24 JA1YOE 123 03 14 JA1YOE 123 02 14 JA1YOE 123 16 24 4 Touch the image you want to send Displays t...

Page 15: ...The DP ID function uses this individual ID information When communicating with another transceiver if the DP IDs of the sta tions are registered in both transceivers they can communicate even though t...

Page 16: ...without the permission of YAESU MUSEN CO LTD YAESU MUSEN CO LTD Tennozu Parkside Building 2 5 8 Higashi Shinagawa Shinagawa ku Tokyo 140 0002 Japan YAESU USA 6125 Phyllis Drive Cypress CA 90630 U S A...

Reviews: