ALIGNMENT-10
Alignment
S
UB
S-
METER
One dot
S-1
S-5
S-7
S-9
S-9+10dB
S-9+20dB
S-9+30dB
S-9+40dB
S-9+50dB
S-9+60dB
A
LIGNMENT
P
ARAMETER
C11 S-0
C12 S-1
C13 S-5
C14 S-7
C15 S-9
C16 S10
C17 S20
C18 S30
C19 S40
C20 S50
C21 S60
RF S
IGNAL
G
ENERATOR
9 dB
μ
12 dB
μ
24 dB
μ
30 dB
μ
36 dB
μ
46 dB
μ
56 dB
μ
66 dB
μ
76 dB
μ
86 dB
μ
96 dB
μ
Noise Blanker Circuit Adjustment
Set the following controls as indicated:
[ANT 1/2] button: ANT 1
[IPO] button: AMP1
[ATT] button: OFF
[AGC] button: “Sub band (VFO-B)”AUTO
[NB] button: “Sub band (VFO-B)” ON
(for short-duration pulse noise)
[NB] knob: Fully clockwise
[RF GAIN] knob: Fully clockwise
[SUB RX] button: ON
Set the Sub Band (VFO-B) frequency to 14.200
MHz in the CW mode.
Connect the DC voltmeter to TP4505 on the RX-2
Unit.
Connect the RF Signal Generator to the “ANT 1”
jack, then set the output level to 30 dB
μ
at the
14.200 MHz.
Adjust T4508 and T4512 on the RX-2 Unit for
minimum deflection on the DC voltmeter.
Turn the Sub band´s (VFO-B) NB to “OFF” by
pressing the [B] button followed by the [NB] but-
ton.
IF Gain Adjustment
Set the following controls as indicated:
[ANT 1/2] button: ANT 1
[IPO] button: AMP1
[ATT] button: OFF
[AGC] button: “Sub band (VFO-B)”AUTO
[PITCH] knob: 700 Hz
[RF GAIN] knob: Fully clockwise
[SUB RX] button: ON
Connect the AC millivoltmeter and 4 Ohm
dummy load to the EXT SP jack.
Connect the RF Signal Generator to the “ANT 1”
jack, then set the output level to 36 dB
μ
at the
1.900 MHz.
Set the Sub Band (VFO-B) frequency to 1.900 MHz
in the CW mode.
Press and hold in the [1(1.8)], [2(3.5)], and [3(7)]
keys, while turning the radio on, to enter the
alignment mode.
Adjust the Sub [AF GAIN] knob so that the AC
millivoltmeter reading is “0 dB.”
Select the appropriate “Alignment Parameter”
using the Main Tuning Dial knob per the chart
below, then set the RF Signal Generator output
to each listed level, and adjust the [SUB(VFO-B)]
knob for the corresponding AC millivoltmeter
reading at each frequency.
Press and hold in the [MENU] button for 2 sec-
onds to save the new setting and exit from the
alignment mode.
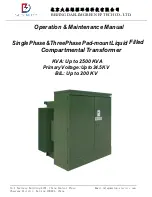
S-meter Adjustment
Set the following controls as indicated:
[ANT 1/2] button: ANT 1
[IPO] button: AMP1
[ATT] button: OFF
[AGC] button: “Sub band (VFO-B)”AUTO
[RF GAIN] knob: Fully clockwise
[SUB RX] button: ON
Connect the RF Signal Generator to the “ANT 1”
jack, then set the frequency to 14.200 MHz.
Set the Sub Band (VFO-B) frequency to 14.200
MHz in the CW mode.
Press and hold in the [1(1.8)], [2(3.5)], and [3(7)]
keys, while turning the radio on, to enter the
alignment mode.
Select the appropriate “Alignment Parameter”
using the Main Tuning Dial knob per the chart
below, then set the RF Signal Generator output
to each listed level, and adjust the [SUB(VFO-B)]
knob until the corresponding Sub S-meter indi-
cator just lights (i.e. Adjust to the lowest value of
each "S" unit range), then press the [ENT] key to
save the new setting at each frequency.
RF S
IGNAL
G
ENERATOR
1.900 MHz, 9 dB
μ
3.750 MHz, 9 dB
μ
7.150 MHz, 9 dB
μ
10.125 MHz, 9 dB
μ
14.175 MHz, 9 dB
μ
18.117 MHz, 9 dB
μ
21.255 MHz, 9 dB
μ
24.940 MHz, 9 dB
μ
28.850 MHz, 9 dB
μ
52.000 MHz, 9 dB
μ
A
LIGNMENT
P
ARAMETER
C01 iGn
C02 iGn
C03 iGn
C04 iGn
C05 iGn
C06 iGn
C07 iGn
C08 iGn
C09 iGn
C10 iGn
VFO-B F
REQUENCY
1.900 MHz
3.750 MHz
7.150 MHz
10.125 MHz
14.175 MHz
18.117 MHz
21.255 MHz
24.940 MHz
28.850 MHz
52.000 MHz
AC
MILLIVOLTMETER
–1.5 dB (±0.5 dB)
–1.5 dB (±0.5 dB)
–1.5 dB (±0.5 dB)
–1.5 dB (±0.5 dB)
–1.5 dB (±0.5 dB)
–1.5 dB (±0.5 dB)
–1.5 dB (±0.5 dB)
–1.5 dB (±0.5 dB)
–1.5 dB (±0.5 dB)
–1.5 dB (±0.5 dB)
Summary of Contents for FT-2000 - MENU MODE LIST
Page 4: ...Specifications Note SPECIFICATIONS 3...
Page 13: ...BLOCK DIAGRAM 1 Block Diagram...
Page 14: ...CONNECTION DIAGRAM 1 Connection Diagram...
Page 35: ...ALIGNMENT 21 Alignment PA A UNIT ALIGNMENT POINTS Pin 6 of J5402 TP5031 TP5032...
Page 36: ...ALIGNMENT 22 Alignment Note...
Page 37: ...MAIN 1 Circuit Diagram MAIN Unit Lot 1...
Page 38: ...MAIN 2 Note MAIN Unit Lot 1...
Page 40: ...MAIN 4 Parts Layout Side A a b c d e f g h i 1 2 3 4 5 6 7 MAIN Unit Lot 1...
Page 41: ...MAIN 5 MAIN Unit Lot 2 5 Circuit Diagram...
Page 42: ...MAIN 6 MAIN Unit Lot 2 5 Note...
Page 44: ...MAIN 8 MAIN Unit Lot 2 5 Parts Layout Side A a b c d e f g h i 1 2 3 4 5 6 7...
Page 45: ...MAIN 9 MAIN Unit Lot 6 Circuit Diagram...
Page 46: ...MAIN 10 MAIN Unit Lot 6 Note...
Page 48: ...MAIN 12 MAIN Unit Lot 6 Parts Layout Side A a b c d e f g h i 1 2 3 4 5 6 7...
Page 71: ...VRF 1 VRF Unit Circuit Diagram...
Page 77: ...BPF 1 BPF Unit Circuit Diagram...
Page 78: ...BPF 2 BPF Unit Parts Layout Side A Side B A B C 1 2 3 a b c 1 2 3...
Page 83: ...ANT 1 ANT Unit Circuit Diagram...
Page 84: ...ANT 2 ANT Unit Note...
Page 86: ...ANT 4 ANT Unit a b c d e f 1 2 Parts Layout Side B...
Page 91: ...CNTL 1 Circuit Diagram CNTL Unit Lot 1...
Page 92: ...CNTL 2 Note CNTL Unit Lot 1...
Page 94: ...CNTL 4 Parts Layout Side B a b c d e f g h i 1 2 3 4 CNTL Unit Lot 1...
Page 95: ...CNTL 5 CNTL Unit Lot 2 Circuit Diagram...
Page 96: ...CNTL 6 CNTL Unit Lot 2 Note...
Page 98: ...CNTL 8 CNTL Unit Lot 2 Parts Layout Side B a b c d e f g h i 1 2 3 4...
Page 107: ...LOCAL 1 LOCAL Unit Circuit Diagram...
Page 108: ...LOCAL 2 LOCAL Unit Note...
Page 110: ...LOCAL 4 LOCAL Unit a b c d e f g h 1 2 3 Parts Layout Side B...
Page 123: ...RX 2 1 Circuit Diagram RX 2 Unit Lot 1 4...
Page 124: ...RX 2 2 Note RX 2 Unit Lot 1 4...
Page 126: ...RX 2 4 Parts Layout Side B 1 2 3 a b c d e f RX 2 Unit Lot 1 4...
Page 127: ...RX 2 5 RX 2 Unit Lot 5 Circuit Diagram...
Page 128: ...RX 2 6 RX 2 Unit Lot 5 Note...
Page 130: ...RX 2 8 RX 2 Unit Lot 5 Parts Layout Side B 1 2 3 a b c d e f...
Page 139: ...PA A Unit PA A 1 Circuit Diagram...
Page 140: ...PA A 2 PA A Unit Note...
Page 142: ...PA A 4 PA A Unit Parts Layout Side B...
Page 149: ...TUNER MAIN 1 TUNER MAIN Unit Circuit Diagram...
Page 150: ...TUNER MAIN 2 TUNER MAIN Unit Note...
Page 152: ...TUNER MAIN 4 TUNER MAIN Unit Parts Layout Side B...
Page 157: ...TUNER CNTL 1 TUNER CNTL Unit Circuit Diagram...
Page 158: ...TUNER CNTL 2 TUNER CNTL Unit Note...
Page 160: ...TUNER CNTL 4 TUNER CNTL Unit Parts Layout Side B...
Page 163: ...DSP 1 DSP Unit Circuit Diagram...
Page 164: ...DSP 2 DSP Unit Note...
Page 166: ...DSP 4 DSP Unit Parts Layout Side B a b c d e 1 2 3...
Page 173: ...VR A 1 VR A Unit Circuit Diagram...
Page 174: ...VR A 2 VR A Unit Note...
Page 175: ...VR A 3 VR A Unit Parts Layout Side A BA05 Q Q8007 A 1 2 3 B C D E 4...
Page 179: ...VR B 1 VR B Unit Circuit Diagram...
Page 180: ...VR B 2 VR B Unit Parts Layout Side A Side B...
Page 183: ...SW A 1 SW A Unit Circuit Diagram...
Page 184: ...SW A 2 SW A Unit Note...
Page 185: ...SW A 3 SW A Unit Parts Layout Side A...
Page 186: ...SW A 4 SW A Unit Parts Layout Side B...
Page 189: ...MIC 1 MIC Unit Circuit Diagram...
Page 191: ...JACK 1 JACK Unit Circuit Diagram...
Page 193: ...KEY 1 KEY Unit Circuit Diagram...
Page 194: ...KEY 2 KEY Unit Note...
Page 195: ...KEY 3 KEY Unit Parts Layout Side A A B C D E F G H I 1 2 3...
Page 201: ...BACK LIGHT 1 BACK LIGHT Unit Circuit Diagram...
Page 204: ...F CONNECT 2 F CONNECT Unit Note...
Page 205: ......