background image

8

4.

5.

INSTALLATION

Plug the Mini-USB  
power cable into the 
DC input port.

Note:

 Power on and test camera before mounting.

Peel off the 
protective sticker 
from the LCD screen.

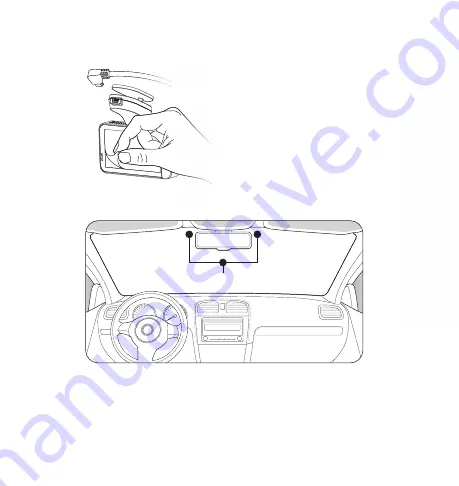
Mount the Roadcam on the windshield. You can turn on the Roadcam and 
check the live screen to determine the most suitable mounting position.

Warning: 

Do not install the product in a location where it can obstruct 

                 driver’s field of vision.

6.

Recommended mounting position

Summary of Contents for 4K Roadcam Pro

Page 1: ...4K ROADCAMPRO App Controlled User Manual Important retain for future reference Read carefully BT58189...

Page 2: ...2 QUICK INSTALLATION GUIDE 1 Mount the Roadcam Before you begin Gather these items 1 2 3 3 4 1 2 4...

Page 3: ...3 2 Connect to Power 3...

Page 4: ...warranty The installation instructions do not apply to all types of vehicles and are written as guidelines to assist in installing the system Consult an experienced technician if you are not comfortab...

Page 5: ...5 1 1 x 4K Roadcam Pro 2 1 x 3M VHB Windshield Mount 3 1 x 12V 24V Power Adapter 4 1 x 16GB MicroSD Card PACKAGE CONTENTS 2 1 3 4...

Page 6: ...5 Up WiFi and Down Microphone On Off Button 6 OK Record Snapshot Button 7 3M VHB Windshield Mount 8 Camera Lens 9 Rear View Camera Port Rear View Camera not Included Sold Separately 10 LED Indicator L...

Page 7: ...SIONS 3 47 88mm 1 47 37mm 1 96 50mm 1 2 3 INSTALLATION Insert the windshield mount to the socket on the top of the Roadcam Insert the MicroSD card Peel off the 3M VHB adhesive tape backer from the win...

Page 8: ...Peel off the protective sticker from the LCD screen Mount the Roadcam on the windshield You can turn on the Roadcam and check the live screen to determine the most suitable mounting position Warning D...

Page 9: ...windshield mount onto the windshield to secure the Roadcam in place 7 Route and hide the power cable in the headliner and pillars in your vehicle Plug the cigarette charger cable into your vehicle s...

Page 10: ...cording and press the M button to switch between modes Video Mode This is the default recording setting The Roadcam will start recording automatically once it is turned on Files are looped or recorded...

Page 11: ...ough all the media files Press the OK button to play video files and press it again to pause Press the M button to select file managing options Delete Select to erase the file Protect Select to protec...

Page 12: ...inutes or 1 minute Screen will dim to a digital clock interface after the specified time you select Frequency 50Hz or 60Hz USB Mode Power On Only or Mass Storage Beep Sound ON or OFF Boot Sound ON or...

Page 13: ...DING THE APP The 4K Roadcam Pro auto sync function enables you to control and play back recorded media files using your smartphone with the YADA Drive APP Scan below QR code or search YADA Drive in th...

Page 14: ...l search for Roadcam s SSID YADA_DVR04_4K_ xxxxxx and connects to Roadcam automatically 5 You should see the live view of Roadcam on the main interface if the connection is successful 1 Press the butt...

Page 15: ...Press WiFi Settings on the main interface when it prompts you to go to the WiFi settings page 5 On the WiFi settings page choose SSID YADA_DVR04_4K_xxxxxx and enter password 12345678 6 Tap on the YADA...

Page 16: ...Note The G Sensor supports sensitivity adjustment and it can be done in the video and camera settings page according to actual needs Battery Indications Please refer to the diagram below for battery...

Page 17: ...ll have a U1 logo 3 Problem During the playback of pictures and videos a file error message prompts Solution When a MicroSD card storage error or incomplete file occurred please use the camera s forma...

Page 18: ...ing cigarette lighter adapter 6 Make sure cord is carefully secured so that it will not be stepped on tripped over or otherwise subjected to damage or stress 7 Do not operate cigarette lighter adapter...

Page 19: ...vehicle visually with mirrors before proceeding The area displayed by the App Controlled 4K Roadcam Pro is limited The App Controlled 4K Roadcam Pro does not display objects that are out of the camer...

Page 20: ...ren are small and hard to see Parents caregivers and all adults need to be vigilant in supervising Never allow children to play with the device Small parts may be a choking hazard There is a plastic c...

Page 21: ...year from the date of original purchase Where permitted by law YADA s liability shall be limited to that set forth in this limited express warranty This limited express warranty shall be the exclusiv...

Page 22: ...YADA under this warranty are protected only for the unexpired portion of the original warranty 6 This is a repair or replace warranty only and does not cover the costs incurred for the installation r...

Page 23: ...TIES INCLUDING ANY IMPLIED WARRANTY OF MERCHANTABILITY OR FITNESS FOR A PARTICULAR PURPOSE YADA and or its affiliates do not guarantee or promise that the user of App Controlled 4K Roadcam Pro will no...

Page 24: ...ADA and or its affiliates shall have no responsibility or liability for damage and or injury resulting from accidents occurring with vehicles having the installed and YADA and or its affiliates the ma...

Page 25: ...alled and used in accordance with the instructions may cause harmful interference to radio or television reception which can be determined by turning the equipment or and on the user is encouraged to...

Page 26: ...ro BT58189 Responsible Party YADA 2975 Red Hill Ave Ste 100 Costa Mesa CA 92626 Tel 1 866 294 9244 3M VHB is a trademark of 3M Company Android is a trademark of Google Inc iPhone iPad Mac and iPod tou...

Page 27: ...ciales www letsyada com register letsyada Product code Code de produit C digo del producto BT58189 Please contact our customer service before returning this product to the store Our friendly represent...

Page 28: ...ML 58189_V1 2975 Red Hill Ave Ste 100 Costa Mesa CA 92626 1 866 294 9244 customercare horizon brands com 2021 ADC Solutions Auto LLC www letsyada com letsyada...

Reviews: