XYZ Printing da Vinci 1.1 Plus Quick Manual Download Page 11

V1

P 11

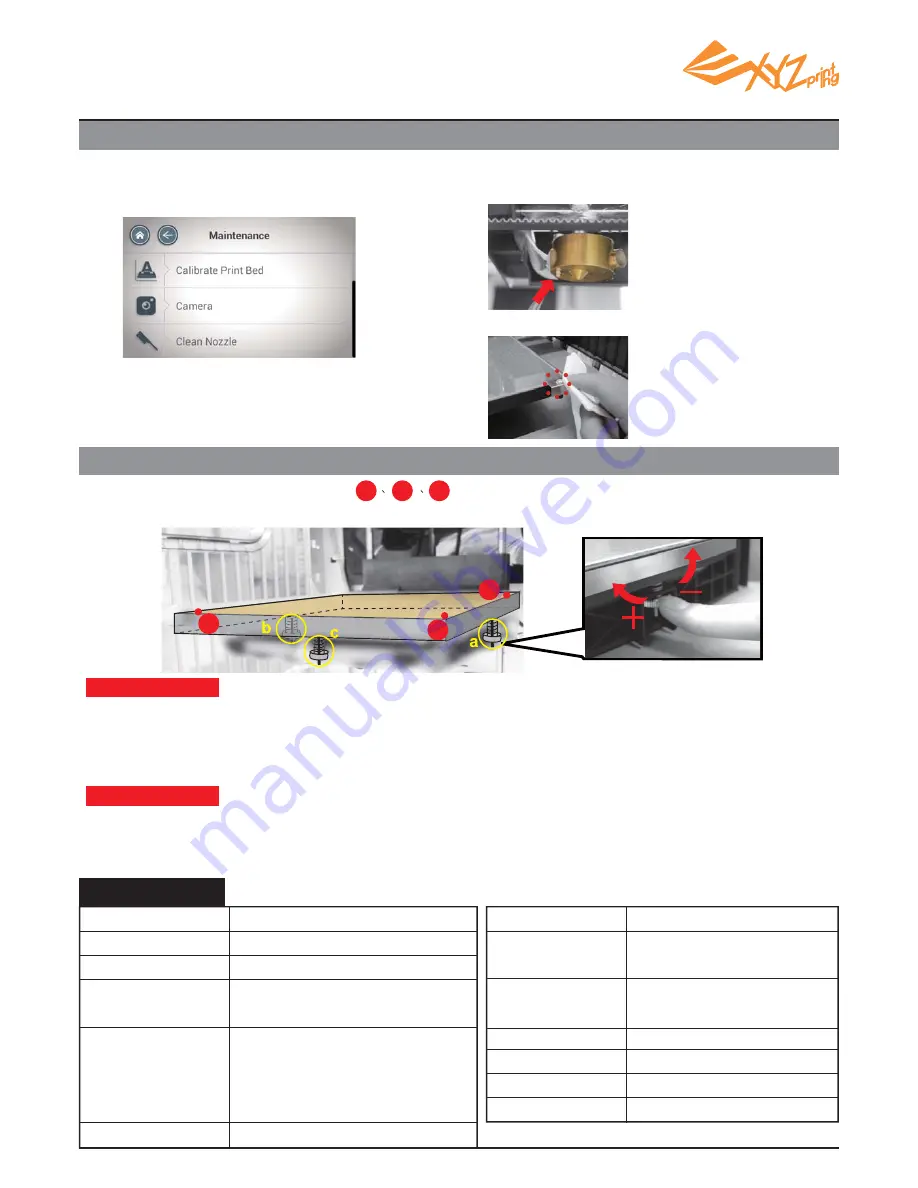
Activate " Setting" > "Printer Settings">

"Maintenance">"Clean Nozzle".

Select “Clean Nozzle” function, and brush the molten filament and dust from the detecting pin while the 

extruder is heated up.

Clean the detecting pin with the copper brush

• Turn clockwise to raise, turn counterclockwise to lower.
• Adjust screw a and b may offset the diagonal. (e.g. Left turn screw b will lead to the descendant of point 2.)
• Tuning the screw for a full circle will change the value by 0.5. A single push to the screw will change the  
  value by 0.2 to 0.25.

• Adjust the values to the 2.3-2.6 range.
• 3 values should be no more than ±0.2 from each other.

1.The value indicates the height of point                            ; greater value indicates the higher the detected point is.
2. Turn the 3 turning screws at location "a", "b", "c" under the print bed to level the platform.

5.Clean the detecting pin

6.Level the print bed

When fi nishing the adjustment, repeat the calibration from step 2 until it shows "Calibration Completed".

Clean the 3 measurement points

How to adjust :

Thumb of rules: 

Specifi cations

Model Name
Print Technology
Print Head
Build Volume 
(W x D x H)
Layer 
Resolution 
Setting

Filament Diameter

Nozzle Diameter
AC Input

Connectivity

Display
Control Method
Indicator
Weight

da Vinci 1.1 Plus 3D Printer
Fused Filament Fabrication(FFF)
Single Head
20 x 20 x 20 cm

Standard 200 microns
Speed 300 microns
Ultra fast 400 microns
Custom 100-400 microns
1.75mm

0.4mm
100 - 127V~4.0A  50/60Hz
200 - 240V~2.0A  50/60Hz
USB 2.0 / WiFi
LAN / USB Flash Drive
5" TFT LCD
Touch Panel
Speaker
27 Kg

P2

P3

P1

P2

P3

P1

Summary of Contents for da Vinci 1.1 Plus

Page 1: ...V1 P 1 da Vinci 1 1 Plus Quick Guide ENG 02 08 09 10 11 12 Product Manual XYZware Print Bed Leveling and Product Specification Support Details...

Page 2: ...s it may be hot and include moving parts Please keep the front door closed during printing to avoid injury Important Safety Instruction for Use of Maintenance Tools The maintenance tools provided shou...

Page 3: ...er and remove the cushions by the extruder Remove the tape on the print bed Remove the cardboard Remove the cardboard Remove the cushions by the print bed Remove the bottom screw and plastic piece und...

Page 4: ...the filament Network Status Display online status of Wi Fi or Ethernet network Settings View the printer status and system settings Function Guidelines Home menu basic operation introduction Print fr...

Page 5: ...ide hole please cut the tip of the filament off at a 45 angle with a cutting pliers filament loading will be easier Top cover Cartridge Guide Hole 1 Remove the filament stopper and tape 2 Install the...

Page 6: ...n the size of the printing object previewed on screen and press to print 1 2 4 6 3 5 Select Print Sample on the screen Select a sample to print and tap to print Remove the printed object when the prin...

Page 7: ...and switch among different categories tap on the desired model for a zoomed in preview Caution Before printing any model from any media always remember to apply glue to the printing area on the printi...

Page 8: ...the extruder module please first unload filament by following the steps above And then press on the black rubber fixers on either ends of the filament tube You may also follow the instructions on the...

Page 9: ...tly XYZware virtualizes the printing platform on the screen You may move rotate and resize the object s in the software and send the file for printing via USB flash drive or PC Note Some instruction a...

Page 10: ...low for detection or the pin measurement point is covered by molten plastic Unleveled print bed may affect printout quality Please level the printbed based on the value of P1 P2 and P3 Press and proce...

Page 11: ...r value indicates the higher the detected point is 2 Turn the 3 turning screws at location a b c under the print bed to level the platform 5 Clean the detecting pin 6 Level the print bed When finishin...

Page 12: ...Communications Commission FCC Statement You are cautioned that changes or modifications not expressly approved by the part responsible for compliance could void the user s authority to operate the equ...

Reviews: