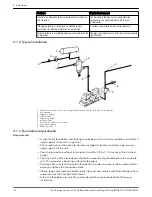
5. Check to make sure that the piping can be aligned to the pump flanges without
placing pipe strain on either flange.
6. Grout the baseplate. See “Grout the baseplate.”
4.1.5 Grout the baseplate
Required equipment:
• Cleaners: Do not use an oil-based cleaner because the grout will not bond to it. See
the instructions provided by the grout manufacturer.
• Grout: Non-shrink grout is required.
1. Clean all the areas of the baseplate that will come into contact with the grout.
2. Build a dam around the foundation.
3. Thoroughly wet the foundation that will come into contact with the grout.
4. Pour grout through the grout hole into the baseplate up to the level of the dam.
When you pour the grout, remove air bubbles from it by using one of these methods:
– Puddle with a vibrator.
– Pump the grout into place.
5. After the grout has thoroughly hardened, check the foundation bolts and tighten if
necessary. Check alignment after tightening the bolts.
6. After the grout has dried, apply an oil base paint to the exposed edges to prevent
moisture from coming in contact with the grout.
4.2 Coupling alignment
WARNING:
Always disconnect and lock out power to the driver before you perform any installation or
maintenance tasks. Failure to disconnect and lock out driver power will result in serious
physical injury.
Alignment guidelines
Follow these guidelines when you align the coupling:
• Only perform alignment by moving or shimming the motor.
• Make allowances for thermal expansion during cold alignment so that the coupling is
aligned at operating temperature.
• Since adjustments in one direction can alter the alignment in another direction, check
the alignment in all directions after you make a correction.
• Make sure that the pump and motor bolts are tight when you take all measurements.
• Perform a final alignment check after the unit reaches its final operating temperature.
• Make final alignment by moving and shimming the motor on the baseplate until the
coupling hubs are within the recommended tolerances measured in total runout.
NOTICE:
Follow shaft alignment procedures in order to prevent catastrophic failure of drive
components or unintended contact of rotating parts. Follow the coupling or v-belt drive
installation and operation procedures from the coupling or v-belt manufacturer.
4.2.1 Prepare for alignment
1. Check the pump and motor shafts and remove any paint, burrs, and rust.
2. Slide the hubs and bushings on the shafts with keys.
3. Hold one half element on the hubs in order to determine the appropriate hub spacing.
4. If you use spacer elements with high speed rings, hold both half elements on the hubs
in order to make sure the hubs do not interfere with the rings.
5. You can install the hubs with the hub extension facing in or out.
4 Installation
16
G&L Pumps Series A-C 8100 Base Mounted Centrifugal Pump INSTRUCTION MANUAL


