background image


- 2 -

SAFETY INFORMATION    


Installation Warnings 

Ventilation Slots and openings in the case are provided for ventilation to ensure reliable operation of the video 

product and to protect it from overheating. These openings must not the blocked or covered. The openings should 

never be blocked by placing the product on a bed, sofa, rug, or heat register. This product should not be placed in 

a built-in installation such as a bookcase or rack, unless proper ventilation is provided or the video product 

manufacturer instructions have been followed. 


Power Lines :

 An outside antenna system should not be located in the vicinity of overhead power lines, other 

electric light or power circuits, or where it can fall into such power lines or circuits. When installing an outside 

antenna system, extreme care should be taken to keep from touching or approaching such power lines or circuits, 

as contact with them might be fatal. Installing an outdoor antenna can be hazardous and should be left to a 

professional antenna installer. 


Lightning 

:For added protection for this product during a lightning storm, or when it is left unattended and 

unused for long periods of time, unplug it from the wall outlet and disconnect the antenna or cable system. This 

will prevent damage to the video product due to lightning and power line surges.   


Compulsory Warnings 

If the supply cord is damaged, it must be replaced by the manufacturer or its service agent, or a similarly qualified 

person, in order to avoid a hazard. This product has not been designed for any uses other than those specified in 

this booklet. 


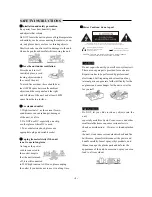
Laser Safety 

This compact disc player is classified as a CLASS 1 


Laser Product. 

Only qualified service personnel should remove the cover or attempt to service this device due to possible eye 

injury. Invisible laser radiation when open and interlock failed or defeated. 

Avoid direct exposure to beam. 


Summary of Contents for 5000

Page 1: ...Opera ng Instruc ons 5 1CH DIGITAL MPEG4 PLAYER Xwave 5000 Please read carefully before operation ...

Page 2: ...nsion AC as the current for air conditioners can cause danger damages of the unit or a fire 2 Do NOT use DC especially on a ship or other places where DC is used 3 To avoid electric shock please use appropriate plug and suitable socket Unplug from electricity if the unit is not to use in long term As long as the power cord is connected to the socket despite that the unit is turned off it is still ...

Page 3: ...roaching such power lines or circuits as contact with them might be fatal Installing an outdoor antenna can be hazardous and should be left to a professional antenna installer Lightning For added protection for this product during a lightning storm or when it is left unattended and unused for long periods of time unplug it from the wall outlet and disconnect the antenna or cable system This will p...

Page 4: ...14 17 Turning on the DVD system 14 Setting language preferences 14 On screen display OSD language 14 Audio Subtitle and Menu language for DVD playback 14 Setting the video display mode 16 Setting the subtitles in MPEG 4 17 DISC OPERATIONS 18 22 Playable discs 18 Region Codes for DVD discs 18 Playing a disc 18 Basic playback controls 19 Selecting various repeat functions 19 Other playback features ...

Page 5: ...ust not be exposed to dripping or splashing Do not place any sources of danger on the apparatus e g liquid filled objects lighted candles Accessories supplied Remote control with batteries AV cable User manual Warranty card Cleaning discs Some problems occur frozen picture sound disruptions picture distortions because the disc inside the unit is dirty To avoid these problems discs should be cleane...

Page 6: ...her disc Improper format discs will not able to be played How to deal with disc Highly data compaction is written in video CD That s why those discs require particular cautiousness and care when we touch them Take the CD disc in hands holding edge or through hole in the middle Do not touch the playback side of the disc by finger Do not perish or scratch this disc Do not put discs in places subject...

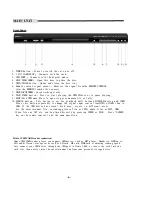
Page 7: ...hift between DVD USB device and CARD Press this button repeatedly to change the signal input source from DVD to CARD then to USB If the USB device has several disk area access to different areas are the entertainment file including picture file as JPEG audio files as MP3 WMA Video files as AVI etc can be played directly by pressing ENTER or PLAY Press SOURCE key on the remote control to do the sam...

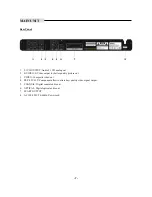
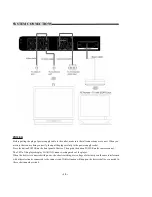
Page 8: ...EO S Video output for better quality picture out 3 VIDEO Composite video out 4 Pb Cb Pr Cr Y Component allow to attain best quality video signal output 5 COAXIAL Digital coaxial audio out 6 OPTICAL Digital optical audio out 7 SCART OUTPUT 8 AC 100 220V 50 60Hz Power cord ...

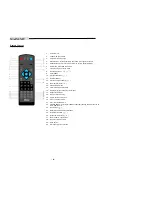
Page 9: ... Enter player setup menu 8 Direc on bu on 9 Enter bu on 10 Play Pause bu on 11 Number bu ons 12 Previous Skip backward 13 Next Skip forward 14 PBC VCD PBC menu 15 Slow Slow mo on playback 16 Display Display or hide play informa on 17 Repeat Repeat play 18 Open or close disc tray 19 Audio Switch audio track 20 VOL Increase volume 21 VOL Decrease volume 23 Stop bu on 24 Goto Play from the desired lo...

Page 10: ...be disposed of properly Basic instruction Cautions Be sure turn off power and unplug unit before connecting Different from other visual format DVD provides you wide visual option which allows on many devices from standard TV with stereophonic out to home cinema system with projector and all spatial and caustic possibilities Please read manual of every device carefully Do not place any objects or a...

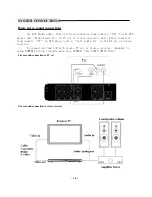
Page 11: ...Cable with red connector from sockets FR in the DVD player and Right Audio In in TV set or stereo receiver while white connector from sockets FL in DVD player and to Left Audio In in the TV set or stereo receiver In connection from L R with stereo TV set or stereo receiver remember to setup DOWNMIX status in Audio menu into STEREO See AUDIO SETUP Page ...

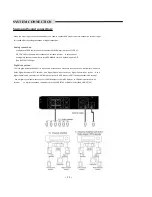
Page 12: ... to setup DOWNMIX status in Audio menu into OFF See AUDIO SETUP Page Digital connec on This is to get a be er audio effect To do this kind of connec on make sure that you have an AV receiver with built in Dolby Digital decoder or DTS decoder with Digital Op cal input socket or Digital Coaxial input socket Use a digital op cal cable connect from OPTICAL output socket in DVD player to OPTICAL input s...

Page 13: ...nd from S VIDEO output socket from DVD player to S VIDEO input socket in TV set or AV receiver Remember to press VIDEO SW on remote control to change to OFF status Or go to VIDEO SETUP PAGE to set the COMPONET as OFF SCART connection Use the 21pin Euro SCART cable to connect to DVD player and TV set to get a better video and audio signal together In case of SCART connection it is not necessary to ...

Page 14: ...t Press the button POWER on the front panel of device Then press the button POWER on the remote control The VFD of this player display LOADING means working mode of the player When the device is connected with power the short switching over voltage of electricity could cause interference with other electronics connected to the same circuit If this situation will happen the device shall be connecte...

Page 15: ......

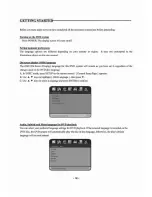
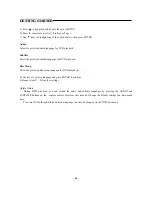
Page 16: ...e for DVD playback Disc Menu Select the preferred disc menu language for DVD playback D Use keys to select a language and press ENTER to confirm E Repeat steps C D for other settings Helpful Hints During DVD playback you can switch the audio and subtitle languages by pressing the AUDIO and SUBTITLE buttons on the remote control However this does not change the default settings you have made here F...

Page 17: ......

Page 18: ...sers who watch films in Standard MPEG 4 Divx XViD Those functions installed here used for display subtitle inscriptions effectively and properly A Press SETUP on the remote control B Press repeatedly to select MPEG4Subtitle Setup Page C Press to move the highlight select your favor setting ...

Page 19: ...he current disc or at the current time Do not put any objects other than discs on the disc tray Doing so may cause the disc player to malfunction Playing a disc A Turn on the TV to the Video In channel for the DVD system e g EXT 0 AV You should see the DVD background LOGO screen on the TV B Press OPEN CLOSE to open the disc tray and load a disc then press the same button again to close the disc tr...

Page 20: ... saving feature the system will automatically switch to Eco Power standby mode if you do not press any buttons within 30 minutes after a disc has stopped playing Please press POWER key on remote to resume it Selecting various repeat functions While playing a disc press REPEAT on the remote control repeatedly to choose a repeat play mode DVD RPT ONE repeat chapter RPT TT repeat title SHUFFLE random...

Page 21: ... the menu press TITLE or ROOT on the remote control TIPS The operating features described here might not be possible for certain discs Always refer to the instructions supplied with the discs This DVD system can display the disc playback information for example title or chapter number elapsed playing time audio subtitle language and a number of operations can be done without interrupting disc play...

Page 22: ... camera angles This option is only available with DVDs that contain sequences recorded from different camera angles This allows you to view the picture from different angles Press ANGLE repeatedly to select the available camera angles Playback Control VCD only Playback Control PBC playback allows you to play VCDs interactively following the menu on the display When playback is stopped press RETURN...

Page 23: ...or image compression and recording Currently standard JPEG is used by majority software for creating pictures and recommended for gathering pictures and photos A The playback by means digit keys When the disc tray is closed device automatically search the information recorded on disc and display them on TV Operate number keys select the right album with photos Notes Key numbers are functional only...

Page 24: ......

Page 25: ......

Page 26: ......

Page 27: ......

Page 28: ...the length of the subtitle Option Font 1 small size Font 2 middle size Font 3 big size Background color Change the Subtitle background color Option 15 kinds of different colors for option Outline Color Change the outline color Option 15 kinds of different colors for option Text Color Change the color of the subtitle text Option 15 kinds of different colors for option Horiz Align Change the Horizon...

Page 29: ...o a CD R when burn the CD Do remember name the CD as MEDIATEK without any change of the BIN file name B Press OPEN CLOSE to open the disc tray C Insert the CD R and press OPEN CLOSE again The software will start to install on the recorder automatically IMPORTANT Power supply must not be interrupted during upgrade That will damage the unit surely D after the upgrading is finished the Disc tray will...

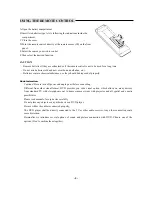
Page 30: ...TV set No disc reading No disc in the player Disc not properly loaded Condensation on the laser head Load a disc Reload a disc with the label side facing up Turn on the player unload the disc and leave it on for about an hour Remote control failure Remote control not pointing to the sensor window Remote control s operating distance is more than 8 meters away from the TV Batteries is low Point the ...

Page 31: ...DVD MPEG 4 DivX XviD MP 3 WMA CD JPEG VCD SVCD Ratio of signal and distortion audio more than 100dB Speed range audio more than 95dB Output Video output Composite video S video output Y Pb Cb Pr Cr component video SCART output Audio output 5 1Channel audio Coaxial optical ATTENTION The product will be modernized continuously and firmware will be modified and available from our website for user upg...

Page 32: ......

Reviews: