background image

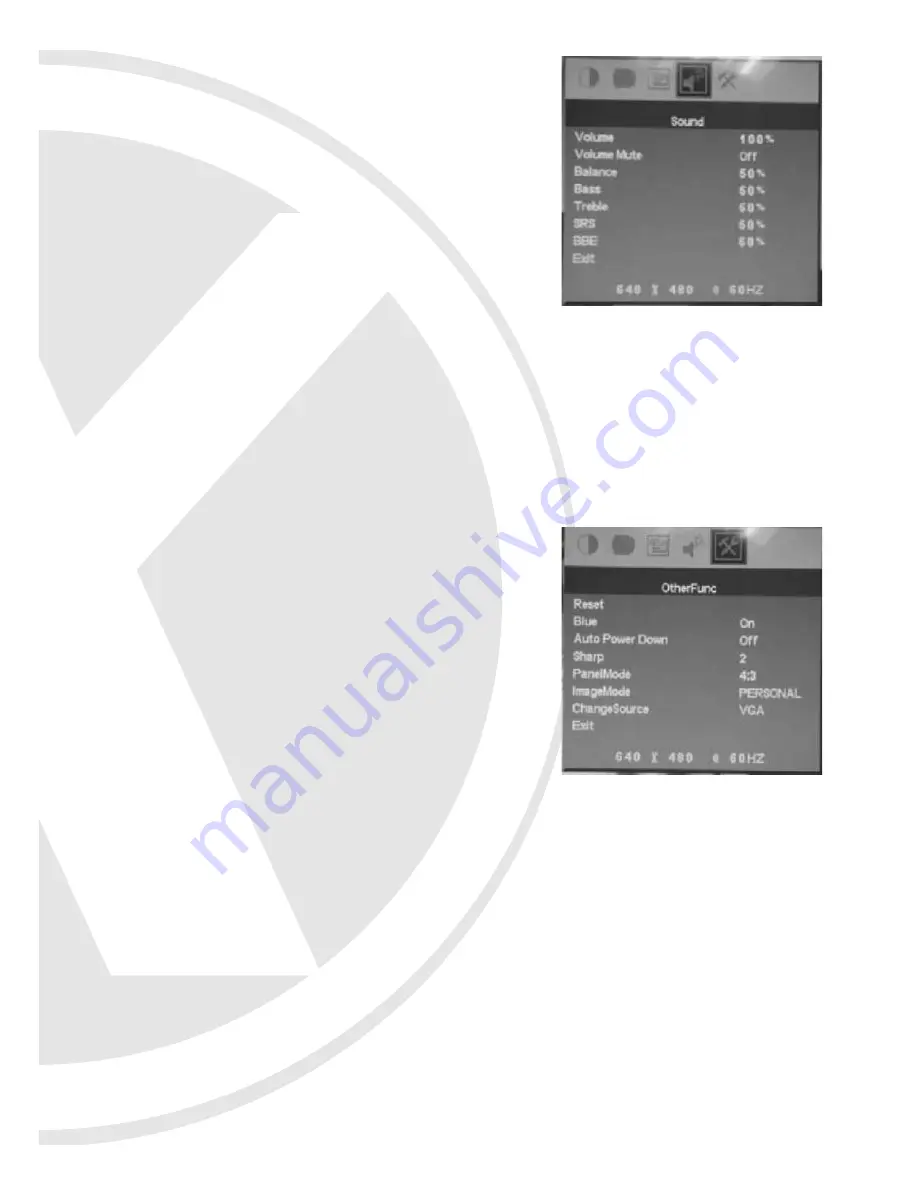
7.1.4 SOUND Menu

Press 

ECHO+

or 

ECHO-

to choose the setting

required from the following:

Volume

- Alter the Volume of the monitor

Volume Mute

- Turn OFF the sound by setting

this option to ON. Setting this option to OFF will
allow the volume to be controlled manually

Balance - 

Control the balance of the speakers

Bass - 

Increase or decrease the bass

Treble - 

Increase or decrease the treble

SRS

BBE

7.1.5 OTHERFUNC Menu

Press 

ECHO+

or 

ECHO-

to choose the setting

required from the following:

Reset

- Resets all the parameters

Blue

- Enables the user to turn the Blue

Background ON or OFF 

Auto Power Down

- Enables user to turn the

Power Down function on or off

Sharp

- Alter the sharpness of the screen 

PanelMode

- Alter the display size on screen 

ImageMode

ChangeSource

- Select between AV and VGA mode 

Summary of Contents for XLCD12

Page 1: ...or wiring is not covered by the warranty Please bear in mind the following points when choosing a mounting position Do not expose the display to humidity dust direct sunlight or to extreme weather conditions Do not use thinner or other chemical detergents when cleaning Use a soft cloth to remove dust or dirt from the display screen Avoid storage and use of this display in areas of extreme hot or c...

Page 2: ...ur monitor combines the small form factor of an LCD monitor with the large screen size of a CRT monitor It features a 12 TFT LCD which generates 1024 x 768 resolution images making it ideal for medium to high risk applications The compact design is ideal for use in areas where space is limited or for wall mounting It features USB connectivity and is powered by a 12V DC Power Supply supplied In add...

Page 3: ...XLCD12 Monitor Stand Bracket Remote Control 3 Contents 4 Controls Front 1 LCD Screen 2 Remote Control Receiver DVR Connection Lead Mains Power Supply Connectors Adapters Batteries ...

Page 4: ...GA mode 3 On Off Switch 4 Volume Down in VGA mode 5 Volume Up in VGA mode 6 Channel Down in VGA mode 7 Channel Up in VGA mode 8 USB Port 9 12V DC Input 10 USB Port 11 SD MS MMC Card Reader 12 CF Card Reader 13 AV Input 14 AV Output 12 Bottom of Monitor Top of Monitor ...

Page 5: ... REW FWD PREV NEXT PLAY PAUSE STOP REPEAT VOL VOL ECHO ECHO PHOTO MUSIC MOVIE FILE 9 POWER 0 _ __ RETURN 5 6 7 8 1 2 3 4 MUTE SOURCE DISPLAY EXIT MENU MODE SETUP TV MODE CARD SEL AUDIO ZOOM ROTATE SLIDESHOW SLIDEINTERVAL Numeric Buttons Enter Play Display Exit Volume Up Photo Mode Music Mode Volume Down Setup TV Mode AV Zoom Rotate Picture Card Select Audio Slideshow Slide Interval Channel Down Ch...

Page 6: ...nu MODE Unavailable VOL VOL Press the VOL button to increase the audio volume and the VOL button to decrease it In menu mode use these buttons to navigate up and down the sub menus ECHO ECHO In menu mode press the ECHO button to go up the list of menu options and the ECHO button to go down it PHOTO Press this button to enter the photo playing mode directly MUSIC Press this button to enter the musi...

Page 7: ...mode FORWARD or REWIND Press these buttons while in music or video mode to forward or rewind during playback In Zoom mode press these buttons to Zoom in and out PLAY PREVIOUS or NEXT Press these buttons while in music or video mode to play the previous or next selection PLAY Press this button to play the selection in VGA mode REPEAT Press this button to repeat the selection in VGA mode PAUSE Press...

Page 8: ... the screen or by using the IR Remote Control supplied 1 Press the POWER button to turn on the display 2 Press the MENU button to access the menus listed below in turn 3 Press VOL or VOL to select the sub menus and any setting you wish to change Press ECHO or ECHO to adjust the selected menu item followed by VOL or VOL to set the changes 4 Navigate to EXIT to exit the sub menu or main menu 7 1 1 C...

Page 9: ...wing Language Choose between English German French Spanish Italian Simplified Chinese Japanese and Russian OSD H Position Alter the horizontal position of the on screen display menu on the screen OSD V Position Alter the vertical position of the on screen display menu on the screen OSD Timeout Select the interval the on screen display menu stays on before it exits automatically Choosing OFF will m...

Page 10: ... of the speakers Bass Increase or decrease the bass Treble Increase or decrease the treble SRS BBE 7 1 5 OTHERFUNC Menu Press ECHO or ECHO to choose the setting required from the following Reset Resets all the parameters Blue Enables the user to turn the Blue Background ON or OFF Auto Power Down Enables user to turn the Power Down function on or off Sharp Alter the sharpness of the screen PanelMod...

Page 11: ...ich will automatically search and display the files located on the device see 7 2 4 4 For a list of all the functions in VGA mode see page 6 and 7 ENTER REW FWD PREV NEXT PLAY PAUSE STOP REPEAT VOL VOL ECHO ECHO PHOTO MUSIC MOVIE FILE 9 0 _ __ RETURN 5 6 7 8 1 2 3 4 DISPLAY EXIT MENU MODE SETUP TV MODE CARD SEL AUDIO ZOOM ROTATE SLIDESHOW SLIDEINTERVAL Numeric Buttons Enter Play Display Exit Volum...

Page 12: ...ETUP Menu Press the arrow keys to choose the setting required from the following DOWNMIX Alter the speaker setting by choosing either LT RT or STEREO 7 2 2 VIDEO SETUP Menu Press the arrow keys to choose the setting required from the following COLOUR Adjust the Colour of video images using the scale of 9 to 9 BRIGHTNESS Adjust the Brightness of video images using the scale of 9 to 9 CONTRAST Adjus...

Page 13: ... or 10 seconds DEFAULTS Default back to original settings 7 2 4 FILE BROWSE Press FILE to enter the File Browse interface You can navigate up and down using the arrow keys on the remote control to select a file Press ENTER to select Press the SLIDESHOW button to display photos while playing music The SLIDE INTERVAL button to set the interval time between displayed photos During playback you can pr...

Page 14: ...tem cannot display the photo when you enter PHOTO mode 1 Make sure VGA mode is activated 2 Ensure the image is in JPEG format GIF BMP or other file formats are not supported 3 No photo files are on the device Video output does not work 1 Make sure the AV Output cable is connected properly 2 Make sure the AV output mode is the same as on the TV Video input does not work 1 Make sure the AV cable is ...

Page 15: ...al Loopthroughs N A Remote Control Yes Power Requirements 110 to 240V AC 12V Output Power Consumption 12W Suggested Power Supply Supplied Mounting Wall Ceiling or Free Standing Weight 1 94kg Dimensions WxHxD 343 x 262 x 54mm File formats supported Photo format JPEG Music format MP3 Movie format MPEG1 VCD MPEG2 DVD AVI MPG MPEG4 DIVX Memory Cards Media CF SD MS MMC MP3 MP4 player supported ...

Page 16: ...is product it should be returned to the place of purchase Manufactured exclusively for Xvision www x vision co uk UK Europe Xvision Group UK Unit 2 Valley Point Beddington Farm Road Croydon Surrey CR0 4WP Email sales x vision co uk Far East Kyoung Am Building 157 27 Samsung dong Kangnam ku 135 090 Seoul Korea Email globalsales x vision co uk Middle East Burjuman Tower 18th Floor PO Box 121828 Duba...

Reviews: