XVision X101T Assembly Manual Download Page 3


3


X101T/X103T Assembly Guide 


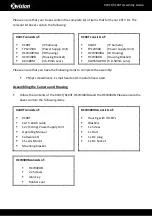
Remove the plastic platform within the housing: 


Take several washers and the screw from the HCW300IRA packaging and connect the X100T 
to the plastic platform, as shown below: 


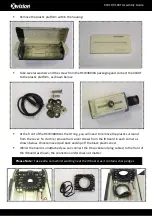
At the front of the HCW300IRA is the IR ring, you will need to remove the plastic surround 
from the cover. To do this, remove the 4 silver screws from the IR board in each corner as 
shown below. Once removed pull back and slip off the black plastic cover.  


Whilst the board is unattached you can connect the DC socket and plug cables) to the front of 
the IR board as shown; the connection order does not matter. 


Please Note:

  Take extra care whilst working near the IR board, as it contains sharp edges 


Summary of Contents for X101T

Page 1: ...ease ensure the boxes contain the following items X101T consists of X100T IP Camera TP123500 Power Supply Unit HCW300IRA IR Housing HCW300B Housing Bracket XL3580M 3 5 8mm Lens X103T consists of X100T IP Camera TP123500 Power Supply Unit HCW300IRA IR Housing HCW300B Housing Bracket XL0550A PRO 5 0 50mm Lens X100T consists of X100T CAT 5 Patch cable 12v 1 Amp Power Supply Unit Operating Manual Soft...

Page 2: ...y Guide Attach the mounting bracket to the underside of X100T as shown below Remove the existing lens from the X100T and replace it with the new lens provided XL3580M XL0550A PRO Open the HCW300IRA by the screws on the arm ...

Page 3: ... you will need to remove the plastic surround from the cover To do this remove the 4 silver screws from the IR board in each corner as shown below Once removed pull back and slip off the black plastic cover Whilst the board is unattached you can connect the DC socket and plug cables to the front of the IR board as shown the connection order does not matter Please Note Take extra care whilst workin...

Page 4: ...he back of the HCW300IRA housing Remove the cover of one of the two screw on nozzles at the back of housing you will then need to hold the inside of the nozzle whilst unscrewing the back end of the nozzle Feed the power supply cable through the nozzle and pierce through the thin black plastic sheath Then re attach the nozzle to the housing as before with the power cable now running through it Repe...

Page 5: ...you with a DC plug for your X100T Connect the Network CAT5 cable first and then then remaining DC plug to the X100T camera As the X100T is Power of Ethernet PoE enabled it can be powered with the CAT5 Network cable and consequently will not need to use the DC Plug If you have any issues please feel free to contact our technical support line on 0871 222 1430 Please Note Do NOT plug in the remaining...

Reviews: